CYP CP-255I User manual

1
CV/SV/PC/HD/HDMI
1080p Scaler Box
CP-255I
Operation Manual

2
TABLE OF CONTENTS
1. Introduction..........................................................................................
2. Features................................................................................................
3. Package Contents..............................................................................
4. Operation Controls and Functions....................................................
4.1 Front Panel.....................................................................................
4.2 Rear Panel.....................................................................................
4.3 OSD Operation..............................................................................
4.4 Remote Control.............................................................................
5. Specications.......................................................................................
5.1 General Specification..................................................................
5.2 Support Resolution........................................................................
6. Connection and Installation..............................................................
1
1
1
2
2
2
4
5
6
6
6
7

1
1. Introduction
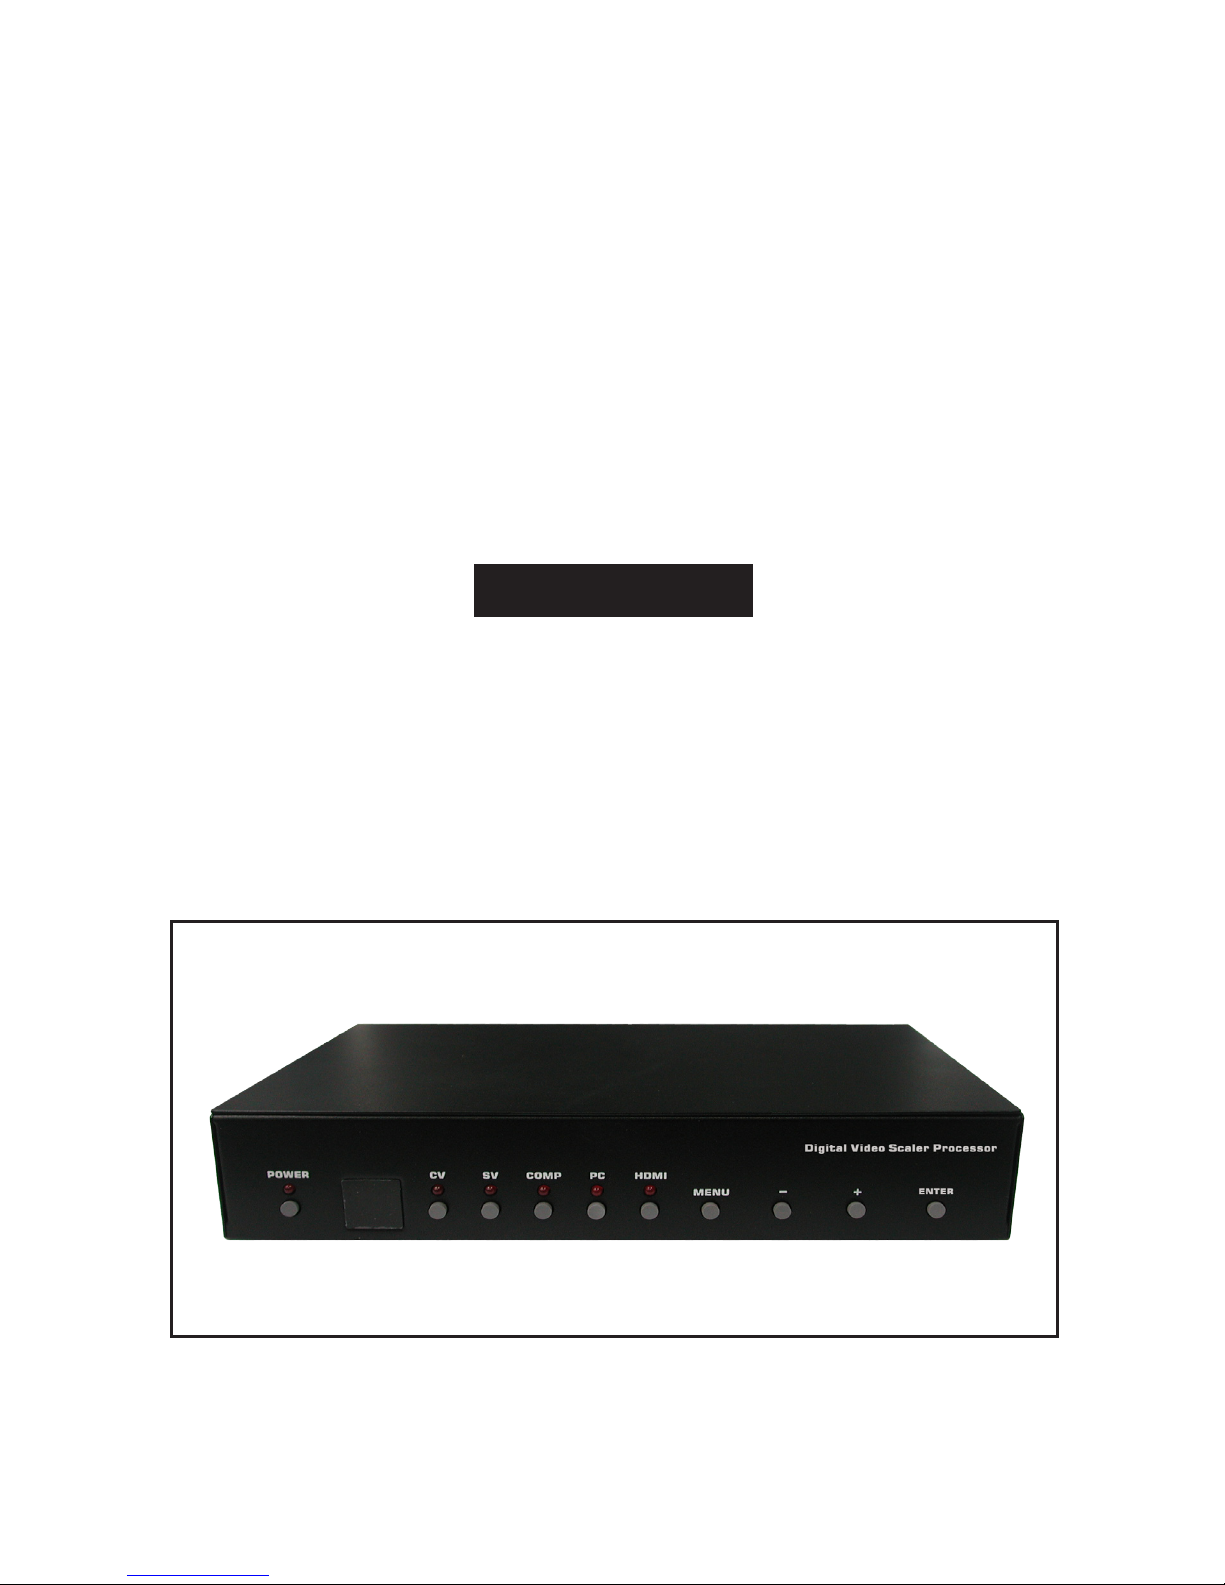
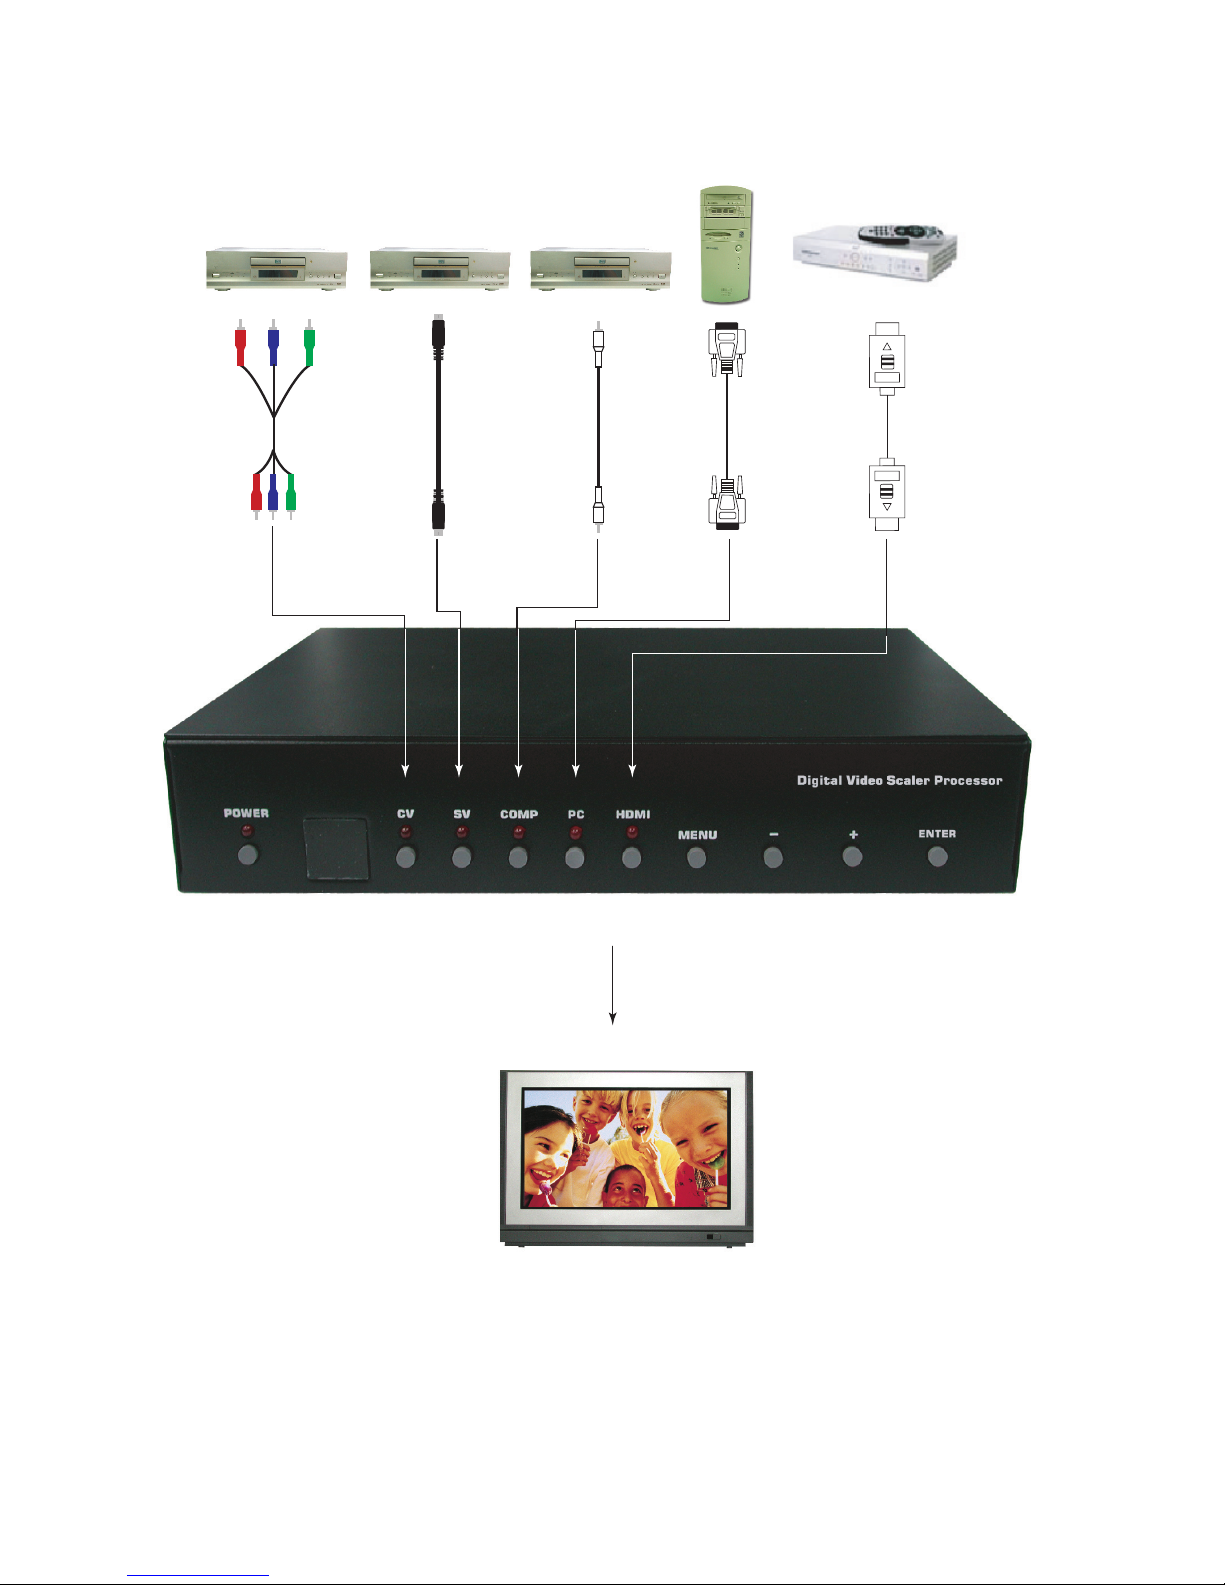
Cypress's CP-255I Scaler Box is designed to upscale digital/analog
video signal from Composite, S-Video, PC, Component (HD) and HDMI input
sources, to digital HDMI output of wide-range HDTV and PC resolutions, up
to 1080p and WUXGA (1920 x 1200.) Besides video upscaling, the scaler
box also converts digital/analog audio signal to digital format, then output
either through HDMI combining with the video, or Coaxial S/PDIF separately.
Cypress CP-255I has a comprehensive OSD menu that allows user to select a
variety of output resolutions and adjust for best picture quality.
2. Features
1. HDMI 1.2, HDCP 1.1 and DVI 1.0 compliant.
2. Scales any PC (VGA ~ WUXGA) /HD (480i ~ 1080p) resolutions to/from
another PC/HD resolutions.
3. Automatically detect the factory setting of the connected display and
output the corresponding resolution and refresh rate, when the NATIVE
output is selected.
4. Supports 50/60Hz frame rate conversion.
5. Supports 3-D motion video adaptive, 3-D de-interlacing, and 3:2 / 2:2 pull-
down detection and recovery.
6. Provides output picture adjustment on contrast, brightness, hue, saturation,
sharpness, RGB (color tone) level, and aspect ratio size.
7. Supports high resolution input/output:
PC: VGA, SVGA, XGA, SXGA, UXGA, WXGA, WSXGA, WUXGA
HDTV: 480i, 576i, 480p, 576p, 720p, 1080i, and 1080p
8. Supports digital and analog audio input and output.
3. Package Contents
1. Cypress CP-255I Scaler Box
2. 5VDC Power Supply Adaptor
3. Operation Manual

2
4. Operation Controls and Functions
4.1. Front Panel
1. POWER Button and LED Indicator:
Press the button to turn ON/OFF the power of the unit. The LED will
illuminate when the power is turned on.
2. IR remote control sensor.
3. Input Selection Buttons and LED Indicators:
Press each of the buttons (CV/SV/COMP/PC/HDMI) to select the
desired input source. The LED will illuminate when the corresponding
input is selected.
4. MENU Button:
Press the MENU button to bring up OSD operation menu (see section
“4.3 OSD Operation”for reference.)
5. +/- Buttons:
a. On the first tier of OSD menu, use + and - buttons to move up/down
the highlight item for selection.
b. Once the desired option is selected, use + and - buttons to toggle
between setting values.
6. ENTER Button:
In OSD menu, use the ENTER button to confirm the selection.
POWER CV SV COMP PC
MENU ENTER
Digital Video Scaler Processor
-
+
HDMI
1 2 3 4 5 6
4.2. Rear Panel
HDMI OUT
AUX IN RS-232 PC IN
HDMI IN
PC IN
R
Cr/Pr
L
Cb/Pb
CO-AX
Y
R
R
LCV
DC 5V
L SV
CO-AX OUT
1
2
3 5 6 8 9
4 7

3
1. HDMI OUT and CO-AX OUT:
Connect the HDMI OUT port to the HDMI input port of your display such
as HDTV. Connect the CO-AX OUT port to the Coaxial (S/PDIF) input
port of your amplifier for separate digital audio output.
2. AUX IN Input:
When the video signal input through the HDMI IN port is from a DVI
source such as a PC, use the AUX IN port to input the audio signal.
3. HDMI IN Input:
Connect the HDMI IN port to the HDMI output port of your source
equipment such as DVD player or Set-Top-Box. Or, use HDMI to DVI
cable to connect to the DVI output of your PC.
4. RS-232:
The port is for firmware update only.
5. PC IN for Video and Audio Input:
Connect the PC IN D-Sub (15-pin) port to the D-Sub output port of your
PC. And, connect the PC IN 3.5mm phone jack to the audio output
port of your PC.
6. Y Pb/Cb Pr/Cr Video and L/R Audio Input:
Connect the Y Pb/Cb Pr/Cr (Component) 3 RCA input ports to the
Component output port of your video source equipment such as DVD
player or Set-Top-Box. And, connect the L/R audio input ports to the
audio output port of your audio source equipment.
7. CO-AX Input:
The CO-AX port provides the digital audio input support, and can be
used to combine with each video input signals from CV/SV/COMP/PC/
HDMI ports. Once connected, please use the Audio Source Selection
in the OSD menu to select between Coaxial (S/PDIF) or other audio
source (see section “4.3 OSD Operation”for reference.)
8. Composite Video / S-Video and L/R Audio Input:
Connect the Composite or S-Video input port to the Composite or
S-Video output port of your video source equipment such as DVD
player or Set-Top-Box. And, connect the L/R audio input ports to the
audio output port of your audio source equipment.
9. Power:
Plug the 5VDC power supply into the unit and connect the adaptor to
AC wall outlet.

4
1st Tier Option 2nd Tier Option Adjustment
VIDEO - PICTURE MODE USER / STANDARD / VIVID / MOVIE
- CONTRAST 0 ~ 100 of Contrast Level
- BRIGHTNESS 0 ~ 100 of Brightness Level
- HUE 0 ~ 100 of Hue Level
- SATURATION 0 ~ 100 of Saturation Level
- SHARPNESS 0 ~ 100 of Sharpness Level
- SCALE OVERSCAN / UNDERSCAN /
LETTERBOX / PANSCAN / FULL
- NR LOW / MIDDLE / HIGH / OFF
- EXIT Back to the 1st Tier
COLOR - COLOR TONE USER / NORMAL / WARM / COOL
- RED 0 ~ 100 of Red Color Level
- GREEN 0 ~ 100 of Green Color Level
- BLUE 0 ~ 100 of Blue Color Level
- EXIT Back to the 1st Tier
OUTPUT -
NATIVE / VGA / SVGA / XGA / SXGA
/UXGA / 480i / 480p / 720p@60Hz
/ 1080i@60Hz / 1080p@60Hz / 576i
/ 576p / 720p@50Hz / 1080i@50Hz
/ 1080p@50Hz / WXGA / WSXGA /
WUXGA
OSD
- HPOSITION 0 ~ 100 of OSD Horizontal Position
- VPOSITION 0 ~ 100 of OSD Vertical Position
- TIMER 0 ~ 100 of OSD Show Time (sec.)
- TRANSP 0 ~ 100 of OSD Transparent Level
- EXIT Back to the 1st Tier
AUDIO - SOURCE HDMI / L/R / COAXIAL
- DELAY OFF / 40MS / 110MS / 150 MS
- SOUND ON / MUTE
- EXIT Back to the 1st Tier
INFORMATION -
SOURCE (Input interface)
INPUT (Input Resolution)
OUTPUT (Output Resolution)
VERSION (Firmware Version)
EXIT - Close the OSD Menu
4.3. OSD Operation

5
2
3
6
8
10
11
1
5
4
7
9
12
4.4. Remote Control
1. POWER:
Press the button once to power on the CP-255I.
Press again to enter standby mode.
2. INPUT:
Press the button repeatedly to toggle through
various input sources.
3. HD Input:
Press the button to directly select component
input.
4. PC Input:
Press the button to directly select PC input.
5. HDMI/DVI Input:
Press the button to directly select DVI (or HDMI)
input.
6. Output Resolution:
Press any one of the button to directly select
output resolution. For other output resolutions that
are not covered by these buttons please enter
OSD Menu to select them.
7. MENU:
Press the button to bring up OSD main menu page.
8. Exit:
Press the button to exit from a sub menu or main
menu.
9. Up/Down/Left/Right:
Press the Up/Down button to move the highlight
bar to your desired parameter during the
OSD operation. Press the Left/Right button to
increase/decrease the setting value of a selected
parameter.
10. OK (Enter):
Press the button to confirm your selection.
11. Reset:
Press the button to reset the unit's firmware setting
to the factory default value.
12. Auto Adjust:
Press the button to optimize the position of the
picture (picture centering) on the screen.

6
5. Specications
5.1. General Specication
* Frequency bandwidth: 1.65Gbps (single link)
* Input Ports:
Composite x 1 / L/R x 1
S-Video x 1 / L/R x 1
Component (3 RCA) x 1 / L/R x 1
PC D-Sub (15-pin) x 1 / 3.5mm Phone Jack x 1
HDMI x 1 / 3.5mm Phone Jack x 1 (for DVI)
Coaxial (S/PDIF) x 1
* Output Ports:
HDMI x 1
Coaxial (S/PDIF) x 1
* 5V DC power supply
* Dimensions: 215(W) x 154(D) x 47(H)mm
* Weight: 1Kgs
5.2. Support Resolution
INPUT
PC
VGA@(60/72/75/85Hz),
SVGA@(56/60/72/75/85Hz),
XGA@(60/70/75/85Hz),
SXGA@(60/75/85Hz), UXGA@60Hz,
WXGA@60Hz, WSXGA@60Hz, WUXGA@60Hz
TV 480i, 480p, 576i, 576p, 720p@(50/60Hz), 1080i@(25/30Hz),
1080p@(50/60Hz)
OUTPUT
PC
VGA@(60/72/75/85Hz),
SVGA@(56/60/72/75/85Hz),
XGA@(60/70/75/85Hz),
SXGA@(60/75/85Hz), UXGA@60Hz,
WXGA@60Hz, WSXGA@60Hz, WUXGA@60Hz
TV 480i, 480p, 576i, 576p, 720p@(50/60Hz), 1080i@(25/30Hz),
1080p@(50/60Hz)

7
6. Connection and Installation
TV
HDMI
Cable
HDMI
HDMI
PC-inComponentS-VideoComposite

8

9

10
Cypress Scaler Box Series:
Product INPUT OUTPUT Highest
Resolution
CP-259H HDMI HDMI 1080p
CP-255I Video/S-Video/PC/
YPbPr/YCbCr/HDMI HDMI 1080p
CP-255H YPbPr/YCbCr/PC/
DVI-D/HDMI
DVI-D
HDMI 1080p
CP-255D YPbPr/YCbCr/PC/
DVI-D
PC
DVI-D 1080p
CM-394 Video/S-Video/
SCART
YPbPr/HDTV
RGB/PC 1080i
CM-393S Video/S-Video/
SCART/HDMI HDMI 1080i
CM-392 Video/S-Video HDMI 1080i
CM-391 Video/S-Video DVI 1080i
CM-390 Video/S-Video YPbPr/HDTV
RGB/PC 1080i
CSC-220 YPbPr/YCbCr/PC/
DVI-D
PC
DVI-D 1080i
CS-720PHD SCART HDMI 720p (fixed)
CV-720PHD Video/S-Video HDMI 720p (fixed)
CP-254 DVI DVI 1080i
CP-253 DVI YPbPr/HDTV
RGB/PC 1080i
CP-252 YPbPr/HDTV
RGB/PC DVI 1080i
CP-251F YPbPr/HDTV
RGB/PC
YPbPr/HDTV
RGB/PC 1080i
20070817 MPM-CP-255I
Home page: http://www.cypress.com.tw
CYPRESS TECHNOLOGY CO., LTD.
Other manuals for CP-255I
2
Table of contents
Other CYP Media Converter manuals