Daewoo DSK-500 User manual

DSK-500
Manual de instrucciones · User manual
Manuel d’instructions · Manual de instruções
ALTAVOZ PORTATIL BLUETOOTH
PORTABLE BLUETOOTH PARTY SPEAKER
HAUT!PARLEUR BLUETOOTH PORTABLE
COLUNA PORTÁTIL BLUETOOTH

ES
2
ADVERTENCIA
RIESGO DE DESCARGA
ELÉCTRICA - NO ABRIR
Lea detenidamente este manual antes de utilizar la unidad
y consérvelo para futuras consultas
La unidad debe estar completamente cargada antes de utilizarla
Información de seguridad y advertencias
PRECAUCIÓN
Deniciones de los símbolos
PELIGRO- Indica una situación de peligro inminente que, si no se evita, ocasionará la muerte o
lesiones graves. Este símbolo solo aparece en las situaciones más extremas.
ADVERTENCIA– Indica una situación potencialmente peligrosa que podría ocasionar la muerte
o lesiones graves.
PRECAUCIÓN- Indica una situación potencialmente peligrosa que, si no se evita, puede
ocasionar lesiones leves o moderadas o daños en el producto. Alerta asimismo contra prácticas
no seguras.
El símbolo de un rayo dentro de un triángulo equilátero se utiliza para alertar al
usuario de la presencia de ‘tensión peligrosa’ no aislada dentro de la carcasa del
producto que puede constituir un riesgo de descarga eléctrica para las personas.
ADVERTENCIA: PARA REDUCIR EL RIESGO DE DESCARGA ELÉCTRICA NO
RETIRE LA CUBIERTA (NI EL PANEL POSTERIOR), NO CONTIENE PIEZAS QUE
DEBA MANIPULAR EL USUARIO. CONTACTE CON PERSONAL TÉCNICO
CUALIFICADO.
El signo de exclamación dentro de un triángulo equilátero se utiliza para alertar
al usuario de la presencia de instrucciones importantes de funcionamiento y
mantenimiento en la documentación que acompaña al producto.
LEA TODAS LAS INSTRUCCIONES ANTES DE UTILIZAR EL PRODUCTO
Siga siempre las precauciones básicas de seguridad cuando utilice este altavoz
Bluetooth con micrófono, especialmente delante de niños.
INSTRUCCIONES DE SEGURIDAD
1) Lea este manual de instrucciones antes de intentar conectar o utilizar el aparato.
2) Conserve estas instrucciones en buen estado. Respete todas las advertencias. Siga todas
las instrucciones.
3) Guarde este manual de instrucciones para futuras consultas.
4) No exponga el aparato a goteos ni salpicaduras y no coloque objetos que contengan
líquidos, como jarrones, sobre el producto. Utilizar exclusivamente en lugares secos.
5) No coloque sobre el producto fuentes de llama viva, como velas.
6) Deberá asegurarse de que los niños no jueguen con el aparato.
7) No cubra los oricios de ventilación para no obstaculizar la ventilación.
8) Asegúrese de que la unidad esté conectada a una toma de CA de 220-240V 50Hz. Si utiliza
una tensión mayor, puede causar el funcionamiento incorrecto de la unidad o incluso que
esta prenda fuego. Apague la unidad antes de desconectarla de la toma de corriente para
apagarla por completo.

ES
3
9) No conecte/desconecte el enchufe con las manos mojadas.
10)Si el enchufe no entra en su toma de corriente, no lo fuerce para que encaje.
11)Utilice piezas de recambio especicadas por el fabricante.
12)Instale la unidad conforme a las instrucciones del fabricante.
13)Coloque la unidad en un lugar con buena ventilación y sobre una supercie lisa, sólida y
estable. No la exponga a temperaturas superiores a 40°C. Deje un espacio de al menos 30
cm respecto a las partes trasera y superior de la unidad, y de 5 cm respecto a cada lado.
14)Pulse suavemente los botones de la unidad, de lo contrario puede dañarla.
15)Elimine las baterías usadas de forma responsable desde un punto de vista ambiental.
16)Compruebe siempre que el producto esté desconectado de la toma eléctrica antes de
moverlo o limpiarlo. Utilice solo un paño seco para limpiarlo.
17)Desenchufe el producto durante tormentas eléctricas o si prevé que no se utilizará durante
un largo período de tiempo.
18)No contiene piezas que puedan ser reparadas o reemplazadas por el usuario. No intente
reparar usted mismo este producto. Solo personal técnico cualicado debe realizar las
tareas de reparación. Lleve el producto a la tienda de reparaciones que preera para
realizar estas tareas de revisión y reparación.
19)No permita NUNCA que nadie, y en especial niños, introduzca ningún tipo de objeto en
los oricios, ranuras u otras aberturas de la carcasa de la unidad ya que podría provocar
una descarga eléctrica con resultado mortal.
20)No monte este producto en una pared o techo.
21)No coloque la unidad cerca de aparatos de TV, altavoces u otros objetos que generen
campos magnéticos potentes.
22)No deje la unidad desatendida mientras se utiliza.
NOTA: Para desconectar por completo el sistema si no se utilizará durante un largo período de
tiempo, desconecte el enchufe de CA de la toma mural.
LOCALIZACIÓN DE LOS CONTROLES
Vista superior
1. CONECTOR DE ENTRADA AUXILIAR 3,5 mm
2. CONECTOR MIC 1 6,3 mm
3. CONECTOR MIC 2 6,3 mm
4. PUERTO USB 1
5. PUERTO USB 2
6. BOTÓN 10/M./CARPETA+
7. BOTÓN DE LUZ
8. BOTÓN 10/M./CARPETA-
9. BOTÓN ECO
10. BOTÓN DEL ECUALIZADOR
11. BOTÓN FUNCIONES/
12. BOTÓN /SINT.-
13. BOTÓN /SINT.+
14. BOTÓN MODO-P/M.
15. BOTÓN /CONEX./BÚSQ.
16. PANTALLA LCD
17. INDICADOR DE CONEXIÓN
18. BOTÓN SUPERGRAVES
19. BOTÓN DE ENCENDIDO/APAGADO
20. INDICADOR DE CARGA
21. CONTROL VOL. MIC
22. CONTROL DE VOLUMEN

ES
4
Vista delantera y trasera
23. ASA
24. ALTAVOCES
25. LUZ LED DISCO
26. TWEETERS
27. ANTENA FM
28. ORIFICIOS
DE VENTILACIÓN
29. TOMA DE CA
30. LEDS DECORATIVOS
FUENTE DE ALIMENTACIÓN
Esta unidad funciona con una batería de ácido-plomo recargable (capacidad de la batería: 4.000
mAh). Cargue al máximo la unidad (unas 5 horas) antes de utilizar por primera vez el producto.
El tiempo de reproducción es de unas 2 horas tras cargar por completo la batería.
Desconecte el enchufe de la toma de CA para que la unidad funcione con la batería una vez
esté completamente cargada. Al conectar la corriente cuando la batería está instalada se inicia
la carga de la batería; el indicador LED de carga se ilumina de color rojo durante el proceso de
carga y cuando la batería está completamente cargada, el indicador es verde. Cuando queda
poca batería, el indicador LED parpadea de color rojo.
Advertencia No cambie la batería, solo personal altamente cualicado puede realizar esta
operación.
INSTRUCCIONES DE FUNCIONAMIENTO
FUNCIONES BÁSICAS
ENCENDIDO/APAGADO DE LA UNIDAD
Pulse el botón ON/OFF para encender/apagar la unidad.
NOTA: En modo USB/Bluetooth/AUX, si la unidad no lleva a cabo la función principal durante
unos 15 minutos, pasará automáticamente al modo de espera. Pulse el botón FUNCTION/
para volver a encender la unidad.
Recuerde que un volumen bajo en la fuente de audio puede ser identicado como “sin
señal de audio”, lo que afectará a la detección de la señal por parte del dispositivo y puede
asimismo originar la activación automática del modo de espera. En este caso, vuelva a activar la
transmisión de la señal de audio o suba el volumen en el reproductor de audio para reanudar
la reproducción.

ES
5
Descargas electrostáticas – Esta unidad puede o no restablecer el modo de funcionamiento
normal debido a una descarga electrostática, tan solo debe desconectarla y conectarla de
nuevo.
AJUSTE DEL MODO FUNCIONES
Paracambiar entrelasdistintasfunciones,pulse repetidamenteelbotónFUNCTION yseleccione
entre las funciones USB1/USB2/BLUETOOTH/AUX/RADIO.
AJUSTE DEL VOLUMEN
1. Haga girar el botón VOLUME de la unidad para subir o bajar el volumen de la música.
2. Haga girar el botón MIC VOL. de la unidad para subir o bajar el volumen del micrófono.
AJUSTE DE GRAVES
Pulse el botón SUPER BASS de la unidad para incrementar el efecto de los graves.
FUNCIÓN DEL ECUALIZADOR (EQ)
Esta unidad incorpora un sistema de ecualizador. Pulse el botón EQ de la unidad para seleccionar
el ajuste que mejor se corresponda con el estilo de música: FLAT, CLASSIC, ROCK, POP y JAZZ.
AJUSTE DEL ECO DEL MICRÓFONO
Pulse el botón ECHO de la unidad para encender y apagar el efecto de eco del micrófono.
LUZ INTERMITENTE
Hay 5 modos de iluminación LED DISCO. Pulse el botón LIGHT para seleccionar los distintos
modos de iluminación:
L-1: Por defecto, el LED azul permanecerá iluminado al seleccionarlo.
L-2: El LED azul parpadeará.
L-3: El LED rojo permanecerá iluminado.
L-4: El LED rojo parpadeará.
L-5: El LED de 7 colores parpadeará.
Hay 3 modos de iluminación LED decorativa alrededor de los altavoces. Pulse y mantenga
pulsado el botón LIGHT para seleccionar los modos de iluminación:
E-1: Por defecto, el LED azul permanecerá iluminado al seleccionarlo.
E-2: El LED rojo permanecerá iluminado.
E-3: El LED azul y rojo parpadeará de forma alterna.
FUNCIONAMIENTO DE LA RADIO
Puede escuchar emisoras de radio FM. Pulse el botón FUNCTION de la unidad y en la pantalla
aparecerá FM y la frecuencia de radio.
Nota: Para obtener la mejor recepción posible, extienda al máximo la antena FM que encontrará
en la parte trasera de la unidad.

ES
6
SINTONIZACIÓN DE UNA EMISORA DE RADIO
Si conoce la frecuencia de la emisora que desea sintonizar directamente:
• Sintonice una emisora pulsando repetidamente los botones /TUN + o /TUN -. La
frecuencia de la emisora se mostrará en la pantalla.
Para sintonizar una emisora programada:
• Para sintonizar la siguiente emisora programada, pulse el botón 10/M./FOLD.+.
• Para sintonizar la emisora programada anterior, pulse el botón 10/M./FOLD.-.
BÚSQUEDA/MEMORIA PREDETERMINADA AUTOMÁTICA
Si desea buscar emisoras dentro de un rango de recepción y guardarlas automáticamente en
una memoria predeterminada, pulse y mantenga pulsado el botón REPR./PAUSA/CONEX./
BÚSQ. Cuando la unidad ha nalizado la búsqueda, automáticamente sintonizará la emisora
en el número 1 (P01).
MEMORIA PREDETERMINADA MANUAL
Seleccione qué emisoras desea guardar en la memoria en lugar de buscarlas
automáticamente.
1. Utilice el botón /TUN + o /TUN - para sintonizar la emisora que desea guardar (p.ej.,
93.1).
2. Pulse el botón P-MODE/M. “P01” parpadeará en la pantalla para indicar que la emisora se
está guardando en la memoria predeterminada 01. (Para cambiar el número de memoria,
pulse 10/M./FOLD.+ o 10/M./FOLD.-).
3. Pulse el botón P-MODE/M. para nalizar el guardado de la emisora (p.ej., P01 está ahora
ajustada en la frecuencia 93.1).
4. Si desea guardar otra emisora, repita los pasos 1 a 3. Puede guardar hasta 30 emisoras FM.
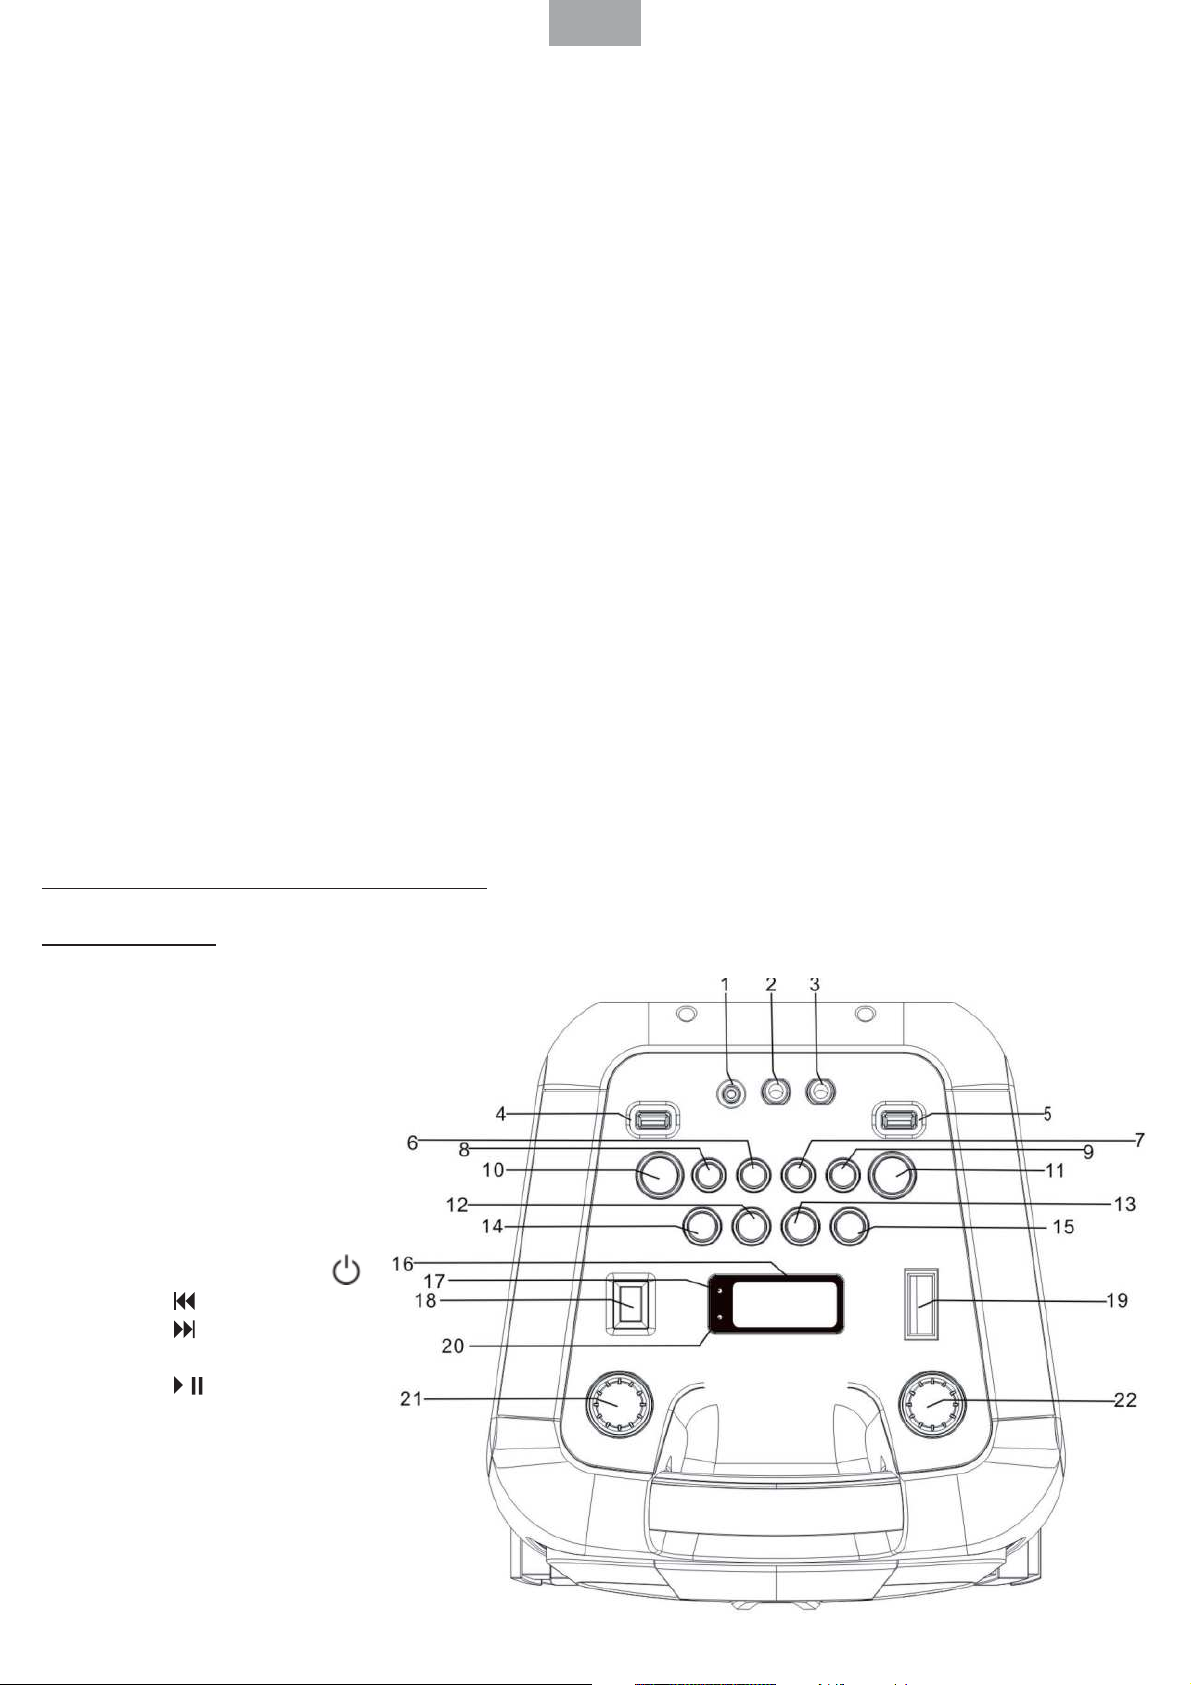
FUNCIONAMIENTO DEL USB
Esta unidad dispone de dos puertos USB para reproducir música.
1. Pulse el botón FUNCTION de la unidad y seleccione el modo “USB1” o “USB2”.
2. Conecte la memoria USB al puerto USB en la parte superior de la unidad (la unidad puede
soportar un dispositivo USB de hasta 32G). La reproducción se iniciará automáticamente a
partir de la pista 1.
3. Para hacer una pausa en la reproducción, pulse el botón REPR./PAUSA/CONEX./BÚSQ. de la
unidad. El tiempo de reproducción parpadeará en la pantalla.
4. Para reanudar la reproducción, vuelva a pulsar REPR./PAUSA/CONEX./BÚSQ.
5. Si desea seleccionar una pista, pulse los botones o durante la reproducción hasta que la
pista deseada aparezca en pantalla. La unidad iniciará su reproducción automáticamente.
6. Para buscar un fragmento determinado durante la reproducción, pulse y mantenga pulsado
el botón o para buscar en la pista en reproducción a alta velocidad hasta que oiga el
punto deseado, suelte entonces el botón y se retomará la reproducción normal.
7. Para seleccionar una canción cuyo número de pista sea superior a 10, pulse 10/M./FOLD.+
o 10/M./FOLD.- para avanzar/retroceder 10 pistas, luego pulse o y seleccione la pista
deseada.
8. Si desea seleccionar una carpeta (si el USB contiene más de una carpeta), pulse y mantenga
pulsado el botón 10/M./FOLD.+ o 10/M./FOLD.- para avanzar/retroceder hasta una carpeta
y luego pulse o para seleccionar la pista deseada.

ES
7
Importante: El puerto USB está diseñado únicamente para transferencia de datos, no se pueden
utilizar otros dispositivos con esta conexión USB. No se recomienda utilizar cables alargadores
USB. No desconecte el USB de la unidad durante la reproducción o lectura del dispositivo USB.
REPETIR REPRODUCCIÓN
Puede reproducir repetidamente una pista o todas las pistas del USB.
Para repetir una sola pista
1. Pulse el botón P-MODE/M. de la unidad durante la reproducción, en la pantalla aparecerá
“ ” y la pista actual se reproducirá una y otra vez.
2. Para cancelar la repetición de la reproducción, pulse P-MODE/M. en la unidad hasta que
“ ” desaparezca de la pantalla.
Para repetir todas las pistas
1. Pulse el botón P-MODE/M. de la unidad hasta que “ ” se muestre jo en la pantalla, todas
las pistas del USB se reproducirán una y otra vez.
2. Para cancelar la repetición de la reproducción, pulse el botón P-MODE/M. de la unidad hasta
que “ ” desaparezca de la pantalla.
Para repetir la carpeta (solo si el USB contiene más de una carpeta)
1. Pulse el botón P-MODE/M. de la unidad hasta que “ FOLDER” se muestre jo en la
pantalla, la carpeta actual se repetirá una y otra vez.
2. Para cancelar la repetición de la reproducción, pulse el botón P-MODE/M. de la unidad hasta
que “ FOLDER” desaparezca de la pantalla.
REPRODUCCIÓN ALEATORIA
Pulse el botón P-MODE/M. de la unidad en modo reproducción hasta que “RAND” aparezca
jo en la pantalla, automáticamente se iniciará la reproducción aleatoria a partir de la pista
siguiente. Vuelva a pulsar el botón P-MODE/M. en la unidad hasta que “RAND” desaparezca
de la pantalla.
FUNCIONAMIENTO DEL BLUETOOTH
1. Pulse el botón FUNCTION de la unidad para activar la función BLUETOOTH, en la pantalla
LCD aparecerá “bt” y el indicador de conexión parpadeará a alta velocidad.
2. Active la función Bluetooth en el dispositivo, busque la unidad “DSK-500” y establezca la
conexión; a continuación, introduzca la contraseña 0000 si es necesario, el indicador de
conexión permanecerá iluminado si la conexión ha nalizado con éxito y en la pantalla
aparecerá “bt”. Pulse el botón de reproducción para iniciar la reproducción.
3. Haga girar el botón VOLUME de la unidad o ajuste el volumen desde el dispositivo externo
para subir o bajar el volumen de la música hasta el nivel deseado.
4. Pulse y mantenga pulsado el botón REPR./PAUSA/CONEX./BÚSQ. para desconectar el
Bluetooth.
Nota: El Bluetooth funciona mejor en un rango máximo de 10 metros al aire libre.

ES
8
FUNCIONAMIENTO DE LA ENTRADA AUXILIAR
1. Pulse el botón FUNCTION de la unidad y seleccione el modo “AUX”.
2. Conecte su dispositivo de audio al conector AUX IN en el panel superior de la unidad con un
cable AUX IN (el cable de audio no está incluido).
3. Haga girar el botón VOLUME de la unidad o ajuste el volumen desde el dispositivo externo
para subir o bajar el volumen de la música hasta el nivel deseado.
4. Controle la reproducción desde su dispositivo de audio.
FUNCIONAMIENTO DEL CONECTOR DEL MICRÓFONO
La entrada del micrófono está disponible en todos los modos.
1. Conecte su micrófono al conector del micrófono (MIC JACK) de 6,3 mm que encontrará en el
panel superior de la unidad.
2. Haga girar el botón MIC VOL. de la unidad para subir o bajar el volumen del micrófono.
3. Pulse el botón ECHO para activar o desactivar el efecto de eco del micrófono.
Especicaciones técnicas
GENERAL
Requisitos de potencia CA 100-240V~60/50 Hz
Consumo eléctrico 33W
Potencia 30W X 2
Frecuencia FM FM 87.5-108m Hz
Conector AUX-IN 3,5 mm
Conector del micrófono 6,3 mm
Temperatura de trabajo 5° C - +40° C
Bluetooth
Sistema de comunicaciones Bluetooth Standard versión 2.1+EDR
Rango de recepción 10 metros (distancia de visibilidad directa)
Perles Bluetooth compatibles Perl de distribución de audio avanzado (A2DP)
ACCESORIOS
Manual de instrucciones x 1 u.
Cable CA x 1 u.
Micrófono x 1 u.
Nota: Las especicaciones están sujetas a cambios para realizar mejoras continuas sin previo
aviso.
INFORMACIÓN SOBRE LA ELIMINACIÓN DEL PRODUCTO
Este símbolo indica que este producto cumple con la directiva europea 2002/96/CE.
No deseche este producto junto con la basura normal, debe depositarlo en un lugar de recogida
de productos eléctricos y electrónicos.

ES
9
DECLARACIÓN DE CONFORMIDAD
DECLARANTE
Nombre: INDUSTRIAS MASATS S.L.U.
Domicilio: C/Metalurgia, 38-42 2ª Planta-08038 Barcelona
Teléfono: 932910505
Fax: 932910547
CIF: B-61666913
Declaramos bajo nuestras exclusiva responsabilidad la conformidad del producto:
PRODUCTO
Nombre: Altavoz portátil Bluetooth
Marca: Daewoo
Modelo: DSK-500
Al que se reere esta declaración, con las normas u otros documentos normativos
2014/30/EU (EMC Directive)
EN 55032:2012 + AC:2013, Class B
EN 61000-3-2:2014
EN 61000-3-3:2013
EN 55020:2007 + A11:2011
2014/35/EU (LVD Directive)
EN 60065:2014
2009/125/EC, 2012/27/EU, 2013/12/EU (ERP Directive)
EN 50564:2011
2014/53/EU (R&TTE Directive)
ETSI EN 300 328 V1.9.1 (2015-02)
ETSI EN 301 489-1 V1.9.2 (2011-09)
ETSI EN 301 489-17 V2.2.1 (2012-09)
ETSI EN 62479:2010
Información adicional:
De acuerdo con las disposiciones de la Directiva 99/05/CE, del Parlamento Europeo y del
Consejo de 9 de Marzo de 1999, (transpuesta a la legislación española mediante Real Decreto
1890/2000, de 20 de noviembre de 2000).
Barcelona, 06 de abril de 2017
D. Sergi Rigat
Director de Marketing

ES
10
GARANTIA
IndustriasMasats,encumplimientoconloestablecidoporlaLeydeProtecciónalConsumidor
(Ley 23/2003 de 10 /07/2003), ofrece Garantía al Cliente en España y Portugal (Península y
Baleares), para todos sus productos de la marca bajo las siguientes condiciones:
A.Todoslosproductosenlosquesedetecten fallosdefuncionamiento antesdetranscurridos
15 DÍAS desde la fecha de venta al cliente nal SERÁN CAMBIADOS POR OTRO, cuando:
1. El producto haya sido utilizado solo en el uso normal para el que estaba previsto.
2. No haya sido abierto, manipulado o alterado por persona ajena al Servicio Técnico
Ocial de la marca.
3.Nohayasufridodañosporgolpes,inundación,sobrecalentamiento,sobrecargaeléctrica
o cualquier otra circunstancia externa que pueda ser posible motivo de avería.
4. Sea devuelto al punto de venta donde se adquirió, con su embalaje original en perfecto
estado, completo con todos sus accesorios y manuales, y acompañado de la factura o
ticket de venta donde se indique claramente la marca tipo del producto y la fecha de
venta.
B.Todos losproductos enlos quese detectenfallos defuncionamiento antesde transcurridos
DOS AÑOS desde su fecha de venta, serán reparados o cambiados por otro, siempre que:
1. El producto haya sido utilizado solo en el uso normal para el que estaba previsto.
2. No haya sido abierto, manipulado o alterado por persona ajena al Servicio Técnico
Ocial de la marca.
3.Nohayasufridodañosporgolpes,inundación,sobrecalentamiento,sobrecargaeléctrica
o cualquier otra circunstancia externa que pueda ser posible motivo de avería.
4. Sea devuelto al servicio técnico de Industrias Masats o al punto de venta donde se
adquirió, con embalaje adecuado y acompañado de la factura o ticket de venta donde
se indique claramente la marca y tipo del producto, la fecha de venta y el nombre
y dirección del establecimiento vendedor así como una explicación de la avería
detectada.
Excepción: Los componentes adicionales de los productos sujetos a desgaste natural
debido a su uso como adaptadores AC, baterías, mandos a distancia, auriculares…, quedan
excluidos de esta garantía.
Será responsabilidad exclusiva del usuario el envío del producto en las condiciones
adecuadas para evitar daños durante el transporte.
Industrias Masats se reserva el derecho a dictaminar sobre el estado de los productos
averiados o defectuosos que le sean remitidos. En caso de reclamación serán de competencia
exclusiva los Tribunales de la ciudad de Barcelona.

EN
CAUTION
RISK OF ELECTRIC SHOCK
DO NOT OPEN
11
Read this booklet thoroughly before using and save it for future reference
Unit must be fully charged before use
Safety information and Warnings
CAUTION
Symbol Denitions
DANGER- Indicates an imminently hazardous situation, which, if not avoided, will result in
death or serious injury. This symbol appears only in the most extreme situations.
WARNING - Indicates a potentially hazardous situation which could result in death or serious
injury.
CAUTION- Indicates a potentially hazardous situation, which, if not avoided, may result in
minor/moderate injury or product/property/damage. It also warns against unsafe practices
The lightning ash with arrowhead symbol, within an equilateral triangle is
intended to alert the user to the presence of insulated ‘dangerous voltage’ within
the product’s enclosure that may be of sucient magnitude to constitute a risk of
electric shock to persons.
WARNING: TO REDUCE THE RISK OF ELECTRIC SHOCK DO NOT REMOVE
COVER (OR BACK), NO USER SERVICEABLE PARTS INSIDE REFER SERVICING
TO QUALIFIED SERVICE PERSONNEL
The exclamation point within an equilateral triangle is intended to alert the user
to the presence of important operating and maintenance (servicing) instructions
in the literature accompanying the appliance.
READ ALL INSTRUCTIONS BEFORE USE
Always follow basic safety precautions when using this Bluetooth speaker system
with Microphone, especially when children are present.
SAFETY INSTRUCTIONS
1) Read this Instruction Manual before you attempt to connect or operate the appliance.
2) Keep these instructions in good condition. Heed all warnings. Follow all instructions.
3) Save this Instruction Manual for future reference.
4) The apparatus shall not be exposed to dripping or splashing and no objects lled with
liquids, such as vases, shall be placed on the product. Dry location use only.
5) No naked ame source, such as candles, should be placed on the product.
6) Children should be supervised to ensure that they do not play with the appliance.
7) Ventilation should not be impeded by covering the ventilation openings.
8) Ensure that the unit is plugged into an AC 220-240V 50 Hz power outlet. Using higher
voltage may cause the unit to malfunction or even re catching. Turn o the unit before
unplugging it from power source to completely switch it o.
9) Do not plug/ unplug the power plug into/from an electrical outlet with wet hands.
10) If the power plug does not t into your outlet, do not force the plug into an electrical
socket if it does not t.
11) Use replacement parts, which are specied by the manufacturer.
12) Install the unit in accordance with the manufacturer’s instructions.

EN
12
13) Place the unit where there is good ventilation. Place the system on a at, hard and stable
surface. Do not expose to temperatures above 40° C. Allow at least 30 cm clearance from
the rear and the top of the unit and 5 cm from each side.
14) Press the buttons of the unit gently. Pressing them too hard can damage the unit.
15) Dispose of used batteries in an environmental-responsible manner.
16) Always ensure that the product is unplugged from the electrical outlet before moving or
cleaning. Clean it with dry cloth only.
17) Unplug the product during lightning, storms or when it will not be used for long periods
of time.
18) This product has no user-serviceable parts. Do not attempt to repair this product yourself.
Only qualied service personnel should perform servicing. Take the product to the
electronics repair shop of your choice for inspection and repair.
19) NEVER let anyone, especially children, push anything into holes, slots or any other
openings in the unit’s casing as this could result in a fatal electric shock.
20) Don’t mount this product on a wall or ceiling.
21) Do not place the unit near TVs, speakers and other objects that generate strong magnetic
elds.
22) Do not leave the unit unattended when it is in use.
NOTE: To disconnect the system completely if it not to be used for a long time, remove the AC
power plug from the wall outlet.
Guide to the Appliance
Top View
1. 3.5 mm AUX IN JACK
2. 6.3 mm MIC JACK 1
3. 6.3 mm MIC JACK 2
4. USB PORT 1
5. USB PORT 2
6.10/M./FOLD.+ BUTTON
7. LIGHT BUTTON
8. 10/M./FOLD.- BUTTON
9. ECHO BUTTON
10. EQ BUTTON
11. FUNCTION/ BUTTON
12. /TUN.- BUTTON
13. /TUN.+ BUTTON
14. P-MODE/M. BUTTON
15. /PAIR/SCAN BUTTON
16. LCD DISPLAY
17. PAIR INDICATOR
18. SUPER BASS BUTTON
19. POWER ON/OFF BUTTON
20. CHARGE INDICATOR
21. MIC VOL. CONTROL
22. VOLUME CONTROL

EN
13
Front and Back view
23. HANDLE
24. SPEAKERS
25. DISCO LED LIGHT
26. TWEETERS
27. FM ANTENNA
28. VENTILATION HOLES
29. AC SOCKET
30. DECORATION LEDS
Getting Started
POWER SOURCE
This unit works with rechargeable lead-acid battery (the battery capacity 4000mAh). Fully
charge the unit (around 5 hours) before using the product for the rst time. The playback time
has about 2 hours after full charging. Unplug the AC Power cord from the AC socket to work on
the battery pack after fully charged.
Plugging the AC Power cord while the battery pack is attached initiates the charging of this
battery, the charge LED indicator lights red during charging, when the battery is fully charged
the indicator will turn to green. When the unit is with low battery, the LED indicator will ash
in red.
Warning: Do not change the battery, only high-qualied personnel can perform this
operation.
OPERATION INSTRACTION
BASIC FUNCTION
TURNING THE UNIT ON/OFF
Press the power ON/OFF button to switch the unit on/o.
NOTE: In USB/Bluetooth/AUX mode, when the unit is not providing the main function for
around 15 minutes, the unit will automatically switch into standby mode. Press the
FUNCTION/ button to turn on the unit again.
Please note that low volume setting in the audio source may be recognized as “no audio
signal”, this will aect the capability of signal detection from the device and can also originate
an automatic switch into standby mode. If this happens please reactivate the audio signal

EN
14
transmission or increase the volume setting on the audio source player in order to resume
playback.
Electrostatic Discharge hints – The unit may reset or may not reset to normal operation mode
due to electrostatic discharge, just switch it o and reconnect again.
SETTING THE FUNCTION MODE
To change the function modes, press the FUNCTION button repeatedly to choose USB1/USB2/
BLUETOOTH/AUX/RADIO function.
ADJUSTING THE VOLUME
1. Rotate the VOLUME knob on the unit to increase or decrease the music volume.
2. Rotate the MIC VOL. knob on the unit to increase or decrease the microphone volume.
BASS ADJUSTMENT
Press the SUPER BASS button on unit to increase the bass eect.
EQUALIZER (EQ) FUNCTION
This unit has a built-in equalizer system, Press the EQ button on unit to select a setting that best
matches the music style: FLAT, CLASSIC, ROCK, POP and JAZZ.
MICROPHONE ECHO ADJUSTMENT
Press the ECHO button on unit turn on or o the microphone echo eect.
FLASHING LIGHT
There are 5 modes for the DISCO LED lighting. Press the LIGHT button to choose the light
modes.
L-1: By default mode, blue LED will be on constantly when it is selected.
L-2: Blue LED will be on ashing mode.
L-3: Red LED will be on constantly.
L-4: Red LED will be on ashing mode.
L-5: 7 colors LED will be on ashing mode.
There are 3 modes for the decoration LED lighting around the speakers. Press and hold the
LIGHT button to choose the light modes.
E-1: By default mode, blue LED will be on constantly when it is selected.
E-2: Red LED will be on constantly.
E-3: Blue and red LED ashing alternatively.
RADIO OPERATION
Listen to FM radio broadcasts. Press the FUNCTION button on the unit, the display reads FM
and the radio frequency.
Note: in order to get the best reception, extend the FM ANT. on the rear of the unit before use
to its full length.

EN
15
TUNING TO A RADIO STATION
If you know the station frequency that you want to tune to directly:
•Tune to a station by press the /TUN + or /TUN - button repeatedly. The station frequency
is shown on the display.
To tune to a preset station:
• To tune to the next preset station, press the 10/M./FOLD.+ button.
• To tune to the previous preset, press the 10/M./FOLD.- button.
AUTO PRESET MEMORY / SCAN
To scan for stations within reception range and save them to preset memory automatically,
press and hold the PLAY/PAUSE/PAIR/SCAN button. After the unit is nished scanning, the
unit will automatically tune to preset number 1 (P01).
MANUAL PRESET MEMORY OPERATION
Choose which stations to save in preset memory instead of scanning automatically.
1. Use the /TUN + or /TUN - button to tune to the station that you want to save as a preset
(e.g., 93.1).
2. Press the P-MODE/M. button. “P01” will ash on the display to indicate that you are saving
the station as Preset Memory 01. (To change the preset memory number, press the 10/M./
FOLD.+ or 10/M./FOLD.- buttons.)
3. Press the P-MODE/M. button to nish saving the station (e.g., P01 is now set to 93.1).
4. To save another station, repeat steps 1 to 3. You may save up to 30 FM stations.
USB OPERATION
This unit provides two USB ports for music playback.
1. Press the FUNCTION button on unit to select “USB1” or “USB2” mode.
2. Plug the USB memory stick to the USB port on top of the unit (The unit can support up to 32G
USB device). Playback will start automatically from Track 1.
3. To pause playback, press the PLAY/PAUSE/PAIR/SCAN button on unit. The playing time will
ash on the display.
4. To resume playback, press the PLAY/PAUSE/PAIR/SCAN button again.
5. To select a desired track, press the or button respectively during playing until the
desired track appears on the display. The unit will start play automatically.
6. To search for a particular passage during playback, press and hold the or button
to scan the current playing track at high speed until desired point (passage) appears, then
release the button for normal playback mode.
7. To select a song which track number exceeds 10, press the 10/M./FOLD.+ or 10/M./FOLD.-
button each time to skip forward/backward 10 tracks, then press the or button to
select desired track.
8. To select a desired folder (if the USB contains more than one folder), press and hold the
10/M./FOLD.+ or 10/M./FOLD.- button each time to skip forward/backward a folder, then
press the or button to select desired track.
Important: The USB port is intended for data transfer only, other devices cannot be used with
this USB connection. The use of USB extension cords is not recommended. Don’t plug the USB
from the unit when playing or reading the USB device.

EN
16
REPEAT PLAY
You can play one track or all tracks on the USB repeatedly.
To repeat a Single Track
1. Press P-MODE/M. button on unit during play, the display will show “ ”and the current
track will be played over an over again.
2. To cancel repeat play, press P-MODE/M. button on unit until “ ” disappears from the
display.
To repeat all the Tracks
1. Press P-MODE/M. button on unit until the “ ” shows steadily on the display, all tracks on
the USB will be played over and over again.
2. To cancel repeat play, press the P-MODE/M. button on unit until “ ” disappears from the
display.
To repeat the folder (only for USB which contains more than one folder)
1. Press the P-MODE/M. button on unit until “ FOLDER” shows steadily on the display, the
current folder will be repeated over and over again.
2. To cancel repeat play, press the P-MODE/M. button on unit until “ FOLDER” disappears
from the display.
RANDOM PLAY
Press the P-MODE/M. button on unit in play mode till the “RAND” shows steadily on the
display, the random play will start from next track automatically. Press the P-MODE/M. button
on unit again until the “RAND” disappears from the display to cancel.
BLUETOOTH OPERATION
1. Press the FUNCTION button on unit to switch to BLUETOOTH function, the LCD will display
“bt” and the pair indicator will ash at high speed.
2. Turn on the Bluetooth function on the device, scan the unit “DSK-500” and connect, then
input the password 0000 if required, the pair indicator keep light up to indicate connection
done, and the display will show “bt”. Press Play to start playback.
3. Rotate the VOLUME knob on the unit or adjust the volume on the external device to increase
or decrease the music volume to your desired level.
4. Press and hold the PLAY/PAUSE/PAIR/SCAN button to disconnect Bluetooth.
Note: The Bluetooth works best within 10 meters in open air.
AUX-IN OPERATION
1. Press the FUNCTION button on unit to select the “AUX” mode.
2. Connect your audio device to the AUX IN jack on the top panel of the unit with an AUX IN
cable (audio cable is not included).
3. Rotate the VOLUME knob on the unit or adjust the volume on the external device to increase
or decrease the music volume to your desired level.
4. Control the playback with your audio device.

EN
17
MIC JACK OPERATION
Microphone input is available in all modes.
1. Connect your microphone to the 6.3mm MIC JACK found on the top panel of the unit.
2. Rotate the MIC VOL. knob on the unit to increase or decrease the microphone volume.
3. Press the ECHO Button to turn on or o the echo eect of the microphone.
Technical Specications
GENERAL
Power Requirements AC100-240V~60/50 Hz
Power consumption 33W
Power output 30W X 2
FM frequency FM 87.5-108 mHz
AUX in jack 3.5mm
Microphone jack 6.3mm
Work temperature 5° C - +40° C
Bluetooth
Communication system Bluetooth Standard version 2.1+EDR
Reception Range 10 meter (line-of-sight distance)
Compatible Bluetooth proles Advanced Audio Distribution Prole (A2DP)
ACCESSORIES
Instruction Manual x 1pc
AC Cord x 1pc
MICROPHONE x 1pc
Note: Specications are subject to change for continuous improvement without prior notice.
PRODUCT DISPOSAL
Attention should be drawn to the environmental aspects of battery disposal.
Don’t throw used batteries in dustbin. Please contact your retailer in order to protect
the environment. Electrical products should not be disposal of with household
waste. Please recycle where facilities exist.
GUARANTEE
This product is guaranteed against all manufacturing defects for 2 years from the
date of purchase. If the care advice and instructions contained in this manual are
not followed the guarantee will be automatically void.
For this guarantee to be valid, it is necessary to present the original receipt or
invoice. Industrias Masats S. L. U. exclusive importer.

FR
18
CAUTION
RISK OF ELECTRIC SHOCK
DO NOT OPEN
Lire attentivement ce manuel avant d’utiliser l’unité et conservez
pour de futures consultations
Avant son utilisation l’unité doit être complètement chargée.
Information de sécurité et avertissements
PRECAUTION
Dénitions des symboles
DANGER - Indique une situation de danger imminent, si elle ne s’évite pas, elle occasionnera la
mort ou de graves lésions. Ce symbole n’apparaît que lors de situations extrêmes.
AVERTISSEMENT – Indique une situation potentiellement dangereuse qui pourrait occasionner
la mort ou de graves lésions.
PRECAUTION- Indique une situation potentiellement dangereuse, si elle ne s’évite pas, elle
peut occasionner des lésions légères ou modérées ou des dommages sur le produit. Alerte
aussi contre les démarches incertaines.
Le symbole avec un éclair à l’intérieur d’un triangle équilatéral s’utilise pour alerter
à l’utilisateur de la présence de « tension dangereuse » non isolée à l’intérieur de
la carcasse du produit qui peut constituer un risque de décharge électrique pour
les personnes.
ADVERTISSEMENT: POUR RÉDUIRE LE RISQUE DE DÉCHARGE ÉLECTRIQUE
NE PAS RETIRER LE COUVERCLE (NI LE PANNEAU POSTÉRIEUR), NE CONTIENT
PAS DE PIÈCES MANIPULABLES PAR L’UTILISATEUR. CONTACTEZ AVEC UN
PROFESSIONNEL QUALIFIÉ.
Le symbole d’exclamation dans un triangle équilatéral s’utilise pour alerter à
l’utilisateur de la présence importante d’instructions de fonctionnement et de
maintenance sur la documentation qui accompagne le produit.
LIRE TOUTES LES INSTRUCTIONS AVANT D’UTILISER LE PRODUIT
Suivez toujours les précautions essentielles de sécurité lorsque vous utiliserez le
haut-parleur Bluetooth avec microphone, spécialement devant les enfants.
INSTRUCTIONS DE SÉCURITÉ
1) Lisez ce manuel d’instructions avant de connecter ou d’utiliser l’appareil.
2) Conservez ces instructions en bon état. Respectez tous les avertissements. Suivez toutes
les instructions.
3) Gardez ce manuel d’instructions pour de futures consultations.
4) Ne pas exposer l’appareil à des dégoulinements ni à des éclaboussures et ne pas placer des
objets sur produit qui contiennent des liquides, tels que les vases. L’utiliser exclusivement
dans des endroits secs.
5) Ne pas placer le produit sur des sources à amme vive, telles que les bougies.
6) Vous devrez vous assurer que le enfants ne jouent pas avec l’appareil.
7) Ne pas couvrir les orices de ventilation an de ne pas obstruer la ventilation.
8) Assurez-vous que l’unité est connectée à une prise de CA de 220-240V 50Hz. Si vous
utilisez une tension majeure, vous pouvez causer un fonctionnement incorrect y compris
que l’unité s’enamme. Eteignez l’unité avant de la déconnecter de la prise de courant an
de l’éteindre complètement.

FR
19
9) Ne pas connecter/déconnecter de la prise avec les mains mouillées.
10)Si la che n’entre pas dans la prise de courant, ne pas forcer pour la faire entrer.
11)Utiliser les pièces de rechange spéciées par le fabricant.
12)Installer l’unité conforme aux instructions du fabricant.
13)Placez l’unité dans un endroit avec une bonne ventilation et sur une supercie plate,
solide et stable. Ne pas exposer l’appareil à des températures supérieures à 40°C. Laissez
un espace de 30 cm minimum entre les parties postérieure et supérieure de l’unité, et de
5 cm à chaque côté.
14)Appuyez doucement sur les touches de l’unité, autrement vous pourriez l’endommager.
15)Eliminez les batteries utilisées d’une manière responsable en respectant
l’environnement.
16)Vériez que le produit est déconnecté de la prise électrique avant de le déplacer ou de le
nettoyer. Utilisez seulement un drap sec pour le nettoyer.
17)Débranchez le produit lors d’une tempête électrique ou si vous prévoyez ne pas l’utiliser
pendant une longue période.
18)Ne contient pas de pièces qui puissent se séparer ou remplacer par l’utilisateur. N’essayez
pas de réparer vous-même le produit. Seul un professionnel qualié peut réaliser les
tâches de réparation. Portez le produit chez votre fournisseur an qu’il réalise les tâches
de révision et réparation.
19)Ne JAMAIS permettre que personne, et spécialement un enfant, introduise aucun type
d’objet dans les orices, rainures et d’autres ouvertures de la carcasse de l’unité car cela
pourrait provoquer une décharge électrique avec un résultat mortel.
20)Ne pas monter le produit sur un mur ou toiture.
21)Ne pas placer l’unité à proximité d’appareils TV, haut-parleurs ou d’autres objets que
génèrent des champs magnétiques puissants.
22)Ne pas négliger l’unité pendant son utilisation.
NOTE: Pour déconnecter complètement le système si vous prévoyez ne pas l’utiliser pendant
une longue période, déconnectez la che de CA de la prise murale.
LOCALISATION DES CONTRÔLES
Vision supérieure
1. CONNECTEUR D’ENTRÉE
AUXILIAIRE3,5 mm
2. CONNECTEUR MIC 1 6,3 mm
3. CONNECTEUR MIC 2 6,3 mm
4. PORT USB 1
5. PORT USB 2
6. TOUCHE10/M./DOSSIER+
7. TOUCHE DE LUMIÈRE
8. TOUCHE10/M./DOSSIER-
9. TOUCHE ECO
10. TOUCHE ÉGALISEUR
11. TOUCHE FONCTIONS/
12. TOUCHE /SYNT.-
13. TOUCHE /SYNT.+
14. TOUCHE MODE-P/M.
15. TOUCHE /CONNEX./RECH.
16. ÉCRANLCD
17. INDICATEUR DE CONNEXION
18. TOUCHE SUPERGRAVES
19. TOUCHE ALLUMÉ/ÉTEINT

FR
20
20. INDICATEUR DE CHARGE
21. CONTRÔLE VOL. MIC
22. CONTRÔLE DU VOLUME
Vision devant et derrière
23. ANSE
24. HAUT-PARLEURS
25. LUMIÈRE LED DISCO
26. TWEETERS
27. ANTENNE FM
28. ORIFICES DE
VENTILATION
29. PRISE CA
30. LEDS DÉCORATIFS
SOURCE D’ALIMENTATION
Cette unité fonctionne avec une batterie au plomb-acide rechargeable (capacité de la batterie:
4000 mAh). Chargez l’unité au maximum (5 heures approximativement) avant de l’utiliser pour
la première fois. Le temps de reproduction est de 2 heures approximativement après une charge
complète de la batterie. Déconnectez la che de la prise CA an que l’unité fonctionne avec la
batterie une fois complètement chargée.
Lorsque vous connectez la che au courant avec la batterie installée le processus de charge
s’active ; l’indicateur LED de charge s’illumine en rouge pendant le processus de charge et
lorsque la batterie est complètement chargée, l’indicateur est vert. Lorsqu’il restera peu de
batterie, l’indicateur LED en rouge clignotera.
Avertissement: Ne pas changer la batterie, seul un professionnel qualié peut réaliser cette
opération.
INSTRUCTION DE FONCTIONNEMENT
FONCTIONS ESSENTIELLES
ALLUMÉ/ÉTEINT DE L’UNITÉ
Appuyez sur la touche ON/OFF pour allumer/éteindre l’unité.
NOTE: En mode USB/Bluetooth/AUX, si l’unité n’atteint pas la fonction principale pendant 15
minutes, celle-ci passera automatiquement au mode attente. Appuyez sur la touche
FUNCTION/ pour allumer à nouveaul’unité.
Table of contents
Languages:
Other Daewoo Speakers manuals

Daewoo
Daewoo DSK-300 User manual

Daewoo
Daewoo DTS-42SP User manual

Daewoo
Daewoo DBT-302 User manual

Daewoo
Daewoo DSK-390 User manual

Daewoo
Daewoo Grey Smart User manual

Daewoo
Daewoo AVS1424 User manual

Daewoo
Daewoo DSK-610 User manual

Daewoo
Daewoo DBT-02 User manual

Daewoo
Daewoo DBT-305 User manual

Daewoo
Daewoo Fabric Speaker User manual

Daewoo
Daewoo AVS1398 User manual

Daewoo
Daewoo DBT-301 User manual

Daewoo
Daewoo AVS1410 User manual

Daewoo
Daewoo DBT-301 User manual

Daewoo
Daewoo DBT-05S User manual

Daewoo
Daewoo DBT-06 User manual

Daewoo
Daewoo DSK-360 User manual

Daewoo
Daewoo DSK-380 User manual

Daewoo
Daewoo DSK-355 User manual

Daewoo
Daewoo DBT-04 User manual