manuals.online logo
Brands
  1. Home
  2. •
  3. Brands
  4. •
  5. DELTA DORE
  6. •
  7. Receiver
  8. •
  9. DELTA DORE TYXIA 4731 User manual

DELTA DORE TYXIA 4731 User manual

230V~
2 VA
N L
230V~
2A /450W
LN N
1
2
1
2
3
1
2
3
230V~
2 VA
N L
230V~
2A /450W
LN N
1
2
1
2
3
www.deltadore.com
TYXIA 4731
230 V~, 50 Hz 2 VA
= Class II
868 MHz (EN 300 220) 100 m
16 max.
-10°C / +70°C
-10°C / +40°C
IP IP 40
Puissance maximum :
80 Nm / 2A / 450 W / 230 V~
Action automatique : type 1.C
50 x 47 x 26 mm
R&TTE 1999/5/CE
Important product information
Ë Ì Í
3. Raccordement / Connection / Anschließen / Collegamento / Conexión / Pod³¹czenie / Aansluiting
1. Sélection du type d’interrupteur / Switch type selection / Auswahl des Schaltertyps /
Selezione del tipo di interruttore / Selección del tipo de interruptor /Wybór rodzaju przełącznika /
Selectie van type schakelaar /
2. Réglage de la protection vent / Wind protection settings / Windschutz-Einstellung / Regolazione della
protezione vento / Ajuste de la protección contra el viento /Regulacja zabezpieczenia przed wiatrem /
Instellen van windbescherming /
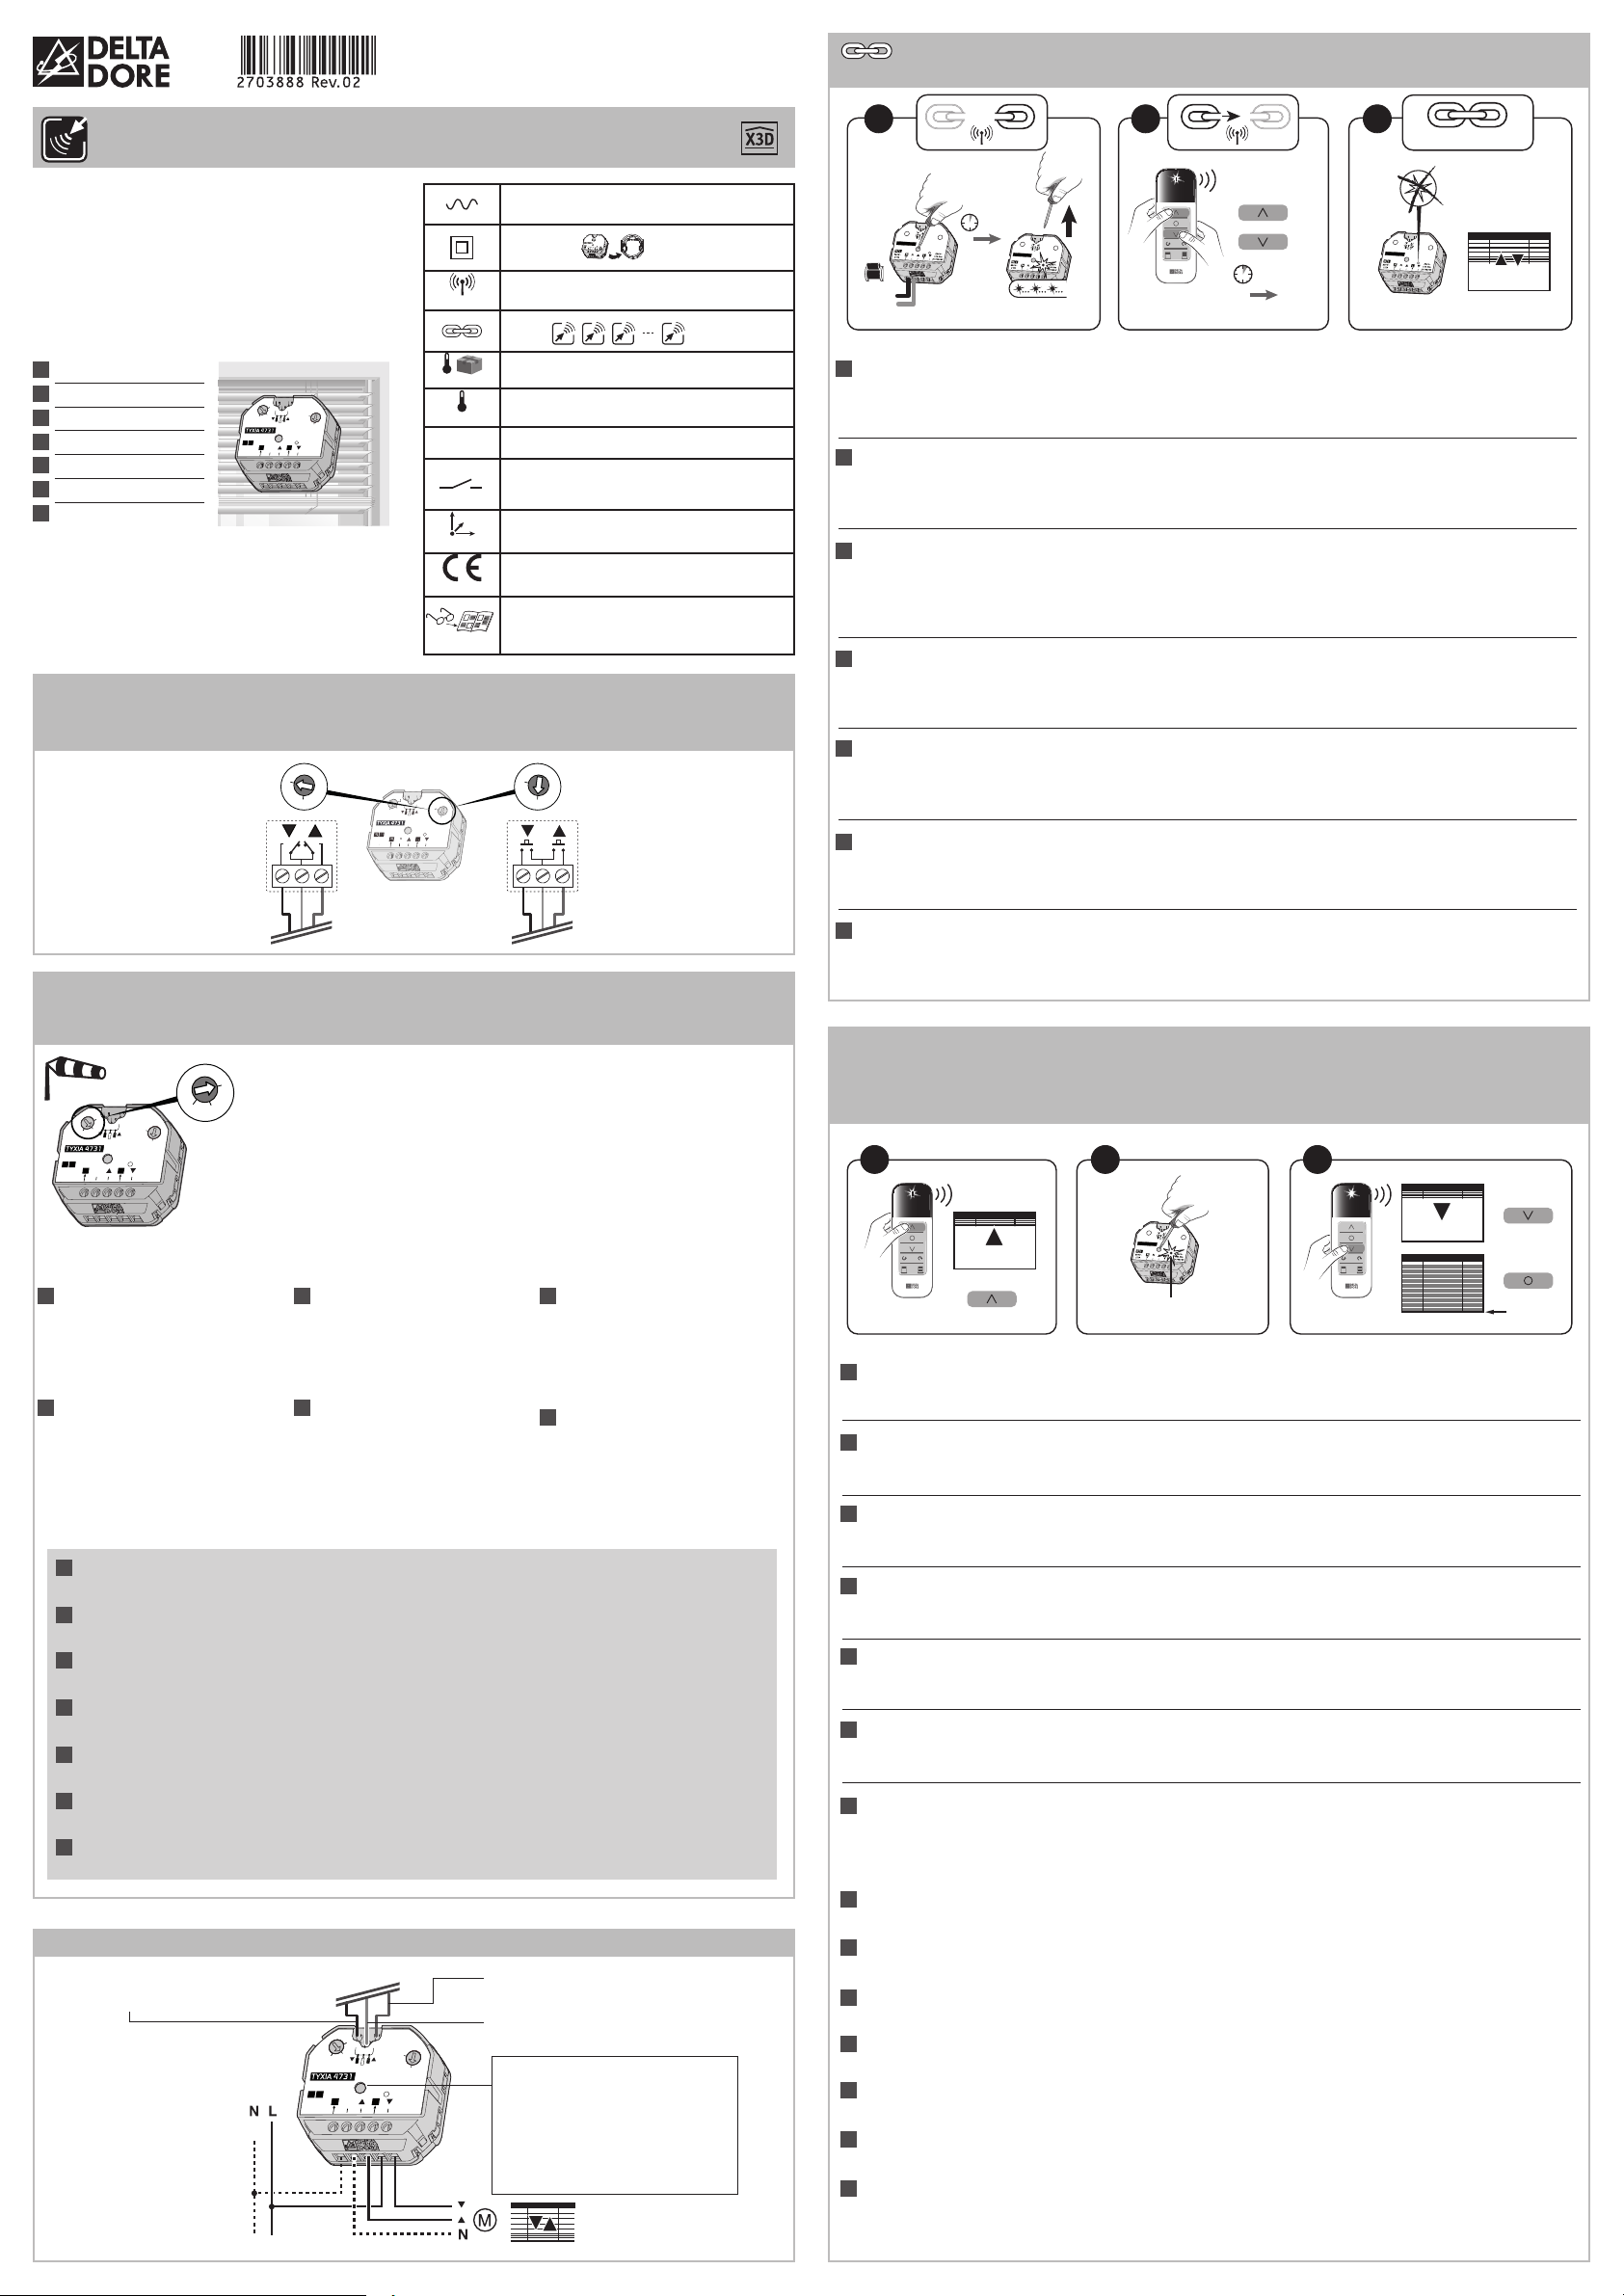
5. Enregistrement du temps de course du volet / Save shutter travel time / Einstellung der Fahrzeit des
Rollladens / Registrazione del tempo di corsa della tapparella / Registro del tiempo de carrera de la
persiana / Zapisywanie czasu ruchu rolety / Opslaan van looptijd van luik/
230V~
50 Hz
230V~
2 VA
N L
230V~
2A/450W
LN N
1
2
1
2
3
Jaune /Yellow / Gelb /
Giallo / Amarillo / Zó³ty / Geel /
Blanc / White / Weiß /
Bianco / Blanco / Bia³y / Wit
Vert / Green / Grün / Verde
/ Zielony / Groen
ÊMettez l’installation sous tension.
Appuyez 3 secondes sur la touche
du récepteur jusqu’à ce que son
voyant clignote. Relâchez.
ÊSwitch on the installation.
Press the receiver button for
3 seconds until its LED flashes.
Release.
ÊSetzen Sie die Anlage unter
Spannung.Drücken Sie 3 Sekunden
lang auf die Taste des Empfängers,
bis dessen Kontrolllampe blinkt.
Lassen Sie die Taste los.
ÊMettete l’installazione sotto
tensione.Premete per 3 secondi il
tasto del ricevitore fino a quando la
sua spia lampeggia. Rilasciate.
ÊPonga el receptor en tensión.
Pulse 3 segundos la tecla del
receptor hasta que el testigo
parpadee. Deje de pulsar.
ÊPod³¹cz instalacjê do pr¹du.
Przez 3 sekundy przytrzymaj
naciśnięty przycisk na odbiorniku, aż
do mignięcia lampki na nim. Puść.
ÊZet de installatie onder spanning.
Druk gedurende 3 seconden op de
toets van de ontvanger tot het lampje
knippert. Laat de toets los.
ÊMettre le volet en position
haute.
ÊRaise the shutter.
ÊBringen Sie den Rollladen in
die obere Position.
ÊDisponete la tapparella in
posizione alta.
ÊSuba la persiana.
ÊUstaw żaluzję w położeniu
górnym.
ÊPlaats het luik in de
hoogste stand.
ËSur l’émetteur, envoyez
l’ordre d’association
(voir sa notice).
ËSend the association
command to the transmitter
(refer to the user guide).
ËGeben Sie über
den Sender die
Zuordnungsanweisung
(siehe entsprechende
Anleitung).
ËSull’emettitore, inviate
l’ordine di associazione
(vedere le relative
istruzioni).
ËEn el emisor, envíe la
orden de asociación
(ver las instrucciones).
Ë Wyślij polecenie
przypisania z nadajnika
(patrz jego instrukcja).*
ËVerstuur het
verbindingscommando
op de zender (zie
handleiding).
ËAppuyez brièvement sur
la touche du récepteur, le
voyant clignote 2 fois.
ËPress and release the
receiver button.The LED
will flash twice.
ËDrücken Sie kurz auf die
Taste des Empfängers. Die
Kontrollleuchte blinkt zweimal.
ËPremete brevemente il
tasto del ricevitore, la spia
lampeggia 2 volte.
ËPulse brevemente la
tecla del receptor, el testigo
parpadea dos veces.
ËNaciśnij na krótko
przycisk odbiornika, lampka
sygnalizacyjna miga 2 razy.
ËDruk kort op de knop van
de ontvanger, het lampje
knippert twee keer.
ÌVérifiez que le voyant du
récepteur ne clignote plus.
Les produits sont associés.
ÌMake sure that the receiver
LED has stopped flashing.
The products are associated.
ÌAchten Sie darauf, dass die
Kontrollleuchte am Empfänger
jetzt nicht mehr blinkt.Die Geräte
sind nun miteinander verbunden.
ÌVerificate che la spia del
ricevitore non lampeggi più.I
prodotti sono associati.
ÌCompruebe que el testigo del
receptor ha dejado de parpadear.
Los productos se asocian.
ÌSprawdź, czy lampka na
odbiorniku przestała migać.
Produkty zosta³y przypisane.
ÌControleer of het controlelampje
van de ontvanger niet meer
knippert.De producten zijn met
elkaar verbonden.
ÌAppuyez sur la touche descente.
Dès que que le volet est complètement
fermé, appuyez sur la touche O.
ÌPress the lower button.
Once the shutter is fully closed,
press the O button.
ÌDrücken Sie die Taste "Ab".
Wenn der Rollladen vollständig geschlossen
ist, auf die Taste O drücken.
ÌPremete il tasto discesa.
Quando la tapparella è completamente
chiusa, premete il tasto O.
ÌPulse la tecla de bajada.
En cuanto la persiana esté
completamente cerrada, pulse la tecla
ÌNaciśnij przycisk opuszczania.
Po całkowitym zamknięciu rolety, naciśnij
przycisk O.
ÌDruk op de knop Omlaag.
Zodra het luik volledig is gesloten, drukt
u op toets O
4. Association / Association / Einlernen / Associazione / Asociación / Przypisanie /
Verbinding
1 2 3
OFF
ON
230V~
50 Hz
OK
> 3s
> 3s
1 3
x1
x2
2
STOP
FR
FR
FR
EN
ES
DE
PL
IT
NL
EN
EN
EN
DE
DE
DE
IT
IT
IT
ES
ES
ES
PL
PL
PL
NL
NL
NL
TYXIA 1605
Récepteur pour Brise-Soleil Orientable
Motorised Blackout Blind Receiver
Empfänger für ausrichtbaren Sonnenschutz
Ricevitore per Frangisole orientabile
Receptor para parasol orientable
Odbiornik do rolet zewnętrznych regulowanych
Ontvanger Verstelbare brise-soleil
230V~
2
V
A
VAV
N
L
230V~
2
A
/450
W
L
N
N
1
2
1
2
3
1
2
1
2
1 2
Recommandé /
Recommended /
Empfohlen /
Consigliato /
Recomendada /
Zalecany /
Aanbevolen
FR Notice d’installation
EN Installation guide
DE Installationsanleitung
IT Guida di installazione
ES Manual de instalación
PL Instrukcja instalacji
NL Installatiehandleiding
Compatible /
Compatible /
Möglich /
Compatibile /
Compatible /
Kompatybilny /
Compatibel
TYXIA 1605 TYXIA 1605
Touche de configuration
/Configuration button /
Konfigurationstaste /
Tasto di configurazione /Tecla de
configuración /
Przycisk konfiguracji /
Configuratietoets /
1- Protection vent active.
2- Protection vent active excepté volet complètement fermé.
3- Protection vent inactive.
1- Wind protection enabled.
2- Wind protection enabled
except when shutter is fully
closed.
3- Wind protection disabled.
1- Protección contra viento
activa.
2- Protección contra viento acti-
va excepto persiana comple-
tamente cerrada.
3- Protección contra viento
inactiva.
1- Windschutz aktiviert.
2- Windschutz aktiviert, außer
bei vollständig geschlossenem
Rollladen.
3- Windschutz deaktiviert.
1- Zabezpieczenie przed wia
rem w³¹czone.
2- Zabezpieczenie przed wia-
trem w³¹czone z wyj¹tkiem
rolety ca³kowicie zamkniêtej.
3- Zabezpieczenie przed wiat-
rem wy³¹czone.
1- Protezione vento attiva.
2- Protezione vento attiva eccet-
to tapparella completamente
chiusa.
3- Protezione vento inattiva.
1- Windsbescherming actief.
2- Windbescherming actief, be-
halve luik volledig gesloten.
3- Windsbescherming inactief.
Sur détection du seuil de réglage > Remontée totale du volet.
When setting threshold is detected > shutter is fully raised.
Bei Erfassung des eingestellten Schwellwerts > Vollständiges Öffnen des
Rollladens.
Su rilevamento della soglia di regolazione > Risalita totale della tapparella.
En detección del umbral de ajuste > Subida total de la persiana.
Po wykryciu ustawionej wartoci progowej > całkowite podniesienie rolety.
Bij detectie van drempelwaarde > Luik volledig omhoog.
Pour les installations équipées de stores banne, marquises ou pergolas, passez directement au
réglage du paragraphe 7.
For installations of awnings, canopies or pergolas,
proceed directly to settings in paragraph 7.
Bei Installationen mit Markisen oder Pergolamarkisen direkt zu den Einstellungen im Abschnitt
7 gehen.
Per le installazioni equipaggiate di tende da sole, tettoie o pergolati,
passate direttamente alla regolazione del paragrafo 7.
Para las instalaciones equipadas con toldos, marquesinas o pérgolas,
pase directamente al ajuste del párrafo 7.
W instalacjach wyposażonych w zasłony tekstylne, markizy lub pergole,
przejdź bezpośrednio do regulacji opisanych w punkcie 7.
Voor installaties met zonneschermen, luifels of pergola's, gaat u naar de instelling
van paragraaf 7.
FR
EN
DE
IT
ES
PL
NL
Sur événement gel de la sonde 6300048 STE 2000, les actions volets sont bloquées
A la fin de l’événement vent ou gel, un temps de garde bloque les actions du volet jusqu’à 10 minutes
If the 6300048 STE 2000 sensor freezes, the roller shutter operations are blocked.
When the freezing or windy episode is over, the roller shutter is prevented from operating for up to 10 minutes
Beim Melden von Eis durch die Eissonde 6300048 STE 2000 können die Rollläden nicht mehr betätigt werden. Nach der
Wird- oder Eismeldung, werden die Rollläden für weitere 10 Minuten aus Sicherheitsgründen blockiert
In caso di evento gelo della sonda 6300048 STE 2000, le azioni delle tapparelle sono bloccate
Alla fine dell’evento vento o gelo, un tempo di protezione blocca le azioni della tapparella fino a 10 minuti
En caso de helada de la sonda 6300048 STE 2000, las acciones persianas están bloqueadas
Al final del evento viento o helada, un tiempo de guardia bloquea las acciones de la persiana hasta 10 minutos
W przypadku zamarznięcia sondy 6300048 STE 2000 działanie rolet jest blokowane
Po ustaniu wiatru lub mrozu rolety pozostają zablokowane przez czas ochronny wynoszący do 10 minut
Als de sensor 6300048 STE 2000 bevroren is, wordt de bediening van de luiken geblokkeerd.Aan het eind van de
gebeurtenis Wind of Vorst zal een bewakingstijd de bediening van de luiken tot 10 minuten blokkeren.
ou / or
1 2 3
> 3s
10. Effacer toutes les associations / Remove all associations / Alle Zuordnungen löschen
/ Cancellare tutte le associazioni / Borrar todas las asociaciones / Usuwanie wszystkich
przypisañ / Alle koppelingen wissen
10s3s 7s
... ... ... .. .. .... .. ..
>20s
OFF
RESET OK
Maintenez appuyé 20 secondes.Après 3 secondes, le voyant clignote lentement. Après 7 secondes,
le voyant clignote rapidement.Maintenez l’appui jusqu’à ce que le voyant s’éteigne. Relâchez.
Press and hold for 20 seconds.After 3 seconds, the LED flashes slowly. After 7 seconds, the LED flas-
hes quickly. Press and hold the button until the LED goes out.Release.
Halten Sie die Taste 20 Sekunden lang gedrückt. Nach 3 Sekunden blinkt die Kontrollleuchte langsam.
Nach 7 Sekunden blinkt die Kontrollleuchte schnell.
Halten Sie die Taste so lange gedrückt, bis die Kontrollleuchte ausgeht. Lassen Sie die Taste los.
Mantenete premuto per 20 secondi.Dopo 3 secondi, la spia lampeggia lentamente. Dopo 7 secondi, la
spia lampeggia rapidamente.Mantenete la pressione fino a quando la spia si spegne. Rilasciate.
Pulse durante 20 segundos.Después de 3 segundos, el testigo parpadea lentamente.Después de 7
segundos, el testigo parpadea rápidamente.
Mantenga pulsado hasta que el indicador se apague.Deje de pulsar.
Przytrzymaj naciśnięty przez 20 sekund. Po 3 sekundach lampka miga wolno. Po 7 sekundach lampka
miga szybko. Przytrzymać naciśnięty przycisk aż do zgaśnięcia lampki. Puść.
Houd 20 seconden ingedrukt. Na 3 seconden knippert het controlelampje langzaam. Na 7 seconden knip-
pert het controlelampje snel. Houd de toets ingedrukt tot het controlelampje uitgaat. Laat de toets los.
9. Effacer une association / Remove an association / Zuordnung löschen / Cancellare un’associa-
zione / Suprimir una asociación / Usuwanie przypisania / Een verbinding verwijderen
> 10s
3s
7s
1 2 3
OFF
> 3s
OK
.. .. .. .. ..
ÊMaintenez appuyé 10 secondes :
- après 3 secondes, le voyant
clignote lentement.
- après 7 secondes, le voyant
clignote rapidement. Relâchez.
ÊPress and hold for 10 seconds:
- after 3 seconds, the LED flashes
slowly.
- after 7 seconds, the LED flashes
quickly. Release.
ÊHalten Sie die Taste 10 Sekunden
lang gedrückt:
- nach 3 Sekunden blinkt die
Kontrollleuchte langsam.
- nach 7 Sekunden blinkt die
Kontrollleuchte schnell. Lassen Sie die
Taste los.
ÊMantenete premuto per 10 secondi:
- dopo 3 secondi, la spia lampeggia
lentamente.
- dopo 7 secondi, la spia lampeggia
rapidamente. Rilasciate.
ÊPulse durante 10 segundos:
- después de 3 segundos, el testigo
parpadea lentamente.
- después de 7 segundos, el testigo
parpadea rápidamente. Deje de pulsar.
ÊPrzytrzymaj naciśnięty przez
10 sekund:
- po 3 sekundach lampka miga wolno.
- po 7 sekundach lampka miga szybko.
Puść.
ÊHoud 10 seconden ingedrukt:
- na 3 seconden knippert het
controlelampje langzaam.
- na 7 seconden knippert het
controlelampje snel. Laat de toets los.
ËValidez sur l’émetteur
(voir sa notice).
ËConfirm on the
transmitter (refer to the
user guide).
ËBestätigen Sie
am Sender (siehe
entsprechende Anleitung).
ËConfermate
sull’emettitore
(vedere le relative
istruzioni).
ËValide en el emisor
(ver las instrucciones).
ËZatwierdź na nadajniku
(patrz jego instrukcja).
ËBevestig op de zender
(zie handleiding).
ÌVérifiez que le voyant du
récepteur ne clignote plus.
Les produits ne sont plus
associés.
ÌMake sure that the receiver
LED has stopped flashing.
The products are no longer
associated.
ÌAchten Sie darauf, dass die
Kontrollleuchte am Empfänger
jetzt nicht mehr blinkt.
Die Geräte sind nun nicht mehr
miteinander verbunden.
ÌVerificate che la spia del
ricevitore non lampeggi più.
I prodotti non sono più associati.
ÌCompruebe que el testigo
del receptor haya dejado de
parpadear.
Los productos ya no están
asociados.
ÌSprawdź, czy lampka na
odbiorniku przestała migać.
Produkty nie są już
przypisane.
ÌControleer of het
controlelampje van de ontvanger
niet meer knippert.
De producten zijn niet meer
met elkaar verbonden.
FR
FR
EN
DE
IT
ES
PL
NL
EN
DE
IT
ES
PL
NL
6. Enregistrement du temps d’inclinaison /Save inclination time / Einstellung der Wendezeit /
Registrazione del tempo di inclinazione / Registro del tiempo de inclinación /
Zapisywanie czasu nachylania / Opslaan van kanteltijd /
7. Réglage des favoris / Set favourites / Favoriteneinstellung / Regolazione dei preferiti /
Ajuste de los favoritos / Ustawianie ulubionych / Instellen van favorieten /
11. Produits recommandés / Recommended products / Produktempfehlungen /
Prodotti consigliati / Productos recomendados / Zalecane urz¹dzenia / Aanbevolen producten /
8. Initialisation des temps de course et d’inclinaison / Initialise travel and inclination times /
Initialisierung der Fahrzeit und Wendezeit /
Inizializzazione dei tempi di corsa e di inclinazione / Inicialización del
tiempo de carrera e inclinación /
Inicjalizacja czasu przebiegu i nachylania /
Initialisatie van de doorlooptijden en
kanteling /
ÊPositionnez le volet à
mi-hauteur, lames à
l’horizontale
ÊRaise the shutter
halfway, blades horizontal
ÊRollladen auf halber Höhe
positionieren, Lamellen
horizontal
ÊPosizionate la tapparella a
metà altezza, con le stecche
in orizzontale
ÊPosicione la persiana a
media altura, lamas
horizontales
ÊUstaw roletê w po³owie
wysokości, z lamelami w
poziomie
ÊPlaats het luik
op halve hoogte, lamellen
horizontaal
ËAppuyez brièvement 2 fois
sur la touche du récepteur,
le voyant clignote 4 fois.
ËPress and release the
receiver button twice.The
LED will flash 4 times.
ËDrücken Sie zweimal kurz auf
die Taste des Empfängers. Die
Kontrollleuchte blinkt viermal.
ËPremete brevemente 2
volte il tasto del ricevitore, la
spia lampeggia 4 volte.
ËPulse brevemente dos veces
la tecla del receptor, el testigo
parpadea cuatro veces.
ËNaciśnij 2 razy na krótko
przycisk odbiornika, lampka
sygnalizacyjna miga 4 razy.
ËDruk 2 keer kort op de
knop van de ontvanger, het
lampje knippert 4 keer.
ÌMaintenez la touche rotation appuyée
(mode pas à pas) jusqu’à la rotation
complète du volet, puis appuyez sur O.
ÌPress and hold the rotation button
(step by step mode) until the shutter has
rotated fully, then press O.
ÌHalten Sie die Taste "Drehen" (Schritt-für-
Schritt-Modus) bis zur kompletten Wendung
gedrückt und drücken Sie anschließend auf O.
ÌMantenete premuto il tasto rotazione
(modalità passo passo) fino alla rotazione
completa della tapparella, poi premete O.
ÌMantenga la tecla de rotación pulsada (modo
paso a paso) hasta la rotación completa de la
persiana, después pulse O.
ÌNaciśnij przycisk obrotów (tryb krokowy)
i przytrzymaj do momentu pełnego obrotu
rolety, a następnie naciśnij O.
ÌHoud de rotatietoets ingedrukt
(stap-modus) totdat het luik volledig is
geroteerd, druk vervolgens op O.
1 3
x2
x4
2
50%
FR
EN
DE
IT
ES
PL
NL
ÊMettez le volet dans la
position souhaitée
ÊSet the shutter to the
required position
ÊBringen Sie den Rollladen in
die gewünschte Position
ÊDisponete la tapparella nella
posizione desiderata
ÊPonga la persiana en la
posición deseada
Ê Ustaw roletę w żądanym
położeniu
ÊPlaats het rolluik in de
gewenste positie
ËEnregistrez la position
ËSave this position
ËSpeichern Sie die Position
ËRegistrate la posizione
ËRegistre la posición
ËZapamiętaj położenie
ËRegistreer de positie
ÌLe moteur s’actionne 2 fois
ÌThe motor will briefly operate
twice
ÌDer Motor schaltet sich zweimal
ein
ÌIl motore si aziona 2 volte
ÌEl motor se acciona dos veces
ÌNapêd uruchamia siê 2 razy
ÌDe motor wordt 2 maal
geactiveerd
FR
FR
EN
DE
IT
ES
PL
NL
EN
DE
IT
ES
PL
NL
Appuyez brièvement 3 fois sur la touche du récepteur,
le voyant clignote 10 fois.
Press and release the receiver button 3 times.The
LED will flash 10 times.
Drücken Sie dreimal kurz auf die Taste des
Empfängers.Die Kontrollleuchte blinkt zehnmal.
Premete brevemente 3 volte il tasto del ricevitore, la
spia lampeggia 10 volte.
Pulse brevemente tres veces la tecla del receptor, el
testigo parpadea diez veces.
Naciśnij 3 razy na krótko przycisk odbiornika, lampka
sygnalizacyjna miga 10 razy.
Druk 3 keer kort op de knop van de ontvanger, het
lampje knippert 10 keer.
Remarque : Cette opération supprime également les favoris enregistrés.
Note:This operation will also remove saved favourites.
Hinweis: Bei diesem Vorgang werden gleichzeitig die gespeicherten Favoriten gelöscht.
Nota: Questa operazione elimina anche i preferiti registrati.
Nota: Esta operación también elimina los favoritos registrados.
Uwaga! Czynność ta powoduje również usunięcie zapisanych ulubionych.
Opmerking: Dit zal de opgeslagen favorieten verwijderen.
x3
x10
FR
Pour la garantie et la protection de vos volets, nous
vous recommandons l’installation d’une sonde
extérieure et d’un capteur vent soleil.
EN
For the warranty and protection of your shutters, we
recommend installing an outdoor sensor and a wind/
sun sensor.
DE
Um ein einwandfreies Funktionieren der Rollläden zu
gewährleisten und für optimalen Schutz empfehlen
wir Ihnen den Einbau eines Außenfühlers und eines
Wind- und Sonnensensors.
IT
Per la garanzia e la protezione delle vostre tapparelle,
vi consigliamo l'installazione di una sonda esterna e
di un sensore vento-sole.
ES
Para la garantía y la protección de sus persianas, le
recomendamos la instalación de una sonda exterior y
un sensor viento sol.
PL
Dla gwarancji i zabezpieczenia rolet zalecamy instalację
sondy zewnêtrznej i czujnika wiatru i s³oñca.
NL
Voor de garantie en bescherming van uw luiken raden
we aan om een externe sensor en een zon-/
windsensor te installeren.
TYXIA 1605 TYXIA 1605
TYXIA 1605
STE 2000
P/N: 6300048
CVS
Best-Nr.:
6351393

Other DELTA DORE Receiver manuals

DELTA DORE TYXIA 4630 User manual

DELTA DORE

DELTA DORE TYXIA 4630 User manual

DELTA DORE TYXIA 5630 User manual

DELTA DORE

DELTA DORE TYXIA 5630 User manual

DELTA DORE AC 51115 User manual

DELTA DORE

DELTA DORE AC 51115 User manual

DELTA DORE X2D User manual

DELTA DORE

DELTA DORE X2D User manual

DELTA DORE TYXIA 4910 User manual

DELTA DORE

DELTA DORE TYXIA 4910 User manual

DELTA DORE RF 6420 User manual

DELTA DORE

DELTA DORE RF 6420 User manual

DELTA DORE RF 6630 User manual

DELTA DORE

DELTA DORE RF 6630 User manual

DELTA DORE Tybox 5701 FP User manual

DELTA DORE

DELTA DORE Tybox 5701 FP User manual

DELTA DORE TYXIA 4910 User manual

DELTA DORE

DELTA DORE TYXIA 4910 User manual

DELTA DORE RF 4890 User manual

DELTA DORE

DELTA DORE RF 4890 User manual

DELTA DORE 6630 User manual

DELTA DORE

DELTA DORE 6630 User manual

DELTA DORE RF 660 WIRELESS RECEIVER - GUIDE D User manual

DELTA DORE

DELTA DORE RF 660 WIRELESS RECEIVER - GUIDE D User manual

DELTA DORE TYXIA 4630 User manual

DELTA DORE

DELTA DORE TYXIA 4630 User manual

DELTA DORE RF 6050 User manual

DELTA DORE

DELTA DORE RF 6050 User manual

DELTA DORE TYXIA 4731 User manual

DELTA DORE

DELTA DORE TYXIA 4731 User manual

DELTA DORE TYXIA 6410 User manual

DELTA DORE

DELTA DORE TYXIA 6410 User manual

DELTA DORE RF 6620 User manual

DELTA DORE

DELTA DORE RF 6620 User manual

DELTA DORE TYXIA 4801 User manual

DELTA DORE

DELTA DORE TYXIA 4801 User manual

DELTA DORE TYXIA 4801 User manual

DELTA DORE

DELTA DORE TYXIA 4801 User manual

DELTA DORE Tyxia 4910 User manual

DELTA DORE

DELTA DORE Tyxia 4910 User manual

DELTA DORE TYXIA 4910 User manual

DELTA DORE

DELTA DORE TYXIA 4910 User manual

DELTA DORE RF 642 Series User manual

DELTA DORE

DELTA DORE RF 642 Series User manual

DELTA DORE RF 6650 User manual

DELTA DORE

DELTA DORE RF 6650 User manual

DELTA DORE RF 4890 User manual

DELTA DORE

DELTA DORE RF 4890 User manual

Popular Receiver manuals by other brands

Traxis DBS 3500 operating manual

Traxis

Traxis DBS 3500 operating manual

Optex Wireless 2000 RC-20U installation instructions

Optex

Optex Wireless 2000 RC-20U installation instructions

JVC KD-X40 instructions

JVC

JVC KD-X40 instructions

Mpow MBR1 user manual

Mpow

Mpow MBR1 user manual

Marantz 1530 manual

Marantz

Marantz 1530 manual

Lexicon RV-5 user guide

Lexicon

Lexicon RV-5 user guide

Aura AMH-320BT owner's manual

Aura

Aura AMH-320BT owner's manual

PCB Piezotronics M353B15 Installation and operating manual

PCB Piezotronics

PCB Piezotronics M353B15 Installation and operating manual

Sony WLL-RX50 Operation manual

Sony

Sony WLL-RX50 Operation manual

HAMTRONICS R451 Installation operation & maintenance

HAMTRONICS

HAMTRONICS R451 Installation operation & maintenance

Spektrum SR215 manual

Spektrum

Spektrum SR215 manual

Sony STR-DE595 Dimensions

Sony

Sony STR-DE595 Dimensions

Sony SS-TS500 Service manual

Sony

Sony SS-TS500 Service manual

Yamaha HTR-5440 owner's manual

Yamaha

Yamaha HTR-5440 owner's manual

Sony XT-XM1 - Xm Satellite Radio Tuner Operating & installation instructions

Sony

Sony XT-XM1 - Xm Satellite Radio Tuner Operating & installation instructions

Onkyo TX-NR801E Service manual

Onkyo

Onkyo TX-NR801E Service manual

JBL DCR600 Service manual

JBL

JBL DCR600 Service manual

Panasonic SAXR50 - DIGITAL A/V RECEIVER operating instructions

Panasonic

Panasonic SAXR50 - DIGITAL A/V RECEIVER operating instructions

manuals.online logo
manuals.online logoBrands
  • About & Mission
  • Contact us
  • Privacy Policy
  • Terms and Conditions

Copyright 2025 Manuals.Online. All Rights Reserved.