manuals.online logo
Brands
  1. Home
  2. •
  3. Brands
  4. •
  5. Delta
  6. •
  7. Accessories
  8. •
  9. Delta AMBIS User manual

Delta AMBIS User manual

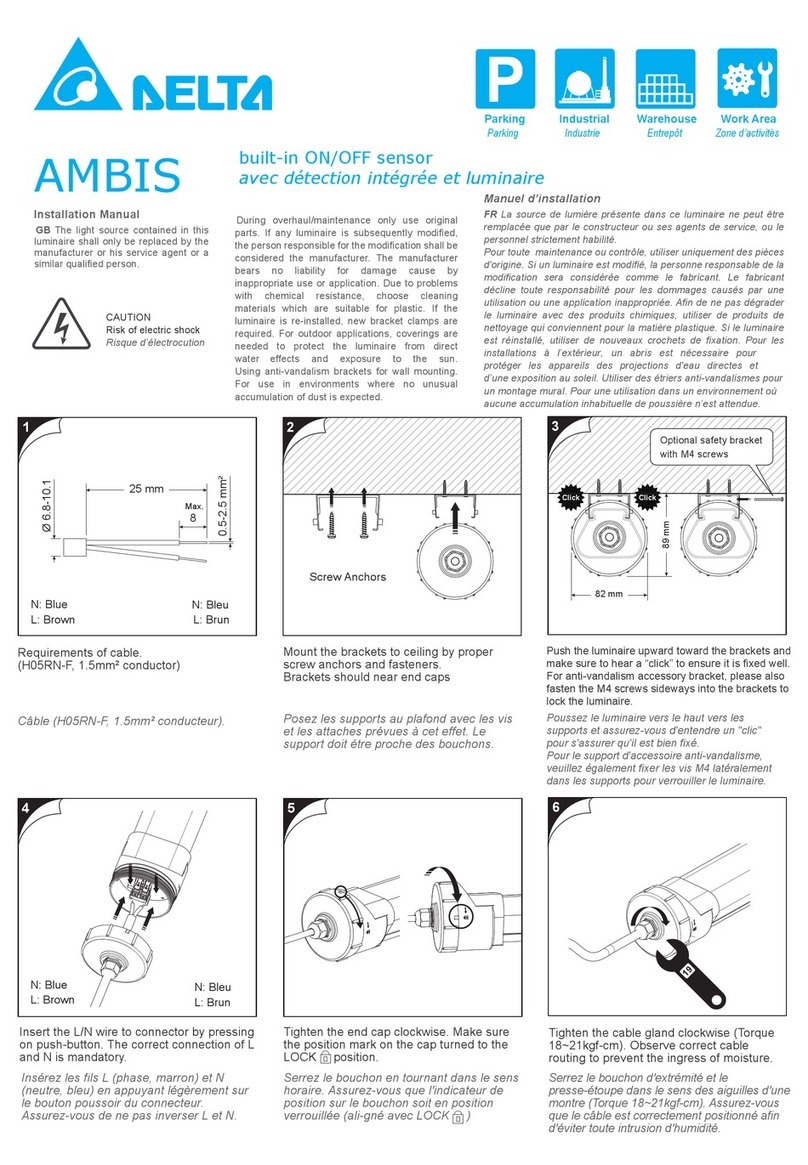
Requirements of cable.
(H07RN-F, 1.5mm² conductor)
Mount the brackets to ceiling by proper screw anchors
and fasteners.
Push the luminaire upward toward the brackets and make
sure to hear a “click” to ensure it is fixed well.
For anti-vandalism accessory bracket, please also fasten
the M4 screws sideways into the brackets to lock the
luminaire.
Tighten the cable gland clockwise (Torque
22~25kgf-cm). Observe correct cable routing to prevent
the ingress of moisture.
Industrial WarehouseParking Work Area
Parking Industrie Entrepôt Zone d’activités
Câble (H07RN-F, 1.5mm² conducteur).
Serrez le bouchon d'extrémité et le presse-étoupe dans
le sens des aiguilles d'une montre (Torque
22~25kgf-cm). Assurez-vous que le câble est
correctement positionné afin d'éviter toute intrusion
d'humidité.
Posez les supports au plafond avec les vis et les
attaches prévues à cet effet.
Poussez le luminaire vers le haut vers les supports et
assurez-vous d'entendre un "clic" pour s'assurer qu'il est
bien fixé.
Pour le support d'accessoire anti-vandalisme, veuillez
également fixer les vis M4 latéralement dans les supports
pour verrouiller le luminaire.
6
Screw Anchors
23
CAUTION
Risk of electric shock
Risque d’électrocution
AMBIS
Optional safety bracket
with M4 screws
89 mm
82 mm
Click Click
N: Blue
L: Brown
1
N: Bleu
L: Brun
E: Green/Yellow E: Vert/Jaune
Installation Manual
4
N: Blue
L: Brown
E: Green/Yellow
N: Bleu
L: Brun
E: Vert/Jaune
Insert the L/N/E wire to connect or by pressing on push-
button. The correct connection of L, N, and E is
mandatory. The terminal marked “E” is for the continuity
of earth conductor for through wiring, not a protective
earth of this luminaire.
Insérez les fils L (phase, marron), N (neutre, bleu) et E
(terre, vert-jaune) en appuyant légèrement sur le bouton
poussoir du connecteur. Assurez-vous de bien respecter
l’ordre de connexion et de ne pas inverser la polarité. Le
connecteur E offre une continuité du fil de terre sur le
câblage traversant. Il n’offre en aucun cas une protection
spécifique par une mise à la terre du luminaire.
5
Tighten the end cap clockwise. Make sure the position
mark on the cap turned to the LOCK position.
Serrez le bouchon en tournant dans le sens horaire.
Assurez-vous que l'indicateur de position sur le
bouchon soit en position verrouillée (ali-gné avec
LOCK )
built-in dimming sensor
avec détection intégrée et luminaire gradable
GB The light source contained in this luminaire shall only be replaced by the manufacturer or his service agent or a similar qualified person. Basic insulation between LV
supply and control conductors shall be provided.
During overhaul/maintenance only use original parts. If any luminaire is subsequently modified, the person responsible for the modification shall be considered the
manufacturer. The manufacturer bears no liability for damage cause by inappropriate use or application. Due to problems with chemical resistance, choose cleaning
materials which are suitable for plastic. If the luminaire is re-installed, new bracket clamps are required. For outdoor applications, coverings are needed to protect the
luminaire from direct water effects and exposure to the sun. Using anti-vadalism brackets for wall mounting. For use in environments where no unusual accumulation of
dust is expected.
Manuel d’installation
FR La source de lumière présente dans ce luminaire ne peut être remplacée que par le constructeur ou ses agents de service, ou le personnel strictement habilité.
Une isolation entre les fils d’alimentation base tension et les fils conducteurs du système de contrôle, doit être conçue et est à la charge de l’installateur.
Pour toute maintenance ou contrôle, utiliser uniquement des pièces d'origine. Si un luminaire est modifié, la personne responsable de la modification sera considérée
comme le fabricant. Le fabricant décline toute responsabilité pour les dommages causés par une utilisation ou une application inappropriée. Afin de ne pas dégrader le
luminaire avec des produits chimiques, utiliser de produits de nettoyage qui conviennent pour la matière plastique. Si le luminaire est réinstallé, utiliser de nouveaux
crochets de fixation. Pour les installations à l’extérieur, un abris est nécessaire pour protéger les appareils des projections d'eau directes et d’une exposition au soleil.
Utiliser des étriers anti-vandalismes pour un montage mural.Pour une utilisation dans un environnement où aucune accumulation inhabituelle de poussière n’est attendue.
Schematic diagram of installation loop.
AC input
Schéma de principe d’une d'installation en série.
Courant d’entrée
Delta Electronics Europe
Zandsteen 15
2132 MZ Hoofddorp, The Netherlands
TEL: +31-20-655-0900
FAX: +31-20-655-0999
For more product information and sales inquiries,
please contact sleu@deltaww.com
www.delta-emea.com/ledlighting
1
2
Dimensions
44*30*23 mm
(L * l * H)
Dimensions
Quantité
2PCS
Quantity
Accessoires
Standard
Accessories
Standard
Optionnel
Optional
Image
01
Image
02
Désignation
Metal Bracket
Designation
Support de fixation
Support de fixation
anti-vandalisme
Anti-Vandalism
Bracket
Utilisation
Accessory USE
Ceiling mounted
Montage plafond
Ceiling mounted
with anti-vandalism
Montage plafond avec
fonction anti-vandalisme
Cable
Entry
Cable
Output
* : Brackets should near end caps
* : Le support doit être proche des bouchons.
Cable
d’entrée
Cable
sortie
Matériaux
SUS304
(support)
Material
SUS304
SUS316L
(bracket)
SUS304 for
M4 Screw
(vis M4)
+ : DIM +
- : DIM -
N: Blue
L: Brown
E: Green / Yellow
+ : DIM +
- : DIM -
N: Blue
L: Brown
E: Green / Yellow
(Option1: AC output for looping other 1-10V dimming luminaires) (Option2: AC output for looping other ON/OFF luminaires)
AC output Load Capacity : 355W
(Stand alone)
(Rester seul)
Initialization
1) On/Off function /3-step dimming function:
After power on, the sensor automatically turns on light at 100% brightness. After 10sec, it
turns off the light. During the initialization, the sensor is not able to detect movement.
2) 2-step dimming function:
After power on, the sensor automatically turns on light at 100% brightness. After 10sec, it
dims the light to a low light level (set by stand-by dim level). During the initialization, the
sensor is not able to detect movement.
Initialisation
1) fonction marche- arrêt / fonction de gradation en 3 niveaux
Après la mise sous tension, le capteur allume le luminaire automatiquement avec un flux
lumineux de 100%. Après 10 secondes, le luminaire s’éteint. Lors de l'initialisation, le capteur
n'est pas capable de détecter un mouvement.
2) Fonction de gradation en 2 étapes
Après la mise sous tension, le capteur allume le luminaire automatiquement avec un flux
lumineux de 100%. Après 10 secondes, le flux lumineux est réduite à un niveau de lumière
faible (régler le niveau de veille). Lors de l'initialisation, le capteur n'est pas capable de
détecter un mouvement.
Factory Setting
Detection Area: 100%, Hold Time: 5S, Stand-by Period: +∞, Stand-by dim Level: 25%,
Daylight Sensor: Disable
Réglage usine
Zone de détection: 100%, temps de maintien: 5 s, période de veille: + ∞, niveau de veille: 25%
Application Notice
1) Quick switch ON/OFF 3 times within 2sec to override sensor function. Lights will switch on
all the time. Power off and on again to recover sensor function.
2)1-10V stand-by Dim level can not be set by remote controller.
Notes
1) Pour annuler rapidement la fonction détection du capteur, appuyer 3 fois sur la touche
ON /OFF pendant 2 secondes. Le luminaire éclairera sans interruption. Eteigner puis rallumer
afin de reconfigurer la fonction de capteur
2) Le niveau de veille 1-10V ne peut pas être réglé par la télécommande
RemoteControl
Télécommande
Button
Touche
Remarks
Instructions
Press“ON/OFF”button,thelightgoestoconstantonor
constantoffmode,thesensorisdisabled. Press“Reset”
buttontoquitfromthismode.
Appuyez surlatouche «ON/OFF»,lalumièrereste en
modeallumée ou éteinte,lecapteur est désactivé
Press“Reset”button,allparametersarethesameas
theDIPswitchsettings.
Appuyezsurlatouche«Reset»,touslesparamètresse
réinitialisentauréglageusine
Note:Sensitivity /Holdtime/Stand‐byPeriod/Daylightsensor
canbeadjustedbypressingthecorrespondingbutton.Thelatest
settingwillstayvalid.(Stand‐byDimlevelcannotbesetby
remotecontroller.)
Remarque:Sensibilité/Tempsdemaintien/Périodedeveille/
Capteurdelumièredujourpeuventêtreréglésenappuyantsurle
boutoncorrespondant.
Ledernierréglageresteravalide.(Leniveaudeveillenepeutpas
êtrerégléparlatélécommande)
ON
OFF
Reset

Other Delta Accessories manuals

Delta DPA Series User manual

Delta

Delta DPA Series User manual

Delta 36-601 User manual

Delta

Delta 36-601 User manual

Delta DPA Series User manual

Delta

Delta DPA Series User manual

Delta DPA Series User manual

Delta

Delta DPA Series User manual

Delta RetroSign GR1 User manual

Delta

Delta RetroSign GR1 User manual

Delta PB-C1003 User manual

Delta

Delta PB-C1003 User manual

Delta LE-753112 User manual

Delta

Delta LE-753112 User manual

Delta DVP04TC-S User manual

Delta

Delta DVP04TC-S User manual

Delta InfraSuite RWD030R User manual

Delta

Delta InfraSuite RWD030R User manual

Delta LE-50637 User manual

Delta

Delta LE-50637 User manual

Delta PB-C1001 User manual

Delta

Delta PB-C1001 User manual

Delta GRX User manual

Delta

Delta GRX User manual

Delta 50-2000 Installation instructions

Delta

Delta 50-2000 Installation instructions

Delta AMBIS User manual

Delta

Delta AMBIS User manual

Delta BIESEMEYER 78-955 User manual

Delta

Delta BIESEMEYER 78-955 User manual

Delta DPB Series User manual

Delta

Delta DPB Series User manual

Delta PB-A1002 User manual

Delta

Delta PB-A1002 User manual

Delta DNS-14 User guide

Delta

Delta DNS-14 User guide

Delta Uno Sense S1649 User manual

Delta

Delta Uno Sense S1649 User manual

Delta DVP-EH Series User manual

Delta

Delta DVP-EH Series User manual

Delta CS-01 User manual

Delta

Delta CS-01 User manual

Delta GT-9000 User manual

Delta

Delta GT-9000 User manual

Delta SH-OP01 User manual

Delta

Delta SH-OP01 User manual

Delta ELEKTRA UV E-5 User manual

Delta

Delta ELEKTRA UV E-5 User manual

Popular Accessories manuals by other brands

Hytronik HIM31 Installation and instruction manual

Hytronik

Hytronik HIM31 Installation and instruction manual

IFM efector 160 LR3000 operating instructions

IFM

IFM efector 160 LR3000 operating instructions

Intermec 5020 installation guide

Intermec

Intermec 5020 installation guide

Lion Precision LRD6110 user guide

Lion Precision

Lion Precision LRD6110 user guide

Silver Eagle SS7KA quick start guide

Silver Eagle

Silver Eagle SS7KA quick start guide

IRROMETER RSU-C Installation and operating instructions

IRROMETER

IRROMETER RSU-C Installation and operating instructions

Nokeval Cell2-Sky-Link-RS485-LTE/LAN user manual

Nokeval

Nokeval Cell2-Sky-Link-RS485-LTE/LAN user manual

S+S Regeltechnik AERASGARD KLQ-W Operating Instructions, Mounting & Installation

S+S Regeltechnik

S+S Regeltechnik AERASGARD KLQ-W Operating Instructions, Mounting & Installation

Emerson Fisher 249VS instruction manual

Emerson

Emerson Fisher 249VS instruction manual

Q-FREE MD 5850 MultiReader installation manual

Q-FREE

Q-FREE MD 5850 MultiReader installation manual

bannerman Q45VA quick start guide

bannerman

bannerman Q45VA quick start guide

weinor PergoTex II Maintenance instructions and directions for use

weinor

weinor PergoTex II Maintenance instructions and directions for use

Cardinal 200 Installation and technical manual

Cardinal

Cardinal 200 Installation and technical manual

ZonBen ZonBULL HD-1 manual

ZonBen

ZonBen ZonBULL HD-1 manual

Avidsen Bamboo manual

Avidsen

Avidsen Bamboo manual

Applied Physics Systems 1540 user manual

Applied Physics Systems

Applied Physics Systems 1540 user manual

Winsen RD-623 user manual

Winsen

Winsen RD-623 user manual

Vernier UVB-BTA quick start guide

Vernier

Vernier UVB-BTA quick start guide

manuals.online logo
manuals.online logoBrands
  • About & Mission
  • Contact us
  • Privacy Policy
  • Terms and Conditions

Copyright 2025 Manuals.Online. All Rights Reserved.