manuals.online logo
Brands
  1. Home
  2. •
  3. Brands
  4. •
  5. Denver
  6. •
  7. Radio
  8. •
  9. Denver DAB-35 User manual

Denver DAB-35 User manual

SIZE:148 x 210mm
DAB-35
DAB+/DAB band III and FM digital radio
DAB+/DAB Band III und digitales UKW-Radio
DAB+/DAB bånd III og FM digital radio
DAB+/DAB band III and FM-digitalradio
DAB +/DAB Band III en FM digitale radio
Radio cyfrowe DAB+/DAB pasmo III i FM
DAB+/DAB-kaista III ja digitaalinen FM-radio
Banda DAB+/DAB III y radio digital FM
Radio FM numérique avec bande III DAB+/DAB
Radio digitale banda DAB+/DAB III ed FM
Rádio digital FM e DAB+/DAB banda III
DAB+/DAB pojas III i FM digitalni radio
DAB Radio Signal
Please notice that DAB signal can be weaken MUCH depending on the type of
building you are living in. (fx. It can be hard to catch proper signal when being in
a concrete building.)
Signal can also be different in different areas of the country. Please check your
local transmitter to get the best signal in your area.
Vær opmærksom på at det kan påvirke DAB signalet MEGET hvilken type
bygning man bor i. Det kan f.eks. være svært at få et ordentligt signal hvis man
bor i beton byggeri.
Der er også forskel på hvor god dækningen er i forskellige områder. Tjek nyeste
dækningskort på www.dabradio.dk under ”hvad er digital radio”.
EN-1 EN-2
BASIC OPERATION - GETTING STARTED
Press the STANDY button to turn the unit on, it will automatically enter into the DAB mode and
perform auto scan function. During the scan, the display show “Scanning…” together with a slide bar
that indicates the progress of the scan and the amount of stations that have been found so far. (F.2)
Once the scan has finished, the radio will select the first alphanumerically found station. You can
now press ▼/▲buttons to explore the found stations followed by pressing the SELECT button to
select listening to the stations.
Note: If there is no stations found after auto scan, the radio will display "Full Scan", you can now
press ▼/▲buttons to select “Full scan” or “Manual tune” for stations, and press SELECT button to
finally confirm.
F.1 F.2
MENU Tree as below:
Mode Mode
DAB
DAB Menu
Full Scan
Manual Tune
Prune
System
FM
Menu Menu
System Menu
Time
Sleep
Backlight
Factory Reset
SW version Backlight Menu
Backlight Low/ Medium/ High
Time Menu
Set Time/Date hh:mm/DD-MM-YYYY
Auto Update Update from Any/Update from DAB/Update from FM/ No Update
Set 12/24 hour 12/24
Set Date Format DD-MM-YYYY/MM-DD-YYYY
Sleep Menu
Sleep Off /10/20/30/60/70/80/90minutes
FM Menu
Scan Setting All station/Strong stations only
Audio Setting Stereo Allowed/Forced mono
System
17
PARTS
Front view Rear view
SWITCHING YOUR RADIO ON FOR THE FIRST TIME
AC Operation
1. Insert the DC power jack of AC/DC adaptor to the DC input socket located at the rear of the
radio.
2. Plug the AC/DC Adaptor to the AC mains outlet.
3. Press the STANDBY to turn the radio on.
Remarks: If the AC Adaptor voltage is over than 6V, it will possible make the line damage.
DC (battery) operation
1. Ensure the AC/DC adaptor is disconnected from the radio and AC mains.
2. Installed the batteries (4×1.5V UM3/AA battery) into the battery compartment.
3. Press the STANDBY to turn the radio on.
Remarks: To obtain the best performance in DC operation, the use of alkaline batteries is highly
recommended.
Menus:
The following controls are used to move about the menu tree to choose and select the required
settings:
Press and hold MENU/INFO button to enter into the “MENU”. Press the TUN/CH▲ or TUN/CH▼
button to navigate the desire option, then press SELECT button to confirm.
1. SPEAKER
2. STANDBY BUTTON
3. MODE BUTTON
4. LCD DISPLAY
5. TUN/CH▼ BUTTON
6. TUN/CH▲ BUTTON
7. ALARM/SNOOZE BUTTON
8. MENU/INFO BUTTON
9. VOLUME CONTROL
10. SELECT BUTTON
11. PRESET BUTTON
12. ROD ANTENNA
13. DC INPUT SOCKET
14. RATING LABEL
15. HEADPHONE JACK
16. BATTERY DOOR
17. AC/DC ADAPTOR
DENVER DAB-35 DENVER DAB-35
EN-3 EN-4
FM radio
1. To select FM, press the MODE button, the display will show FM and the frequency.
2. To activate auto search, press SELECT button or press and hold ▼/▲buttons until the radio
starts to scan the frequency band, the display will show ‘Scanning …‘(F6), and it will stop
automatically once a station has been found.
3. To search manually, press ▼/▲buttons in the desired direction to increment the frequency by
0.05MHz. If reception is still poor adjust the position of the antenna or try moving the radio to
another location.
Scan setting
In FM mode, press and hold MENU/INFO button and then press ▼/▲buttons to select
“Scan setting”. And press the SELECT button to confirm. Press ▼/▲buttons to select
“All stations/Strong stations only”, and then press the SELECT button to confirm the setting.
USING HEADPHONES (not included)
A stereo headphone jack has been provided so that the radio can be used without disturbing others.
Plug in the headphones at the point marked ‘ ’ and adjust the listening volume to your chosen
level. Excessive sound pressure from earphones and headphones can cause hearing loss. The
speakers will not operate when earphones are fitted.
TECHNICAL SPECIFICATION
Rated voltage (adaptor)
Adaptor output
Rated voltage (radio)
Power consumption
Audio output
Radio
Operating conditions Temperature:
Unit dimension :
Weight :
***SPECIFICATION SUBJECT TO CHANGE WITHOUT FURTHER NOTICE.***
RESET
1. If moving the radio to another location in the country the pre-tuned and stored DAB stations
may no longer be available and it will be necessary to reset the radio back to the factory settings.
2. With the unit switched on, press and hold the MENU/INFO button and press ▼/▲buttons until the
display shows ‘System’ and press the SELECT button and continue press ▼/▲buttons until
the display shows “Factory Reset <No> Yes’ and press ▼/▲buttons to “<Yes>” and press the
SELECT button. (F.15), (F.16)
3. The radio will display “Restarting….” and will then go into standby mode.
Note 1: All stored programmed stations will be lost during reset.
Note 2: Use the battery status without reset function.
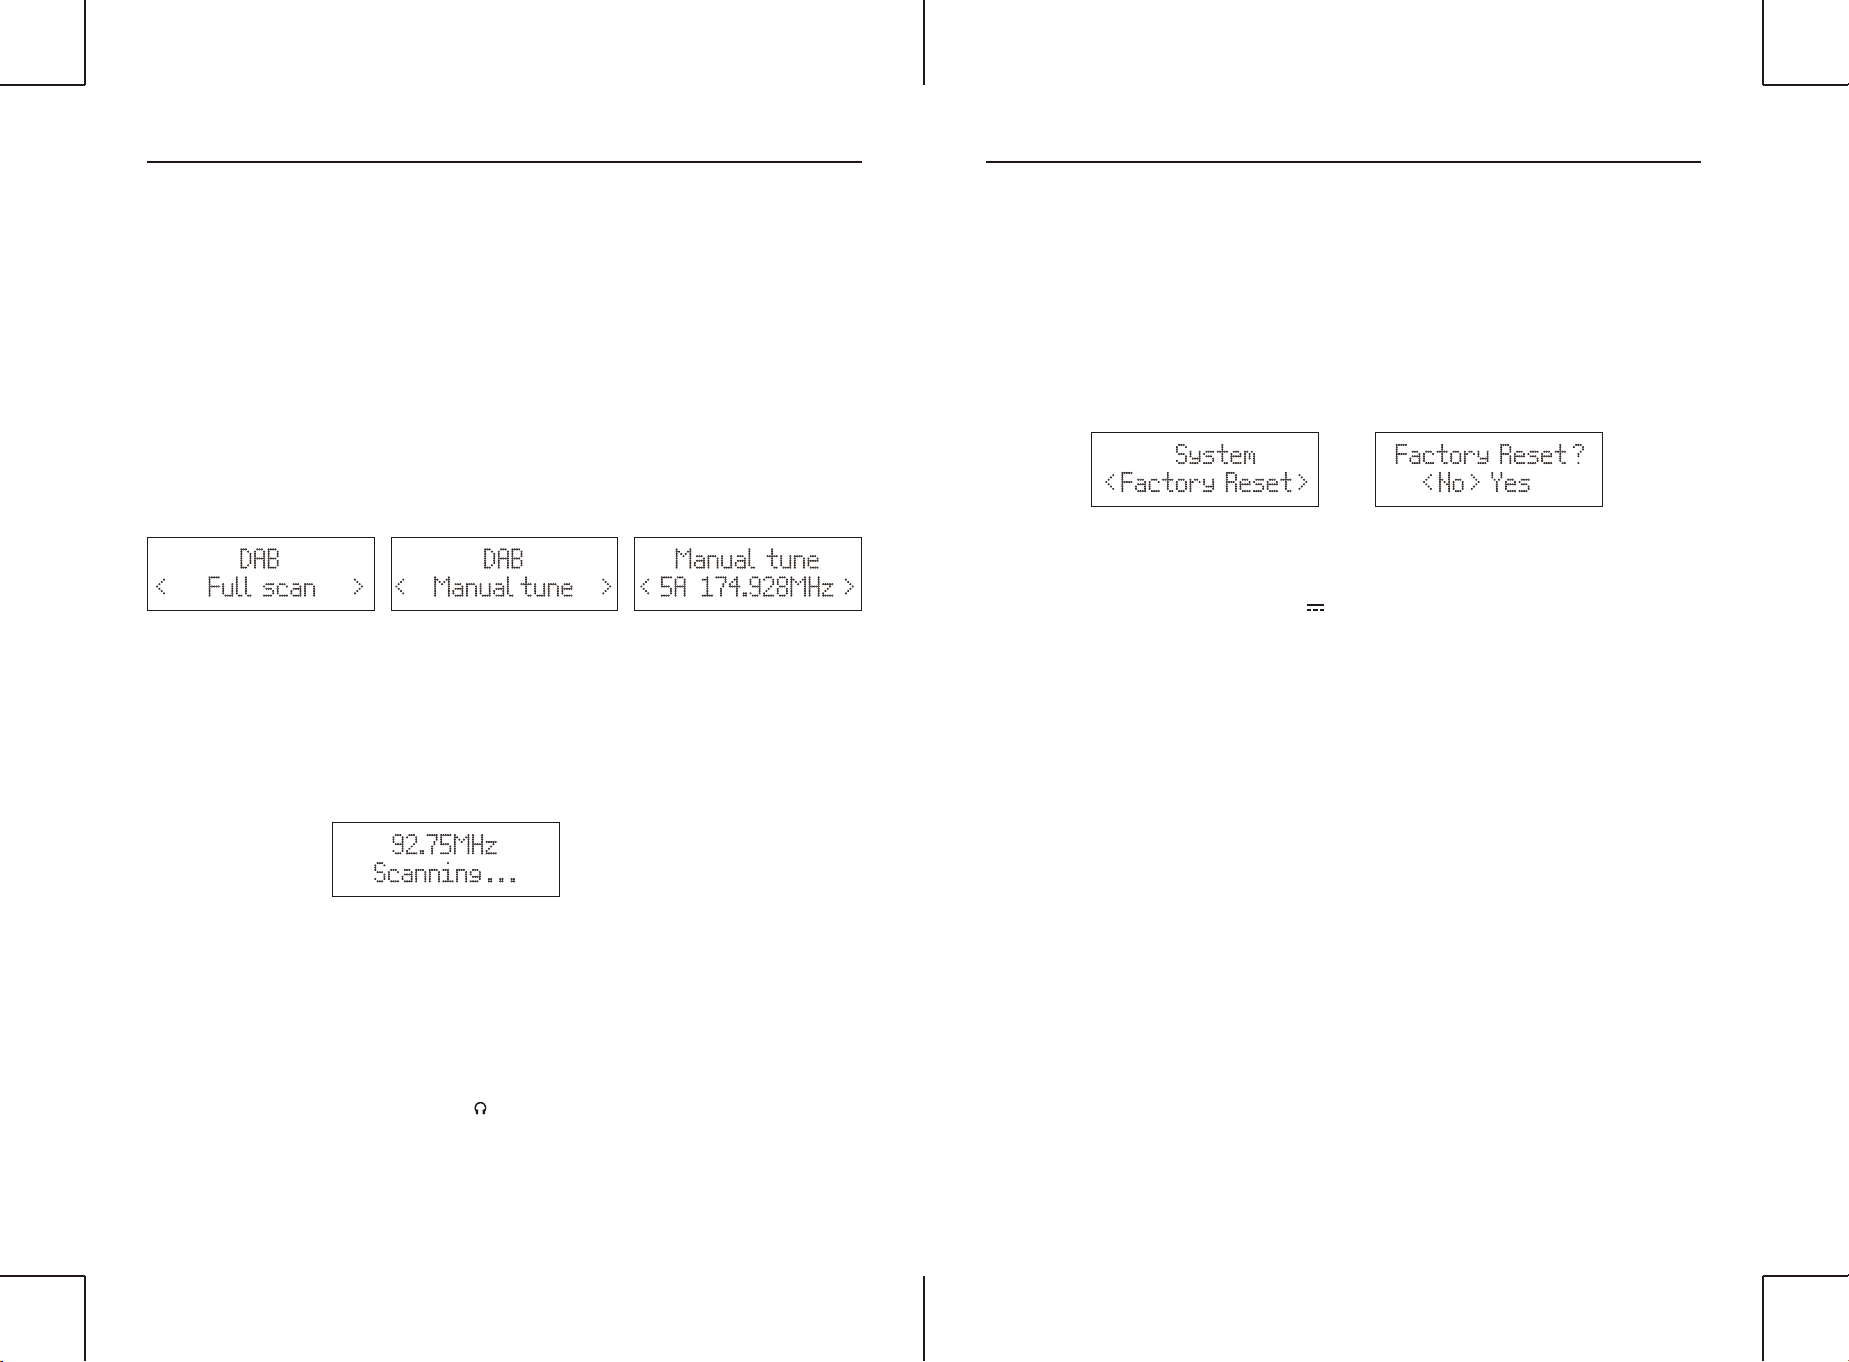
DAB Auto Scan
The auto scan will search for the entire DAB Band III channels, After the scan has finished, the first
alphanumerically found stations will be automatically selected.
1. To activate auto scan, press and hold MENU button, and press ▼/▲buttons to enter into the
Menu to select “Full scan”, finally press the SELECT button to confirm. The display will show
“Scanning…” and a pressing slide bar.(F.3)
2. All the stations that have been found will be stored automatically, press ▼/▲buttons to
explore the stations that have been found. When you find a station that you would like to listen,
press the SELECT button to confirm.
DAB Manual tune
1. To select manual tune, press and hold MENU/INFO button, and then press ▼/▲buttons to
select “Manual tune”(F.4). And press the SELECT button to confirm.
2. Press ▼/▲buttons to move through the DAB channels, the display will show “5A to 13F” and
their associated frequencies. (F.5)
3. When your desired frequency appears in the display, press the SELECT button to listen, the
name of the station group (ensemble/multiplex) will be displayed.
Manual tune
< 5A 174.928MHz >
F.5
DAB
< Manual tune >
F.4
DAB
< Full scan >
F.3
92.75MHz
Scanning . . .
F.6
System
< Factory Reset >
Factory Reset ?
< No > Yes
F.15
F.16
AC 100 – 240V~ 50/60Hz, 0.3A
DC 6V 1A
DC 6V (1.5V x 4 AA)
6 W
RMS
DAB 174-240MHz
FM 87.5-108MHz
5°C to 35°C
Humidity 5% to 90%
190 (L) × 110(W) × 115 (H) mm
0.8kg
DENVER DAB-35 DENVER DAB-35
EN-5
DENVER DAB-35
ALL RIGHTS RESERVED, COPYRIGHT DENVER ELECTRONICS A/S
www.denver-electronics.com
Electric and electronic equipment contains materials, components and
substances that can be hazardous to your health and the environment,
if the waste material (discarded electric and electronic equipment) is not
handled correctly.
Electric and electronic equipment is marked with the crossed out trash
can symbol, seen below. This symbol signifies that electric and electronic
equipment should not be disposed of with other household waste, but
should be disposed of separately.
All cities have established collection points, where electric and electronic
equipment can either be submitted free of charge at recycling stations and
other collection sites, or be collected from the households. Additional
information is available at the technical department of your city.
Imported by:
DENVER ELECTRONICS A/S
Stavneagervej 22
DK-8250 Egaa
Denmark
www.facebook.com/denverelectronics

Other manuals for DAB-35

2

Other Denver Radio manuals

Denver DAB-23 User manual

Denver

Denver DAB-23 User manual

Denver DAB-35 User manual

Denver

Denver DAB-35 User manual

Denver DAB-33 User manual

Denver

Denver DAB-33 User manual

Denver DAB-24 User manual

Denver

Denver DAB-24 User manual

Denver WRB-50 User manual

Denver

Denver WRB-50 User manual

Denver DAB-23 User manual

Denver

Denver DAB-23 User manual

Denver DAB-60LW User manual

Denver

Denver DAB-60LW User manual

Denver TR-54 User manual

Denver

Denver TR-54 User manual

Denver DAH-126 User manual

Denver

Denver DAH-126 User manual

Denver TR-54 BLACK MK2 User manual

Denver

Denver TR-54 BLACK MK2 User manual

Denver DAB-24 User manual

Denver

Denver DAB-24 User manual

Denver WRD-50 User manual

Denver

Denver WRD-50 User manual

Denver TWR-818 User manual

Denver

Denver TWR-818 User manual

Denver CRD-506 User manual

Denver

Denver CRD-506 User manual

Denver MIR-270 User manual

Denver

Denver MIR-270 User manual

Denver DAB-35 User manual

Denver

Denver DAB-35 User manual

Denver IR-110 User manual

Denver

Denver IR-110 User manual

Denver IR-100 User manual

Denver

Denver IR-100 User manual

Denver DAB-38 User manual

Denver

Denver DAB-38 User manual

Denver CAD-438BT User manual

Denver

Denver CAD-438BT User manual

Denver MIR-260 User manual

Denver

Denver MIR-260 User manual

Denver CRL-330 User manual

Denver

Denver CRL-330 User manual

Denver SCR-2000 User manual

Denver

Denver SCR-2000 User manual

Denver MIR-260 User manual

Denver

Denver MIR-260 User manual

Popular Radio manuals by other brands

Hama 62760 Operating	 instruction

Hama

Hama 62760 Operating instruction

Myria MY9301 user manual

Myria

Myria MY9301 user manual

Kogan KGNDRVDA user manual

Kogan

Kogan KGNDRVDA user manual

Magnum MD 606T instruction manual

Magnum

Magnum MD 606T instruction manual

Sailor 6210 VHF installation guide

Sailor

Sailor 6210 VHF installation guide

Hytera MD78X manual

Hytera

Hytera MD78X manual

Porter-Cable PC18JR instruction manual

Porter-Cable

Porter-Cable PC18JR instruction manual

Makita MR005G instruction manual

Makita

Makita MR005G instruction manual

Vertex Standard VX-2100 Series operating manual

Vertex Standard

Vertex Standard VX-2100 Series operating manual

Motorola Astro XTL 5000 Detailed service manual

Motorola

Motorola Astro XTL 5000 Detailed service manual

Hytera MD615B owner's manual

Hytera

Hytera MD615B owner's manual

Bosch GML SoundBox Professional Original instructions

Bosch

Bosch GML SoundBox Professional Original instructions

Xact ReGo XTR-5 owner's manual

Xact

Xact ReGo XTR-5 owner's manual

Kenwood CR-M30DAB-R operating manual

Kenwood

Kenwood CR-M30DAB-R operating manual

Midland 220 manual

Midland

Midland 220 manual

Beper EL.202 use instructions

Beper

Beper EL.202 use instructions

Kogan KADA BXXPIXA user manual

Kogan

Kogan KADA BXXPIXA user manual

Tait TM9100 installation guide

Tait

Tait TM9100 installation guide

manuals.online logo
manuals.online logoBrands
  • About & Mission
  • Contact us
  • Privacy Policy
  • Terms and Conditions

Copyright 2025 Manuals.Online. All Rights Reserved.