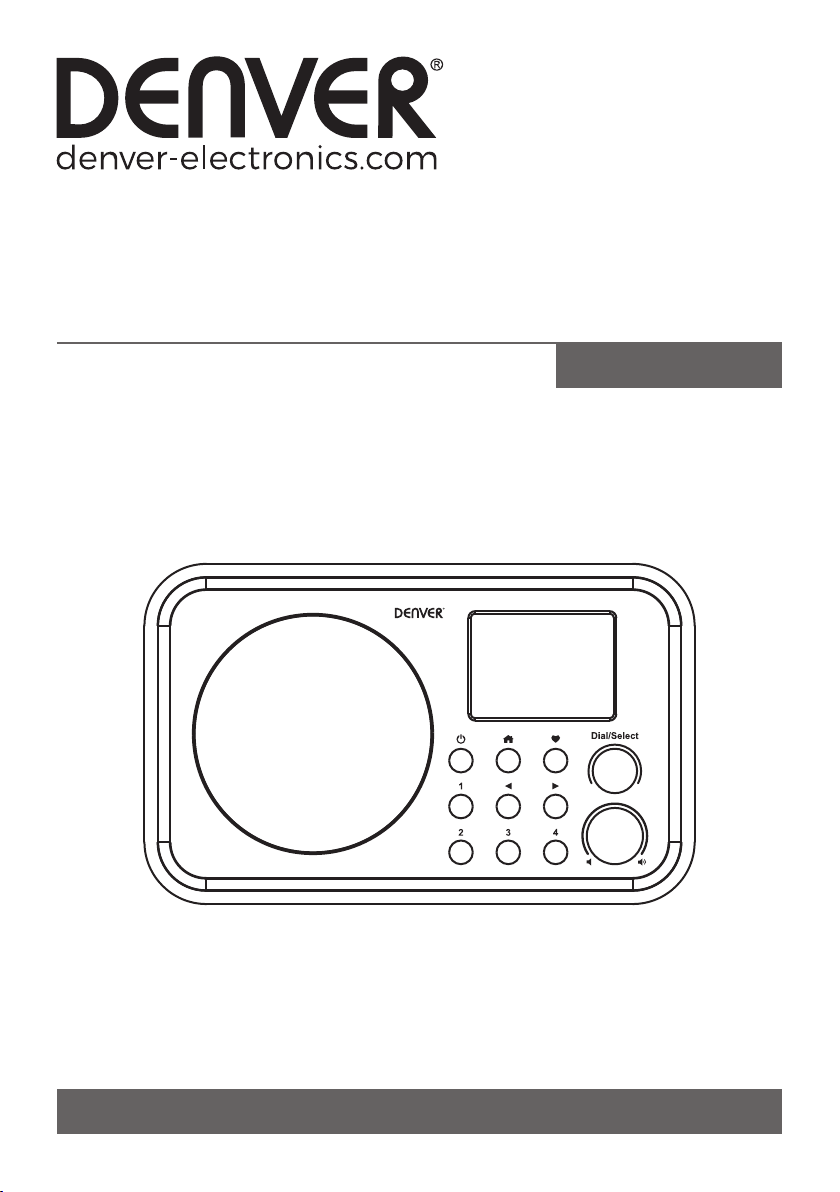
Denver IR-140 User manual

IR-140
Internet Radio
User Manual
Please read this user manual carefully before using the radio.
Warning: Lithium battery inside

1.
Press and hold this to turn on/off the radio.
Press this button shortly to activate the radio / turn it to standby. (Standby is
only enabled when the radio is connected to the mains. This option will be
disabled when the internal battery is used.)
2.
Press this button to enter the main menu / return to the main screen.
3.
Press and hold this button to preset a particular station.
Press this button to recall the favorite list.
4. ►
Right cursor/enter the edit menu under the Favorite list / view the big clock,
radio and info under the main screen.
5. ◄
Back to previous menu/left cursor
6-9. Preset button 1-4
For presetting the top four favorite stations
Press and hold to preset the station
Press this button briefly to recall the station
10. Speaker
11. TFT color screen 2.4"
12. Dial / Select knob
Rotate this knob to scroll up/down in the menu. Push this knob to confirm/select
menu options. Push this knob to pause/resume playback of the radio channel.
13. /
Rotate this knob to adjust the volume level.
14. LED indicator for battery charging status
15. DC IN Jack
16. Line output jack 3.5 mm
17. Earphone jack 3.5 mm
14
7 2 5 8 3
6910
11
12
13
15 16 17
Location of the controls
14
ENG-1

Use the [Dial/Select] knob to scroll through the characters, highlight it and press
the [ ► ] button to confirm and enter the next character. When the last character of
the password is reached, press the [Dial/Select] knob to confirm and complete the
entry.
Note: The password is case sensitive.
How to input password for
your wireless network
ENG-2

The radio is powered by the built-in lithium battery. A USB cable and power adapter
are supplied in the product package.
Press and hold the [ ] button to turn on the radio.
Press and hold the same button to turn off the radio.
The standby mode is enabled only when the mains is connected. So, to be able to
make use of the alarm clock function, the mains should be connected.
Connect the mains to the radio, and press and hold the [ ] button to turn it on.
Pressing the [ ] button again will put the radio into standby.
Getting started
ENG-3

In the main menu, select Internet Radio; the following options will be displayed:
Skytune
Select Skytune to start enjoying thousands of radio stations all over the world. You
can filter your search by region, music genre and talks.
You can use Local Radio for quick access to the stations that are available in your
local area through your internet connection.
Internet Radio
Local Radio
Globe All
Globe By Genre
Globe By Region
Skytune
Search
History
ENG-4

Music streaming
● You can start streaming music, once the UPnP/DLNA compatible server is
configured to share media files with your radio.
● In the main menu, select Media Centre, and select UPnP.
● It may take a few seconds for the radio to complete the scan for available UPnP
servers. If no UPnP servers are found, the screen will display Empty List.
● After completing a successful scan, select your UPnP server.
● The screen will display the media categories available from the UPnP server, e.g.
“Music”, “Playlists” etc.
● Select the media files that you wish to play.
You can set the mode of playback under Configuration > Playback setup.
ENG-5

● Push the Menu button to display the selection menu for the different operating
modes.
● Use the up/down button to select the operating mode Bluetooth and push the
Dial/Select knob.
● Switch on the Bluetooth device to which you want to connect the radio, and
activate the pairing mode on that device. The device scans for Bluetooth devices
in the reception range.
● When the radio is found, the name IR-140-XXXX is displayed on your Bluetooth
device (XXXX is the identification code of your radio).
● Select the radio on your Bluetooth device.
● Start playback on your Bluetooth device.
● Playback now takes place through the radio.
Bluetooth playback
ENG-6

Setting the alarm
Important!
In order to use the alarm clock function, the radio should be connected to the
mains, in order to have the standby mode enabled. When the radio is turned
on, press the [ ] button to put the radio into standby. Standby is disabled
when the radio is using the internal battery.
● Select Alarm from the main menu.
● Select either Alarm 1 or Alarm 2, select Turn on to activate the alarm.
● Follow the instructions of the alarm wizard to set the alarm.
● The wizard will guide you through the following settings:
Time - Set the time for the alarm
Sound - You can select Wake to Tone, My Favoriteas the alarm source.
Repeat - You can schedule the alarm as desired -Every day, Once or multiple
days.
Alarm Volume - Adjust the volume of the alarm as desired by rotating the
[Dial/Select] knob.
Alarm duration - Set the duration of the alarm from the preset options ranging
from 30 to 180 minutes. The radio will be turned to standby when the selected
duration has elapsed.
● After the above settings are completed, press the button [ ◄ ] to exit the menu and
to ensure that the alarm is turned on. When the alarm is active, the alarm icon
appears on the display.
Stopping the alarm / activating the snooze function
When the alarm sounds, press the [ ] button to stop the alarm or press the
[Dial/Select] knob to activate the snooze function.
When the Snooze function is activated, the alarm is muted, and sounds again after
9 minutes. You can repeat the process multiple times.
To stop the snooze function, press the [ ] button.
Snooze
9:00
am
Press POWER to stop
ENG-7

Technical Specification
Model IR-140
Power input 5V 1A
Power voltage 100-240V~50/60Hz
Wireless Network IEEE802.11b/g/n
Wireless network frequency 2.412 - 2.484 GHZ
Security Protocol WEP/WPA/WPA2
Wireless transmission power Rated transmission power 14 dBm (72.2 Mbps);
20 dBm (11b mode)
Bluetooth version V4.2 BR/EDR compliant
Bluetooth frequency 2.400-2.485 GHz
Bluetooth range 10 meters (line of sight)
Audio output Stereo earphone jack 3.5 mm
Stereo audio out
Dimensions of the unit 185 x 100 x 114 mm (L x D x H)
Remark: Specification may vary without notice
Built-in Lithium-ion battery 3.7V 2000 mAh
ENG-8

* Internet radio
* USB cable with power adapter
* User manual
WEEE and recycling
European legislation does not allow the disposal of old or defective electric or
electronic devices with household waste. Dispose of your product by returning
it to a municipal collection point for recycling. This system is financed by the
industry and ensures environmentally responsible disposal and the recycling of
valuable raw materials.
In the box
Manufacturer’s name or trade mark,
commercial registration number
and address
Shenzhen Fushigang Technology Co., Ltd
Southeast 9/F, Southeast 7/F, Building 1
Baotang High-tech Park, Tangwei
Community, Fenghuang Street Guangming
District 518106 Shenzhen,Guangdong
Province PEOPLE’S REPUBLIC OF CHINA
Model identifier
Input voltage
AS0601A-0501000EUU
Input AC frequency
Output voltage
Output current
Output power
Average active efficiency
Efficiency at low load (10%)
No-load power consumption
100-240V
50/60Hz
5V
1A
5W
≥ 73.62%
NA
≤ 0.1W
ENG-9

Please notice - All products are subject to change without any notice. We take
reservations for errors and omissions in the manual.
ALL RIGHTS RESERVED, COPYRIGHT DENVER ELECTRONICS A/S
Electric and electronic equipment contains materials, components and substances
that can be hazardous to your health and the environment, if the waste material
(discarded electric and electronic equipment) is not handled correctly.
Electric and electronic equipment is marked with the crossed out trash can symbol,
seen above. This symbol signifies that electric and electronic equipment should not
be disposed of with other household waste, but should be disposed of separately.
All cities have established collection points, where electric and electronic
equipment can either be submitted free of charge at recycling stations and other
collection sites, or be collected from the households. Additional information is
available at the technical department of your city.
Hereby, Inter Sales A/S declares that the radio equipment type IR-140 is in
compliance with Directive 2014/53/EU. The full text of the EU declaration of
conformity is available at the following internet address: www.denver-
electronics.com and then click the search ICON on topline of website. Write model
number: IR-140. Now enter product page, and RED directive is found under
downloads/other downloads.
Operating Frequency Range: 2.412-2.484 GHz
Max Output Power: 3W
DENVER ELECTRONICS A/S
Omega 5A, Soeften
DK-8382 Hinnerup
Denmark
www.facebook.com/denverelectronics
www.denver-electronics.com
ENG-10

IR-140
Internetradio
Bedienungsanleitung
Bitte lesen Sie diese Bedienungsanleitung gründlich durch,
bevor Sie das Internetradio benutzen
Warnung: Lithiumbatterie innen

14
7 2 5 8 3
6910
11
12
13
15 16 17
Location of the controls
14
1.
Diese Taste für das Ein-/Ausschalten des Internetradios gedrückt halten
Diese Taste für den Wechsel in den Standby-Modus oder das
Wiedereinschalten im Standby-Modus kurz drücken (der Standby-Modus wird
nur aktiviert, wenn das Internetradio am Stromnetz angeschlossen ist; bei
Betrieb über die interne Batterie ist der Standby-Modus deaktiviert)
2.
Diese Taste für den Zugriff auf das Hauptmenü/die Rückkehr zum
Wiedergabebildschirm drücken
3.
Diese Taste für das Speichern eines bestimmten Radiosenders gedrückt halten
Diese Taste für das Abrufen der Favoritenliste drücken
4. ►
Diese Taste für die Navigation nach rechts, den Wechsel zum
Bearbeitungsmenü unter der Favoritenliste oder die Anzeige der großen Uhr,
des Radios und der Informationen unter dem Wiedergabebildschirm drücken
5. ◄
Diese Taste für die Navigation nach links oder die Rückkehr zum vorherigen
Menü drücken
6-9. Preset button 1-4
Diese Tasten für die Schnellauswahl der ersten vier Radiosender in der
Favoritenliste drücken
Eine dieser Tasten für das Speichern eines Radiosenders auf diesem
Speicherplatz drücken
Eine dieser Tasten für das Abrufen des auf diesem Speicherplatz
gespeicherten Radiosenders drücken
10. Lautsprecher
11. 2,4"-TFT-Farbdisplay
12. Auswahldrehknopf
Diesen Drehknopf für die Auf-/Abwärtsnavigation in Menüs drehen und zur
Bestätigung der Auswahl/Einstellung, für die Auswahl von Menüoptionen oder
zum Beenden/Fortsetzen der Wiedergabe eines Radiosenders drücken
13. /
Diesen Regler zum Einstellen der Lautstärke drehen
14. LED-Anzeige für die Batterierestladung
15. DC-Eingangsbuchse
16. 3,5-mm-LINE-Ausgangsbuchse
17. 3,5-mm-Ohrhörerbuchse
GER-1

Wie Sie das Passwort für
Ihr WLAN eingeben
Scrollen Sie mit Hilfe des Auswahldrehknopfes [Dial/Select] durch die Zeichen,
wählen Sie das benötigte Zeichen aus und drücken Sie anschließend die Taste [►],
um Ihre Eingabe zu bestätigen und mit dem nächsten Zeichen fortzusetzen. Wenn
Sie das letzte Zeichen des Passworts eingegeben haben, dann drücken Sie den
Auswahldrehknopf [Dial/Select], um das Passwort zu bestätigen und die Eingabe
abzuschließen.
Hinweis: Beachten Sie bei der Passworteingabe die Groß-/Kleinschreibung.
GER-2

Ihr Internetradio wird über eine eingebaute Lithium-Batterie mit Strom versorgt. Mit
dem Internetradio werden sowohl ein USB-Kabel als auch ein Netzadapter
mitgeliefert.
Halten Sie die Taste [ ] gedrückt, um das Internetradio einzuschalten.
Drücken Sie diese Taste zum Ausschalten des Internetradios erneut.
Das Internetradio wechselt nur in den Standby-Modus, wenn es am Stromnetz
angeschlossen ist. In diesem Fall steht Ihnen auch die Weckruffunktion zur
Verfügung.
Schließen Sie hierfür den Netzadapter am Internetradio an und halten Sie
anschließend die Taste [ ] gedrückt, um das Internetradio einzuschalten.
Wenn Sie die Taste [ ] erneut drücken, dann wechselt das Internetradio in den
Standby-Modus.
Erste Schritte
GER-3

Lokalradio
Global alle
Global nach Genre
Global nach Region
Internetradio
Wenn Sie im Hauptmenü Internetradio auswählen, dann stehen Ihnen folgende
Optionen zur Verfügung:
Skytune
Wählen Sie Skytune aus, um mit dem Genuss tausender Radiosender aus der
ganzen Welt zu beginnen. Sie können Ihre Suche nach Gebiet, Musikgenre und
Gesprächsthemen filtern.
Die Menüoption Lokalradio ermöglicht Ihnen den schnellen Zugriff auf die in Ihrer
Region verfügbaren Radiosender über die Internetverbindung.
Skytune
Suche
Verlauf
GER-4

Musikstreaming
● Sobald Sie einen UPnP/DLNA-kompatiblen Server konfiguriert haben und Sie
dadurch Mediendateien freigeben können, können Sie mit dem Musikstreamen
beginnen.
● Wählen Sie im Hauptmenü Mediencenter und anschließend UPnP aus.
● Es kann einige Sekunden dauern, bis das Radio die Suche nach verfügbaren
UPnP-Servern abgeschlossen hat. Wenn kein UPnP-Server gefunden werden
konnte, dann wird Liste leer angezeigt.
● Wenn der Scan erfolgreich war, dann wählen Sie Ihren UPnP-Server aus.
● Das Radio zeigt daraufhin die auf dem UPnP-Server verfügbaren
Medienkategorien wie beispielsweise „Musik“, „Wiedergabelisten“ usw. an.
● Wählen Sie die Mediendateien aus, die Sie wiedergeben lassen möchten.
Den Wiedergabemodus können Sie unter Konfiguration >
Wiedergabeeinstellung einstellen.
GER-5

Bluetooth-Wiedergabe
● Drücken Sie die Menütaste, um das Auswahlmenü für die verschiedenen
Betriebsmodi anzeigen zu lassen.
● Wählen Sie mit Hilfe der Tasten für die Auf-/Abwärtsnavigation den
Betriebsmodus Bluetooth aus und drücken Sie anschließend den
Auswahldrehknopf Dial/Select.
● Aktivieren Sie die Bluetooth-Funktion des mit dem Internetradio zu verbindenden
Bluetooth-Geräts. Aktivieren Sie anschließend dessen Kopplungsmodus. Ihr
Bluetooth-Gerät scannt daraufhin nach in der Umgebung befindlichen Bluetooth-
Geräten.
● Wenn das Radio gefunden wurde, dann zeigt Ihr Bluetooth-Gerät den Bluetooth-
Name IR-140-XXXX (XXXX steht für den ID-Code Ihres Radios) an.
● Wählen Sie auf Ihrem Bluetooth-Gerät dieses Radio aus.
● Starten Sie jetzt die Wiedergabe auf Ihrem Bluetooth-Gerät.
● Die Wiedergabe erfolgt nun über Ihr Internetradio.
GER-6

Weckrufeinstellung
Wichtig!
Schließen Sie bitte den Netzadapter am Internetradio an und wechseln Sie
dann in den Standby-Modus, wenn Sie die Weckruffunktion benutzen
möchten. Drücken Sie bei eingeschaltetem Internetradio die Taste [ ], um in
den Standby-Modus zu wechseln. Wenn das Internetradio über die interne
Batterie betrieben wird, dann steht Ihnen die Weckruffunktion nicht zur
Verfügung.
● Wählen Sie im Hauptmenü Weckruf aus.
● Wählen Sie jetzt entweder Weckruf 1 oder Weckruf 2 und anschließend
Aktivieren aus, um den ausgewählten Weckruf zu aktivieren.
● Folgen Sie den Anweisungen des Weckrufassistenten, um den Weckruf
einzustellen.
● Der Assistent führt Sie durch die nachstehenden Einstellungen:
Weckzeit – Einstellung der Zeit für den Weckruf
Weckklang – Sie können als Weckklangquelle Weckmelodie oder
bevorzugten Radiosender auswählen.
Weckhäufigkeit – Sie können den Weckruf planen: Einmalig, täglich oder an
mehreren Tagen.
Wecklautstärke – Einstellung der gewünschten Lautstärke des Weckrufs durch
Drehen des Auswahldrehknopfes [Dial/Select].
Weckdauer – Einstellung der Dauer des Weckrufs in voreingestellten Schritten
im Bereich von 30 bis 180 Minuten. Nach Ablauf der eingestellten Weckdauer
wechselt das Internetradio in den Standby-Modus.
● Wenn Sie die vorstehenden Einstellungen vorgenommen haben, dann drücken
Sie die Taste [ ◄ ], um das Menü zu verlassen. Überprüfen Sie anschließend, ob
der Weckruf aktiviert ist. Wenn der Weckruf aktiviert ist, dann wird auf dem
Display das entsprechende Weckersymbol angezeigt.
Beenden des Weckrufs/aktivieren der Schlummerfunktion
Wenn der Weckruf ertönt, dann drücken Sie die Taste [ ], um den Weckruf zu
beenden oder den Auswahldrehknopf [Dial/Select], um die Schlummerfunktion zu
aktivieren.
Wenn die Schlummerfunktion aktiviert ist, dann wird der Weckruf für 9 Minuten
stummgeschaltet und ertönt danach erneut. Die Schlummerfunktion können Sie
mehrmals aktivieren.
Drücken Sie die Taste [ ], um die Schlummerfunktion zu beenden.
Snooze
9:00
am
Press POWER to stop
GER-7

Technische Daten
Modell IR-140
Stromversorgungseingang 5V 1A
Stromversorgungsspannung 100-240V~50/60Hz
Funknetzwerk IEEE802.11b/g/n
Funknetzwerkfrequenz 2.412 - 2.484 GHZ
Netzwerkverschlüsselung WEP/WPA/WPA2
Sendeleistung des
Funknetzwerks
Typische Sendeleistung: 14 dBm (72,2 Mbps);
20 dBm (11b-Modus)
Bluetooth-Version V4.2 BR/EDR-konform
Bluetooth-Frequenz 2.400-2.485 GHz
Bluetooth-Reichweite 10 Meter (ohne Hindernisse)
Audioausgang 3,5-mm-Stereo-Ohrhörerbuchse
Stereo-Audioausgang
Geräteabmessung 185 x 100 x 114 mm (L x T x H)
Hinweis: Die technischen Daten können ohne Vorankündigung geändert werden
Eingebaute Lithium-Ionen-Batterie 3,7 V/2000 mAh
GER-8
Table of contents
Languages:
Other Denver Radio manuals

Denver
Denver IR-135B User manual

Denver
Denver SCR-2010 User manual

Denver
Denver TR-54 User manual

Denver
Denver MCR-50 User manual

Denver
Denver MIR-260 User manual

Denver
Denver CR-212 User manual

Denver
Denver DAB-30 User manual

Denver
Denver DAB-34 User manual

Denver
Denver DAB-60 User manual

Denver
Denver DAB-28 User manual

Denver
Denver DAB-43 PLUS User manual

Denver
Denver DAB-36 User manual

Denver
Denver WRB-50 User manual

Denver
Denver DAB-25 PLUS User manual

Denver
Denver DAB-23 User manual

Denver
Denver DAB-42 User manual

Denver
Denver MCR-50MK2 User manual

Denver
Denver DAH-126 User manual

Denver
Denver TR-56C User manual

Denver
Denver DAB-33 User manual