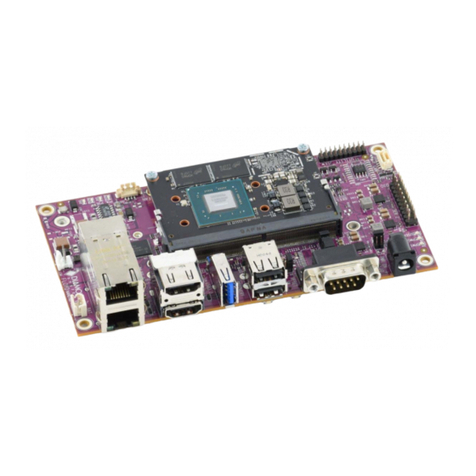
Diamond Systems Ziggy User manual

Ziggy User Manual Rev 1.0 www.diamondsystems.com Page 1
Ziggy Baseboard
NVIDIA Jetson TX2 Base Board
Copyright 2019
FOR TECHNICAL SUPPORT Diamond Systems Corporation
PLEASE CONTACT: 555 Ellis Street
Mountain View, CA 94043 USA
support@diamondsystems.com Tel 1-650-810-2500
Fax 1-650-810-2525
www.diamondsystems.com
Revision
Date
Comment
1.00
07/16/2019
Initial Release

Ziggy User Manual Rev 1.0 www.diamondsystems.com Page 2
CONTENTS
1. Important Safe Handling Information .............................................................................................................3
2. Introduction.......................................................................................................................................................5
2.1 Features................................................................................................................................................5
2.2 Operating System Support....................................................................................................................5
2.3 Mechanical, Electrical, Environmental..................................................................................................6
3. Functional Block Diagram ...............................................................................................................................7
3.1 Feature Descriptions.............................................................................................................................8
3.1.1 Processor Module.............................................................................................................................8
3.1.2 Backup Battery .................................................................................................................................8
3.1.3 Ethernet............................................................................................................................................8
3.1.4 Display..............................................................................................................................................8
3.1.5 Camera.............................................................................................................................................8
3.1.6 USB ..................................................................................................................................................8
3.1.7 Audio.................................................................................................................................................8
3.1.8 Micro SD...........................................................................................................................................8
3.1.9 Serial Ports.......................................................................................................................................8
3.1.10 DAQ..............................................................................................................................................8
3.1.11 Connectivity..................................................................................................................................9
3.1.12 LED Indicators..............................................................................................................................9
3.1.13 Power Supply............................................................................................................................ 10
4. Mechanical Board Drawing........................................................................................................................... 10
5. Board Layout (Connector and Jumper Locations)..................................................................................... 11
6. I/O Connectors ............................................................................................................................................... 13
6.1 Connector Pin-out and Signal Description......................................................................................... 13
6.1.1 Utility (J1)....................................................................................................................................... 13
6.1.2 External Battery (J2)...................................................................................................................... 13
6.1.3 Camera (J3)................................................................................................................................... 14
6.1.4 DAQ I/O (J4).................................................................................................................................. 15
6.1.5 SAM Programming Header (J5).................................................................................................... 15
6.1.6 Fan Connector (J6)........................................................................................................................ 15
6.1.7 HDMI (J7) ...................................................................................................................................... 16
6.1.8 Ethernet (J8).................................................................................................................................. 16
6.1.9 USB 3.0 Ports (J9)......................................................................................................................... 16
6.1.10 Power In (J10)........................................................................................................................... 16
6.1.11 Serial Ports (J11)....................................................................................................................... 17
6.1.12 Micro SD (J13) .......................................................................................................................... 17
6.1.13 USB 2.0 OTG (J14)................................................................................................................... 17
6.2 List of Connectors.............................................................................................................................. 18
7. I/O Cables ....................................................................................................................................................... 19
8. Getting Started............................................................................................................................................... 20
8.1 Development Kit................................................................................................................................. 20
8.2 Quick Setup ....................................................................................................................................... 20
9. INSTALLING DSC IMAGE in module............................................................................................................ 21
10. DAQ................................................................................................................................................................. 23
11. Thermal Solutions.......................................................................................................................................... 24
12. Specifications................................................................................................................................................. 25
Ziggy User Manual Rev 1.0 www.diamondsystems.com Page 3
1. IMPORTANT SAFE HANDLING INFORMATION
WARNING!
ESD-Sensitive Electronic Equipment
Observe ESD-safe handling procedures when working with this product.
Always use this product in a properly grounded work area and wear appropriate
ESD-preventive clothing and/or accessories.
Always store this product in ESD-protective packaging when not in use.
Safe Handling Precautions
The Venus SBC contains a high number of I/O connectors with connection to sensitive electronic
components. This creates many opportunities for accidental damage during handling, installation and
connection to other equipment. The list here describes common causes of failure found on boards returned to
Diamond Systems for repair. This information is provided as a source of advice to help you prevent damaging
your Diamond (or any vendor’s) embedded computer boards.
ESD damage –This type of damage is usually almost impossible to detect, because there is no visual sign of
failure or damage. The symptom is that the board eventually simply stops working, because some component
becomes defective. Usually the failure can be identified and the chip can be replaced.
To prevent ESD damage, always follow proper ESD-prevention practices when handling computer boards.
Damage during handling or storage –On some boards we have noticed physical damage from
mishandling. A common observation is that a screwdriver slipped while installing the board, causing a gouge
in the PCB surface and cutting signal traces or damaging components.
Another common observation is damaged board corners, indicating the board was dropped. This may or may
not cause damage to the circuitry, depending on what is near the corner. Most of our boards are designed
with at least 25 mils clearance between the board edge and any component pad, and ground / power planes
are at least 20 mils from the edge to avoid possible shorting from this type of damage. However these design
rules are not sufficient to prevent damage in all situations.
A third cause of failure is when a metal screwdriver tip slips, or a screw drops onto the board while it is
powered on, causing a short between a power pin and a signal pin on a component. This can cause
overvoltage / power supply problems described below. To avoid this type of failure, only perform assembly
operations when the system is powered off.
Sometimes boards are stored in racks with slots that grip the edge of the board. This is a common practice for
board manufacturers. However our boards are generally very dense, and if the board has components very
close to the board edge, they can be damaged or even knocked off the board when the board tilts back in the
rack. Diamond recommends that all our boards be stored only in individual ESD-safe packaging. If multiple
boards are stored together, they should be contained in bins with dividers between boards. Do not pile boards
on top of each other or cram too many boards into a small location. This can cause damage to connector pins
or fragile components.
Power supply wired backwards –Our power supplies and boards are not designed to withstand a reverse
power supply connection. This will destroy each IC that is connected to the power supply (i.e. almost all ICs).
In this case the board will most likely will be unrepairable and must be replaced. A chip destroyed by reverse
power or by excessive power will often have a visible hole on the top or show some deformation on the top
surface due to vaporization inside the package. Check twice before applying power!
Board not installed properly in PC/104 stack –A common error is to install a PC/104 board accidentally
shifted by 1 row or 1 column. If the board is installed incorrectly, it is possible for power and ground signals on
the bus to make contact with the wrong pins on the board, which can damage the board. For example, this
can damage components attached to the data bus, because it puts the 12V power supply lines directly on
data bus lines.

Ziggy User Manual Rev 1.0 www.diamondsystems.com Page 4
Overvoltage on analog input –If a voltage applied to an analog input exceeds the design specification of
the board, the input multiplexor and/or parts behind it can be damaged. Most of our boards will withstand an
erroneous connection of up to 35V on the analog inputs, even when the board is powered off, but not all
boards, and not in all conditions.
Overvoltage on analog output –If an analog output is accidentally connected to another output signal or a
power supply voltage, the output can be damaged. On most of our boards, a short circuit to ground on an
analog output will not cause trouble.
Overvoltage on digital I/O line –If a digital I/O signal is connected to a voltage above the maximum
specified voltage, the digital circuitry can be damaged. On most of our boards the acceptable range of
voltages connected to digital I/O signals is 0-5V, and they can withstand about 0.5V beyond that (-0.5 to 5.5V)
before being damaged. However logic signals at 12V and even 24V are common, and if one of these is
connected to a 5V logic chip, the chip will be damaged, and the damage could even extend past that chip to
others in the circuit.
Bent connector pins –This type of problem is often only a cosmetic issue and is easily fixed by bending the
pins back to their proper shape one at a time with needle-nose pliers. The most common cause of bent
connector pins is when a PC/104 board is pulled off the stack by rocking it back and forth left to right, from
one end of the connector to the other. As the board is rocked back and forth it pulls out suddenly, and the pins
at the end get bent significantly. The same situation can occur when pulling a ribbon cable off of a pin header.
If the pins are bent too severely, bending them back can cause them to weaken unacceptably or even break,
and the connector must be replaced.

Ziggy User Manual Rev 1.0 www.diamondsystems.com Page 5
2. INTRODUCTION
This product is a Jetson TX2 module-based board with rich graphics and camera input capability. This base board
converts Jetson TX2 module into a complete embedded system by providing interface circuitry, I/O connectors for
all the major features of the module, camera interface, power supply and additional I/O capability.
Ziggy TX2 Base Board redefines possibility; a combination of performance, power efficiency, integrated deep
learning capabilities and rich I/O remove the barriers to a new generation of products
The base board also contains a Micro SD card for storage option with all key I/O connectors placed along one
edge for cable-free installation.
2.1 Features
Module NVIDIA Jetson TX2
SoC Parker Series SoC
GPU NVIDIA Pascal™, 256 CUDA cores
CPU HMP Dual Denver 2/2MB L2 + Quad ARM A57/2MB L2
VIDEO 4K x 2K 60Hz Encode (HEVC)
4K x 2K 60Hz Decode (12-Bit Support)
MEMORY 8 GB 128-Bit LPDDR4
4K x 2K 60Hz Encode (HEVC)
4K x 2K 60Hz Decode (12-Bit Support)
58.2 GB/s (51.2 GB/s TX2i)
Memory 1x microSD slot
Connectivity 1 10/100/100 Mbps directly from module
USB 2 USB 3.0 ports to standard header
1x USB micro with OTG support
HDMI HDMI 2.0a/b directly from processor
Serial ports 2 ports with RS-232 capability
DAQ 13 digital IO
6x ADC Input
2x DAC Output
Utility 1x I2C, 1xUART, 1x SPI, Reset
2.2 Operating System Support
Linux Kernel version 4.4.38, Ubuntu 16.04 aarch64

Ziggy User Manual Rev 1.0 www.diamondsystems.com Page 6
2.3 Mechanical, Electrical, Environmental
Form factor 3.43” x 1.97” (87mm x 50mm)
Cooling Conduction cooling, heat spreader
Power +9V /+5.5V to +18VDC; +12V Typical
Operating Temp -40°C to +85°C at outer surface of heat spreader
Environmental Designed to meet the following conditions:
Shock: MIL-STD-202G, Method 213-B, Table 213-1 Condition A, 50G / 11ms half sine, non-
operational
Vibration: MIL-STD-202G, Method 214A, Table 214-1, Condition D, 11.95G random vibration, 15
minutes per axis, operational

Ziggy User Manual Rev 1.0 www.diamondsystems.com Page 7
3. FUNCTIONAL BLOCK DIAGRAM
Ziggy Base Board Block Diagram
V1.3
Jetson
TX2/TX2i
400pin
Connector
VIN (5.5-18V) TX2
VIN (9-18V) TX2i
Power Supply
13x DIO (3.3V)
6 ADC (3.3V)
2 DAC (3.3V)
SAM MCU
Gb Ethernet
Magnetics
HDMI 2.0
1x Camera
SD Micro SD
2x USB2.0
2x USB3.0
Utility Con
2x RS-232
Transceiver
2x UART
I2C, UART,SPI, PWR_BTN, RST
USB3.0
USB2.0
CSI 2x4 Lane
HDMI
GBE
I2C/SPI
Figure 1 Functional Block Diagram

Ziggy User Manual Rev 1.0 www.diamondsystems.com Page 8
3.1 Feature Descriptions
This section describes the key subsystems of Ziggy.
3.1.1 Processor Module
The baseboard supports Jetson TX2 / TX2i modules. Jetson TX2 is the fastest, most power-efficient embedded AI
computing device. The latest addition to the industry-leading Jetson embedded platform, this 7.5-watt
supercomputer on a module brings true AI computing at the edge. It's built around an NVIDIA Pascal™-family
GPU and loaded with 8 GB of memory and 59.7 GB/s of memory bandwidth. It features a variety of standard
hardware interfaces that make it easy to integrate it into a wide range of products and form factors.
3.1.2 Backup Battery
A 2x1 input connector is provided for connecting the external backup battery.
3.1.3 Ethernet
The board provide one 10/100/1000 Ethernet port directly from the module The MDIx signals from the module are
terminated to standard RJ45 connector with integrated magnetics.
LEDs for Link, Activity, and Speed Indication are available on RJ45 jack
3.1.4 Display
Ziggy offers HDMI2.0 a/b video output. The HDMI port is directly from the processor and is made available on a
standard HDMI header. Integrated audio support is provided along with HDMI display.
3.1.5 Camera
The board supports one MIPI CSI x2 camera interface through 30pin I-PEX connector. Supporting signals like I2C
and control signals are available through connector so that user can directly interface the camera to the board.
3.1.6 USB
2x USB3.0 (with USB2.0) ports are available from the Jetson module. These ports are available on the standard
USB3.0 connector on the Ziggy. Note that only bottom port on the dual USB3.0 connector supports USB3.0 due
to the current software mapping.
1 x USB2.0 from the module is interfaced to micro USB with OTG support
3.1.7 Audio
Audio interface is integrated with HDMI interface. No separate audio analog outputs are provided.
3.1.8 Micro SD
The board offers one micro SD connector with 4-bit data 3.3V for an additional low-cost storage option
3.1.9 Serial Ports
The board provides 2 serial ports from the module.
Two serial ports are available on 2x5 header through MAX3232 transceiver with RS232 protocol support.
Jumpers for Termination Control circuit is incorporated to enable termination resistor (120 Ohm) for RS422 and
3.1.10 DAQ
The board has a SAM microcontroller, through which 13 Digital I/O signals, 6 Analog Inputs and 2 DAC output are
made available through 2x13 header. All the IOs are 3.3V level.

Ziggy User Manual Rev 1.0 www.diamondsystems.com Page 9
SAM microcontroller is interfaced to the Jetson Module via SPI interface. An EEPROM is connected to the
controller for storing the calibration values of ADC/DAC.
3.1.11 Connectivity
Jetson module supports WLAN/Bluetooth integrated with Male I-PEX antenna connectors for WLAN/ BT are
located on the module.
WLAN:
2x2 MIMO
802.11ac compliant (backwards compatible with legacy 802.11b/g/a/n devices)
Bluetooth:
Bluetooth 4.1 ready (can connect to Bluetooth 4.1 enabled devices)
HIDP
Audio –A2DP (advanced audio distribution profile)
RFKILL
The board supports socket for plugging the Skywire LTE CAT1 module from NimbeLink. 2x10 socket is provided
on the board with USB and UART to support the LTE module.
3.1.12 LED Indicators
The board provides the following LED indicators. All LEDs are located near to board edge or their respective
features. All LEDs are labeled in silkscreen with their function.
Power In: Green LED for Power IN
Power Good Green LED for Power Good indication.
Host LED Green LED to indicate Module is booted successfully
Ethernet: Green LED for Link, activity, and speed for each port
User LED Green LED for DAQ activity

Ziggy User Manual Rev 1.0 www.diamondsystems.com Page 10
3.1.13 Power Supply
Ziggy supports wide range +9VDC to 18VDC. Typical input voltage is +12VDC
All required supply voltages for the board are derived from the input. These power supplies are sized to support
the highest capacity of the module plus have enough reserve capacity to support the below add-on features:
12V 5V 3.3V Feature
1.6A Jetson TX2/TX2i Module
1A USB Ports
0.1A 0.1A Camera circuit
4. MECHANICAL BOARD DRAWING
Figure 2: Mechanical Board Drawing

Ziggy User Manual Rev 1.0 www.diamondsystems.com Page 12
I/O Connectors, Jumpers and LED Summary
Connector
Function
LED Block
J1
Utility
1st LED (Left most
in the block)
Host LED
J2
External Battery
2nd LED (Middle
one in the block)
DAQ User LED
J3
MIPI Camera
3rd LED
Power OK
J4
DAQ
J5
SAM Programming
Header
J6
FAN
J7
HDMI
J8
GbE port
J9
USB3.0 Dual
J10
Power In
J11
Serial ports 1,2
J12
Jetson TX2 module
J13
microSD
J14
USB2.0 OTG

Ziggy User Manual Rev 1.0 www.diamondsystems.com Page 13
6. I/O CONNECTORS
6.1 Connector Pin-out and Signal Description
6.1.1 Utility (J1)
3.3V fused
1
2
I2C GP1 Clk
WDT_TIME_OUT#
3
4
I2C GP1 Data
FORCE_RECOVERY
5
6
UART7_TX_3P3
POWER_BTN
7
8
UART7_RX_3P3
RESET_IN
9
10
GND
Signal Name Definition
Power Button Use switch / Drive using open collector (5V level)
Force Recovery Use switch / Drive using open collector (1.8V level)
Reset In Use switch / Drive using open collector (1.8V level)
I2C GP1 I2C interface 3.3V level
UART7 UART7 Interface 3.3V level
Connector type: Standard 2mm dual row straight pin header.
Mating Cable part number: TBD
6.1.2 External Battery (J2)
1
VBAT
2
Ground
VBAT = +3.0V Min. 1.65V to 5.5V
Connector used is 2x1 Header
Mating Cable: 6980524

Ziggy User Manual Rev 1.0 www.diamondsystems.com Page 14
6.1.3 Camera (J3)
30pin I-PEX connector is used to directly plug the camera modules.
1
3.3V
2
3.3V
3
3.3V
4
5V-
5
NC
6
NC
7
NC
8
NC
9
PWR#
10
NC
11
NC
12
NC
13
NC
14
FLASH
15
MCLK
16
RST#
17
SDA
18
SCL
19
NC
20
DATA2-
21
DATA2+
22
DATA0-
23
DATA0+
24
CLK-
25
CLK+
26
GND
27
DATA1-
28
DATA1+
29
DATA3-
30
DATA3+
Connector: 20525-030E-02C.
Mating Cable: FAW-1233-03 (Pinouts are reversed in cable)
Camera supported: LI-IMX274-MIPI-CS and LI-IMX185-MIPI-CS

Ziggy User Manual Rev 1.0 www.diamondsystems.com Page 15
6.1.4 DAQ I/O (J4)
ADC0
1
2
ADC1
ADC2
3
4
ADC3
ADC4
5
6
ADC5
DAC0
7
8
DAC1
AGND
9
10
AGND
DGND
11
12
DGND
DIO 0
13
14
DIO 1
DIO 2
15
16
DIO 3
DIO 4
17
18
DIO 5
DIO 6
19
20
DIO 7
DIO 8
21
22
DIO 9
DIO 10
23
24
DIO11
DIO 12 /RESET_IN
25
26
DGND
Signal Name Definition
ADC 5-0 Analog Inputs (3.3V level)
DAC 1-0 DAC outputs (3.3V level)
DIO 11-0 Digital I/O port; programmable direction (3.3V level)
DIO 12 /RESET_IN Digital IO (3.3V level) / Reset In Signal (1.8V level)
DGND Digital ground;
AGND Analog ground
Connector type: Standard 2mm dual row header
Mating cable part No: 6980516
6.1.5 SAM Programming Header (J5)
1
3V3
2
SAM_RESET
3
SWCLK
4
SWDIO
5
GND
6
NC
Connector: 1x6 2mm pitch header
6.1.6 Fan Connector (J6)
A 4 pin 1.25mm pitch Vertical SMD connector is used for Heatsink Fan connection Pinout is shown below.
1
FAN PWM (5V level)
2
FAN TACH (1.8V level)
3
VDD 5V
4
GND
Connector part number: 533980471

Ziggy User Manual Rev 1.0 www.diamondsystems.com Page 16
6.1.7 HDMI (J7)
Standard HDMI Receptacle Connector 19 Position Panel Mount, Through Hole, Right Angle is used for HDMI
interface. Standard HDMI pinouts are followed.
6.1.8 Ethernet (J8)
Standard RJ45 Magjack Connector Through Hole 10/100/1000 Base-T, AutoMDIX is used for GbE port. Standard
Ethernet pinouts are followed.
6.1.9 USB 3.0 Ports (J9)
Standard USB - A, Stacked USB 3.0 Receptacle Connector 18 Position Through Hole, Right Angle is used for
USB3.0/USB2.0 port. Standard USB3.0/USB2.0 pinouts are followed.
Note: USB3.0 port is available only on the bottom connector due to software limitations.
6.1.10 Power In (J10)
+VIN = +9V to +18V
Connector used is Power Jack.
DC Power Plug Jack 2.5mm x 5.5mm

Ziggy User Manual Rev 1.0 www.diamondsystems.com Page 17
6.1.11 Serial Ports (J11)
Connector supports 2 RS232 (Tx, Rx only) serial ports. Additional 4 GPIOs are provided from SAM controller as
options. Pinouts are as follows based on the configuration Option to use 8 GPIOs instead of Serial ports are
provided.
RS-232 +GPIO (Default)
GPIO
6.1.12 Micro SD (J13)
Standard Micro SD connector will be used for additional storage option. The pinout is shown below.
1
DAT2
2
CD/DAT3
3
CMD
4
VDD 3.3V
5
CLK
6
Ground
7
DAT0
8
DAT1
Connector part number: 114-00841-68
6.1.13 USB 2.0 OTG (J14)
Standard USB 2.0 Micro AB 5 Positions SMD RA is used for USB2.0 OTG port. This port is also used for
programming purpose. Standard USB OTG pinouts are followed.
TX1
1
2
TX2
RX1
3
4
RX2
GND
5
6
GND
GPIO_5
7
8
GPIO_6
GPIO_7
9
10
GPIO_8
GPIO_1
1
2
GPIO_2
GPIO_3
3
4
GPIO_4
GND
5
6
GND
GPIO_5
7
8
GPIO_6
GPIO_7
9
10
GPIO_8

Ziggy User Manual Rev 1.0 www.diamondsystems.com Page 18
6.2 List of Connectors
The following table provides a summary of all I/O connectors on the board.
Function
Manufacturer
Part no.
Description
DSC Mating
Cable
Power in
CUI Inc.
PJ-202B
PWR JACK 2.5X5.5MM SOLDER
NA
External battery
Molex
22-03-5025
2 pos. TH VERT HDR, .1” pitch shrouded
6980524
GbE Ethernet
LINK PP
LPJG4820GENL
Magnetic RJ45 Jack
NA
HDMI
TE
2007435-1
HDMI RCPT TYPE A R/A TH
NA
Camera
I-PEX
20525-030E-02C
30pIn I-PEX RA SMD
FAW-1233-03
Serial Ports
MLX
878331020
Conn, Hdr 2x5 2mm RA TH, Box Hdr
TBD
USB 3.0
Molex
0484060003
USB 3.0 RA DUAL REC TH TYPE A
NA
USB 2.0 OTG
Hirose
ZX62-AB-5PA(31)
USB2.0 MICRO AB SMD RA
NA
SD
Amphenol
114-00841-68
10 (8 + 2) Position Card Connector Secure
Digital - microSD™ Surface Mount, RA
NA
DAQ
FCI
98414-F06-26ULF
2x13, 2mm pitch, TH Header
6980516
Utility
OUP
2115-2X05G00DN
Pin Hdr,2x5,2mm,ST,4mm,SMT
TBD
Module
Connector
Samtec
SEAM-50-03.0-S-08-2-
A-K-TR
400-pin board-to-board connector, 8mm B2B
NA

Ziggy User Manual Rev 1.0 www.diamondsystems.com Page 20
8. GETTING STARTED
This section describes the steps needed to get Ziggy board up and running and assumes that user also has a
Ziggy Cable Kit. The Cable Kit includes all cables needed for the I/Os and Power. The Development Kit includes
the Cable Kit, an AC adapter to power the board.
8.1 Development Kit
Model Number
Description
TO BE UPDATED?
8.2 Quick Setup
1. Attach HDMI display, USB keyboard, and mouse to the cables.
2. Connect power (12V) to power input connector J10 using external power supply. Check the polarity of the
cable before inserting.
WARNING: Attaching the power connector incorrectly will destroy the Ziggy!
On plugging the power cable, the board will boot to Linux.
Table of contents
Other Diamond Systems Carrier Board manuals

Diamond Systems
Diamond Systems Jackson JAX-BB01 User manual

Diamond Systems
Diamond Systems JETBOX FLOYD-SC Series User manual

Diamond Systems
Diamond Systems JASPER User manual

Diamond Systems
Diamond Systems FLOYD FLD-BB01 User manual

Diamond Systems
Diamond Systems ELTON ELT-BB01 User manual

Diamond Systems
Diamond Systems OSBOURNE User manual