manuals.online logo
Brands
  1. Home
  2. •
  3. Brands
  4. •
  5. DMP Electronics
  6. •
  7. Control Unit
  8. •
  9. DMP Electronics 400 User manual

DMP Electronics 400 User manual

INSTALLATION GUIDE
Model 400 USB Flash Module
Description
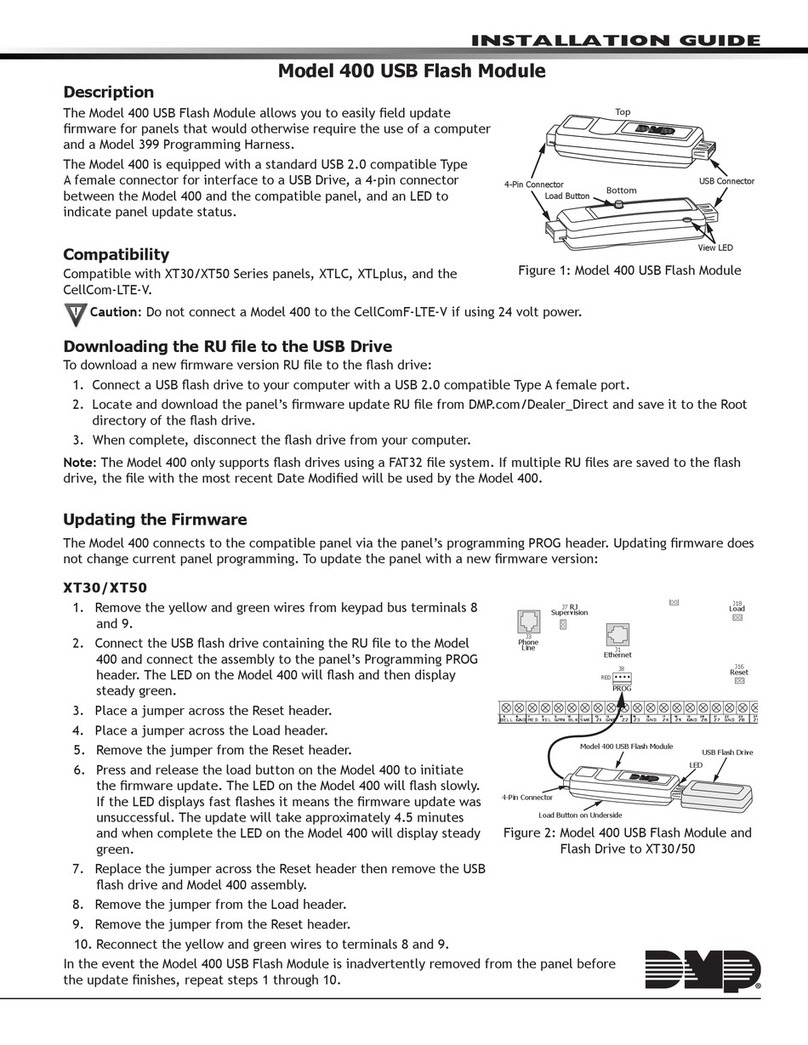
The Model 400 USB Flash Module allows you to easily eld update
rmware for panels that would otherwise require the use of a computer
and a Model 399 Programming Harness.
The Model 400 is equipped with a standard USB 2.0 compatible Type
A female connector for interface to a USB Drive, a 4-pin connector
between the Model 400 and the compatible panel, and an LED to
indicate panel update status.
Note: The Model 400 USB Flash Module is limited to RU les smaller
than 480k.
Compatibility
Compatible with XT30/XT50 Series panels, XTLC, XTLplus, and the
CellCom-LTE-V.
Caution: Do not connect a Model 400 to the CellComF-LTE-V if using 24 volt power.
Downloading the RU le to the USB Drive
To download a new rmware version RU le to the ash drive:
1. Connect a USB ash drive to your computer with a USB 2.0 compatible Type A female port.
2. Locate and download the panel’s rmware update RU le from DMP.com/Dealer_Direct and save it to the Root
directory of the ash drive.
3. When complete, disconnect the ash drive from your computer.
Note: The Model 400 only supports ash drives using a FAT32 le system. If multiple RU les are saved to the ash
drive, the le with the most recent Date Modied will be used by the Model 400.
Updating the Firmware
The Model 400 connects to the compatible panel via the panel’s programming PROG header. Updating rmware does
not change current panel programming. To update the panel with a new rmware version:
XT30/XT50
1. Remove the yellow and green wires from keypad bus terminals 8
and 9.
2. Connect the USB ash drive containing the RU le to the Model
400 and connect the assembly to the panel’s Programming PROG
header. The LED on the Model 400 will ash and then display
steady green.
3. Place a jumper across the Reset header.
4. Place a jumper across the Load header.
5. Remove the jumper from the Reset header.
6. Press and release the load button on the Model 400 to initiate the
rmware update. The LED on the Model 400 will ash slowly. If
the LED displays fast ashes it means the rmware update was
unsuccessful. The update will take approximately 4.5 minutes
and when complete the LED on the Model 400 will display steady
green.
7. Replace the jumper across the Reset header then remove the USB ash drive and Model 400 assembly.
8. Remove the jumper from the Load header.
9. Remove the jumper from the Reset header.
10. Reconnect the yellow and green wires to terminals 8 and 9.
In the event the Model 400 USB Flash Module is inadvertently removed from the panel before
the update nishes, repeat steps 1 through 10.
Bottom
Top
4-Pin Connector USB Connector
Load Button
View LED
Figure 1: Model 400 USB Flash Module
Figure 2: Model 400 USB Flash Module and
Flash Drive to XT30/50
J3
Phone
Line J1
Ethernet
J16
Reset
J7 RJ
Supervision
J24
Celllular
header
connection
J18
Load
RED
PROG
J8
USB Flash Drive
4-Pin Connector
Model 400 USB Flash Module
Load Button on Underside
LED
800-641-4282
INTRUSION • FIRE • ACCESS • NETWORKS
www.dmp.com 2500 North Partnership Boulevard
Designed, Engineered and
Assembled in U.S.A. Springeld, Missouri 65803-8877
LT-1402 © 2019 Digital Monitoring Products, Inc.
19151
Specications
Dimensions 3-3/8” L x 7/8” W x 1/2” H
Certications
FCC Part 15
CellCom-LTE-V, XTLplus, XTLC
1. Connect the USB ash drive containing the RU le to the Model
400 and connect the assembly to the panels Programming PROG
header. The LED on the Model 400 will ash then display steady
green.
2. Press and hold the Load switch on the panel. While holding the
Load switch, press and release the Reset switch, then release the
Load switch.
3. Press and release the load button on the Model 400 to initiate the
rmware update. The LED on the Model 400 will ash slowly. If
the LED displays fast ashes it means the rmware update was
unsuccessful. The update will take approximately 4.5 minutes
and when complete the LED on the Model 400 will display steady
green.
4. Press and release the Reset switch then remove the USB ash
drive and Model 400 assembly.
In the event the Model 400 USB Flash Module is inadvertently removed
from the panel before the update nishes, repeat steps 1 through 4.
Verify the Firmware
1. At a keypad, enter the Diagnostic code 2313 (DIAG), and press CMD.
2. Press CMD until Panel Settings displays. Press any select key.
3. Press CMD until Firmware Version displays. Verify the panel rmware version is correct.
4. Press CMD until Stop displays. Press any select key to exit the Diagnostic menu.
Figure 3: Model 400 USB Flash Module and
Flash Drive to XTLC
USB Flash Drive
4-Pin Connector
Model 400 USB Flash Module
Load Button on Underside
LED
RESET
S1
LOAD
S2
BAT
J7
PROG
RED
PWR
TX RF RX
SN
J1

Other DMP Electronics Control Unit manuals

DMP Electronics 736P Radionics Installation guide

DMP Electronics

DMP Electronics 736P Radionics Installation guide

DMP Electronics 1116 User manual

DMP Electronics

DMP Electronics 1116 User manual

DMP Electronics 277CAN User manual

DMP Electronics

DMP Electronics 277CAN User manual

DMP Electronics 734 User manual

DMP Electronics

DMP Electronics 734 User manual

DMP Electronics Wiegand 734N Installation guide

DMP Electronics

DMP Electronics Wiegand 734N Installation guide

DMP Electronics 714 User manual

DMP Electronics

DMP Electronics 714 User manual

DMP Electronics X1 Installation guide

DMP Electronics

DMP Electronics X1 Installation guide

DMP Electronics 263EXT User manual

DMP Electronics

DMP Electronics 263EXT User manual

DMP Electronics Wiegand 734N User manual

DMP Electronics

DMP Electronics Wiegand 734N User manual

DMP Electronics 734N-WIFI Administrator Guide

DMP Electronics

DMP Electronics 734N-WIFI Administrator Guide

DMP Electronics 865 User manual

DMP Electronics

DMP Electronics 865 User manual

DMP Electronics 736P Radionics User manual

DMP Electronics

DMP Electronics 736P Radionics User manual

DMP Electronics 867 W LX-BUS User manual

DMP Electronics

DMP Electronics 867 W LX-BUS User manual

DMP Electronics 716 User manual

DMP Electronics

DMP Electronics 716 User manual

DMP Electronics 400 Operating and maintenance instructions

DMP Electronics

DMP Electronics 400 Operating and maintenance instructions

DMP Electronics 734 Installation guide

DMP Electronics

DMP Electronics 734 Installation guide

DMP Electronics 708 User manual

DMP Electronics

DMP Electronics 708 User manual

DMP Electronics 734INT Installation guide

DMP Electronics

DMP Electronics 734INT Installation guide

DMP Electronics 736V User manual

DMP Electronics

DMP Electronics 736V User manual

DMP Electronics 1134 Installation guide

DMP Electronics

DMP Electronics 1134 Installation guide

DMP Electronics Wiegand 734N User manual

DMP Electronics

DMP Electronics Wiegand 734N User manual

DMP Electronics 711S User manual

DMP Electronics

DMP Electronics 711S User manual

DMP Electronics 717 User manual

DMP Electronics

DMP Electronics 717 User manual

DMP Electronics RoBoard RM-G211 User manual

DMP Electronics

DMP Electronics RoBoard RM-G211 User manual

Popular Control Unit manuals by other brands

Global Fire Equipment IO-ISO Programming manual

Global Fire Equipment

Global Fire Equipment IO-ISO Programming manual

Grasslin talento LAN plus operating manual

Grasslin

Grasslin talento LAN plus operating manual

QuantAsylum QA450 user manual

QuantAsylum

QuantAsylum QA450 user manual

Cisco ATUC-4DMT-ISDN Installation and configuration

Cisco

Cisco ATUC-4DMT-ISDN Installation and configuration

CAME BPT MTMA/IP Programming manual

CAME BPT

CAME BPT MTMA/IP Programming manual

Parker S6N-DN manual

Parker

Parker S6N-DN manual

Polycom SpectraLink 6000 System Facility Preparation

Polycom

Polycom SpectraLink 6000 System Facility Preparation

Beckhoff KM10 2 Series Documentation

Beckhoff

Beckhoff KM10 2 Series Documentation

Cornelius UF-1 Bulletin

Cornelius

Cornelius UF-1 Bulletin

Siemens Flowrite 599 Series Technical instructions

Siemens

Siemens Flowrite 599 Series Technical instructions

mastro GASFRY-PAN ADK2007 Technical description, installation, operating and maintenance instructions

mastro

mastro GASFRY-PAN ADK2007 Technical description, installation, operating and maintenance instructions

Roger Technology H70/104AC Instruction and warnings for the installer

Roger Technology

Roger Technology H70/104AC Instruction and warnings for the installer

Tyco ACC-1 Operation manual

Tyco

Tyco ACC-1 Operation manual

Siemens CP 5611 Installation Instructions / Product Information

Siemens

Siemens CP 5611 Installation Instructions / Product Information

Fasel Elektronik FCU2000-IR series operating manual

Fasel Elektronik

Fasel Elektronik FCU2000-IR series operating manual

V-Chip Microsystems VT-CC1110-433M user guide

V-Chip Microsystems

V-Chip Microsystems VT-CC1110-433M user guide

nvent Raychem NGC-30-CR installation instructions

nvent

nvent Raychem NGC-30-CR installation instructions

Divus OPTIMA KNX MQTT Module manual

Divus

Divus OPTIMA KNX MQTT Module manual

manuals.online logo
manuals.online logoBrands
  • About & Mission
  • Contact us
  • Privacy Policy
  • Terms and Conditions

Copyright 2025 Manuals.Online. All Rights Reserved.