DOD GS300 User manual

GS300/GS600 USER MANUAL
GS300/GS600 產品操作說明
www.dod-tec.com

DOD GS300/GS600 CAR BLACK BOX
.FULL HD 1920 x 1080@30FPS
.Loop recording
.Wide vision angle 120 degree
.AV OUT or HDMI output
.Collision Data protecon

2
Contents
Instructions before use ·························································································· 03
Preface············································································································· 03
Product Guarantee ·························································································· 03
Copyright infringement Warning ····································································· 03
Check Product Accessories··············································································· 04
Product Structure··································································································· 05
Front View ······································································································· 05
Bottom View···································································································· 05
Rear View ········································································································ 06
Top View ·········································································································· 06
Remote Controller Image················································································· 07
Installation ············································································································· 08
Holder Installation ··························································································· 08
Memory Card Installation (Optional Purchase)················································ 08
Installation on Your Vehicles ············································································ 09
Transmit the video to the vehicle monitor······················································· 11
Transmit the video to LCD TV··········································································· 12
Component Descriptions ······················································································· 13
Menu Operation····································································································· 15
Image Param···································································································· 15
System Setup ··································································································· 25
Language·········································································································· 36
Playback··········································································································· 37
Connecting to PC···································································································· 42
Q&A························································································································ 43
Related Parameters································································································46
Light indication guide······················································································· 46
Video Recording Time (For Reference) ····························································47
Product Specifications ····················································································· 48

3
目錄
使用前須知············································································································ 50
前言 ············································································································· 50
產品保證 ····································································································· 50
侵犯版權警告······························································································50
檢查產品附件······························································································50
產品結構················································································································ 51
前視圖 ········································································································· 51
下視圖 ········································································································· 51
後視圖 ········································································································· 52
上視圖 ········································································································· 52
遙控器圖 ····································································································· 53
安裝方法················································································································ 54
安裝支架 ····································································································· 54
安裝記憶卡(選購) ······················································································· 54
安裝於您的車上·························································································· 55
將畫面輸出於車用螢幕·············································································· 57
將畫面輸出於液晶電視·············································································· 58
各部件介紹············································································································ 59
選單操作················································································································ 60
圖像參數 ····································································································· 60
系統設置 ····································································································· 70
語言選擇 ····································································································· 81
影片回放 ····································································································· 82
與PC 連接·············································································································· 87
常見問題 Q&A ······································································································· 88
相關參數················································································································ 90
燈號提示指南······························································································90
影片錄影時間(供參考)················································································ 91
產品規格 ····································································································· 92

4
Instructions before use
Preface
This user manual will describe the usage of this product in details and
at the same time provide comprehensive information including usage,
operation, installation instructions and specification, etc. Please read
the manual carefully and keep it properly. We hope our product will
satisfy your need and provide you with long-term services.
Product Guarantee
This product is approved by ISO9001:2000 International Quality
Standard and certified with FCC, CE and SGS. Our customers can use
this product free of apprehension.
Copyright infringement Warning
Please note this product is for personal use only. The forms of usage
should not offend or infringe international or domestic copyright laws
and regulations. All recorded videos should be for personal use only.
Please note that using this product for recording of occasions like
shows, exhibitions or commercial activities will infringe others’
copyrights or legislation rights.

5
Check Product Accessories
Please check whether the following accessories are present before
use
1. Vehicle Power Cable (4M) x1
2. Holder x1
3. AV Video Cable x1
4. USB Cable x1
5. Remote Controller x1
6. User Manual x1
6
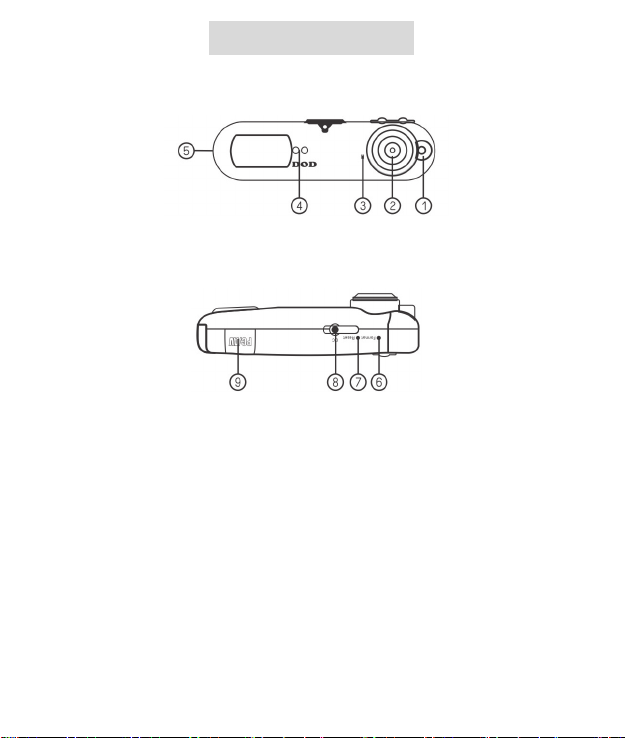
Product Structure
Front View
Bottom View
1. Laser light
2. Lens
3. Microphone
4. Remote Controller Receptor
5. HDMI Port
6. Format Button
7. Forced Shutdown Button
8. DC Power Port
9. USB Port/AV Output
7
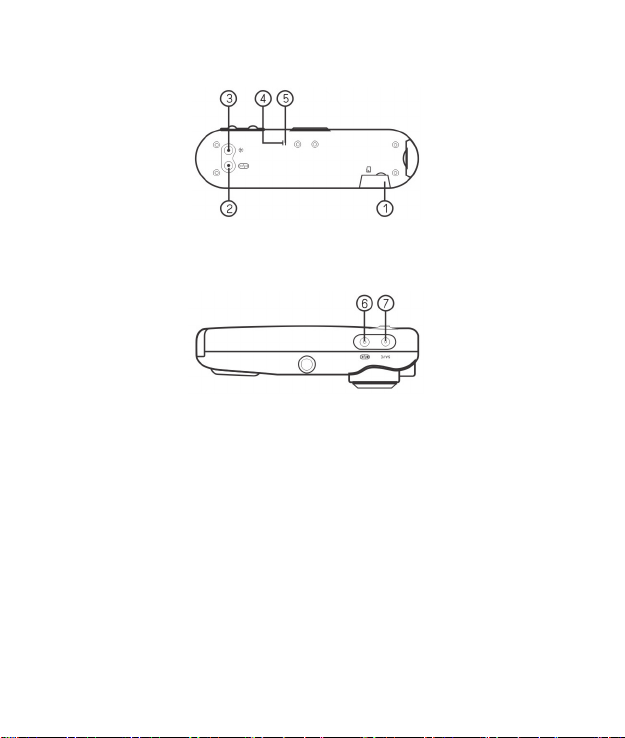
Rear View
Top V iew
1. Micro-SD Card Slot
2. Halt Recording/USB Switch
3. Laser Ray Button
4. Blue Indicator Light (GPS)
5. Red Indicator Light (Recording)
6. Audio Switch
7. Data Protection Button
8
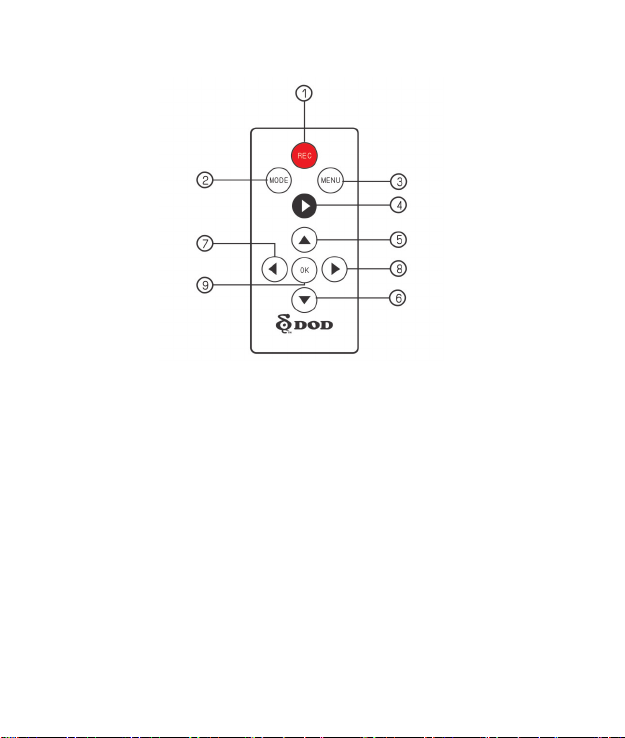
Remote Controller Image
1. Recording Button
2. Mode Button
3. Menu Button
4. Playback Button
5. Up Button
6. Down Button
7. Left Button
8. Right Button
9. OK Button
9
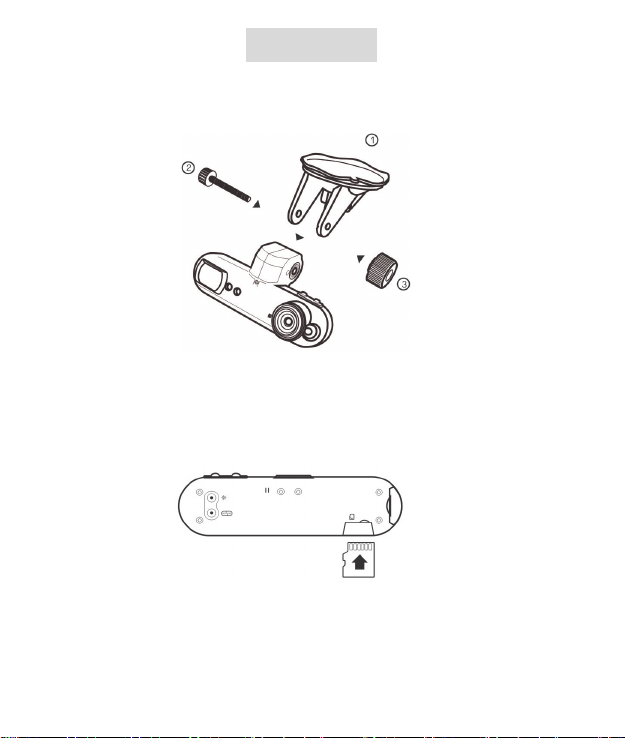
Installation
Holder Installation
Combine the suction cup holder with the host device
Memory Card Installation (Optional Purchase)
Install the Micro SD card into the drive recorder in the specific
direction.
Other manuals for GS300
1
This manual suits for next models
1
Table of contents
Other DOD Dashcam manuals


