manuals.online logo
Brands
  1. Home
  2. •
  3. Brands
  4. •
  5. Dorma
  6. •
  7. Door Lock
  8. •
  9. Dorma ARCOS Universal PT 40 User manual

Dorma ARCOS Universal PT 40 User manual

Montageanleitung
ARCOS Universal PT 40
Notwendiges Werkzeug zur Montage:
Innensechskantschlüssel 5 mm
Kreuzschlitzschraubendreher
Sie erhalten den Winkeloberlichtbeschlag montiert.
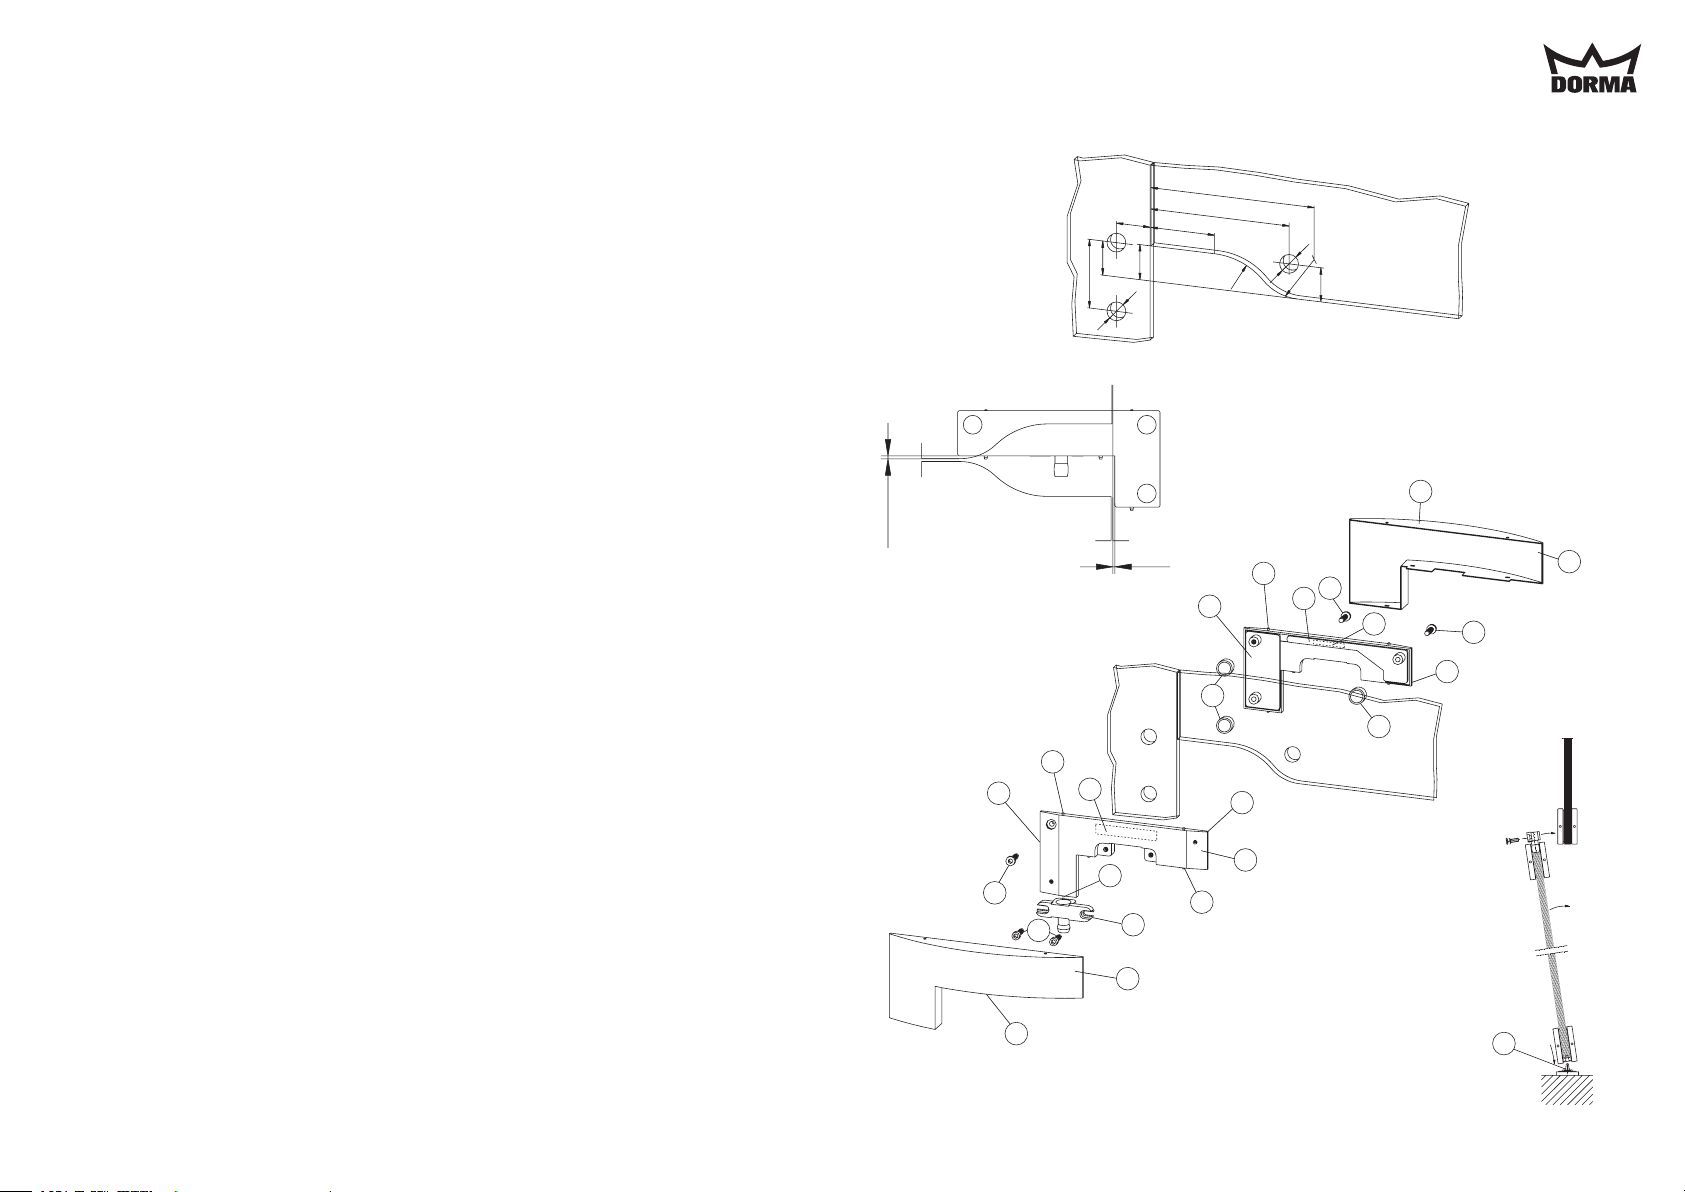
(Abb. C) Montagefolge:
Seitenteil an Wand und Oberlicht an Decke befestigen
(z.B. mit Wandanschlussprofil).
Grundplatten (7) und (12) auseinanderschrauben.
Schutzfolie von Doppelklebeband (9) auf beiden
Gegenplatten abziehen und Zwischenlagen (8)
aufdrücken. Schlauchabschnitt (11) in Glasbohrung
stecken. Grundplatten (7) und (12) im Abstand von
3 mm und 2 mm zu beiden Glaskanten ausrichten
und mit 3 Senkschrauben (5) (sw = 5) verschrauben.
(siehe Abb. B)
Anzugsmomente der Schrauben = 15 Nm
Im montierten Zustand muss zwischen PT 40-Kappe
und PT 20-Kappe mindestens 3 mm Luft vorhanden
sein, um Kappen nachträglich montieren und demon-
tieren zu können. (Abdeckkappen sind dann bündig
mit den Glaskanten)
Abb. A zeigt die Glasbearbeitung
Abb. B zeigt den PT 40 mit den notwendigen Ab-
ständen zu den Glaskanten
(Abb. D) Einsetzen der Glastür
Oberen Einsatz mit Zapfen (4) in die Buchse des
oberen Eckbeschlages stecken.
Der Einsatz muss mit etwas Kraft auf den Zapfen
gedrückt werden, um die Wulst in der Buchse zu
überbrücken. Diese dient zur Sicherung des Beschla-
ges bei evtl. Glasbruch.
Die Tür auf BTS-Achse (oder Bodenlager-Achse) (13)
setzen. (siehe Abb. D)
Die Tür hochschwenken und den Einsatz mit Zylinder-
schrauben (3) am Oberlichtbeschlag, mit Anzugsmo-
ment = 12 Nm, gleichmäßig anziehen. Verschraubun-
gen immer zur Innenseite des Raumes.
Mounting instructions
ARCOS Universal PT 40
Necessary tools for mounting:
Allan key 5 mm
Crosstip screwdriver
You receive a completely assembled patch fitting for
overhead panel and side panel
(Fig. C) Mounting steps:
Fix side panel on wall and overhead panel at ceiling
(e.g. with wall connecting profile).
Unscrew base plates (7) and (12). Pull off safety foil
from double-sided adhesive tape (9) on both base
plates and press intermediate gaskets (8) into place.
Insert hose section (11) through hole in glass. Align
base plates (7) and (12) so that they are 2 mm apart
from both edges of the glass. Fix with 3 countersunk
screws (5) (with 5 mm Allan key).
(see fig. B)
Tightening torque = 15 Nm
For fixing and dismantling the caps afterwards it is
necessary to provide at least a 3 mm space between
PT 40-cap and PT 20-cap.
(Cover caps are flush with glass edges)
Fig. A shows glass preparation
Fig. B shows the PT 40 with the necessary
distance to the glass
(Fig. D) Fitting the glass door
Fit top insert with pin (4) into bushing of the upper
patch fitting of the door.
To overcome the rim in the PT 20 bushing the insert
should be pressed slightly with small force. This
creates protection if glass should break.
Fit door on BTS spindle (or bottom floor bearing
spindle) (13). (see fig. D)
Lift the door and tighten insert with cylinder head
screws (3) evenly into overhead panel patch fitting,
tightening torque = 12 Nm. Screws should always
face into the inside of the room.
161
148
68
36
37
36
73
20
20
R 80
R 55
36
3-3.5
2
1
2
34
5
6
6
7
8
89
10
11
886
10
11
12
95
1
2
13
DORMA-Glas 800.52.065.6.32 Stand/Issue 09/04 Seite/Page 1/2
Abb./Fig. A
Abb./Fig. B
Abb./Fig. C
Abb./Fig. D
65 mm Drehpunkt
= Langer Anschraubsteg des Einsatzes zur Glaskante
55 mm Drehpunkt
= Kurzer Anschraubsteg des Einsatzes zur Glaskante
(Abb. E) Befestigung der Abdeckkappen
Abdeckkappen (2) mit der ungelochten Seite (1) in
Federstifte (6) einhängen, Federstifte eindrücken und
Gegenseite an den Stiften (10) einrasten.
(siehe Abb. C)
Pflege allgemein
Die Oberflächen der Beschläge sind nicht wartungs-
frei und sollten gemäß ihrer Ausführung gereinigt
werden.
- Für metallische Oberflächen (Eloxaltöne, Edelstahl)
bitte nur geeignete Reiniger ohne Scheuermittelan-
teil verwenden.
- Für lackierte Oberflächen bitte nur entsprechende
lösemittelfreie Reiniger verwenden.
- Messing Oberflächen (ohne Oberflächenschutz)
müssen von Zeit zu Zeit mit geeignetem Pflegemit-
tel behandelt werden, um ein Anlaufen zu vermeiden.
65 mm pivot point
= longer insert body part for fastening facing towards
glass edge
55 mm pivot point
= shorter insert body part for fastening facing
towards glass edge
(Fig. E) Securing the cover caps
Hook the unpunched side (1) of the cover caps (2)
into the spring pins (6), press spring pins down and
engage other side into pins (10).
(see fig. C)
General care instructions
The surface finishes of the fittings are not
maintenance-free and should be cleaned according to
their material and design.
- For metallic surfaces (anodised finishes, stainless
steel) please use appropriate cleaning agents
without abrasive additives only.
- For varnished surfaces please use appropriate
solvent-free cleaning agents only.
- Brass surfaces (without surface protection) have to
be treated with an appropriate maintenance agent
on occasion, to avoid tarnishing.
1
6
2
10
DORMA-Glas 800.52.065.6.32 Stand/Issue 09/04 Seite/Page 2/2
Abb./Fig. E

Other Dorma Door Lock manuals

Dorma HZ 43-F Series User manual

Dorma

Dorma HZ 43-F Series User manual

Dorma RTS Series User manual

Dorma

Dorma RTS Series User manual

Dorma D860 User manual

Dorma

Dorma D860 User manual

Dorma RTS Series User manual

Dorma

Dorma RTS Series User manual

Dorma RTS Series User manual

Dorma

Dorma RTS Series User manual

Dorma RTS Series User manual

Dorma

Dorma RTS Series User manual

Dorma MUNDUS PREMIUM PT 60 User guide

Dorma

Dorma MUNDUS PREMIUM PT 60 User guide

Dorma EM 6900 AM B User manual

Dorma

Dorma EM 6900 AM B User manual

Dorma ARCOS Universal PT 10 User manual

Dorma

Dorma ARCOS Universal PT 10 User manual

Dorma MATRIX AIR Standard User manual

Dorma

Dorma MATRIX AIR Standard User manual

Dorma MUNDUS PREMIUM US 10 User guide

Dorma

Dorma MUNDUS PREMIUM US 10 User guide

Dorma Duo HOME User manual

Dorma

Dorma Duo HOME User manual

Dorma ES62 User manual

Dorma

Dorma ES62 User manual

Dorma MUNDUS PREMIUM PT 70 User guide

Dorma

Dorma MUNDUS PREMIUM PT 70 User guide

Dorma SVP 7000 Air Installation and operation manual

Dorma

Dorma SVP 7000 Air Installation and operation manual

Dorma RTS Series User manual

Dorma

Dorma RTS Series User manual

Dorma C301 User manual

Dorma

Dorma C301 User manual

Dorma SVP 22 DCW Series User manual

Dorma

Dorma SVP 22 DCW Series User manual

Dorma MATRIX AIR User manual

Dorma

Dorma MATRIX AIR User manual

Dorma PHA Glas Kit User manual

Dorma

Dorma PHA Glas Kit User manual

Dorma RTS Series User manual

Dorma

Dorma RTS Series User manual

Dorma MUNDUS PREMIUM GK 50 User guide

Dorma

Dorma MUNDUS PREMIUM GK 50 User guide

Dorma RTS Series User manual

Dorma

Dorma RTS Series User manual

Dorma STE 400 User manual

Dorma

Dorma STE 400 User manual

Popular Door Lock manuals by other brands

Zebratti LCS Series Installation instruction

Zebratti

Zebratti LCS Series Installation instruction

Delf Architectural DDL120 installation instructions

Delf Architectural

Delf Architectural DDL120 installation instructions

Yale Keyfree Connected User guide keyfree

Yale

Yale Keyfree Connected User guide keyfree

Endura Trilennium 3020 Replacement instructions

Endura

Endura Trilennium 3020 Replacement instructions

Yale YDM4109 user guide

Yale

Yale YDM4109 user guide

Assa Abloy OneSystem N1940 manual

Assa Abloy

Assa Abloy OneSystem N1940 manual

Assa Abloy Effeff 843G Mounting instructions

Assa Abloy

Assa Abloy Effeff 843G Mounting instructions

Yale YDM3109A user guide

Yale

Yale YDM3109A user guide

Kaba Combi B 30 operating instructions

Kaba

Kaba Combi B 30 operating instructions

AGB R4 10 Assembly instructions

AGB

AGB R4 10 Assembly instructions

Yale YDG413A user manual

Yale

Yale YDG413A user manual

Samsung SDS SHS-3320 user guide

Samsung

Samsung SDS SHS-3320 user guide

The QuickLock Bluetooth + NFC Doorlock user manual

The QuickLock

The QuickLock Bluetooth + NFC Doorlock user manual

Kwikset 553 installation instructions

Kwikset

Kwikset 553 installation instructions

SUGATSUNE LAMP HC-30H installation manual

SUGATSUNE

SUGATSUNE LAMP HC-30H installation manual

Eco D-110 Assembly instruction

Eco

Eco D-110 Assembly instruction

Assa Abloy Access 3 Technical manual

Assa Abloy

Assa Abloy Access 3 Technical manual

Yale 724NS installation instructions

Yale

Yale 724NS installation instructions

manuals.online logo
manuals.online logoBrands
  • About & Mission
  • Contact us
  • Privacy Policy
  • Terms and Conditions

Copyright 2025 Manuals.Online. All Rights Reserved.