manuals.online logo
Brands
  1. Home
  2. •
  3. Brands
  4. •
  5. Dormakaba
  6. •
  7. Door Lock
  8. •
  9. Dormakaba RCI 0162 User manual

Dormakaba RCI 0162 User manual

Instructions
1. Mark horizontal center line (CL) of existing device latch from active door to inactive door. Align center of Double Door Housing
(DDH) with horizontal centerline marked on inactive door and square it with edge of the inactive door. Maintain 3/16” minimum
gap between the exit device & strike face for proper functioning of exit device. See IS0162 for details.
2. Mark the mounting holes for the DDH on the inactive door using DDH as template.
3. Drill two 13/32” (10.5mm) holes through inactive door).
4. Mount DDH to inactive door using hardware as shown.
Note: Wire access hole is not provided, drill DDH as required.
5. Make wire connections from the power source to the appropriate wire harness supplied. Use the 12V harness for 12VDC,
12-24VAC or 11-16VAC. Use the 24V harness only for 24VDC.
6. Mount the electric strike with 1/4-20 UNC (Hole C) screws provided in the outer oval mounting holes (the
outer slots). Adjust electric strike horizontally until exit device latch fully engages with the door closed.
Note: Ensure a 1/16” [1.5mm] clearance between exit device latch and the electric strike keeper is maintained.
7. Tighten the two mounting screws and check operation. Adjust the horizontal position of electric strike as required.
8. Using the electric strike as a marking template, drill & tap for 1/4-20 UNC (Hole D). Using the 1/4-20 UNC screws provided
secure the electric strike through the locking holes.
Note: 0162 strike is not adjustable after installing these screws.
IMPORTANT: The fire and/or security ratings shown on the (F)0162 strike labels no longer apply with the use of the double door
housing.
INSTALLATION 0162
Double Door Housing for
Surface Mounted Rim Strike
IS0DDH PCN18003
R01-18TG
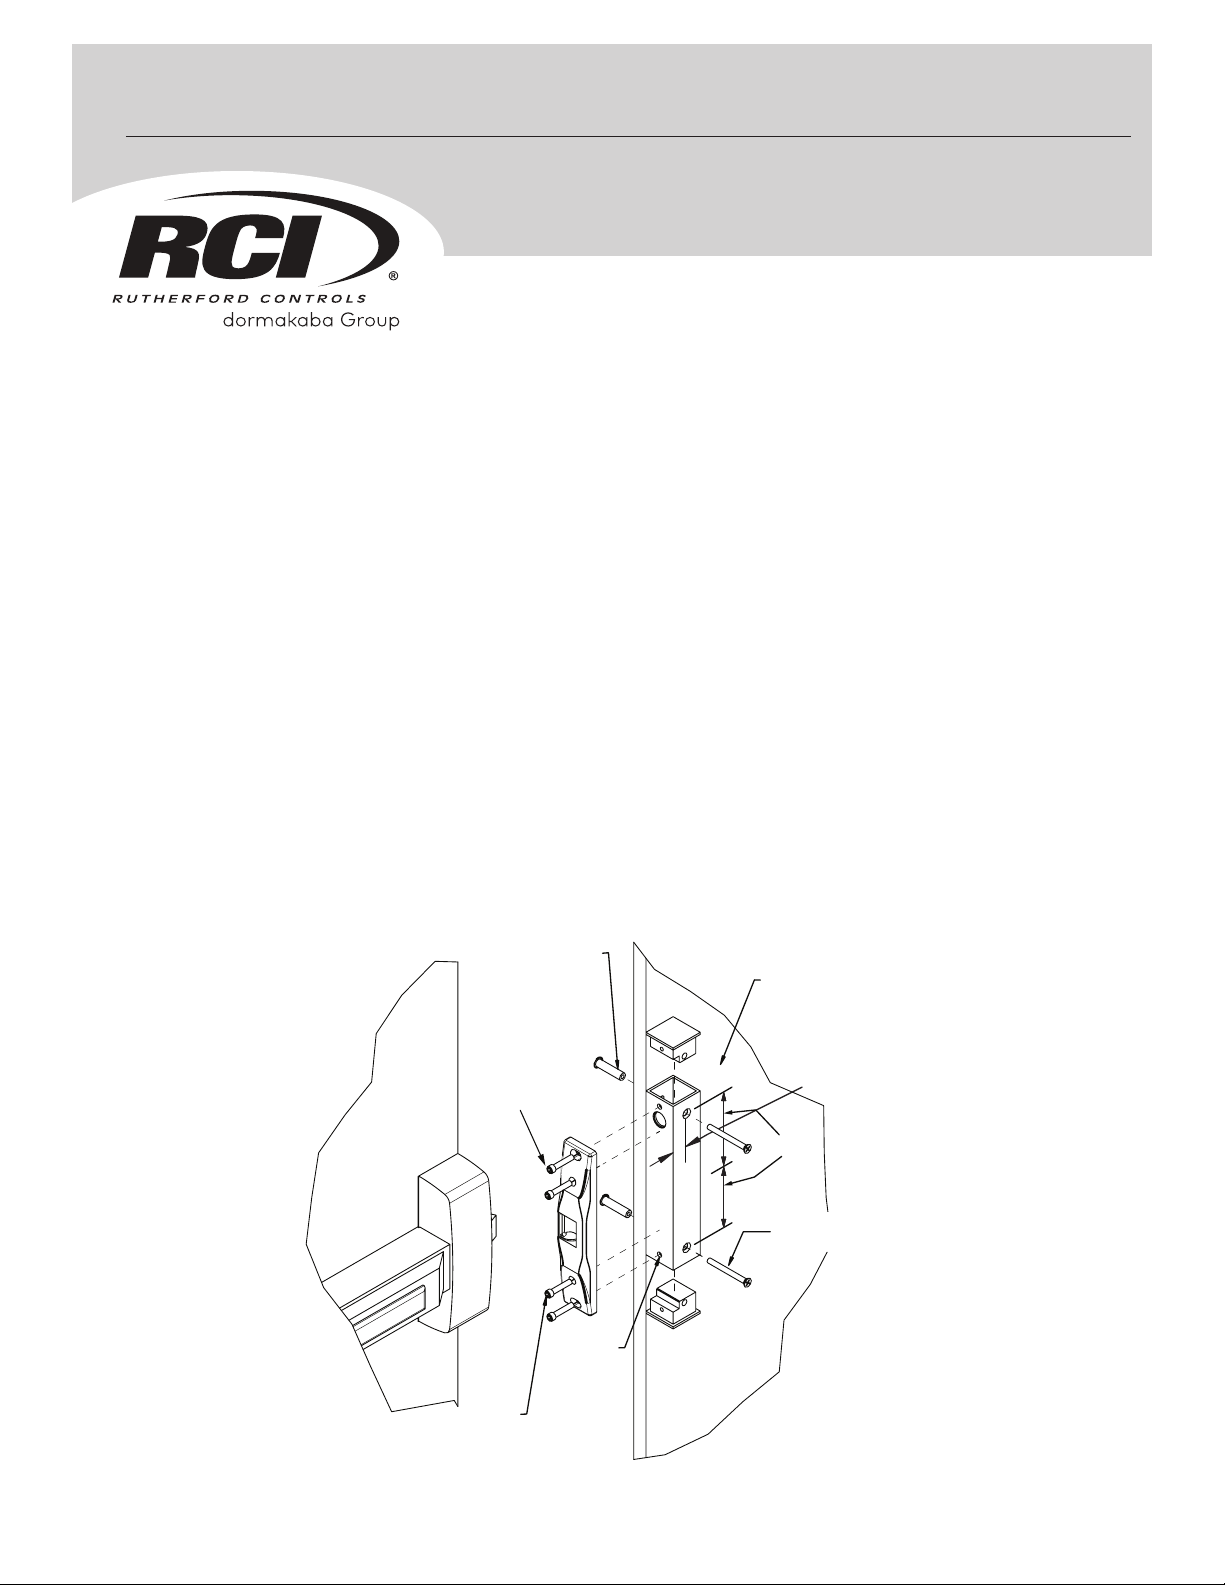
0162 Typical Double Door
Housing Assembly
C
L
INACTIVE
DOOR
SEX NUT 1/4-20
WITH 13/32" HOLE
THROUGH (DOOR)
(2 PLACES)
HOLE C
1/4-20 X 1"
ADJUSTMENT
SCREW
HOLE C
1/4-20 X 1"
SCREW
HOLE D
1/4-20 X 1"
LOCKDOWN
SCREW
(2 PLACES)
3-3/4” (95mm)
7/8” (22.2mm)
1/4-20 X 2.5"
(2 PLACES)
0162 DOUBLE
DOOR HOUSING
© 2018 dormakaba Canada Inc. | dormakaba Group
www.rutherfordcontrols.com • PHONE: 1.800.265.6630 • FAX: 1.800.482.9795 • E-MAIL: [email protected]
Instructions
1. Mark center line (CL) of existing device latch from active door to inactive door. Align center of Double Door Housing (DDH) with
horizontal centerline marked on inactive door and square it with edge of the inactive door. Maintain 3/16" minimum gap between
the exit device & strike face for proper functioning of exit device. See IS0161 for details.
2. Mark the mounting holes for the Double Door Housing (DDH) on the inactive door using DDH as template.
3. Drill two 13/32" (10.5mm) holes through inactive door.
4. Drill wire access hole into desired area of DDH. Pull two (2) wires through the access hole and connect to strike
(polarity is not critical).
5. Temporarily mount 0161 strike to DDH through the slotted holes (Hole C) using 1/4-20 UNC x 1" screws provided.
6. Mount DDH to inactive door using the two (2) 1/4-20 x 3” screws and 1/4-20 Sex Nuts supplied.
7. Adjust electric strike insert horizontally, if necessary, until Pullman Latch engages when door is closed. (See Fig. 3 on 0161
installation instructions if further horizontal insert adjustment is necessary).
8. Mark, drill and tap Hole D for 1/4-20 x 1” provided to secure the final location.
IMPORTANT: The security ratings shown on the 0161 strike labels no longer apply with the use of the double door housing.
INSTALLATION 0161
Double Door Housing
DETAIL F
SCALE 0.2 : 1
1
1
2
2
3
3
4
4
A A
B B
DRAWING NO
SIZE
REV
REV ECN BY DATE
PROPRIETARY AND CONFIDENTIAL
THE INFORMATION CONTAINED IN THIS
DRAWING IS THE SOLE PROPERTY OF
RCI. ANY REPRODUCTION IN PART OR
AS A WHOLE WITHOUT THE WRITTEN
PERMISSION OF RCI IS PROHIBITED.
DRAWING UNITS: METRIC
ANGLE VIEW:
DO NOT SCALE DRAWING
1 PLACE DECIMAL 0.5
2 PLACE DECIMAL 0.25
ANGLES 0.5
METRIC GENERAL TOLERANCES
UNLESS OTHERWISE SPECIFIED
3RD ANGLE PROJECTION
TITLE
DRAWN BY
CHECKED BY
DATE
DATE
SCALE
0161 INSTALLATION
01A01-I02 0
ntalebi 7/17/2008
B1 : 1
INACTIVE
DOOR
0161 DOUBLE
DOOR HOUSING
C
L
SCREW
1/4-20 x 3”
DRILL
13/32” HOLE
(2 PLACES)
ACTIVE
DOOR
EDGE
TYPICAL SURFACE
EXIT DEVICE
SEX NUT
1/4-20
HOLE C
ADJUSTMENT
SCREW
1/4-20 x 1”
HOLE D
LOCKDOWN
SCREW
1/4-20x1”
HOLE D
LOCKDOWN
SCREW
1/4-20 x 1”
HOLE C
ADJUSTMENT
SCREW
1/4-20 x 1”
0161 Typical Double
Door Housing Assembly
© 2018 dormakaba Canada Inc. | dormakaba Group
www.rutherfordcontrols.com • PHONE: 1.800.265.6630 • FAX: 1.800.482.9795 • E-MAIL: [email protected]

Other Dormakaba Door Lock manuals

Dormakaba SVA 2 Series Training manual

Dormakaba

Dormakaba SVA 2 Series Training manual

Dormakaba Junior User manual

Dormakaba

Dormakaba Junior User manual

Dormakaba 8300 Series User manual

Dormakaba

Dormakaba 8300 Series User manual

Dormakaba ML530 User manual

Dormakaba

Dormakaba ML530 User manual

Dormakaba Best Switch Fob User manual

Dormakaba

Dormakaba Best Switch Fob User manual

Dormakaba MUTO Elock MEM4400 User manual

Dormakaba

Dormakaba MUTO Elock MEM4400 User manual

Dormakaba STUDIO Rondo Glass/Glass User manual

Dormakaba

Dormakaba STUDIO Rondo Glass/Glass User manual

Dormakaba UNIQUIN User manual

Dormakaba

Dormakaba UNIQUIN User manual

Dormakaba Saffire LX User manual

Dormakaba

Dormakaba Saffire LX User manual

Dormakaba RD10 User manual

Dormakaba

Dormakaba RD10 User manual

Dormakaba c-lever pro User manual

Dormakaba

Dormakaba c-lever pro User manual

Dormakaba ML330 User manual

Dormakaba

Dormakaba ML330 User manual

Dormakaba ED50LE User manual

Dormakaba

Dormakaba ED50LE User manual

Dormakaba Saffire LX-D User manual

Dormakaba

Dormakaba Saffire LX-D User manual

Dormakaba 79 Series User manual

Dormakaba

Dormakaba 79 Series User manual

Dormakaba Saffire LX User manual

Dormakaba

Dormakaba Saffire LX User manual

Dormakaba RCI 6 Series User manual

Dormakaba

Dormakaba RCI 6 Series User manual

Dormakaba US 10 User manual

Dormakaba

Dormakaba US 10 User manual

Dormakaba SVA 4 Series Training manual

Dormakaba

Dormakaba SVA 4 Series Training manual

Dormakaba Grange User manual

Dormakaba

Dormakaba Grange User manual

Dormakaba Saffire LX-I User manual

Dormakaba

Dormakaba Saffire LX-I User manual

Dormakaba STV 50 Series User manual

Dormakaba

Dormakaba STV 50 Series User manual

Dormakaba MUNDUS PREMIUM US 10 User guide

Dormakaba

Dormakaba MUNDUS PREMIUM US 10 User guide

Dormakaba E7900 Series User manual

Dormakaba

Dormakaba E7900 Series User manual

Popular Door Lock manuals by other brands

Von Duprin M996L Series installation instructions

Von Duprin

Von Duprin M996L Series installation instructions

Lockly SECURE PLUS user manual

Lockly

Lockly SECURE PLUS user manual

Dorma RTS Series quick start guide

Dorma

Dorma RTS Series quick start guide

Schlage CO-100 installation instructions

Schlage

Schlage CO-100 installation instructions

PDQ KMS pdqSMART Installation instruction

PDQ

PDQ KMS pdqSMART Installation instruction

Abloy ML81APV instructions

Abloy

Abloy ML81APV instructions

USP ALPHA-H operating instructions

USP

USP ALPHA-H operating instructions

Maco PROTECT Operating and maintenance instructions

Maco

Maco PROTECT Operating and maintenance instructions

Techno CNC Systems Patriot Troubleshooting

Techno CNC Systems

Techno CNC Systems Patriot Troubleshooting

Bewator KC 5000 Technical manual

Bewator

Bewator KC 5000 Technical manual

MERONI Nova Assembling instructions

MERONI

MERONI Nova Assembling instructions

Locstar MINI General introduction

Locstar

Locstar MINI General introduction

ESP EZ-TAG2 user manual

ESP

ESP EZ-TAG2 user manual

Siegenia GENIUS operating instructions

Siegenia

Siegenia GENIUS operating instructions

Aqara N100 user manual

Aqara

Aqara N100 user manual

AGB SCIVOLA TT Assembly instructions

AGB

AGB SCIVOLA TT Assembly instructions

Assa Abloy Aperio C100 V3 Installation and mounting instructions

Assa Abloy

Assa Abloy Aperio C100 V3 Installation and mounting instructions

Austral Lock Yarra Ridge ILLUSTRATED FITTING INSTRUCTIONS

Austral Lock

Austral Lock Yarra Ridge ILLUSTRATED FITTING INSTRUCTIONS

manuals.online logo
manuals.online logoBrands
  • About & Mission
  • Contact us
  • Privacy Policy
  • Terms and Conditions

Copyright 2025 Manuals.Online. All Rights Reserved.