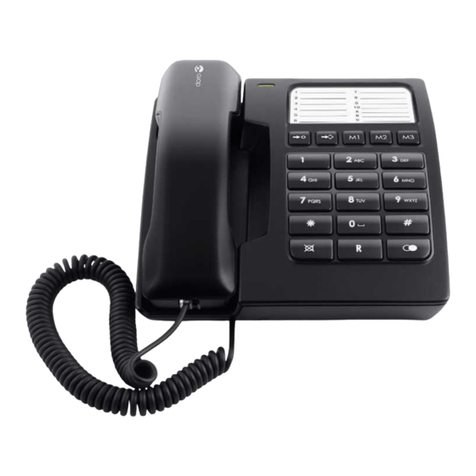
Doro Congress 100 User manual

doro congress 100

1 Hook switch
2 Volume control for handset/
headset
3 Redial button
4 Recall button
5 Pause button
6 Memory button
7 Hold button and LED
8 Headset button and LED
9 Store/Mute button and LED
10 Number keys 0-9, *, #
11 Ring/Message Wait Indicator
English (see page EN 1-8)
1 Pédale de raccroché
2 Réglage du volume combiné/
casque
3 Touche Bis
4 Touche R
5 Touche Pause
6 Touche de sélection directe
7 Touche et LED de mise en garde
8 Touche et LED casque
9 Touche Programmation et secret
+ LED
10 Touches numérotées 0-9, *, #
11 Témoin lumineux de sonnerie
Français (voir page FR 1-6)

1 Klyka
2 Volymkontroll för luren/headset
3 Återuppringning
4 R-knapp
5 Pausknapp
6 Kortnummerknapp
7 Knapp för parkera och indikator
8 Knapp för headset och indikator
9 Knapp för lagra/sekretess med
indikator
10 Siffertangenter 0-9, *, #
11 Ringsignalindikator
Svenska (se sidan SE 1-6)
1 Nedkoblingstast
2 Volumkontroll for håndsett/
headset
3 Repetisjon
4 R-knapp
5 Pauseknapp
6 Kortnummerknapp
7 Parkeringsknapp med indikator
8 Headsetknapp med indikator
9 Knapp for lagring/mikrofonsperre
med indikator
10 Siffertaster 0-9, *, #
11 Ringesignalindikator
Norsk (se side NO 1-6)
1 Afbrydertast
2 Lydstyrke for røret/headset
3 Genopkald
4 R-tast
5 Pause-tast
6 Kortnummer-tast
7 Parkering-tast og indikator
8 Headset-tast og indikator
9 Tast for lagring/taleafbrydelse og
indikator
10 Ciffertaster 0-9, *, #
11 Indikator for ringesignal
Dansk (se side DK 1-6)
1 Katkaisin
2 Kuulokkeen tai sankakuulokkeiden
äänenvoimakkuuden säädin
3 Uudelleensoittopainike
4 R-painike
5 Taukopainike
6 Lyhytvalintapainike
7 Puhelu pitoon -painike ja
merkkivalo
8 Sankakuulokepainike ja
merkkivalo
9 Yhdistetty mikrofonin mykistys-
painike ja tallennuspainike
10 Numeronäppäimet 0-9, *, #
11 Soittomerkkivalo
Suomi (sivut FI 1-6)
1 Miejscenasłuchawkę/wyłącznik
2 Regulatorgłośnościsłuchawki/
zest.nagłownego
3 Przyciskpowtórnegowybierania
4 Przycisk„Recall”(Flash)
5 Przyciskpauzy
6 Przyciskskróconegowybierania
7 Przyciskikontrolkazawieszenia
8 Przyciskikontrolkazestawu
nagłownego
9 Przyciskikontrolkazapisu/
wyłącznikamikrofonu
10 Klawiszezcyframi0-9,*,#
11 Sygnalizatordzwonienia/
wiadomości
Polski (zobacz strony PL 1-12)

English
www.doro.com EN 1
Installation
Important!
The earpiece of the handset may attract small ferromagnetic objects such as staples and pins,
care should be taken when placing the handset near these items.
Connection
1. Connect the curly cord to the handset and the socket marked Q
underneath the telephone.
2. Connect the telephone cord to the socket marked tunderneath the
telephone, and then to the telephone network socket.
3. A click will be heard when the modular plug is correctly in place.
4. Lift the handset and listen for the dial tone. Your telephone is now
operational.
Hearing Aid compatible
This telephone is hearing aid compatible. Select T mode on the hearing aid to
enable coupling.
Connection of headset
The socket underneath the telephone marked =is used for the connection of
a headset. The headset button =is for connecting/disconnecting a telephone
call (equivalent to lifting and putting down the handset) when a headset is
connected.
Please note!
DORO original headsets are tested and adapted to DORO Congress 100. Other types and
makes of headsets may be used, though the function and sound quality can not be guaranteed.
Any damage occurring due to incompatible or non Doro headsets being installed, will not be
covered under the telephones guarantee.
Connection of additional equipment
On the left side of the telephone there is a socket marked TERMINAL. This is
used for connecting additional telephone equipment to the same telephone line,
e.g. a wireless telephone, modem, etc.

English
EN 2 www.doro.com
Operation
Mute button
The handset/headset microphone can be muted during a call by pressing the
mute button z. Press the mute button again to activate the microphone. The
LED next to the button ashes when the microphone is muted.
Making a call with the headset
1. Press the headset button =. A dialling tone will be heard in the headset and
the LED next to the headset button will illuminate.
2. DIAL the NUMBER required.
3. Press the headset button again to terminate the call.
Redial button
If the number dialled is engaged or if the last number dialled is to be redialled,
lift the receiver or press the headset button =.
Press the redial button r.
On Hold
Press the hold button hto place a call on hold. The LED next to the button
will illuminate. The call can be resumed by pressing the hold button again or
from another telephone connected to the same line.
Whenacallisconnected.
Press the button hto hold the telephone call. The LED above the button will
illuminate.
To resume the telephone call, lift any receiver.
Recall
Press the recall button Rfollowed by the extension number to transfer calls
when connected to a PBX.
Access to additional network services can be gained by using the recall button
R, *and #keys. Contact your network operator for more information.

English
www.doro.com EN 3
Settings
Memory
This telephone has 10 indirect memories (0-9).
When a number is stored in a memory location, you need to press only two
buttons to make the call.
Storing numbers
1. Lift the receiver and press store button P(ignore the dialling tone).
2. Press memory button m.
3. Select memory location by pressing one of the number keys 0-9.
4. Enter the phone number (max 21 digits).
5. Press store button Pand replace the receiver. The number is now stored.
Calling using memory locations
1. Lift the receiver (or press the headset button) and wait for a dialling tone.
2. Press memory button m.
3. Select memory location by pressing any of the number keys 0-9.
A pause may be inserted into the telephone number by pressing P.
In case of a number change, replace the old number with the new.

English
EN 4 www.doro.com
Settings
Volume control
The volume level in the earpiece can be increased or decreased using the volume
buttons during a call (5 steps). Use the volume up button $to increase the
volume and the volume down button £to decrease the volume.
Ringer
1. Lift the receiver (ignore the dialling tone) and press the store button Pand #.
2. Select ring signal by pressing the number keys 0-9in accordance with the
table below.
3. Press store button Pand replace the receiver. The ring signal is now set.
Key/setting Melody type Ringer level
1.......................................... Melody A........................ Low
2.......................................... Melody A........................ Normal
3.......................................... Melody A........................ High
4.......................................... Melody B........................ Low
5.......................................... Melody B........................ Normal
6(factorysetting)................ Melody B........................ High
7.......................................... Melody C....................... Low
8.......................................... Melody C....................... Normal
9.......................................... Melody C....................... High
0.......................................... Off *............................... -
* If the key 0 is selected, the ring signal will be turned off until the next time the receiver is
lifted. After that, the ring signal will revert to the previous setting.

English
www.doro.com EN 5
Other
Technical information
Some selector switches are located in a compartment on the underside of the
telephone.
These switches control technical parameters for connection to PBX equipment.
You remove the lid by pressing a small screwdriver (max. Ø 2,5mm) or similar
in the hole to the right of the lid.
IMPORTANT NOTE: These switches should only be adjusted by qualied personnel.
Recall time
Selection of 100/300/600ms timed loop break for recall functionality.
The standard setting is 100 ms for UK/Australia and 600 ms for New Zealand.
Tone/Pulse(♫/...)
Selection of either dialling method depending on PBX.
Message Waiting Indicator
Some PBX systems have a function called Message Waiting.
On the under side of the telephone is a switch marked (MW), this is used to
select one of the following options: LED+, LED-, Visual Ring Indicator ( )
and high voltage (HV).
By selecting the appropriate option for your system the telephone will indicate if
there are any voice mail messages available.
This function operates differently depending on the PBX system in question
therefore please contact your system administrator for more information.
If the unit is not connected through a PBX please select ring indication ( ).
Declaration of conformity
Doro declares that the apparatus Doro Congress 100 complies with the essential
requirements and other relevant positions of Directive 1999/5/EC. A copy of
the Declaration of Conformity can be found at www.doro.com/dofc

English
EN 6 www.doro.com
Other
Troubleshooting
Check that the telephone cord is undamaged and properly plugged in.
Disconnect any additional equipment that may be connected.
If the problem is resolved the fault is with the other equipment.
Test the equipment on a known working line, if the product works then the
fault is with the line.
If you are still experiencing difculties, contact the Technical helpline.
UK
If you cannot resolve the fault using the faultnder section, technical support is
available on the Premium Rate Number: 0906 302 0114.
Calls cost 50 pence per minute (prices correct at the time of going to press),
and is operational between 9AM - 5PM Monday-Friday excluding Bank
Holidays. Alternatively,
E-mail on: tech@doro-uk.com
You can contact us in writing: Consumer Support Group, Doro UK Ltd.,
22 Walkers Road, North Moons Moat, Redditch, Worcestershire, B98 9HE,
(regarding any Spares or Technical query), or
Telephone (Spares only): 01527 584377
Web site: www.doro-uk.com
Guarantee
This product is guaranteed for a period of 12 months from the date of purchase.
Proof of purchase is required for any service or support during the guarantee period.
This guarantee shall not apply to a fault caused by an accident or any similar
incident or damage, liquid ingress, negligence, abnormal usage or any other
circumstances on the purchaser’s part. Furthermore, this guarantee shall not
apply to a fault caused by a thunderstorm or any other voltage uctuations.
This guarantee does not in any way affect your statutory rights.
(As a matter of precaution, we recommend disconnecting the telephone during
a thunderstorm.)

English
www.doro.com EN 7
Other
Australia and New Zealand
Products permitted for connection to the telephone network are marked with
in Australia and in New Zealand. These marks indicate the
products comply with the regulations and can be used without concern in the
country of purchase.
If you believe this product is malfunctioning, please refer to the relevant section
and/or consult the troubleshooting guide in this manual to ensure that you have
followed the instructions carefully. As an alternative you can visit our web site
for FAQ’s or send an e-mail for a prompt reply.
Guarantee
This product is guaranteed for a period of 12 months from the date of purchase.
Should you experience difculties with the product, please contact us for
assistance. If the product is then found to be faulty you will be asked to return
it directly to us with a copy of the purchase receipt. This guarantee shall not
apply to a fault caused by an accident or a similar incident or damage, liquid
ingress negligence, abnormal usage, not reasonably maintained or any other
circumstances on the purchaser’s part. Furthermore, this guarantee shall not
apply to a fault caused by a thunderstorm or lightning, excessive or any other
voltage uctuations or faults on the telephone line. (As a matter of precaution,
we recommend disconnecting the telephone during a thunderstorm).
This guarantee does not affect your statutory rights.
AUSTRALIA NEW ZEALAND
DORO Australia Pty Ltd Atlas Gentech (NZ) Limited
PO Box 6760 Private Bag 14927
Baulkham Hills BC NSW 2153 Panmure
Australia Auckland
New Zealand
Consumer Support Consumer Support
Ph: Ph: 1300 885 023 Ph: 0900-500-25 (Toll Call)
Fax: (02) 8853-8489 Fax: (09) 574-2722
Web site: www.doro.com.au

English
EN 8 www.doro.com

Français
www.doro.com FR 1
Installation
Raccordement
1. Reliez le câble téléphonique fourni à la prise de téléphone et à la che située
au dos du téléphone marquée t.
2. Reliez le câble exible spiralé à la prise du combiné et dans la che située au
dos du téléphone marquée Q.
3. Un déclic indique que la prise est branchée correctement.
4. Prenez le combiné: vous devez entendre la tonalité.
Amplicateur
Un amplicateur est intégré au combiné à l’attention des personnes portant une
prothèse auditive. Mettez la prothèse auditive sur le mode T pour connecter
l’amplicateur téléphonique de la prothèse auditive.
Raccordement du casque
La che située au dos du téléphone marquée =permet de raccorder le casque.
Lorsque le casque est branché, la touche casque =permet de connecter/
déconnecter la ligne téléphonique (ce qui revient à prendre et à reposer le
combiné).
Remarque!
Le casque DORO d’origine est testé et adapté au Congress 100 de DORO. Vous pouvez
utiliser d’autres types ou marques de casques; dans ce cas nous ne pourrons pas garantir leur
qualité sonore et leur bon fonctionnement.
Dans le pire des cas, le casque et le téléphone seront endommagés. La garantie du téléphone ne
couvre pas ce type de dommage.
Raccordement d’un autre appareil
Une che marquée TERMINAL est située sur la gauche du téléphone. Elle
permet de brancher un appareil supplémentaire (téléphone sans l, modem, etc.)
sur la même ligne téléphonique.

Français
FR 2 www.doro.com
Utilisation
Touche secret
Le micro peut être coupé en cours de communication en pressant la touche
secret z. Appuyez à nouveau sur la touche secret pour ré-activer le micro. La
LED en regard de la touche indique si le micro est coupé.
Appel téléphonique avec casque
1. Appuyez sur la touche casque =. Vous entendez la tonalité d’appel dans le
casque et la LED en regard de la touche casque s’allume.
2. Composez le numéro de téléphone souhaité.
3. Pour mettre n à la communication, appuyez à nouveau sur la touche
casque.
Touche Bis
Lorsque la ligne de votre correspondant est occupée ou si vous désirez rappeler le
dernier numéro composé, prenez le combiné ou appuyez sur la touche casque =.
Appuyez ensuite sur la touche bis r.
Mise en garde
Utilisez la touche hpour mettre un appel en garde. Vous pouvez reprendre
l’appel téléphonique sur un autre téléphone (branché sur la même ligne).
Ainsi, en cours d’appel, appuyez sur la touche hpour mettre l’appel en garde,
et raccrochez le combiné.
Pour reprendre l’appel téléphonique, décrochez le combiné d’un des téléphones
branché sur la même ligne.
Autocommutateurs / Opérateurs
Cet appareil peut être installé derrière la plupart des autocommutateurs. Il
peut également vous donner accès à des services additionnels proposés par des
opérateurs de réseau. Les touches *, #et Rvous permettront d’accéder à ces
fonctions ou services complémentaires.
Pour toute information, adressez-vous directement au fabricant du PABX ou à
votre opérateur de réseau.

Français
www.doro.com FR 3
Réglages
Mémoires
Ce téléphone possède 10 numéros enregistrés en mémoires abrégées. Une fois
un numéro de téléphone enregistré sur une de ces plages, vous le composez
en pressant simplement deux touches. Les plages en mémoire abrégée sont
numérotées de 0 à 9.
Enregistrement de numéros en mémoire abrégée
1. Prenez le combiné et appuyez sur la touche P(ne tenez pas compte de
la tonalité).
2. Appuyez sur la touche m.
3. Sélectionnez ensuite la plage de mémoire souhaitée 0-9.
4. Composez le numéro de téléphone souhaité. (21 chiffres max.).
5. Appuyez sur la touche Pet reposez le combiné. Le numéro est alors
enregistré.
Composer un numéro enregistré en mémoire abrégée
1. Prenez le combiné (ou appuyez sur la touche casque) et attendez la tonalité.
2. Appuyez sur la touche m.
3. Sélectionnez le numéro de mémoire abrégée en appuyant sur une des touches
numérotées 0-9. Le numéro est composé automatiquement.
Insérez une pause en appuyant sur P.
En cas de changement de numéro, remplacez l’ancien par le nouveau.

Français
FR 4 www.doro.com
Réglages
Réglage du volume
Utilisez la touche de réglage du volume pour ajuster le volume du combiné/
casque pendant une communication. Appuyez sur la touche $pour augmenter
le volume et sur la touche £pour le réduire.
Réglage de la sonnerie
1. Prenez le combiné (ne tenez pas compte de la tonalité) et appuyez sur la
touche Pet sur #.
2. Sélectionnez une des sonneries en appuyant sur une des touches numérotées
0-9qui correspondent au tableau suivant.
3. Appuyez sur la touche Pet reposez le combiné. La sonnerie est alors réglée.
Touche/réglage Mélodie Niveau sonore
1.......................................... Mélodie A....................... Faible
2.......................................... Mélodie A....................... Normal
3.......................................... Mélodie A....................... Fort
4.......................................... Mélodie B....................... Faible
5.......................................... Mélodie B....................... Normal
6(réglaged’usine).............. Mélodie B....................... Fort
7.......................................... Mélodie C...................... Faible
8.......................................... Mélodie C...................... Normal
9.......................................... Mélodie C...................... Fort
0.......................................... Coupée *........................ -
* Quand la touche 0 est sélectionnée, la sonnerie reste coupée tant que le combiné n’est pas
décroché. Après utilisation du combiné, le réglage antérieur de la sonnerie est rétabli.

Français
www.doro.com FR 5
Autres
Fonctions avancées
Vous pouvez régler les paramètres techniques pour la connexion de l’appareil
derrière un PABX, etc … grâce aux 3 curseurs situés dans le compartiment
sous l’appareil.
Pour enlever la trappe du compartiment, appuyez avec un petit tournevis (max.
2.5mm) ou outil similaire dans le trou situé à droite du compartiment.
IMPORTANT: Ces réglages doivent être effectués par une personne qualiée.
Touche «R»
Sélectionnez le réglage souhaité en positionnant le curseur sur 100 / 300 ou
600ms (le réglage par défaut est 300 ms)
NumérotationFréquencesVocalesouDécimales(♫/...)
Sélectionnez le réglage souhaité en positionnant le curseur sur
♫(Fréquences vocales) ou
... (numérotation Décimale) (le réglage par défaut est ♫)
Indicateur de messages en attente
Certains PABX utilisent la fonction d’indication de messages en attente. Ce
terminal peut indiquer la présence de messages sur le serveur vocal à condition
de sélectionner la methode qui correspond à celle utilisée par le PABX. Sous
l’appareil, il y a un switch qui permet de la sélectionner.
Le fonctionnement de l’indicateur de message en attente dépend du PABX utilisé.
Pour plus d’information, veuillez contacter votre installateur. Les options sont les
suivantes: LED+; LED-; Indicateur visuel( ) et surtension (
HV
). Si le poste n’est
pas connecté derrière PABX, positionnez le switch sur le symbol .
Declaration de conformité
Doro certie que cet appareil Doro Congress 100 est compatible avec l’essentiel des
spécications requises et autres points de la directive 1999/5/EC. Une copie de la
déclaration de conformité est disponible à l’adresse suivante: www.doro.com/dofc

Français
FR 6 www.doro.com
Autres
Dépannage
Vériez que le câble téléphonique soit en bon état et qu’il soit branché
correctement. Débranchez tout autre matériel, rallonges et téléphones. Si
l’appareil fonctionne alors normalement, la panne est causée par le matériel
additionnel.
Testez le matériel sur une ligne en état de marche. S’il fonctionne, cela signie
que votre propre raccordement téléphonique est défectueux. Signalez la panne à
votre opérateur.
Garantie et S.A.V.
Cet appareil est garanti deux ans à partir de sa date d’achat, la facture faisant
foi. La réparation dans le cadre de cette garantie sera effectuée gratuitement.
La garantie est valable pour un usage normal de l’appareil tel qu’il est déni
dans la notice d’utilisation.
Les fournitures utilisées avec l’appareil ne sont pas couvertes par la garantie.
Sont exclues de cette garantie les détériorations dues à une cause étrangère à
l’appareil.
Les dommages dûs à des manipulations ou à un emploi non conformes, à un
montage ou entreposage dans de mauvaises conditions, à un branchement ou
une installation non conformes ne sont pas pris en charge par la garantie.
Par ailleurs, la garantie ne s’appliquera pas si l’appareil a été endommagé à la
suite d’un choc ou d’une chute, d’une fausse manoeuvre, d’un branchement
non conforme aux instructions mentionnées dans la notice de l’effet de
la foudre, de surtensions électriques ou électrostatiques, d’une protection
insufsante contre l’humidité, la chaleur ou le gel.
En cas de panne, adressez-vous au S.A.V. de votre revendeur ou installateur.
Pour la France
En tout état de cause, la garantie légale pour vices cachés s’appliquera
conformément aux articles 1641 et suivants du Code Civil.
Si vous avez des soucis d’utilisation, contactez notre Service d’Assistance
Téléphonique au 08 92 68 90 18 ( N° Audiotel - 0,34€/min.).
E-Mail : contact@doro.fr
Site Internet : www.doro.com

Svenska
www.doro.com SE 1
Installation
Inkoppling
1. Anslut telefonens telesladd till ett telejack och till uttaget märkt tpå
telefonens undersida.
2. Anslut den medföljande spiralsladden till uttaget på luren och till uttaget
märkt Qpå telefonens undersida.
3. Ett klickljud hörs när modularkontakten kommit riktigt på plats.
4. Lyft luren och kontrollera att kopplingston hörs.
Hörselslinga
Koppla in hörapparatens telespole genom att ställa hörapparaten i T-läge.
Anslutning av headset
Ett headset kan anslutas till uttaget märkt =på telefonens undersida. När ett
headset är inkopplat används headsetknappen =för att koppla upp/ned linjen
(motsvarande att lyfta och lägga på luren).
Observera!
DORO original-headset är utprovade och anpassade för DORO Congress 100. Det går att
använda andra typer och märken av headset, men funktion eller ljudkvalitet kan då inte
garanteras.
I värsta fall kan dessa skada både själva headsetet och telefonen. Telefonens garanti täcker inte
denna typ av skador.
Anslutning av extrautrustning
På telefonens vänstra sida nns ett uttag märkt TERMINAL som kan användas
för att koppla in annan teleutrustning till samma telefonlinje t ex trådlös telefon,
modem etc.

Svenska
SE 2 www.doro.com
Handhavande
Sekretessknapp
Mikrofonen kan kopplas bort under samtal genom att trycka på sekretess-
knappen z. Tryck en gång till för att aktivera mikrofonen. Indikatorn vid
knappen visar när mikrofonen är bortkopplad.
Uppringning/samtal med headset
1. Tryck på headsetknappen =. Kopplingston hörs i headsetet, och indikatorn
vid headsetknappen tänds.
2. Slå önskat telefonnummer med siffertangenterna.
3. Tryck på headsetknappen igen för att avsluta samtalet och koppla ned linjen.
Parkering
Med knappen hkan ett samtal parkeras i telefonen. Samtalet kan sedan
plockas upp från valfri telefon (som är kopplad på samma linje).
Volymkontroll
Med volymkontrollen kan ljudstyrkan i luren regleras i era steg under samtal.
Tryck på knapp $för att höja volymen, och på knapp £för att sänka.
Other manuals for Congress 100
2
Table of contents
Languages:
Other Doro Telephone manuals

Doro
Doro PHONEEASY RECORD 327CR User manual

Doro
Doro 6521 User manual

Doro
Doro 909c User manual

Doro
Doro HANDLEPLUS 326I GSM User manual

Doro
Doro PhoneEasy 331ph User manual

Doro
Doro Arc 7 User manual

Doro
Doro PhoneEasy 311 User manual

Doro
Doro PhoneEasy 331ph User manual

Doro
Doro NeoBio 40 User manual

Doro
Doro 914c User manual

Doro
Doro HearPlus 317ci User manual

Doro
Doro PHONEEASY 410GSM User manual

Doro
Doro AUB 200 User manual

Doro
Doro 313C User manual

Doro
Doro COMFORT 4005 User manual

Doro
Doro th50 User manual

Doro
Doro 80 User manual

Doro
Doro PhoneEasy Display 312C User manual

Doro
Doro ALERTACALL 200E User manual

Doro
Doro 516CR User manual