DuraLabel 9000 User manual

Graphic Products, Inc. |800.788.5572
DuraLabel.com |GraphicProducts.com
QUICKSTART GUIDE
9000

Minimum System Requirements
Operating System: Windows 2000 SP4, XP SP2, Vista, 7
Memory: 128 MB RAM
Hard Drive: 100 MB
Additional Requirements: IT Administrator privileges
© 2008–2013 Graphic Products, Inc. All Rights Reserved

1
DuraLabel.com 800.788.5572
CONTENTS
Contents
1.Introduction.....................................................2
2.EquipmentChecklist .............................................3
3.LoadingthePrinter...............................................4
3.1LoadingVinylSupply............................................4
3.2LoadingRibbon................................................7
4.ConnectingthePrinter............................................8
4.1UpgradingaDriver..............................................9
4.2. Installing DuraLabel 9000 Software Using a USB Cable. . . . . . . . . . . . . . . 9
4.3. Installing DuraLabel 9000 Software Using a Parallel Cable . . . . . . . . . . .10
5. Conguring Printer Drivers .......................................12
5.1 Continuous Vinyl Printing Instructions . . . . . . . . . . . . . . . . . . . . . . . . . . . . .12
5.2 Die-cut Label Printing Instructions. . . . . . . . . . . . . . . . . . . . . . . . . . . . . . . .12
5.3 B Mark Label Printing Instructions. . . . . . . . . . . . . . . . . . . . . . . . . . . . . . . .13
6. Installing DuraSuite Labeling Software . . . . . . . . . . . . . . . . . . . . . . . . . . . . .13

2
DuraLabel.com 800.788.5572
INTRODUCTION
1. Introduction
Congratulations on the purchase of your DuraLabel®9000 Printer. This
QuickStart Guide explains how to set up your printer, load supplies and print
labels. It’s designed to get you printing as quickly as possible.
The DuraSuite Labeling Software included with your printer expands your
creative capabilities, simplifies safety compliance and lets you produce
professional-quality labeling for virtually any application*. You’ll be printing arc
flash, NFPA, right-to-know, GHS and custom labels in no time!
Call us at 800.788.5572 if you have any questions about your new DuraLabel
9000 Printer. We’re here to help!
*Refer to the DuraSuite User’s Guide for complete information.

EQUIPMENT CHECKLIST
3
DuraLabel.com 800.788.5572
2. Equipment Checklist
PACKAGE CONTENTS
DuraLabel 9000 Printer
DuraLabel 9000 Installation CD
DuraSuite Labeling Software Installation CD
DuraLabel 9000 QuickStart Guide and User’s Guide
Power Cord
USB Cable
Supply Guides (2)
Ribbon Supply Core
Ribbon Guides with Screws (2)
If anything is missing, please call your Graphic Products representative at
800.788.5572.

4
DuraLabel.com 800.788.5572
LOADING THE PRINTER
3. Loading the Printer
DuraLabel ribbon and vinyl supplies have been optimized for compatibility and
print quality. Only authorized DuraLabel supplies from Graphic Products will
print correctly with the DuraLabel 9000 Printer.
3.1 Loading Vinyl Supply
Always turn the power OFF when loading supplies. Always wait at
least 5 seconds before turning power back ON.
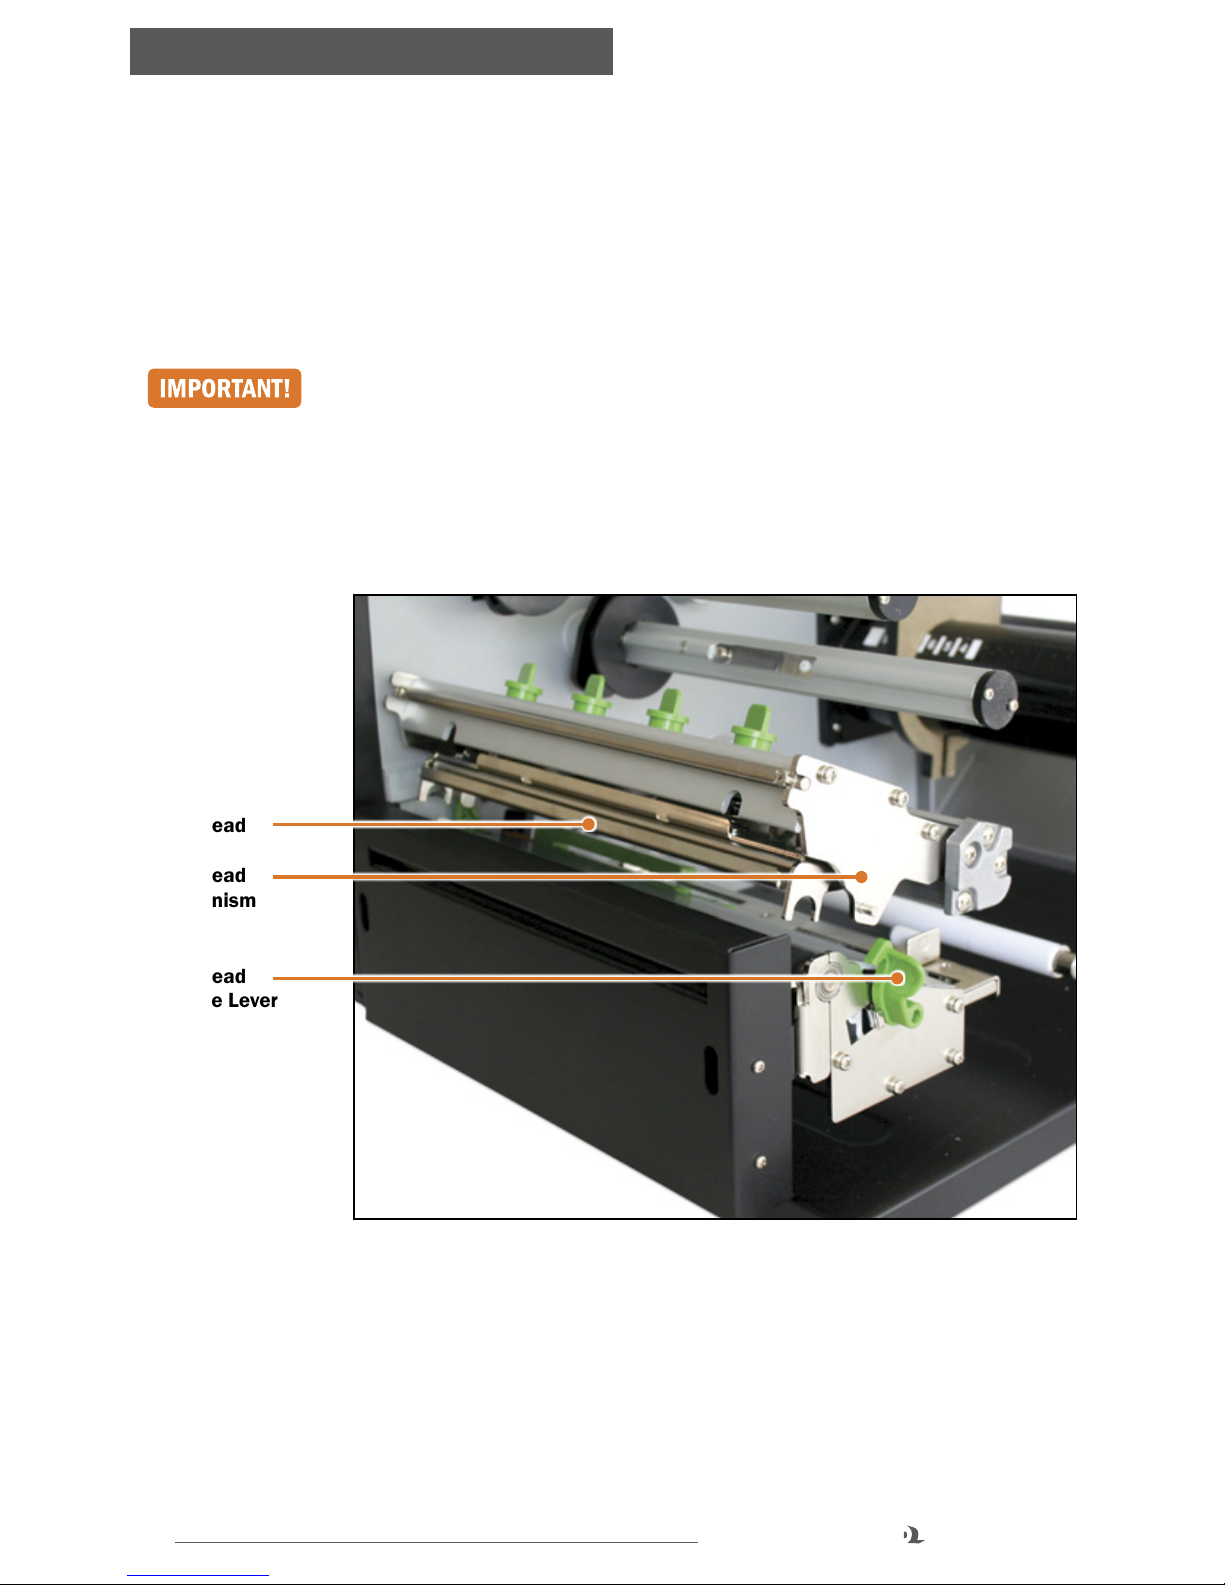
A. Open the printer cover by lifting up on the handle on the right side.
B. Push the green print head release lever to pop up the print head mechanism.
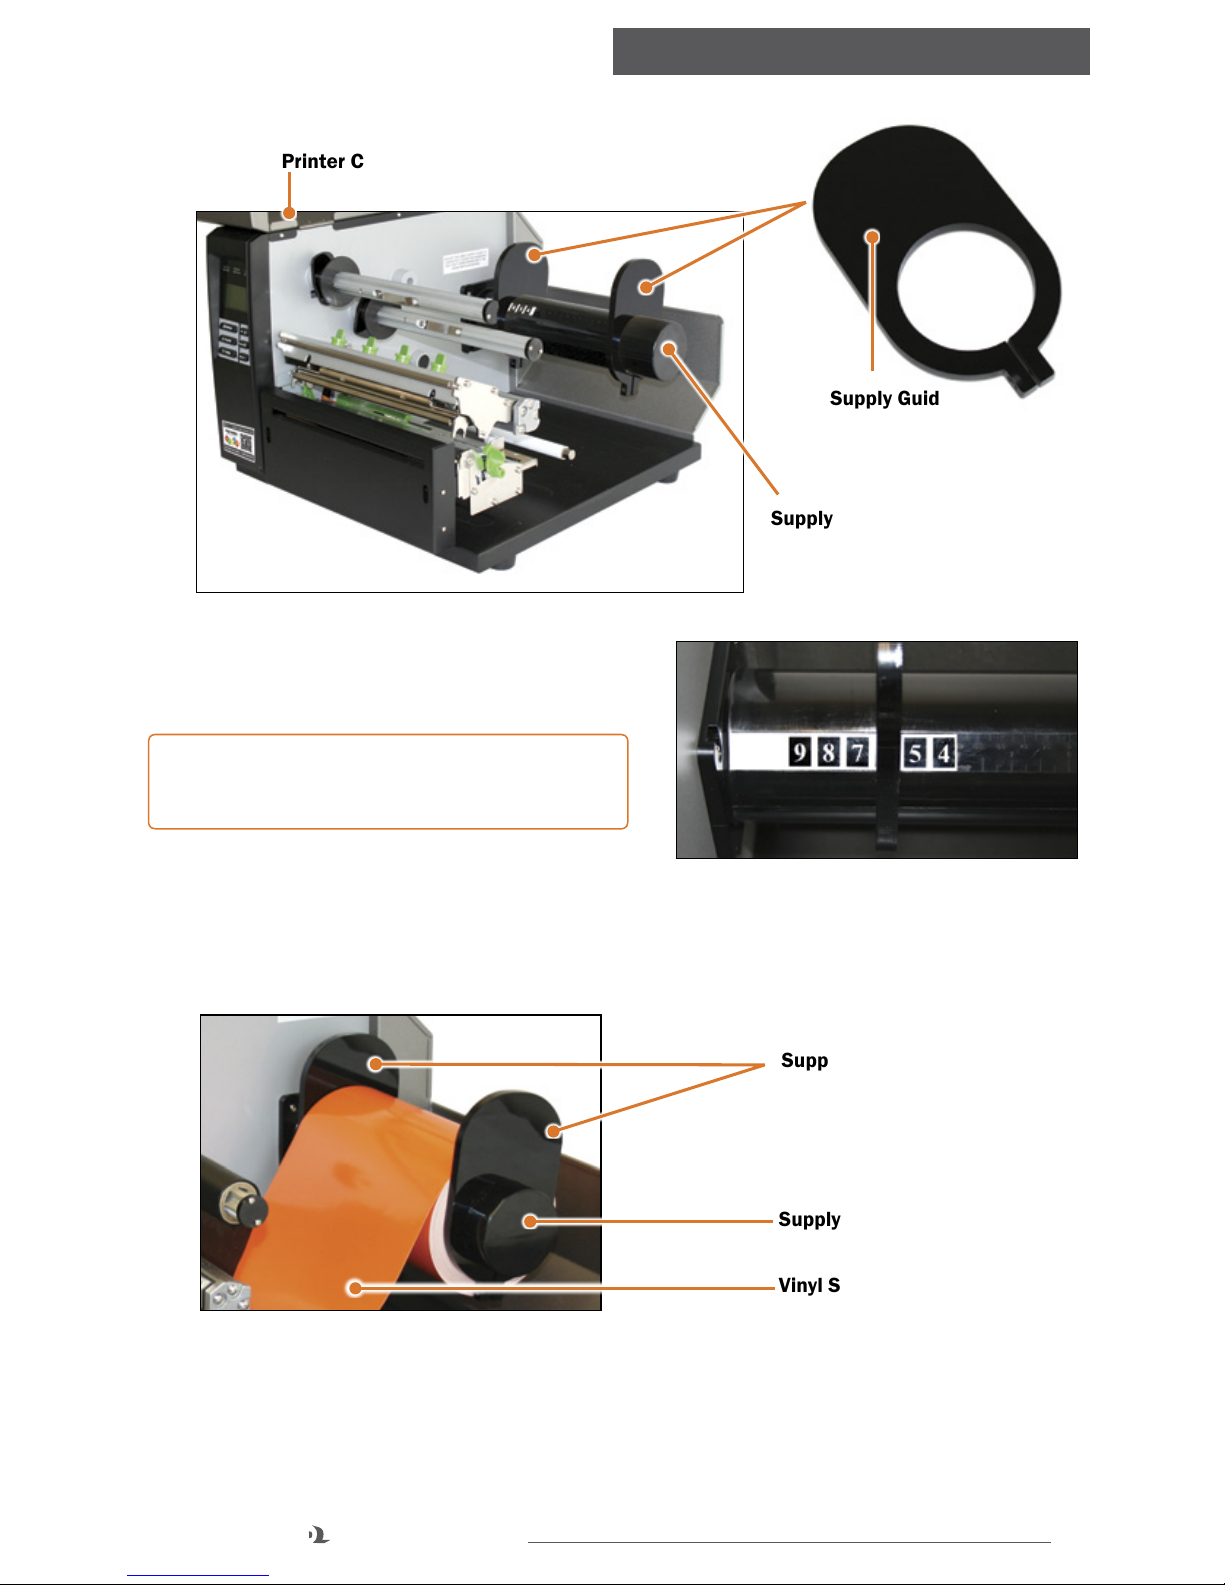
C. Remove and set aside the outside supply guide from the supply bar (Fig. 2).
D. Adjust the inside supply guide to cover the number corresponding to the size
of label supply being loaded (Fig. 3).
Print Head
Mechanism
Print Head
Release Lever
Print Head
FIGURE 1

5
DuraLabel.com 800.788.5572
LOADING THE PRINTER
Printer Cover
Supply Guide
FIGURE 2
Supply Bar
E. Place the label supply onto the supply
bar.
NOTE: Label supply should roll over the
top and toward the front of the printer.
F. Fit the supply guide onto the label bar,
against the vinyl supply but with enough
room for the supply to rotate easily.
FIGURE 3 The inside supply guide is set for 6"
vinyl supply/media.
Supply Guides
Supply Bar
Vinyl Supply/Media
FIGURE 4

6
DuraLabel.com 800.788.5572
LOADING THE PRINTER
G. Pull the leading edge of the label supply and thread it under the media guide
bar and through the adjustable media guides.
H. Pull the vinyl supply over the black platen roller and through the printed label
opening.
NOTE: Make sure the label supply threads under the green media sensor,
located under the print head.
I. Move the adjustable media guides to fit the width of the vinyl supply,
securing the vinyl in place.
FIGURE 5
Printed
Label
Opening
Adjustable
Media Guides
Platen
Roller
Print Head
Mechanism
Supply
Guides
Supply Bar
Media
Guide Bar
Media Sensor
Printed Label
Opening
Adjustable
Label Guides
FIGURE 6

7
DuraLabel.com 800.788.5572
LOADING THE PRINTER
3.2 Loading Ribbon
Always turn the printer OFF when loading supplies. Always wait at
least 5 seconds before turning power back ON.
A. Set ribbon guides based on loaded ribbon size.
a. For 4.33" ribbon, move
each ribbon guide to the
line indicated on the
ribbon spindle and
tighten the screw on the
top of each ribbon guide.
b. For 8.66" ribbon, move the ribbon guides against the inside printer wall.
FIGURE 1 Guides for 4.33" ribbon
FIGURE 2 Guides for 8.66" ribbon
B. Slide an empty supply core onto the front ribbon rewind spindle, flush against
the ribbon guide.
C. Slide a roll of ribbon supply onto the ribbon spindle, flush against the ribbon
guide, with the leading edge hanging down toward the back of the printer.
D. Pull the ribbon supply back, then down and thread it underneath the print
head mechanism and above the ribbon sensor (black bar above the green
media sensor).
Media Sensor Ribbon Sensor
Print Head Mechanism
Ribbon Spindle (back)
Ribbon Rewind Spindle (front)
FIGURE 3

8
DuraLabel.com 800.788.5572
CONNECTING THE PRINTER
E. Tape the end of the ribbon supply
to the front of the empty supply
core.
F. Roll the ribbon rewind spindle
(front spindle) clockwise a few times, toward
the back of the printer to tighten the ribbon
and remove flaws and fingerprints.
G. Press down to close, with a hand on each
side of the print head mechanism.
NOTE: Make sure the print head release lever
latches closed.
FIGURE 4
Ribbon Spindle
Ribbon Rewind
Spindle
Print Head Mechanism
Print Head Release Lever
FIGURE 5
H. Close the printer cover.
I. Turn the printer ON.
4. Connecting the Printer
A. Connect the power supply.
B. Connect the DuraLabel 9000 to your PC using a USB or parallel cable.
C. Turn on the DuraLabel 9000.
D. If using a USB cable, follow instructions in Section 4.2, Using a USB Cable.
E. If using a parallel cable, follow instructions in Section 4.3, Using a Parallel
Cable.

9
DuraLabel.com 800.788.5572
CONNECTING THE PRINTER
NOTE: When printing RTK, arc ash and other die-cut or B Mark labels, you
must set up the printer driver and printer. Refer to Section 6.2, Die-Cut Label
Printing Instructions, or Section 6.3, B Mark Label Printing Instructions, in your
DuraLabel 9000 User’s Guide.
4.1 Upgrading a Driver
If you’re upgrading from a previously installed driver, follow these steps to
uninstall the previous driver:
A. Insert the installation CD.
B. Press the Uninstall Driver button on the installation screen.
C. Click Remove printer drivers, then click Next.
D. Click Use advanced printer driver removal options, then click Next.
E. Check all existing DuraLabel printers, then click Next.
F. Check all existing DuraLabel drivers, then click Next.
G. Check all existing DuraLabel components, then click Next.
H. Check the files associated with the deleted items you wish to remove, then
click Next.
I. Review the list provided, then click Finish.
J. Click Restart.
The new DuraLabel 9000 printer driver may now be installed.
NOTE: If upgrading from an older driver, you may need to restart your
computer during installation of the new driver.
4.2 Installing DuraLabel 9000 Software Using a USB Cable
You may need IT administrator privileges to perform this
installation.
If Found New Hardware announcement appears, select No, not at this time.
A. Insert the DuraLabel 9000 Installation CD in your computer’s disk drive. A
DuraLabel 9000 startup screen appears.

10
DuraLabel.com 800.788.5572
CONNECTING THE PRINTER
NOTE: If the CD does not run automatically, go to Start > Computer and
double-click on the DLP icon.
B. Click on Driver Wizard, then click Next in the Driver Wizard window that
appears (this step may run automatically when using a USB cable).
C. Click I Agree on the Windows Printer Driver License Agreement window
that appears.
D. Select DuraLabel 9000 and click Next on the DuraLabel Driver Selection
window that appears.
E. Choose the install location and click Install on the Choose Install Location
window that appears.
F. Select Install printer drivers on the Driver Wizard window that appears and
click Next.
G. A Plug and Play Detection window appears. Click on Graphic Products
DuraLabel 9000 and click Next.
H. Enter Printer Name and set it as the default printer by checking the adjoining
box in the Specify Printer Name window that opens. Choose a sharing
option, then click Next.
I. Review information on the Completing the Seagull Driver Wizard window that
appears. Click Finish if the information is correct. If it isn’t, correct previous
selections and click Finish when the information is correct.
J. A Driver Wizard Completed Successfully window appears, confirming the
printer driver installation was completed successfully. Now click Close.
K. The previous window closes and a Completing the DuraLabel Driver Setup
Wizard window appears. Click Finish to complete the new driver installation.
4.3 Installing DuraLabel 9000 Software Using a Parallel Cable
NOTE: Skip this step if using a USB cable.
You may need IT administrator privileges to perform this
installation.
A. Insert the DuraLabel 9000 Installation CD in your computer’s disk drive. A
DuraLabel 9000 startup screen appears.

11
DuraLabel.com 800.788.5572
CONNECTING THE PRINTER
NOTE: If the CD does not run automatically, go to Start > Computer and
double-click on the DLP icon.
B. Click on Driver Wizard, then click Next in the Driver Wizard window that
appears (this step may run automatically when using a USB cable).
C. Click I Agree on the Windows Printer Driver License Agreement window
that appears.
D. Select DuraLabel 9000 and click Next on the DuraLabel Driver Selection
window that appears.
E. Choose the install location and click Install on the Choose Install Location
window that appears.
F. Select Install printer drivers on the Driver Wizard window that appears and
click Next.
G. Select Graphic Products DuraLabel 9000 on the Specify Printer Model
window that appears and click Next.
H. Select the LPT1 port on the Specify Port window that appears and click
Next.
I. Select Printer Name, set the printer as default and choose printer sharing
options on the Specify Printer Name window that opens, then click Next.
J. Review information on the Completing the Seagull Driver Wizard window
that opens and click Finish if the information is correct. If it isn’t correct,
revise the selections made in previous steps and click Finish when the
window’s information is accurate.
K. A Driver Wizard Completed Successfully window appears, confirming the
printer driver installation was completed successfully. Click Close.
L. The previous window closes and a Completing the DuraLabel Driver Setup
Wizard window appears. Click Finish to complete the new driver installation.

12
DuraLabel.com 800.788.5572
CONFIGURING PRINTER DRIVERS
5. Conguring Printer Drivers
Perform the driver configuration before opening the document
you plan to print or close any documents you currently have open before
making these changes.
A. Click Start > Devices and Printers. A Devices, Printers and Faxes window
appears.
B. Right-click the Graphic Products DuraLabel 9000 icon and select Printing
preferences. A Printing Preferences dialog box appears.
C. Click the Page Setup tab and select Landscape or Portrait, depending on
your label’s orientation.
D. If your label size is not shown in the Stock Name drop-down menu, click Edit
and set the size to match your label size.
NOTE: Your DuraLabel 9000 printer drivers are preset to several print values.
Please be aware that changing a preset value is not fully supported by all
software programs. For best results, make changes to preset values from the
Devices and Printers window.
5.1 Continuous Vinyl Printing Instructions
Your printer driver has been preset to common settings to reduce the steps
needed to set them manually. You can change your settings by following these
steps:
A. Select the Stock tab and set Type to Continuous. To cut after each label,
select Cut from the Post-Print Action drop-down menu and After Every Page
from the Occurrence drop-down menu, then click OK.
B. To cut after each job, select Cut from the Post-Print Action drop-down menu
and select After Job from the Occurrence drop-down menu.
C. Click Apply.
These settings may be adjusted in Printer Properties when printing your labels.
5.2 Die-cut Label Printing Instructions
Label supply must be calibrated to print die-cut labels. Using the menu on the
left side of the front of your printer:

13
DuraLabel.com 800.788.5572
INSTALLING DURASUITE SOFTWARE
A. Press the Menu button.
B. Select Setup.
C. Select Sensor.
D. Select Calibration.
E. Select Gap Mode.
F. Select Automatic.
G. The printer will begin to feed supply as it calibrates.
H. To change driver settings, follow directions in Section 6.2.2, Driver Settings,
in the DuraLabel 9000 User’s Guide.
5.3 B Mark Label Printing Instructions
Label supply must be calibrated to print B Mark labels. Using the menu on the
left side of the front of your printer:
A. Press the Menu button.
B. Select Setup.
C. Select Sensor.
D. Select Calibration.
E. Select B Mark Mode.
F. Select Automatic.
G. The printer will begin to feed supply as it calibrates.
H. To change driver settings, follow directions in Section 6.3.2, Driver Settings,
in the DuraLabel 9000 User’s Guide.
6. Installing DuraSuite Labeling Software
DuraSuite™ Labeling Software lets you create professional-quality pipe markers
and arc flash, RTK, NFPA Diamond, GHS and custom labels, quickly and easily.
Insert the DuraSuite Labeling Software installation CD in your computer’s
disk drive and follow the directions that appear on your screen. Refer to the
DuraSuite Labeling Software User’s Guide for additional information.
NOTE: You may need IT administrator privileges to perform this installation.

v. 2.0 - 01/23/13
Graphic Products, Inc. | 800.788.5572
DuraLabel.com | GraphicProducts.com
© 2008–2013 Graphic Products, Inc. All Rights Reserved
Other manuals for 9000
5
Table of contents
Other DuraLabel Printer manuals

DuraLabel
DuraLabel Toro User manual

DuraLabel
DuraLabel Toro User manual

DuraLabel
DuraLabel 900 User manual

DuraLabel
DuraLabel 9000 User manual

DuraLabel
DuraLabel 9000 User manual

DuraLabel
DuraLabel 9000 User manual

DuraLabel
DuraLabel Toro User manual

DuraLabel
DuraLabel PRO 300 User manual

DuraLabel
DuraLabel PRO User manual

DuraLabel
DuraLabel Toro User manual