DuraLabel Toro User manual

800.788.5572
DuraLabel.com
QUICKSTART GUIDE
PORTABLE STANDALONE PRINTER

2| 1. Getting Started DuraLabel.com | 800.788.5572
1. Getting Started
Thank you for choosing the DuraLabel Toro. With this guide, you’ll quickly learn how to
set up your Toro, load supplies, and start printing labels.
1. Unpack the Toro and verify that the following components are included:
◦Toro Printer
◦AC Power Brick/Adapter and Cord
◦Wireless Mouse
◦Battery and Battery Charger (if purchased)
2. Place the Toro printer with the Control Panel facing toward you.
3. Plug the AC power brick/adapter into a standard, grounded three-prong wall outlet,
then plug the other end into the Toro.
4. Push the Keyboard Release Slider on the control panel to the right and swing the
keyboard down.
5. Push the screen release button to the right of the computer screen. Pull the screen
up until it locks on the desired position.
Supply Feed Power Button
Printer Status Light
Supply Status Light
Battery Status Light
Keyboard Release Slider
Control Panel

DuraLabel.com | 800.788.5572 2.1 Loading Ribbon | 3
2. Loading Ribbon and Label Stock
To load your Toro with supplies, you will need to raise the hinged cover. The cover will
hold at the fully-opened position.
2.1 Loading Ribbon
The printing ribbon provides the “ink” for the printing process. As labels are printed, the
used ribbon will be collected on a take-up roller for later disposal.
1. Start with a fresh, empty ribbon take-up core. Fit one end of the core onto the gray
spring-loaded holder on the top of the print head carriage. Then, fit the other end of
the ribbon core onto the wheeled holder (Fig. A). Turn the take-up core or holder by
hand, until the tab on the holder locks into the notch in the core.
2. Then, push the gray print head release tabs (Fig. B) to release the print head
carriage. It will spring upward. Hold the new roll of ribbon so the loose end falls to
the rear of the printer. Fit one end of the ribbon core onto the gray spring-loaded
holder (Fig. B) on the underside of the print head carriage.
3. Then, fit the other end of the ribbon core onto the geared holder. Turn the ribbon
core by hand until the tab on the holder locks into the notch in the core.
4. Pull the loose end of the ribbon up and around the print carriage and use a small
piece of label stock or tape to secure the end of the ribbon to the top of the empty
rewind core.
5. Pull the ribbon snug by turning the gray take-up wheel (Fig. A).
Ribbon Take-up Core Holders
Print head release Tabs
Ribbon Supply Core Holders
Take-Up Wheel
FIG. A FIG. B

4| 2.2 Loading Label Stock DuraLabel.com | 800.788.5572
LOADING RIBBON AND LABEL STOCK
2.2 Loading Label Stock
Your label stock is the base material for your labels, or the “paper” in the printing
process. For each roll of ribbon you use in the Toro, you will probably use three or four
rolls of label stock.
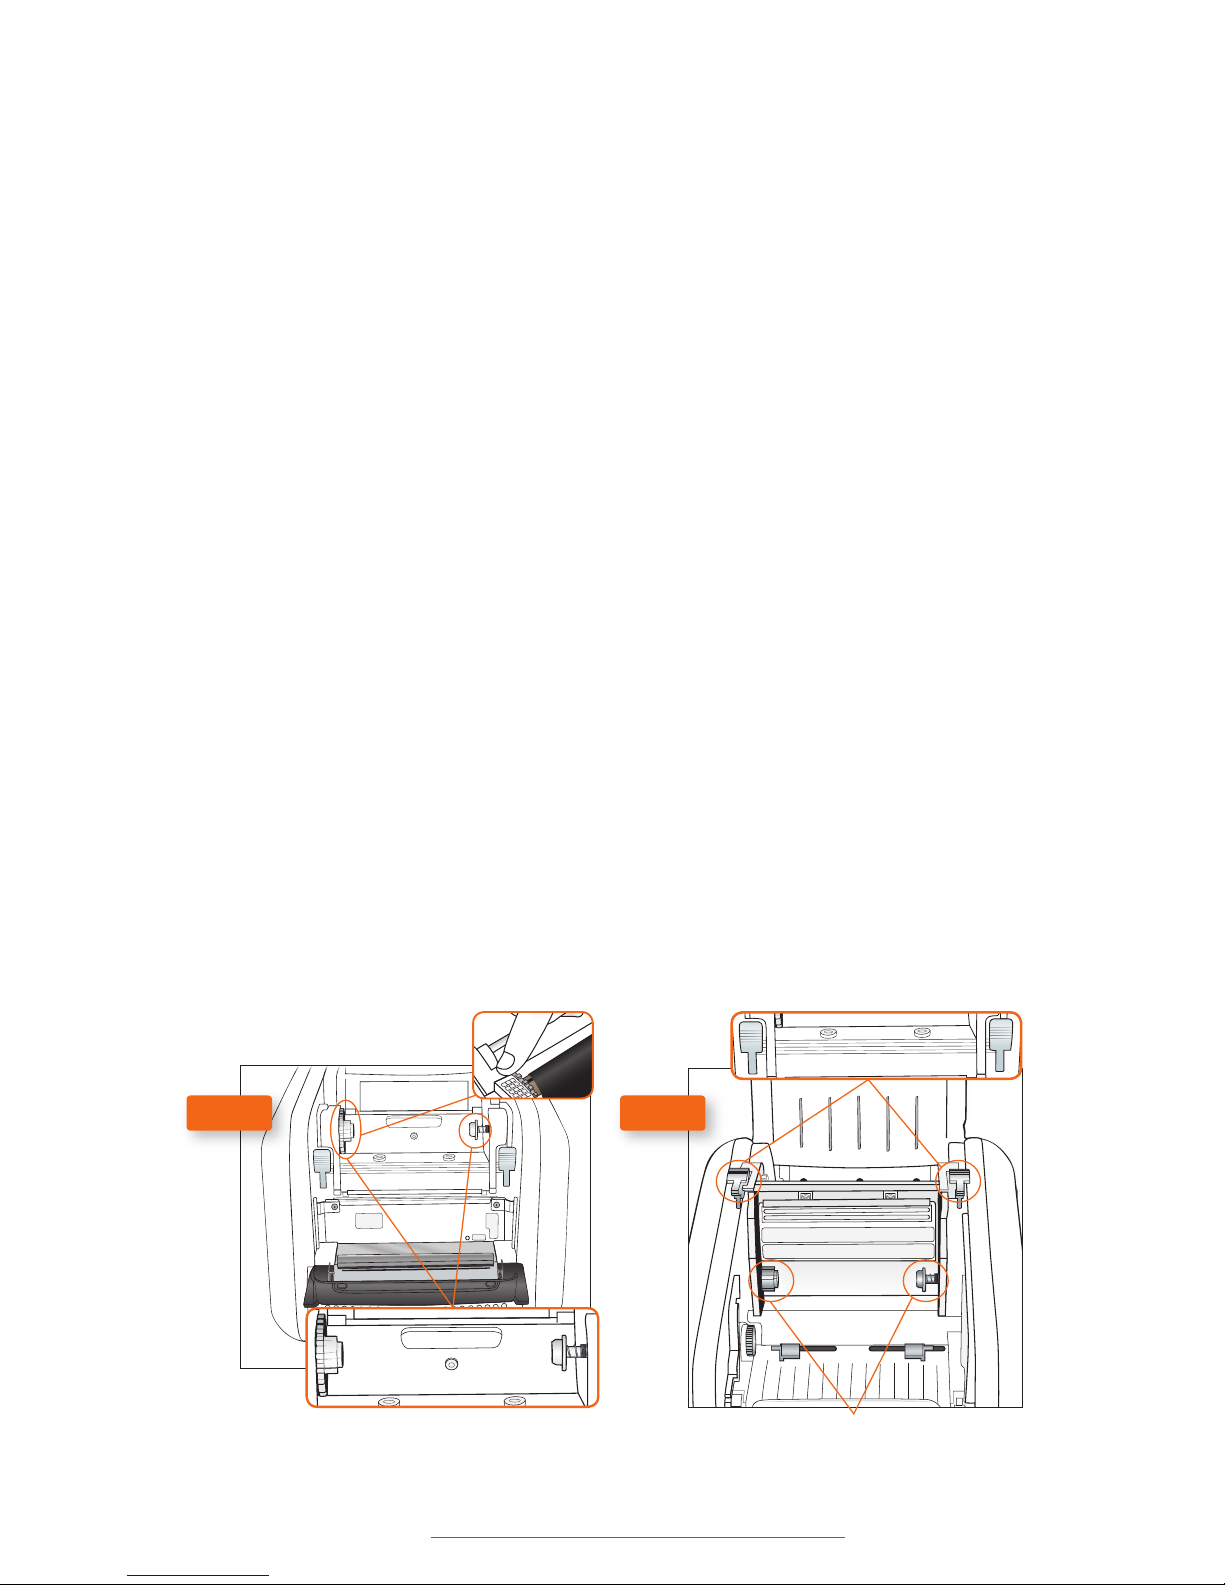
Cutter Module
Print
Carriage
Fixing Tabs
Adjustable
Label Guides
FIG. C
1. Place label supply onto the supply
spindle and slide the fixing tabs onto
either side (Fig. C) to hold the roll in the
center of the spindle.
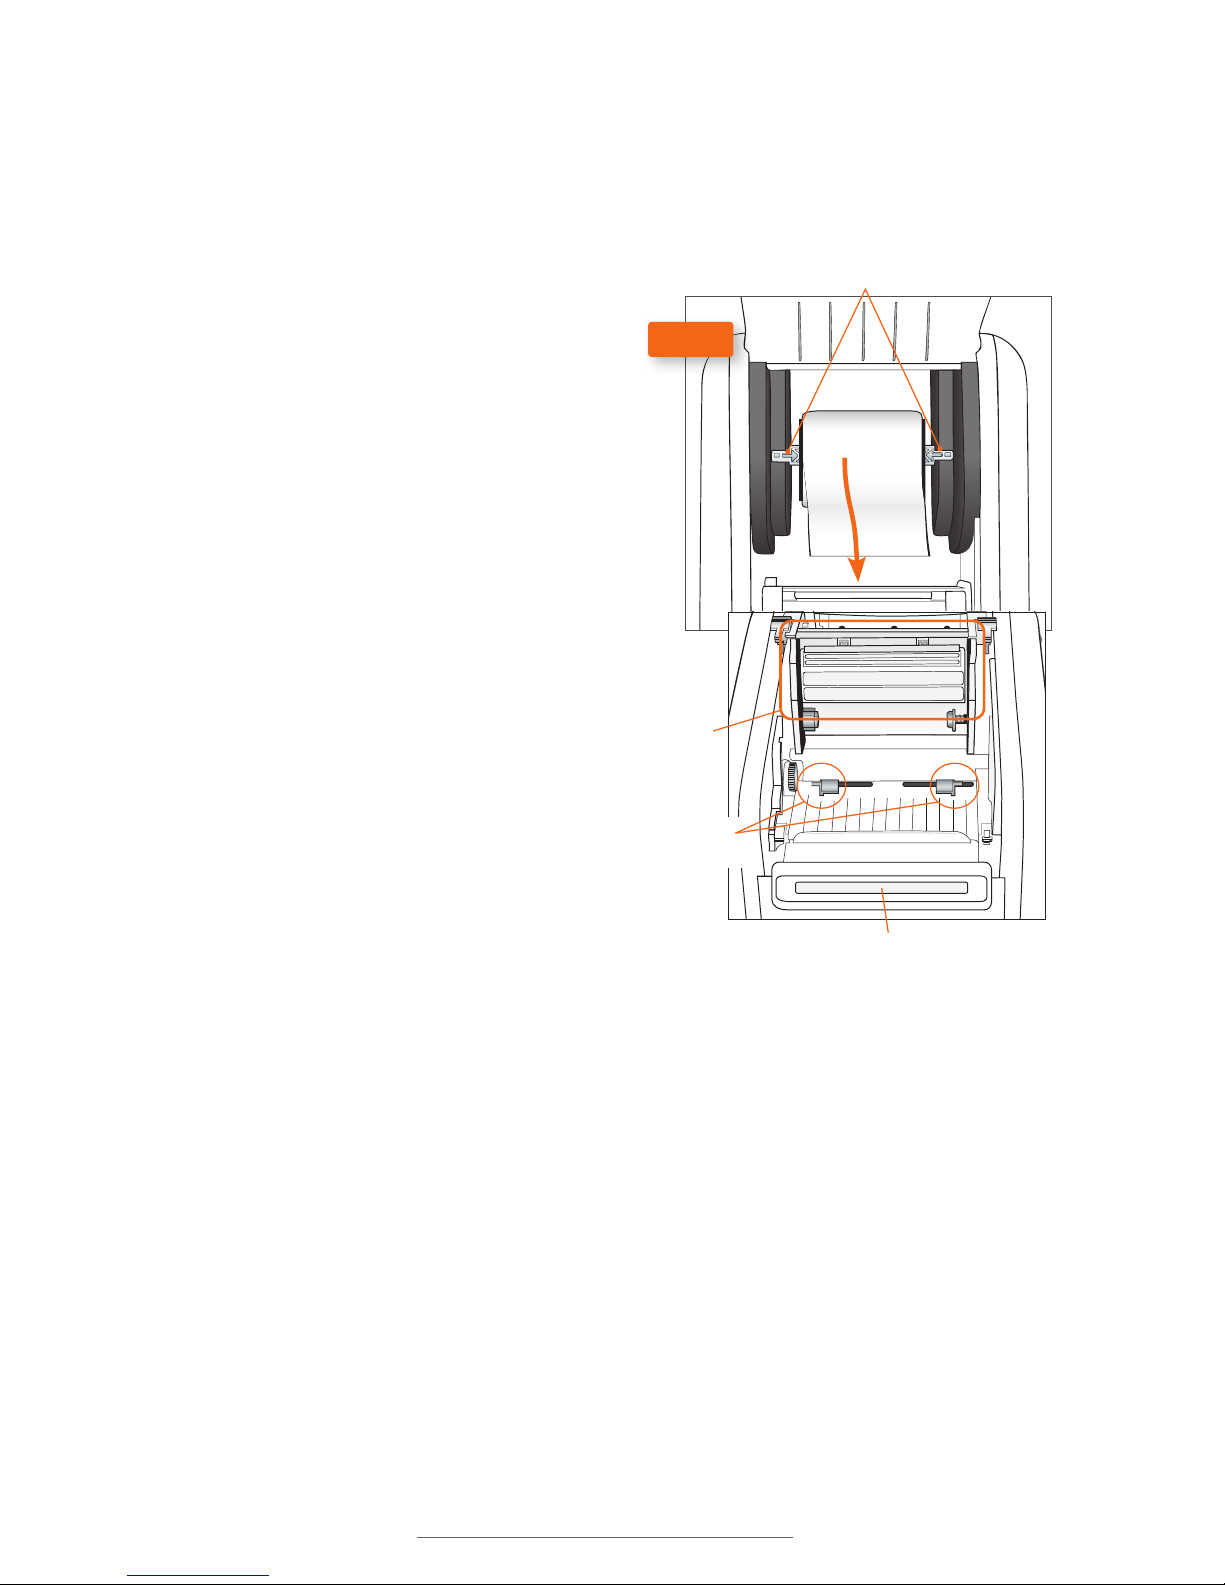
2. With the label supply unrolling from
the top of the roll and feeding toward
the print head carriage, rest the supply
spindle into its slots in your Toro.
3. Feed the end of the label supply under
the print carriage, threading it between
and beneath the gray adjustable label
guides, and over the top of the rubber
roller near the cutter module.
4. Slide the gray adjustable label guides
together to keep the label stock
centered, but not so tight as to bend or
wrinkle the label stock.
5. Close the print head carriage by
pressing it down into place, and then
close the Toro cover.
When loading supplies, you can also flip the cutter module down to provide more room.
Simply pull the top edge of the cutter module away from the rest of the Toro; it will rest
in its lowered position. If you lower the cutter module while changing supplies, be sure
to raise it back into place before closing the Toro lid.

DuraLabel.com | 800.788.5572 3. Printer Settings | 5
3. Printer Settings
Your Toro’s printing settings can be accessed through the printer icon on the toolbar that
appears along the top of the screen.
If you change ribbon types, you will need to
select the current ribbon under “Ribbon Type”
in this window. Different ribbon types will have
a color-coded marking on the end of the ribbon
core:
Black Core - premium black ribbon
Blue Core - petroleum-resistant ribbon
Red Core - extreme chemical-resistant ribbon
Green Core - custom ribbon
Orange Core - black shrink tube ribbon
Plain Core - white, red, green, orange, yellow,
dark blue
If you change from one type of label stock to another, you may need to select the current
supply type in the “Supply Calibration” section.
• Continuous: an uninterrupted, continuous roll of label stock (the most common
supply type)
• Black Mark: a roll of partially pre-printed labels, with black marks on the backing to
distinguish one label from the next
• Die-Cut: a roll of pre-cut labels, usually pre-printed with some elements, with small
gaps between labels
For further assistance setting up your printer, please refer to the Toro User Guide. Select
the [?] button in the Toro toolbar. You will find the User Guide for your system, How-To
videos for Toro operations, and a label example library.
Printer Settings window

6| 4.1 Charging the Battery DuraLabel.com | 800.788.5572
4. Battery (Optional)
If purchased, the Toro battery will allow label design and printing even without an
AC power supply. A fully-charged battery will provide power for about three hours of
continuous printing, or 30 hours of sleep mode. Recharging the battery typically takes
about three hours.
4.1 Charging the Battery
The Toro battery should be charged only with the charging unit provided. Plug the
charging unit into the Toro battery and place the battery on a clean and dry surface.
Then, plug the charger into an AC outlet. The light on top of the charger will glow red.
When the charger light turns green, the charge is complete. A typical charging time is
three hours; do not leave the battery connected to the charger for more than 24 hours
at a time.
4.2 Battery Loading
The battery mounts into the back of the Toro. Remove the battery cover door by pushing
the slider downward and pulling the door away. Position the battery so the cut-outs are
aligned and the contacts are in position with the contact interface. Push the battery in
until it locks into place.
4.3 Battery Maintenance
When the battery is not in use, keep it in a cool, dry place, away from heat or direct
sunlight. Do not disassemble your Toro battery. Do not let the metal battery pins come
into contact with another metal surface. If you notice any unusual odor, leakage, or
swelling in the Toro battery, discontinue use and contact your DuraLabel representative.
4.4 Battery Warnings
• The Toro must be shipped with the battery removed.
• Do not use in static-sensitive environments.

DuraLabel.com | 800.788.5572 4.6 Cautions | 7
BATTERY
4.5 Battery Storage
• Toro battery storage temperature should be between 10°C and 30°C.
• Keep the Toro battery away from humidity and corrosive environments.
• Charge the Toro battery until is it completely charged before disconnecting from the
charging unit.
• Store the Toro battery in a cool, dry place but not below -20°C.
• Check the Toro battery every three months and recharge it.
4.6 Cautions
• Never throw the Toro battery into a fire as it could explode.
• Never disassemble the Toro battery, as leakage and damage may occur.
• Puncturing the Toro battery may result in fire.
• Do not step or stand on the Toro battery.
• Do not bring the Toro battery terminals into contact with another metal object.
• Do not expose the Toro battery to any liquid or direct sunlight.
• Do not store the battery in a locked or unventilated vehicle where extreme
temperatures may be experienced.
• Always keep the Toro battery out of reach of infants or small children.
• Never dispose of the Toro battery with other solid wastes as it contains toxic
substances. Dispose of the Toro battery in accordance with local regulations
regarding battery disposal.
• For complete removal of power from Toro, make sure the battery is removed and
the wall plug is disconnected.

800.788.5572 | DuraLabel.com
©2011, 2015 Graphic Products, Inc. All Rights Reserved
v 2.0—02/02/15
Other manuals for Toro
5
Table of contents
Other DuraLabel Printer manuals

DuraLabel
DuraLabel 9000 User manual

DuraLabel
DuraLabel 9000 User manual

DuraLabel
DuraLabel Toro User manual

DuraLabel
DuraLabel Toro User manual

DuraLabel
DuraLabel PRO User manual

DuraLabel
DuraLabel 9000 User manual

DuraLabel
DuraLabel 9000 User manual

DuraLabel
DuraLabel 9000 User manual

DuraLabel
DuraLabel Toro User manual

DuraLabel
DuraLabel Bronco User manual