manuals.online logo
Brands
  1. Home
  2. •
  3. Brands
  4. •
  5. DVTEL
  6. •
  7. Security Camera
  8. •
  9. DVTEL Quasar User manual

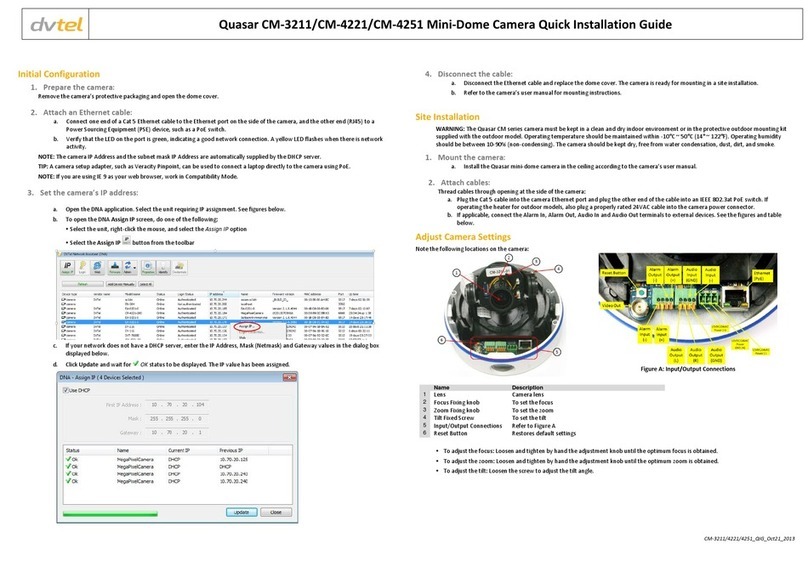
DVTEL Quasar User manual

1
V/11_QIG.Quasar HDPTZ.09.2012
Quasar HD PTZ Quick Installation Guide
Initial Configuration
1. Assemble your camera:
Remove the camera protective packaging and attach the dome cover to the
body.
2. Attach cables:
On the camera backplate, plug the CAT5 cable into the camera Ethernet port. If
the network does not use IEEE 802.3 at PoE+, plug a properly rated AC 24V power
supply into the camera Power Connector. See the diagrams Quasar HD PTZ
Connections and Quasar HD PTZ Pin Definitions.
NOTE: The camera can be connected to a PC for bench installation via an Ethernet cross-cable.
NOTE: The camera default IP Address is 192.168.0.250 and default subnet mask is
255.255.255.0.
TIP: A camera setup adapter, such as Veracity Pinpoint, can be used to connect a laptop directly
to the camera when using PoE+.
NOTE: If your OS is IE9, select to work in Compatibility Mode.
3. Set the Camera IP address
a. Open the DeviceSearch application:
Copy and run the DeviceSearch.exe from the included CD, OR
From the Latitude Sidebar, run the Unified Configurator by selecting
Applications Device Configuration Tool and then on the Unified
Configurator screen, click DVTEL HD Series.
b. In the DeviceSearch application, click Device Search.
c. In the search results, click on the
camera to select it.
d. Right-click and select from the
shortcut menu Network Setup.
e. In the dialog that appears, select
Static IP
f. Enter the IP Address, Gateway,
and Netmask (network mask) as
needed and click OK.
4. Disconnect cables:
Disconnect the Ethernet cable and if you are using a power supply, turn off the
power to the power supply and unplug it.
The camera is ready for deployment in a site installation (mounting).
Site Installation
WARNING: The Quasar HD PTZ Camera must be kept in a clean and dry indoor environment or in the
protective outdoor mount kit supplied with the outdoor model. Operating temperature should be
maintained within -10°C ~ 50°C (14° ~ 122°F). Operating humidity 10% to 90% (non-condensing). The
camera should be kept dry, free from water condensation, dust, dirt, and smoke.
1. Mount the Camera
Install the Quasar HD PTZ Hard Ceiling Mount (supplied), Recessed Mount,
Standard Pendant Mount, Compact Pendant Mount, Wall Box Mount or Corner
Mount according to the Quasar HD PTZ Installation Guide.
2. Attach cables:
Thread cables through the installed mounting device and connect to the camera
backplate (see diagram below):
a. Plug the CAT5 cable into the camera Ethernet port and plug the other end of the
cable into an IEEE 802.3at PoE+ switch. If operating the heater for outdoor
models, or if the network does not support PoE+, also plug a properly rated AC
24V cable into the camera power connector.
b. If applicable, wire the Alarm In, Alarm Out, Audio In and Audio Out terminal blocks
to external devices. See the diagrams below.
c. Connect the other end of the CAT5 cable to the network.
d. Attach and fix the camera to the mounting device.
Quasar HD PTZ Connections
A
RJ-45 Connector
B
ALARM I/O
C
Power
D
Micro SD Card Slot
E
Factory Reset Button
F
Audio I/O
Indoor Backplate
Outdoor Backplate
2
V/11_QIG.Quasar HDPTZ.09.2012
Quasar HD PTZ Pin Definitions
Power Connector
Audio Connector
Pin
Definition
Pin
Definition
1
AC 24_1
1
LINE_OUT
2
FG
2
GND
3
AC 24_2
3
LINE_IN
Alarm I/O Pin Definitions
Adjusting and framing up the camera view
1. Access the camera
In the DeviceSearch application, click Device Search and in the results, click to
select the camera, right-click to open the shortcut menu and select Browse.
-OR-
Enter the camera’s IP as a URL in a web browser.
2. Install the web player
When the Internet browser connects to the camera and prompts for login, do the
following:
a. Log in using the default user name Admin and password 1234.
b. Allow the ActiveX to download and choose to install the DVTEL Web Player
(DCViewer).
3. Adjust camera settings
Use the Web Viewer to adjust the camera’s autofocus, pan, tilt and zoom
settings.
NOTE: Users who have previously installed the DVTEL Web Player (DCViewer) on the PC should
delete the existing DCViewer from the PC before accessing the camera.
TIP: To view greater image detail for more accurate high-definition focusing, use the full screen
view on the Web Base Viewer homepage.
TIP: Best focusing results are achieved when the lens Iris is fully open (such as at night in low light). To
achieve this during the day, in the Web Base Viewer go to the Camera Exposure screen and select
from the Exposure Setting menu Auto-shutter mode. Save changes and complete the focusing step
#3. When finished, restore the Exposure settings.
Attach in Latitude
1. In the Latitude application on the Sidebar, click Physical View,
2. On the Navigation Tree click the system name and then
select the Discovery tab and do the following:
Under Cameras and Encoders
ensure DVTEL HD Series is selected
and click Start. The camera details
appear in the Discovery table.
If the camera wasn’t found after
running Start, click
Discover Unit Manually and in
the dialog box that appears, enter
the Camera IP, select type
DVTEL HD Series and click OK.
3. In the Discovery table, right click on
the camera, choose Attach, and then click the Archiver name to attach to.
When finished, click to save.
Contact DVTEL:
North America: 1-888-DVTEL77 (1-888-388-3577)
Latin America: +52 443 279 3746
EMEA: +44 (0) 1494 430240
APAC: +65 6389 1815
China: +86 10 8586 8836
India: +91 (129) 431-5031
ANZ/Pacific: +61 8 8235 9211
For assistance, email us at support@dvtel.com or visit http://www.dvtel.com/support.
© DVTEL Inc. All rights reserved worldwide. Printed May 2012.
Pin
Definition
Pin
Definition
1
ALARM_OUT_NO_1
7
ALARM_OUT_COM_2
2
ALARM_OUT_NC_1
8
GND
3
ALARM_OUT_COM_1
9
ALARM_IN_4
4
GND
10
ALARM_IN_3
5
ALARM_OUT_NO_2
11
ALARM_IN_2
6
ALARM_OUT_NC_2
12
ALARM_IN_1

Other DVTEL Security Camera manuals

DVTEL 9520 User manual

DVTEL

DVTEL 9520 User manual

DVTEL Pro Line 9460A User manual

DVTEL

DVTEL Pro Line 9460A User manual

DVTEL Quasar CM-4321 User manual

DVTEL

DVTEL Quasar CM-4321 User manual

DVTEL ioimage CP-2202-361P/N Manual

DVTEL

DVTEL ioimage CP-2202-361P/N Manual

DVTEL ioimage mmp100dn User manual

DVTEL

DVTEL ioimage mmp100dn User manual

DVTEL CB-5222 User manual

DVTEL

DVTEL CB-5222 User manual

DVTEL Ariel CM-3011 Manual

DVTEL

DVTEL Ariel CM-3011 Manual

DVTEL CM-3211 User manual

DVTEL

DVTEL CM-3211 User manual

DVTEL Quasar CP-3211-180 Manual

DVTEL

DVTEL Quasar CP-3211-180 Manual

DVTEL Quasar CM-3211-00 Manual

DVTEL

DVTEL Quasar CM-3211-00 Manual

DVTEL 9600 Series User manual

DVTEL

DVTEL 9600 Series User manual

DVTEL Quasar CP-3211 User manual

DVTEL

DVTEL Quasar CP-3211 User manual

DVTEL CM-3211 Technical manual

DVTEL

DVTEL CM-3211 Technical manual

Popular Security Camera manuals by other brands

Grundig GU-CI-AP5634T quick start guide

Grundig

Grundig GU-CI-AP5634T quick start guide

Camlux PTI-403I user manual

Camlux

Camlux PTI-403I user manual

EtroVISION N10 EV8180 Series Quick installation guide

EtroVISION

EtroVISION N10 EV8180 Series Quick installation guide

LG LVW901 series owner's manual

LG

LG LVW901 series owner's manual

Lorex CVC6930 Series quick start guide

Lorex

Lorex CVC6930 Series quick start guide

Bosch NDC-255-P Installation and operation manual

Bosch

Bosch NDC-255-P Installation and operation manual

Okina USA SEDX-768AI-B Quick setup guide

Okina USA

Okina USA SEDX-768AI-B Quick setup guide

GEV CSV 9745 manual

GEV

GEV CSV 9745 manual

Axis 01755-001 installation guide

Axis

Axis 01755-001 installation guide

Wisenet TNV-8010C user manual

Wisenet

Wisenet TNV-8010C user manual

urmet domus 1092/205A instructions

urmet domus

urmet domus 1092/205A instructions

Bosch EX65 instruction manual

Bosch

Bosch EX65 instruction manual

Arlo Pro 3 Setup

Arlo

Arlo Pro 3 Setup

Ikegami ICD-808 Specifications

Ikegami

Ikegami ICD-808 Specifications

XtendLan XL-ICA562M1CIR user guide

XtendLan

XtendLan XL-ICA562M1CIR user guide

Kkmoon IP-CAM 805 user manual

Kkmoon

Kkmoon IP-CAM 805 user manual

Hoop Cam Plus user guide

Hoop

Hoop Cam Plus user guide

TP-Link Tapo C400S2 user manual

TP-Link

TP-Link Tapo C400S2 user manual

manuals.online logo
manuals.online logoBrands
  • About & Mission
  • Contact us
  • Privacy Policy
  • Terms and Conditions

Copyright 2025 Manuals.Online. All Rights Reserved.