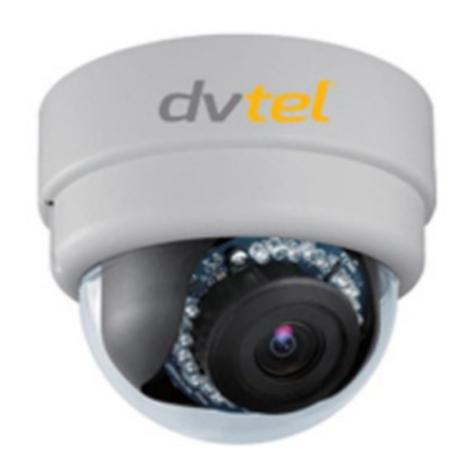
DVTEL Quasar CP-3211-180 Manual

Quasar CP Series HD PTZ
Camera User and Installation
Guide
Installation and configuration instructions
for the Quasar CP Series PTZ Cameras
CP-3211-180 Indoor camera with
18x Optical Zoom
CP-4221-200 Indoor camera with
20x Optical Zoom
CP-3211-181 Outdoor camera with
18x Optical Zoom
CP-4221-201 Outdoor camera with
20x Optical Zoom
Copyright © 2012, DVTel Inc., All Rights Reserved.
All text and figures included in this publication are the exclusive property of DVTel Inc., and may not be copied, reproduced or used in any way
without the express written permission of DVTel Inc. Information in this document is subject to change without notice. This document also contains
registered trademarks and service marks that are owned by their respective companies or organizations. Trademarks used in this document: Dell,
the trademark is a trademark of Dell Inc.; Microsoft Windows and Windows, the trademarks are trademarks of Microsoft Corporation. DVTel
disclaims and repudiates interest to claim to use their respective trademarks and service marks.
V0.2_Oct17_2012
Copyright © 2012, DVTel Inc., All Rights Reserved.

Quasar CP Series HD PTZ Camera User and Installation Guide
Contents
Chapter 1 - Safety ...............................................................................................1
Chapter 2 - Overview ..........................................................................................2
2.1 Features ................................................................................................................................... 3
2.2 Package Contents ..................................................................................................................... 4
Chapter 3 - Introduction to the Quasar HD PTZ Camera ......................................6
3.1 Quasar HD PTZ Indoor Camera Dimensions................................................................................ 6
3.2 Quasar HD PTZ Outdoor Camera Dimensions............................................................................. 6
3.3 Camera Connectors................................................................................................................... 7
Chapter 4 - System Requirements.......................................................................9
Chapter 5 - Installation .....................................................................................10
5.1 Indoor Installation .................................................................................................................. 10
5.2 Outdoor Installation ............................................................................................................... 10
5.3 Power and Ethernet Cable Connection..................................................................................... 11
5.4 Initial Camera Configuration.................................................................................................... 11
5.5 Preparing the Camera for Mounting ........................................................................................ 12
5.6 Mounting Instructions............................................................................................................. 12
5.6.1 Ceiling Mount............................................................................................................................ 13
5.6.2 Wall Mount ............................................................................................................................... 22
5.6.3 Corner Mount ........................................................................................................................... 26
5.6.4 Pole Mount ............................................................................................................................... 30
Chapter 6 - Searching and Accessing the Camera with Device Search................33
6.1 To configure the communication settings of the Quasar CP series camera: ............................... 33
6.2 Adjusting and Framing-Up the Camera View............................................................................ 36
Chapter 7 - Configuration and Operation ..........................................................37
7.1 Browser-Based Viewer Introduction ........................................................................................ 37
7.2 Home Page ............................................................................................................................. 39
7.3 System-Related Settings.......................................................................................................... 42
7.3.1 Host Name and System Time Setting........................................................................................ 43
7.3.2 Security ..................................................................................................................................... 44
7.3.3 Network .................................................................................................................................... 53
7.3.4 DDNS ......................................................................................................................................... 61
7.3.5 Mail ........................................................................................................................................... 62
7.3.6 FTP............................................................................................................................................. 63
7.3.7 HTTP.......................................................................................................................................... 64
7.3.8 Application (Alarm Settings) ..................................................................................................... 65
7.3.9 Motion Detection...................................................................................................................... 72

Quasar CP Series HD PTZ Camera User and Installation Guide
7.3.10 Network Failure Detection........................................................................................................ 76
7.3.11 Storage Management ............................................................................................................... 78
7.3.12 Recording .................................................................................................................................. 80
7.3.13 File Location.............................................................................................................................. 82
7.3.14 View Information ...................................................................................................................... 83
7.3.15 Factory Default ......................................................................................................................... 87
7.3.16 Software Version....................................................................................................................... 88
7.3.17 Software Upgrade..................................................................................................................... 88
7.3.18 Maintenance............................................................................................................................. 90
7.4 Video and Audio Streaming Settings........................................................................................ 91
7.4.1 Video Resolution and Rotate Type ........................................................................................... 92
7.4.2 Video Compression................................................................................................................... 96
7.4.3 Video OCX Protocol................................................................................................................... 98
7.4.4 Video Frame Rate...................................................................................................................... 99
7.4.5 Audio Mode and Bit Rate Settings.......................................................................................... 100
7.5 PTZ Settings.......................................................................................................................... 101
7.5.1 Preset ...................................................................................................................................... 102
7.5.2 Pattern .................................................................................................................................... 103
7.5.3 Auto Pan.................................................................................................................................. 104
7.5.4 Sequence................................................................................................................................. 105
7.5.5 Home....................................................................................................................................... 107
7.5.6 Tilt Range ................................................................................................................................ 108
7.5.7 Privacy Mask ........................................................................................................................... 109
7.5.8 Camera –Exposure ................................................................................................................. 110
7.5.9 Camera –WB (White Balance)................................................................................................ 111
7.5.10 Camera –Misc1 (Miscellaneous Settings Menu 1)................................................................. 113
7.5.11 Camera –Misc2 (Miscellaneous Settings Menu 2)................................................................. 115
7.5.12 Camera- Default...................................................................................................................... 116
7.6 Logout .................................................................................................................................. 117
Appendix A - Technical Specifications.............................................................. 118
Appendix B - Internet Security Settings ........................................................... 120
Appendix C - Install UPnP Components ........................................................... 123
Appendix D - Deleting the Existing DCViewer................................................... 125
Appendix E - Deleting Temporary Internet Files .............................................. 126
Appendix F - Optional Accessories .................................................................. 127
Dome Camera Accessories ............................................................................................................. 127
Mounting Accessories.................................................................................................................... 128
Appendix G - Contacting DVTel ........................................................................ 134
Quasar CP Series HD PTZ Camera User and Installation Guide
1
Safety
Observe due diligence and proper security and safety standards when installing and operating the unit.
To help ensure safety and to help reduce risk of injury or damage, observe the following:
Do not disassemble the camera. To prevent electric shock, do not remove screws or covers. There are
no user serviceable parts inside. Ask a qualified service person for servicing.
Ensure the unit is installed and operating in an indoor environment or in the protective outdoor
mount kit supplied with the outdoor model.
Place or install the unit on a secure flat surface or mount it using optional hardware.
Ensure the operating environment is not contaminated by dust, particles, chemicals, smoke, or water.
Use proper maintenance to ensure that the unit is clean and dry.
Do not block cooling holes on the bracket. This camera has a cooling fan inside. Blocking the cooling
holes leads to build up of heat in the camera and may cause malfunction.
Operating temperature should be maintained within 14ºF to 122ºF (-10ºC to 50ºC), with no more
than 90% non-condensing humidity.
Use the properly rated power supply unit or PoE Plus and protect against static electricity, ground
faults and power surges.
Observe local codes and laws and ensure installation is in accordance with fire, security and safety
standards.

Quasar CP Series HD PTZ Camera User and Installation Guide
2
Overview
The Quasar CP Series HD PTZ Camera provides real-time video in high-definition quality at either HD1080p or
HD720p. With 18x or 20x optical zoom and high-speed pan-tilt-zoom functionality, the Quasar HD PTZ Camera can
cover a wide monitoring area quickly and with a high level of detail. Multiple streams can be run simultaneously,
providing an ideal solution when differing levels of image quality are required, including increasing frame rate and
level of detail when events are triggered. In addition, DVTel’s Scene Adaptive Algorithms provide the highest image
quality at the lowest bandwidth and storage requirements.
The Quasar HD PTZ’s snap-in camera chassis and use of Power over Ethernet Plus facilitate easy installation.
The Quasar HD PTZ series includes the following models:
CP-3211-180 Indoor camera with18x Optical Zoom
CP-4221-200 Indoor camera with 20x Optical Zoom
CP-3211-181 Outdoor camera with 18x Optical Zoom
CP-4221-201 Outdoor camera with 20x Optical Zoom
Important: If using DVTel Latitude, we recommend that you configure the camera’s settings via the
AdminCenter as the camera’s web-based interface might be overwritten by Latitude settings. Refer to the
Latitude online help for information regarding configuring camera settings.

Quasar CP Series HD PTZ Camera User and Installation Guide
3
Features
Following are key features of Quasar HD PTZ cameras:
18x, 20x optical zoom
10x digital zoom
H.264 and MJPEG compression
Full HD real-time resolution
Dual encoder streams (Full HD
real-time and D1 real-time)
Dual codecs (H.264 Baseline and H.264
Main)
Bidirectional audio
Progressive scan CMOS sensor
Edge motion detection
Motion detection with region of
interest masking
Historical motion-detection
levels detected /recorded at
frame levels.
Detection event driven alarms
Alarm input driven events
Relay output actions on alarm
Built-in web application/web server
FTP upload (up to two locations)
Upload alarm images to FTP
Dual HTTP notification server support
(up to two servers)
Send images on alarm to e-mail
E-Mail SMTP alarm notification
(up to two e-mails)
MicroSD recording support
Record snapshots to SD card on
alarm
Presets and Preset Sequences
Pattern Lines and Auto Pan Paths
SNMP v1/v2 and SNMP traps
Security IP restricted access
allow/deny list
Removable IR Cut Filter
Image Flip/Mirror/Inverse/Vertical
View
Privacy masks
WDR and ATW
Backlight compensation
Digital noise reduction
ONVIF support
UPnP support
Supports PoE Plus/12VDC/24VAC
RTSP support
Per-user and Group permissions
Multiple users
Optional vandal-proof enclosure
NOTE: MJPEG is not supported by Latitude.

Quasar CP Series HD PTZ Camera User and Installation Guide
4
Package Contents
Before proceeding, please check the box contains the items listed here. If any item is missing or has defects, DO
NOT install or operate the product and contact your dealer for assistance.
Indoor Camera Package Contents
Camera Body
Optical Cover
Hard Ceiling Mount
M4 Screw (x4)
Plastic Anchors (x4)
Quick Guide
CD: (Bundled software and
documentation)

Quasar CP Series HD PTZ Camera User and Installation Guide
5
Outdoor Camera Package Contents
Camera Body with Outdoor
Mount Kit
M3 Standard Screw (x1)
M3 Security Screw (x1)*
M5 Standard Screw (x1)
M5 Security Screw (x1)*
Waterproof Gasket
Quick Guide
CD: Operation Manuals
Optical Cover
Lubricant
Security Torx*
*Optional: For Vandal Proof Cover only.

Quasar CP Series HD PTZ Camera User and Installation Guide
6
Introduction to the Quasar HD PTZ Camera
This chapter provides the camera dimensions for reference before installation. Definition of each connector on the
camera’s back plate is also specified.
Related Links
Appendix A: Technical Specifications
Quasar HD PTZ Indoor Camera Dimensions
The Quasar HD PTZ Indoor Camera’s dimensions are shown below.
Top View Side View
Quasar HD PTZ Outdoor Camera Dimensions
The Quasar HD PTZ Outdoor Camera’s dimensions are shown below.
Top View Side View

Quasar CP Series HD PTZ Camera User and Installation Guide
7
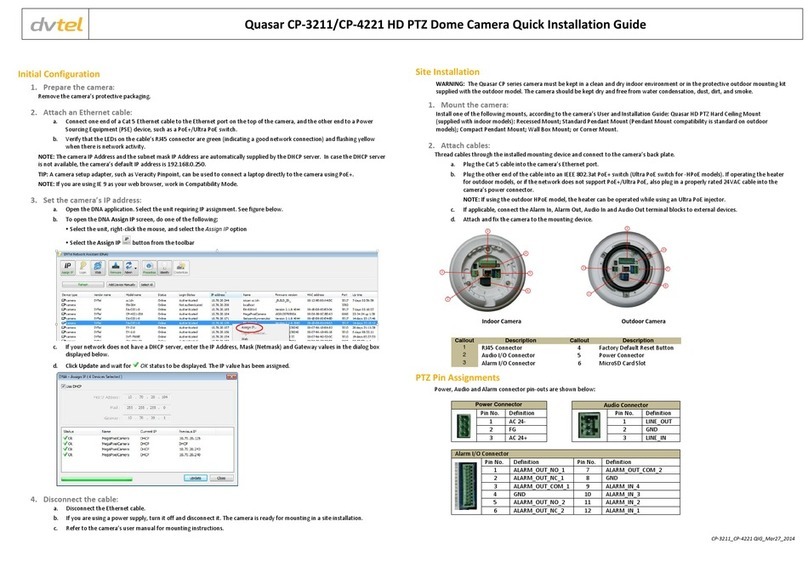
Camera Connectors
Various connectors are located on the Quasar HD PTZ Camera’s back plate as shown in the diagrams below.
Definitions for each connector follow.
Indoor Outdoor
A
RJ-45 Connector
B
Alarm I/O
C
Power
D
MicroSD Card Slot
E
Factory Reset Button
F
Audio I/O
NOTE: DO NOT change the Quasar HD PTZ Camera’s Communication Switch factory default
settings.
Power Connector Audio Connector
Pin
Definition
1
AC 24-
2
FG
3
AC 24+
Pin
Definition
1
LINE_OUT
2
GND
3
LINE_IN

Quasar CP Series HD PTZ Camera User and Installation Guide
8
Alarm I/O Pin Definitions
Pin
Definition
Pin
Definition
1
ALARM_OUT_NO_1
7
ALARM_OUT_COM_2
2
ALARM_OUT_NC_1
8
GND
3
ALARM_OUT_COM_1
9
ALARM_IN_4
4
GND
10
ALARM_IN_3
5
ALARM_OUT_NO_2
11
ALARM_IN_2
6
ALARM_OUT_NC_2
12
ALARM_IN_1

Quasar CP Series HD PTZ Camera User and Installation Guide
9
System Requirements
To access the camera via a web browser, ensure that your PC has the proper network connection and meets system
requirements as described below.
Items
Minimum System Requirement
Personal Computer
Intel® Pentium® IV, 3GHz or Intel® Core™2 Duo,
2.0GHz
1GB RAM or more
AGP graphics card with 64MB RAM and DirectDraw
support
Operating System
Windows Vista
Windows XP
Windows 7
Web Browser
Microsoft Internet Explorer 6.0 or later
Firefox
Chrome
Safari
Network Card
10Base-T (10 Mbps) or 100Base-TX (100 Mbps) operation
Viewer
ActiveX control plug-in for Microsoft IE

Quasar CP Series HD PTZ Camera User and Installation Guide
10
Installation
Following are instructions for indoor and outdoor installation of Quasar HD PTZ cameras.
Indoor Installation
Read the instructions provided in this chapter thoroughly before installing the CP-3211-180 or CP-4221-200 camera.
Following are additional considerations for indoor installation:
There must be a fuse or breaker at the starting point of the electrical wiring infrastructure.
For indoor installations, such as industrial applications, the camera must be protected from elements
such as damaging fumes, metallic dust, extreme temperatures, soot, moisture, and over spray.
Do not place the camera on or near radiators and heat sources.
All electrical work must be performed in accordance with local regulatory requirements.
Outdoor Installation
Read the instructions provided in this chapter thoroughly before installing the CP-3211-181 or CP-4221-201 camera.
Following are additional considerations for outdoor installation:
Be sure not to expose the camera head to strong sunlight, which could cause the camera to overheat.
For outside wiring installation, always use weatherproof equipment, such as boxes, receptacles,
connectors, etc.
For electrical wiring, use the properly rated sheathed cables for conditions to which the cable will be
exposed (for example, moisture, heat, UV, physical requirements, etc.).
Plan ahead to determine where to install infrastructure weatherproof equipment. Whenever possible,
ground components to an outdoor ground.
Use best security practices to design and maintain secured camera access, communications
infrastructure, tamper-proof outdoor boxes, etc.
All electrical work must be performed in accordance with local regulatory requirements.
Related Links
Power and Ethernet Cable Connection
Initial Camera Configuration
Preparing the Camera for Mounting
Mounting Instructions
Adjusting and Framing-up the Camera View

Quasar CP Series HD PTZ Camera User and Installation Guide
11
Power and Ethernet Cable Connection
Power Connection
Make sure the camera’s power cable is properly connected. Refer to the pin definition table in Camera Connectors.
If using Power over Ethernet Plus (PoE Plus), make sure Power Sourcing Equipment (PSE) is available on the
connected network. All electrical work must be performed in accordance with local regulatory requirements.
Ethernet Cable Connection
Use of Category 5 Ethernet cable is recommended for network connection. For best transmission quality, cable
length should not exceed 100 meters (328 feet). Connect one end of the Ethernet cable to the RJ-45 connector of
the Quasar HD PTZ camera and the other end to the network switch or PC.
NOTE: You can use an Ethernet crossover cable to connect the camera directly to a PC.
Check the status of the link indicator and activity indicator LEDs. If the LEDs are not lit, check the LAN connection.
The green Link LED indicates a good network connection.
The orange Activity LED flashes to indicate network activity.
Initial Camera Configuration
To perform the initial camera configuration:
Unpack the camera and rotate and remove the protective cover.
Remove the PE cloth sheet and lens cap and attach the dome cover to the body.
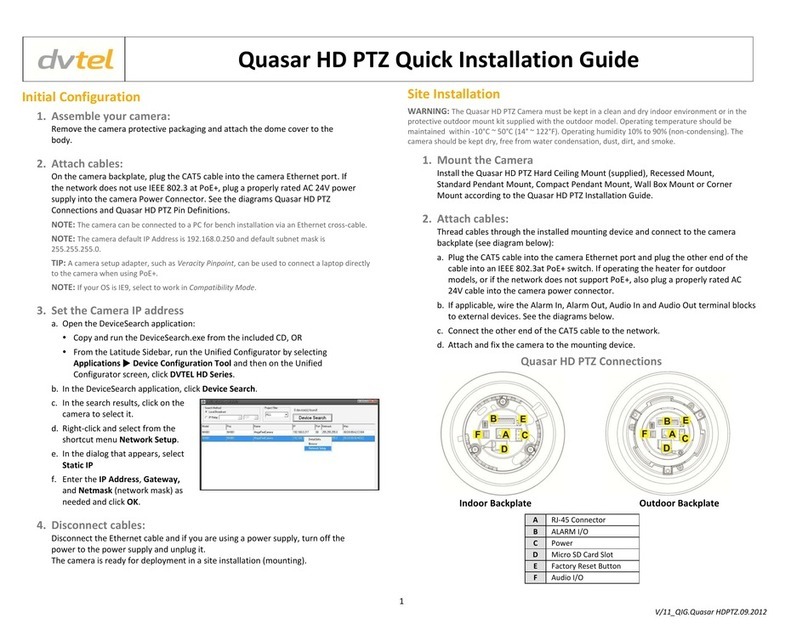
On the camera back plate, plug the CAT5 cable into the camera Ethernet port. If the network does not use IEEE
802.3at PoE Plus, plug a properly rated AC 24V power supply into the camera Power Connector. See
polarity noted under Power Connectors in Camera Connectors.
Do one of the following:
Copy and run the DeviceSearch.exe from the included CD.
From the Latitude Sidebar, run the Unified Configurator by selecting Applications Device
Configuration Tool and then on the Unified Configurator screen, click DVTel HD Series.
AUTO
IRIS
1 2 3 4
I/O
NETWORK
DC12V
LINE LINE IN
MIC IN
OUT
VIDEO
DC
RESET

Quasar CP Series HD PTZ Camera User and Installation Guide
12
In the DeviceSearch application, click Device Search and do the following:
In the search results, click on the camera to select it.
Right-click and select from the shortcut menu Network Setup.
In the dialog that appears, select Static IP.
Enter the IP Address, Gateway and Netmask (network mask) as needed and click OK.
Disconnect the Ethernet cable and, if you are using a power supply, turn off the power to the power supply and
unplug it. The camera is ready for deployment in a site installation (mounting).
NOTE: The camera can be connected to a PC for bench installation via an Ethernet cross-cable.
NOTE: The camera default IP Address is 192.168.0.250 and default subnet mask is 255.255.255.0.
Tip: A camera setup adapter, such as Veracity Pinpoint, can be used to connect a laptop directly to the
camera when using PoE Plus.
Preparing the Camera for Mounting
If you have not already done so, rotate and remove the camera’s protective cover, then remove the PE cloth sheet
and lens cap.
Mounting Instructions
There are four general methods to mount Quasar HD PTZ cameras:
Ceiling Mount
Wall Mount
Corner Mount
Pole Mount
Within each general method there may be several mounting types available as optional packages. See Appendix G:
Accessories.

Quasar CP Series HD PTZ Camera User and Installation Guide
13
Ceiling Mount
Ceiling mount methods include:
Hard Ceiling Mounting (Indoor Cameras only)
Recessed (T-Bar) Mounting (Indoor Cameras only)
Indoor Mounting Kit (Indoor Cameras only)
Straight Tube Mounting
Swan Tube Mounting
Hard Ceiling Mounting (Indoor Cameras Only)
Hard Ceiling Mounting is the standard installation for a Quasar HD PTZ Indoor Camera and is supplied in the
standard indoor camera package.
Hard Ceiling Mount Package Contents:
Hard Ceiling Mount x1
M4 self-tapping screw x4
Plastic anchors x4
Fixing plate x1
M3 standard screw x4 (3 for fixing plate, 1 for Dome Cover*)
(*) For the Vandal Proof Camera Dome Cover, a security screw is supplied instead of the standard screw.
Tools Required:
Drill
Phillips and flat-head screw drivers
To install the Hard Ceiling Mount:
1. If you have not already done so, remove the dome cover
Use the Hard Ceiling Mount as a template to mark the mounting surface where the three screw holes will need
to be drilled.
In the marked locations, drill each hole using a drill-bit of a slightly smaller diameter than the supplied screw
anchors and fully insert the anchors into drilled holes. You may need to tap them flush with the wall using a
finishing hammer.
Attach the Hard Ceiling Mount using three supplied self-tapping screws.

Quasar CP Series HD PTZ Camera User and Installation Guide
14
Thread cables through the center hole of the Mount and connect them to the camera back plate.
Hide the cables inside the ceiling. Alternatively, thread the cables through the gap at the side of the fixing plate
as shown in the figure below.
Attach the camera to the Hard Ceiling Mount by turning the camera clockwise.
Tighten the screw at the side of the camera’s fixing plate.
Replace the camera’s Dome Cover and secure using two supplied standard screws.

Quasar CP Series HD PTZ Camera User and Installation Guide
15
Screw in the supplied standard screw (security screw for Vandal Proof Dome) on the Dome Cover.
Recessed (T-Bar) Mounting (Indoor Cameras Only)
Items Needed:
Recessed (T-Bar) Mount package (see Appendix G: Accessories)
T-Bar Mounting Package Contents:
Lock Bar x1
M3x6 screw x4
Ceiling sticker x1
Trim Ring x1
Tools Required:
Tool for cutting a circle on the ceiling
Phillips and flat-head screw drivers
To Install the T-Bar Mount:
1. Attach the camera to the T-Bar Bottom Mount by turning the camera clockwise.

Quasar CP Series HD PTZ Camera User and Installation Guide
16
Tighten the screw at the side of the camera’s fixing plate to secure it to the T-Bar Bottom Mount.
Loosen the wings from the In-Ceiling (T-Bar) Bracket by turning each wing’s center screw counterclockwise (as
indicated in the first figure below), until the wings are able to swing outward (as shown in the second
figure below).
Place the ceiling sticker on the ceiling plate, and cut the circle part out of the ceiling.
With the wings facing inward, place the winged T-Bar Bracket into the ceiling opening.
Insert a hand into the center of the T-Bar Bracket and rotate the wings to face outward. Tighten the three
screws clockwise until the wings are completely flush with the ceiling board.
Thread cables through the center hole of the T-Bar and connect them to the camera.

Quasar CP Series HD PTZ Camera User and Installation Guide
17
Place the installed T-Bar Bottom Mount with camera into the ceiling opening. Tighten the screws to fix the T-
Bar Bottom Mount onto the T-Bar Bracket.
Attach the Trim Ring to the T-Bar Bracket.
Mounting with Indoor Mount Kit (Indoor Cameras Only)
The Indoor Mount Kit works with the following mounting accessories:
Straight Tube
Swan Tube
Standard Pendant Mount
Compact Pendant Mount
Items Needed:
Indoor Mount Kit (see Appendix G: Accessories)
Tools Required:
Phillips and flat-head screw drivers
This manual suits for next models
3
Table of contents
Other DVTEL Security Camera manuals

DVTEL
DVTEL CB-5222 User manual

DVTEL
DVTEL Quasar CP-3211 User manual

DVTEL
DVTEL 9520 User manual

DVTEL
DVTEL Quasar User manual

DVTEL
DVTEL Quasar CM-3211-00 Manual

DVTEL
DVTEL Pro Line 9460A User manual

DVTEL
DVTEL Ariel CM-3011 Manual

DVTEL
DVTEL ioimage mmp100dn User manual

DVTEL
DVTEL ioimage CP-2202-361P/N Manual

DVTEL
DVTEL CM-3211 Technical manual