DYU C6 User manual

MADE BY DYU
C6
DYU ELECTRIC BIKE
USER MANUAL
(Please read the instruction manual carefully and understand the perfor-
mance of the electric bicycle before using. Please keep the instruction manual
properly)

PRODUCT FUNCTION DIAGRAM
Quick start Unfolded folding
Note:Some details of your bike may be little different from the above picture due to our product
upgrading,which will not affect the usage.
LIST OF ACCESSORIES
Pedal×2 Charger×1 Manual×1 Warranty card×1 Allen key×1 15mm Open Wrench×1
Install Pedals:
Right Pedal: Rotating clockwise
Left Pedal: Rotating Anticlockwise
rear carrier
rear fender
rear light
rear derailleru
controller box
hub motor
freewheel
crankset
rear brake
seat
battery
seat post QR
fender rod
frame
chain
centre shaft
chain cover pedal
grip
stem
hed bube
spoke
front tyre
front fender
front fork
front light
throttle
front derailleur
brake lever
front basket
reflector
rim
front hub
hed set
front brake

FUNCTION
INTRODUCTION TO METER
7.Electric & Assistant mode:The default setting is ECO
economy gear when the machine is turned on, and it can
directly accelerate when riding, and it can also use
power-assisted sensors to ride.
8. Zero speed booting and none zero speed booting. Zero
speed booting: when the E-bike on standby mode, you can
accelerate with speeding bar; None zero speed booting: the
bike boots when it runs only.
9.Hold the brake gently when going downhill,can recoverthe
part of the power and charge for your Ebike.
1. Charging: Connect the charger to the power plug and
then to the Dyu E-bike.When the charger indicator turns
green from red, it shows full power.
2. Turn on the Dyu E-bike: Push forward the boot button to
turn on the E-bike, the dash board lights up; Push back the
boot button to turn off the E-bike.
3. Switching on and off: Press the switch button, the display
shows power on when there is power, press the switch
button, the display shows off when there is no power.
4. Horn: Pressing the horn button, the horn sounds up.
Clicking recommended.When pressing for over 10 seconds,
the horn stops, you need to repress it.
5. Front light: Push the front light button forward to turn on
the front light, push it backward to turn off the front light.
6.Brake: When the brake handle is not fully rebounded
during use, it is in a power-off state and cannot be powered
up.
Power display:
Battery Define:
DC2.1
Charger
Front light switch
Trumpet Power
display Power
switch
Half-light switch
PUSH LOCK:Can remove battery in lock tongue retracted state, remove
battery case after remove the key;
OFF:Remove the key when lock tongue extended, non power-on;
battery case locked,immovable;
ON:Remove the key when lock tongue extended, in power-on state;
battery case locked,immovable;

INTRODUCTION TO THE ICONS ON METER INTERFACE
FUNCTION OF BUTTON
ELECTRIC INSTRUCTION
When the battery power less -than 1% “ ”,the power meter will monitor if the power lobat is less than low-voltage
protection standard.After the power meter has detected that power lobat is lower than low-voltage protection standard,the
icon “ ” will keep flashing,which warns a battery low-voltage.
Definition of
Display Icon
Front Light
Power button
Display Icon Display
Push the front light button forward to turn on
the front light, push it backward to turn off the front light.
Click to turn on/display battery, then click to turn off
100% 55%~75% 25%~50% ﹤25%
Power
Percentage
Display
Current Power It displays power range.

Gears
Derailleur System
Some of Dyu E-Bike go with gears, which consists of:
• A rear sprocket cluster, called a freewheel or cog set
• A rear derailleur
• One swifter
• One control cable
• One front sprocket called a chaining
• A drive chain
There are many different types of swifter mechanisms, each preferred for specific
Applications because of its ergonomic, performance and price characteristics.
A downshift is a shift to a lower or lower gear, one which is easier to pedal. An upshift is a shift to a higher or faster gear, one which is harder to
pedal. For example, you can downshift to a lower gear to make pedaling easier on a hill.
On the other hand, you may upshift to a higher gear when you wish to go faster.
Whether up-shifting or downshifting, the derailleur system requires that the drive
Chain be moving forward and be under at least some tension. A derailleur will
Shift only if you are pedaling forward.
Caution:__________________________________________________
Never move the swifter while pedaling backward. Also do not pedal backwards after moving the swifter. Either of these actions could jam chain
and cause serious damage to the E-Bikes.
The derailleur system includes the front and rear derailleur, the shift levers,
and the derailleur control cables, all of which must function properly for smooth
gear
shifting to occur.
Derailleur
Although the front and rear derailleur are initially adjusted in our factory, you will
need to inspect and read just both before riding bicycle.
Rear Derailleur
Begin by shifting the rear swifter to largest number indicated, loosen the cable
from the rear derailleur cable anchor bolt, and place the chain on the smallest
sprocket.
Adjust the high limit screw so that the guide pulley and the smallest sprocket
are lined up vertically. Re-tighten the cable, pull out any slack, and re-tighten
the anchor bolt securely. Shifting through the gears, making sure that each gear
is achieved quietly and without hesitation. If necessary, use the barrel adjuster
to fine tune the cable tension by turning it the direction you want the chain to
go. For example, turning clockwise will loose the cable tension and move the
chain away from the wheel, while turning counter-clockwise will tighten cable
tension and direct the chain to the wheel.

PARAMETERS
Remark: Many factors will affect the max speed,such as power,load,tyre pressure,road conditions,chain,lubrication degree etc.
Mileage has been measured on basis of temperature 25℃,load of 60KG,speed of 15-20KM/H,smooth and hard road,and from
full battery to dead battery. It also is subjected to other factors,such as driving habits,temperature,load,tyre presure,road
conditions etc.”
Size
Material
Spread size
1850*610*1170mmFolding size
1500*220*760mm
Center distance 1170mm
Hub size 26inch
Package size 1490*250*760mm
Color
White
Weight 27kg
Max load 120kg
Riding speed 20km/h
Max speed 25km/h
Mileage(pure electric) 40±3km
Assistant-Mileage 40-60km
Uphill 15 degree
Battery 12.5Ah
Rated power 350W
Rated voltage 36V
Charging voltage DC42V
Input voltage AC100~240V
BMS Yes
App No
Personal sticker No
Lights Yes
Cruise Yes
Brake mode Front and rear disc brake
Charging time 6-8H
Temperature -10~45℃
Waterproof IP54
Steel
Model C6
Performance
Standards
Features

Charge between 0 degree- 45 degree, rife between -20 degree to 60 degree, keep the battery dry. Don’t put it in acid and
alkalinity fluid. No rain, fire and heat. Don’t put the battery positive an negative wrong. Don’t damage disassemble the battery
or use the wrong adapter. Don’t charge it over 6 hours and don’t charge it over 2A.
When not using for a long time, please put the battery in dry and cool place and charge it for 2 hours every 2 months. Follow
the instruction or the user will be responsible for the consequence.
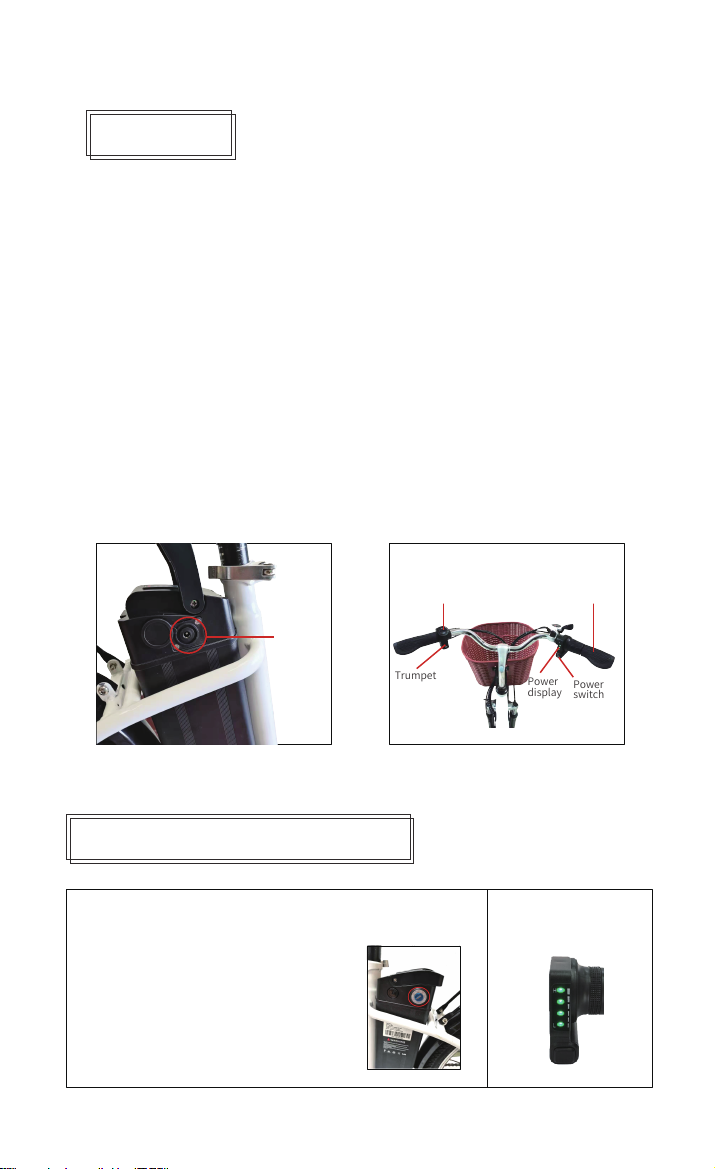
When charging, Please be careful of the battery type and voltage, place the battery in open air and don’t put it under bright sun
shine and closed space.
When charging, please place the battery first, then connect the electricity; after charging, cut the electricity then cut the battery
plug. When the green light lights up, turn off the power, don’t connect the battery when not charging.
When charging, if the indicating light goes wrong or some strange smell shows up or the charger is over hot, please stop
charging immediately, them check and repair or replace the charger. When using or storing the charging. In case of something
wrong were dropped into the charger, especially the water or other fluids, please don’t take the charger when possible.
Otherwise, be careful and put it in the cool box. No disassembling the charger yourself.
Please check the brake before riding.
Please brake the rear wheel first.
Be careful of the tightness of brake, use the hexagon wrench when it’s loose.
Rainy and snowy days need longer braking distance.
Suitable age :16-45 years old.
Riding
Read the instruction first to know the product performance first.
Don’t lend it to someone who is not familiar with it.
Wear a helmet when riding. Obey the traffic rules and don’t ride it in the cars road.Don’t riding it in the crowded road.
When go downhill or slippery road, the speed should be under 15km/h.
Inspect the Tyre before riding, Tyre pressure should be 35-45PSI.
Don’t over impact the motor, keep the axile smooth.
Don’t over load.(Max load is 120kg)
Please be careful of the adding distance when it under the rainy day and snow day.
Single-handed ride is prohibited.
Maintenance
The E-bike front and back wheel should be at the center of the frame.
Put the E-bike up after riding at cool and dry place.
Check the Motor and Brake often, don’t inject the oil onto the brake.
Check the E-bike and screws and places that need fixing, fix it often.
Suggested torsion: Bar screws 60-80 kgf.cm, bar stand screws 175-200kgf.cm, wheel screws 320-450kgf.cm.
Check the Tyre is pierced and leaks air, please contact professional technician for repairing and replacing.
Responsibility announcement
All the product model, type and related information copy right and explain right are reserved.
This instruction is suitable for denoted models.
Any changing or replace part of the E-bike will not be informed again.
No copy, modification, propaganda or publication before getting the permission form F-wheel.
Read the instructions and follow the instructions or the user will be responsible for the damage.
F-wheel won’t be responsible for injuries, casualties and possession damages.
For more information please visit : www.dyucycle.com .
CAUTION
Table of contents
Other DYU Scooter manuals