EGO Commercial PGX3000D User manual

WARNING: To reduce the risk of injury, the user must read and understand the
Operator’s Manual before using this product. Save these instructions for future reference.
OPERATOR’S MANUAL
PGX™COMMERCIAL
CHARGING
3-PORT DOCK
MODEL NUMBER PGX3000D/PGX3000D-FC
Español p. 43
Français p. 21
COMMERCIAL

PGX™ COMMERCIAL CHARGING 3-PORT DOCK — PGX3000D/PGX3000D-FC2
READ ALL INSTRUCTIONS!
READ & UNDERSTAND
OPERATOR’S MANUAL
TABLE OF CONTENTS
Introduction ............................................ 3
Specications .......................................... 4
Packing List ............................................ 4
Accessories ............................................ 5
Description ...........................................6-7
Operation ............................................8-15
Maintenance .......................................... 16
Troubleshooting ........................................ 17
EGO Limited Warranty .................................18-19

PGX™ COMMERCIAL CHARGING 3-PORT DOCK — PGX3000D/PGX3000D-FC 3
INTRODUCTION
Congratulations on your selection of the EGO PGX™commercial charging 3-port dock.
It has been designed, engineered and manufactured to give you the best possible
dependability and performance.
Should you experience any problem you cannot easily remedy, please contact EGO
Customer Service 1-855-EGO-5656.
This manual contains important information on the safe assembly, operation and
maintenance of your dock. Read it carefully before using the dock. Keep this manual
handy so you can refer to it at any time.
SERIAL NUMBER _____________________ DATE OF PURCHASE _________________
YOU SHOULD RECORD BOTH SERIAL NUMBER AND DATE OF PURCHASE AND KEEP IN A SAFE
PLACE FOR FUTURE REFERENCE

PGX™ COMMERCIAL CHARGING 3-PORT DOCK — PGX3000D/PGX3000D-FC4
SPECIFICATIONS
Dock Input / Output Voltage 56V
Compatible Hub PGX1600H/PGX1600H-FC
Charging Time
Approximately
45 min for 3 x BA2800T/BA2800T-FC (5.0Ah)
100 min for 3 x BA6720T/BA6720T-FC (12.0Ah)
Dock Weight 9.2 lb. (4.2 kg)
PACKING LIST
PART NAME QUANTITY
Dock 1
2’ (0.7 m) Power Cable (ACE0700) 1
Rubber Block (pre-installed in the dock) 2
Operator’s Manual 1

PGX™ COMMERCIAL CHARGING 3-PORT DOCK — PGX3000D/PGX3000D-FC 5
ACCESSORIES
WARNING: Use only accessories listed below. Use of accessories that do not
meet the original equipment specications may lead to improper performance and
compromised safety.
PART NAME MODEL NUMBER
PGXTM Commercial Charging E-track Mounting Kit AEK1000
PGXTM Commercial Charging 2’ (0.7 m) Power Cable ACE0700
PGXTM Commercial Charging 5’ (1.5 m) Power Cable ACE1500
For more information about the latest accessories, please visit www.egopowerplus.com.

PGX™ COMMERCIAL CHARGING 3-PORT DOCK — PGX3000D/PGX3000D-FC6
DESCRIPTION
1
23
4
5
1
9
678

PGX™ COMMERCIAL CHARGING 3-PORT DOCK — PGX3000D/PGX3000D-FC 7
1. Anti-theft Bar
2. Dock Status Indicator
3. Connector
4. Power Cable
5. Battery-bay status Indicator (3)
6. Wall-mount Hole (5)
7. Assist Handle
8. Rubber Block (2)
9. Main Handle (2)

PGX™ COMMERCIAL CHARGING 3-PORT DOCK — PGX3000D/PGX3000D-FC8
OPERATION
WARNING:
This EGO PGXTM commercial charging 3-port dock is designed to only
work with EGO PGXTM commercial charging 1600W hub PGX1600H/PGX1600H-FC to
charge EGO battery packs. For compatible batteries please refer to operator’s manual
included with the hub. Read and understand all its safety warnings and instructions.
Failure to follow them may result in electric shock, re, and/or serious injury.
WARNING:
Do not expose the dock to wet or damp conditions. Water entering
the dock will increase the risk of electric shock.
WARNING:
When the dock is not in use, keep it away from other metal
objects, like paper clips, coins, keys, nails, screws or other small metal objects,
which can make a connection from one terminal to another.
Shorting the terminals
together may cause burns or a re.
CHARGING BATTERY PACKS
NOTE:
Lithium-Ion battery packs are shipped partially charged. Before using them for
the rst time, fully charge the battery packs.
WARNING: D
uring charging, the b
attery packs must be placed in a well-
ventilated area.

PGX™ COMMERCIAL CHARGING 3-PORT DOCK — PGX3000D/PGX3000D-FC 9
The following illustrations in Fig. 2a show how to charge the battery
packs via the docks:
1. Push the collar of the hub connector onto the dock until you hear a click as shown
in Fig. 2a (step a).
2a
a
db
c
a
Dock
Hub
≤30
NOTE:
To disconnect the hub from the
dock, rst rotate the collar of the hub
connector according to rotation arrow
marked on the connector and pull it out
from the dock as shown in Fig. 2b.
2. Connect the dock to the next dock
in the same way. You can continue
to connect more docks if necessary
(step b). Do not connect more than
30 docks.
3. Plug the hub into the power supply (step c). The hub status indicator and dock-
status indicator will glow green, indicating that the hub and the dock are working
properly and can charge the battery packs.
4. Align the raised ribs of a battery pack with the mounting slot in one of the dock’s
battery bays. Slide the battery pack(s) down into the battery bay (step d). The
battery release button will spring up indicating that the battery pack is securely
attached.
2b
a
b

PGX™ COMMERCIAL CHARGING 3-PORT DOCK — PGX3000D/PGX3000D-FC10
5. The hub will communicate with the battery pack to evaluate the condition of the
battery pack. When the battery pack meets the charging conditions, the hub will
begin charging the battery pack and the hub status indicator and the battery-bay
status indicator (above the inserted battery pack) will ash green.
6. Insert more battery packs.
7.
When connecting more docks to the hub, the hub will supply power to the docks in
the order of proximity – the dock nearest to the hub is powered rst. The ashing
green battery-bay status helps identify which battery is currently charging.
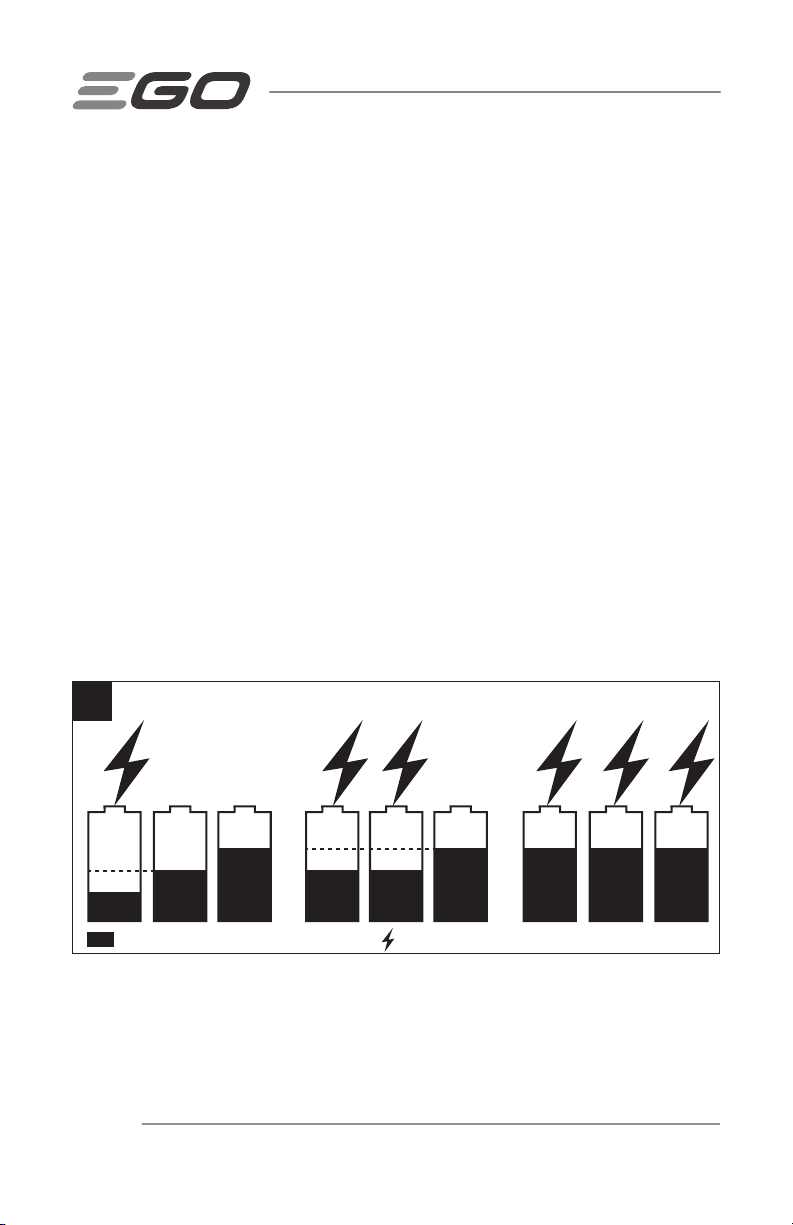
The Charging Sequence of the Battery Packs in the Same Dock
◾If two battery packs are connected to the dock at the same time, the battery pack
with the lower voltage level is charged rst, once the battery pack with the lower
voltage level has the same voltage level as the other, the two battery packs are
charged at the same time.
◾If three battery packs are connected to the dock at the same time, the battery
pack with the lowest voltage level is charged rst, once the battery pack with the
lowest voltage level has the same voltage level as the battery pack with medium
voltage level, these two battery packs are charged at the same time. Once these
two battery packs have the same voltage level as the battery pack with the
highest voltage level, all three battery packs are charged at the same time. Refer
to Fig. 3.
3
Voltage Level of the Battery Pack Charging
◾When the battery packs are fully charged, the hub status indicator and the
battery-bay status indicators will glow solid green. The “fuel gauges” on the
battery packs will go out. It is recommended to disconnect the hub from the
power supply, if it is not going to be used for a long period of time.

PGX™ COMMERCIAL CHARGING 3-PORT DOCK — PGX3000D/PGX3000D-FC 11
NOTE:
◾A signicantly reduced run time after fully charging a battery pack indicates that
the battery pack is near the end of its usable life and must be replaced.
◾The hub and dock may get warm during charging. This is part of the normal
operation. Charge in a well-ventilated area.
Hub, Dock, and Battery Pack Indicators
HUB DOCK BATTERY PACK
Hub Status
Hub
Status
Indicator
Dock
Status
Indicator
Battery-
bay Status
Indicator(s)
Fuel Gauge on the
Battery Pack
Standby (no
battery to
charge)
Solid
green Solid green Off N/A
Normal
charging
Flashing
green Solid green
Flashing
green above
the battery
pack(s) being
charged
1. For EGO battery packs
w/o “T” in the model
number (e.g. BA4200):
Flashing GREEN, RED and
ORANGE alternately
2. For EGO battery
packs with “T” in the
model number (e.g.
BA4200T):
Last LED ashing GREEN,
the former LEDs shining
solid GREEN.
Or fuel gauge will shine
solid in the last phase of
the charging process, and
the battery will refresh
LED indicator every 1-2
minutes to update the
real-time fuel gauge.
Charging
slowly when
the hub
temperature
is 104 – 140 °F
(40 – 60 °C)
Flashing
orange
Solid green
Flashing
green above
the battery
pack(s) being
charged

PGX™ COMMERCIAL CHARGING 3-PORT DOCK — PGX3000D/PGX3000D-FC12
HUB DOCK BATTERY PACK
Hub Status
Hub
Status
Indicator
Dock
Status
Indicator
Battery-
bay Status
Indicator(s)
Fuel Gauge on the
Battery Pack
Fully charged
Solid
green Solid green
Solid green
above the
fully charged
battery
pack(s)
Off
Hub is too
hot or too
cold
Solid red Off Off Off
Hub error
Flashing
red
Off Off Off
Hub operates
normally.
Charging a
hot or cold
battery pack.
Solid
green Solid green
Solid red
above the
battery
pack being
charged.
Off
Hub energy
saving mode
Flashing
green
slowly
Off Off Off
NOTE: After two hours of inactivity, when the battery packs are fully charged or no
battery pack to charge, the hub will enter energy saving mode and the hub status
indicator will ash green slowly. Energy saving mode can be exited from by unplugging
and re-plugging the power cord or briey pressing the reset button.

PGX™ COMMERCIAL CHARGING 3-PORT DOCK — PGX3000D/PGX3000D-FC 13
CHARGING A HOT OR COLD BATTERY PACK
If the battery pack in the charging dock is outside of the normal temperature range, the
corresponding battery-bay status indicator will glow solid red and the power indicator
on the battery pack will turn off. When the battery pack cools down or warms up to a
normal temperature range, the battery pack will resume to charge automatically.
BATTERY PACK OR DOCK ERROR
If the battery pack error is detected, the corresponding battery-bay status indicator will
ash red and the power indicator on the battery pack will turn off.
1. Remove and re-insert the battery pack into the dock. If the battery-bay status
indicator still ashes red, try charging a different battery pack that is known to be
functional.
2. If the new replacement battery pack can be charged normally, the original battery
pack is faulty.
3. If the battery-bay status indicator still ashes red after trying to charge a
functional battery pack, reset the hub by unplugging the hub from power supply
and waiting until the hub status indicator goes out. Then reconnect the plug to the
power supply.
4. If the battery-bay status indicator still ashes red after step 3, the dock may be
faulty.

PGX™ COMMERCIAL CHARGING 3-PORT DOCK — PGX3000D/PGX3000D-FC14
MOUNT THE DOCK (FIG. 4)
Wall-mount Holes
1. Make sure the two rubber blocks t into the upper slots of back on the dock.
2. Mark the locations of the ve wall-mount holes at the desired location on a wall.
3. Use ve #8 or #10 screws with the length of at least 2.5” (63 mm) and washers
(not included) to securely mount the dock to the wall.
NOTICE: Mounting surface should be at least 3/4’’ (19 mm) thick to securely support
the dock.
4Wall-mount Holes (5) Rubber Blocks (2)
Mounting onto E-track Rail
(Fig. 5)
EGO E-track mounting kit AEK1000 (sold
separately) is required to mount the dock
onto an E-track rail.
1. Disconnect the dock from the hub
and remove the battery packs.
2. Remove the 2 rubber blocks shown
in Fig. 2.
3. Install the E-track clips (included in the kit) into the recessed areas (vacated by
the rubber blocks) as shown in Fig. 5.
4. Use the assembly tool (included in the kit) to secure each E-track clip to the dock
using M5 bolt and washer sets (included in the kit).
5. Insert two rubber bumpers (included in the kit) into the outer lower slots on the
back of the dock.
Bolt and
washer set (2)
E-track Rail
Rubber
Bumper(2)
E-track Clip(2)
5

PGX™ COMMERCIAL CHARGING 3-PORT DOCK — PGX3000D/PGX3000D-FC 15
6. Snap the dock to the E-track rail using the E-track clips as shown and make sure
the dock is secured to the rail.
7. To remove the dock from the E-track rail press the release levers on the E-track
clips and pull the dock away.
NOTE:
The hole in the E-track clip can function as an anti-theft device using a padlock
(not included). The shackle diameter range is 13/64” – 9/32” (5 – 7 mm).
ANTI-THEFT BAR ON THE DOCK
(FIG. 6)
To prevent unauthorized removal of
battery packs, pull the tab of the anti-theft
bar out and secure it with a padlock (not
included). The shackle diameter range is
13/64” – 9/32” (5 – 7 mm).
6
Anti-theft Bar

PGX™ COMMERCIAL CHARGING 3-PORT DOCK — PGX3000D/PGX3000D-FC16
MAINTENANCE
WARNING: To avoid serious personal injury, always disconnect the hub
from power outlet and remove the battery pack(s) from the dock when cleaning or
performing any maintenance.
WARNING: When servicing, use only identical replacement parts. Use of any
other parts may create a hazard or cause product damage. To ensure safety and
reliability, all repairs should be performed by a qualied service technician at an EGO
Customer Service.
WARNING: It is not recommended to use compressed dry air as cleaning
method of the dock. If cleaning with compressed air is the only method to apply, always
wear safety goggles or safety glasses with side shields when using compressed air to
clean the dock. If the operation is dusty, also wear a dust mask.
GENERAL MAINTENANCE
Avoid using solvents when cleaning plastic parts. Most plastics are susceptible to
damage from various types of commercial solvents and may be damaged by their use.
Use clean cloth to remove dirt, dust, oil, grease, etc.
WARNING: Do not at any time let brake uids, gasoline, petroleum-based
products, penetrating oils, etc. to come in contact with plastic parts. Chemicals can
damage, weaken or destroy plastic which may result in serious personal injury.

PGX™ COMMERCIAL CHARGING 3-PORT DOCK — PGX3000D/PGX3000D-FC 17
TROUBLESHOOTING
Refer to the EGO hub operator’s manual of PGX1600H/PGX1600H-FC.

PGX™ COMMERCIAL CHARGING 3-PORT DOCK — PGX3000D/PGX3000D-FC18
EGO LIMITED WARRANTY
WARRANTY POLICY TERMS AND DURATION
Chervon North America, Inc. (“Chervon North America”) provides the following Limited
Warranty for EGO products to the original purchaser of EGO products.
The detailed warranty period for each EGO product can be found online at
http://egopowerplus.com/warranty-policy.
Please contact EGO Customer Service Toll-Free at 1-855-EGO-5656 any time you
have questions or warranty claims or would like a hard copy of the warranty.
LIMITED SERVICE WARRANTY
EGO products are warranted against defects in material or workmanship from the date
of original retail purchase for the applicable warranty period. For any properly and
timely submitted warranty claim, if Chervon North America determines a product to be
defective during the warranty period, the product will receive free repair or replacement
as determined by Chervon North America.
HOW TO OBTAIN SERVICE
For warranty service, within the applicable warranty period, please contact EGO
Customer Service toll-free at 1-855-EGO-5656. When requesting warranty service,
you must present the original dated sales receipt. An authorized service center will be
selected to evaluate and repair the product if defective according to the stated warranty
terms. When bringing your product to the authorized service center, there may be a
small deposit that will be required when dropping off your product. This deposit is
refundable when the repair service is deemed to be covered under warranty.
ADDITIONAL LIMITATIONS & EXCLUSIONS
This limited warranty applies only to the original purchaser from an authorized EGO
retailer and is not transferable. EGO products shall not be considered defective, and this
warranty will not apply, where the claimed defect is attributable to any cause other than
the above-dened defects. This warranty shall be void if the product has been used for
rental purposes. This warranty shall not apply to damage caused by accident, abuse,
misuse, alteration, modication, unauthorized repair, liquid contact, re, earthquake or
other external cause; operating the product outside EGO’s instructions, specications
or guidelines; or failure to properly service of maintain the product. This warranty also

PGX™ COMMERCIAL CHARGING 3-PORT DOCK — PGX3000D/PGX3000D-FC 19
does not apply to cosmetic damage, including but not limited to scratches or dents;
defects caused by normal wear and tear or otherwise due to the normal aging of the
product.
THIS EXPRESS WARRANTY IS GIVEN IN LIEU OF ALL OTHER WARRANTIES, EXPRESS OR
IMPLIED, INCLUDING, BUT NOT LIMITED TO, ANY WARRANTIES OF MERCHANTABILITY
OR FITNESS FOR PARTICULAR PURPOSE OR USE, WHICH ARE DISCLAIMED. Any implied
warranties, including warranties of merchantability or tness for a particular purpose,
that cannot be disclaimed under state law are limited to the applicable warranty period
dened at the beginning of this article. The sole and exclusive remedy in connection
with the purchase, installation, use, and/or performance of the EGO products is repair
or replacement of the product as determined by Chervon North America. Chervon North
America’s maximum liability shall not in any case exceed the purchase price paid for
the product. CHERVON NORTH AMERICA SHALL NOT BE LIABLE TO THE USER OR TO
ANYONE ELSE FOR CONSEQUENTIAL, INCIDENTAL, SPECIAL, EXEMPLARY, INDIRECT,
OR PUNITIVE DAMAGES ARISING FROM USE OF THE PRODUCTS, INCLUDING BUT NOT
LIMITED TO PERSONAL INJURY, DEATH, PROPERTY DAMAGE, LOST PROFITS, OR OTHER
ECONOMIC INJURY. This warranty gives you specic legal rights, and you may also have
other rights which vary from state to state. Some states do not allow limitations on how
long an implied warranty lasts, the exclusion or limitation of incidental or consequential
damages, or the limitations on time to bring certain actions, so such limitations
contained herein do not apply to individual consumers in those states.
This warranty is subject to and shall be interpreted according to Michigan law without
regard to principles of conicts of laws. No legal action shall be brought against
Chervon North America unless led within one (1) year after the basis for such legal
action becomes known, or with the exercise of reasonable diligence should have
become known. Any action not timely led shall be deemed waived.
For Customer Service contact us toll-free at: 1-855-EGO-5656 or
EGOPOWERPLUS.COM.
EGO Customer Service
769 Seward Ave. NW, Suite 102
Grand Rapids, Michigan 49504.

This manual suits for next models
1
Table of contents
Languages:
Other EGO Batteries Charger manuals