manuals.online logo
Brands
  1. Home
  2. •
  3. Brands
  4. •
  5. Elko
  6. •
  7. Controllers
  8. •
  9. Elko iNels RFGB-20 User manual

Elko iNels RFGB-20 User manual

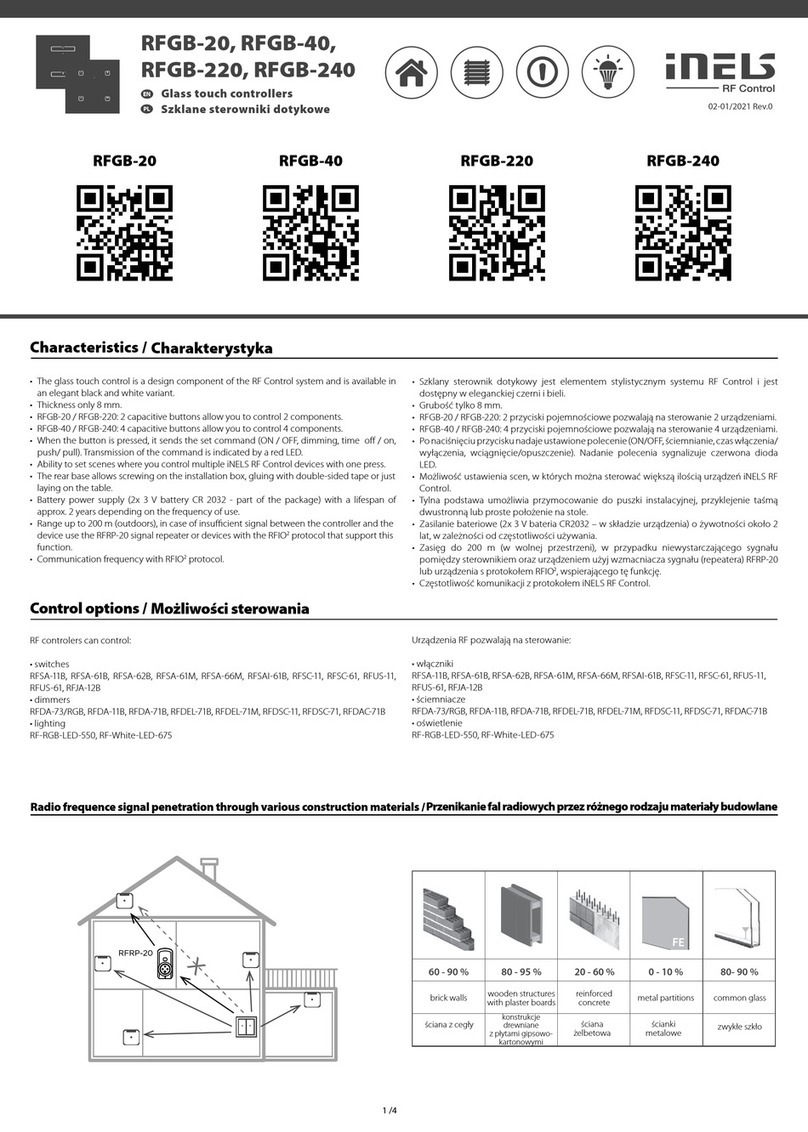
RFGB-20, RFGB-40,
RFGB-220, RFGB-240
Glass touch controllers
EN
02-01/2021 Rev.0
Characteristics /
RFGB-20 RFGB-40 RFGB-220 RFGB-240
EN
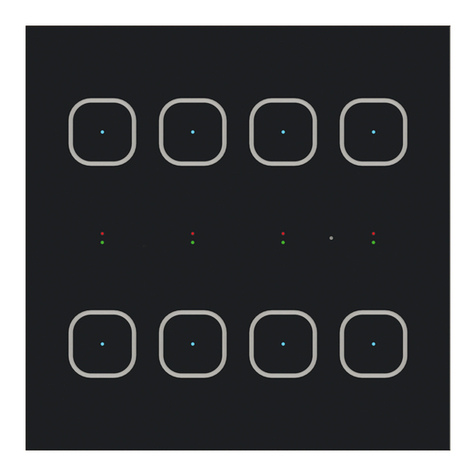
• The glass touch control is a design component of the RF Control system and is
available in an elegant black and white variant.
• Thickness only 8 mm.
• RFGB-20 / RFGB-220: 2 capacitive buttons allow you to control 2 components.
• RFGB-40 / RFGB-240: 4 capacitive buttons allow you to control 4 components.
• When the button is pressed, it sends the set command (ON / OFF, dimming, time off /
on, push/ pull). Transmission of the command is indicated by a red LED.
• Ability to set scenes where you control multiple iNELS RF Control devices with one
press.
• The rear base allows screwing on the installation box, gluing with double-sided tape or
just laying on the table.
• Battery power supply (2x 3 V battery CR 2032 - part of the package) with a lifespan of
approx. 2 years depending on the frequency of use.
• Range up to 200 m (outdoors), in case of insufficient signal between the controller
and the device use the RFRP-20 signal repeater or devices with the RFIO2 protocol that
support this function.
• Communication frequency with RFIO protocol.
RF controlers can control:
• switches
RFSA-11B, RFSA-61B, RFSA-62B, RFSA-61M, RFSA-66M, RFSAI-61B, RFSC-11, RFSC-61, RFUS-11,
RFUS-61, RFJA-12B
• dimmers
RFDA-73/RGB, RFDA-11B, RFDA-71B, RFDEL-71B, RFDEL-71M, RFDSC-11, RFDSC-71, RFDAC-71B
• lighting
RF-RGB-LED-550, RF-White-LED-675
Control options /
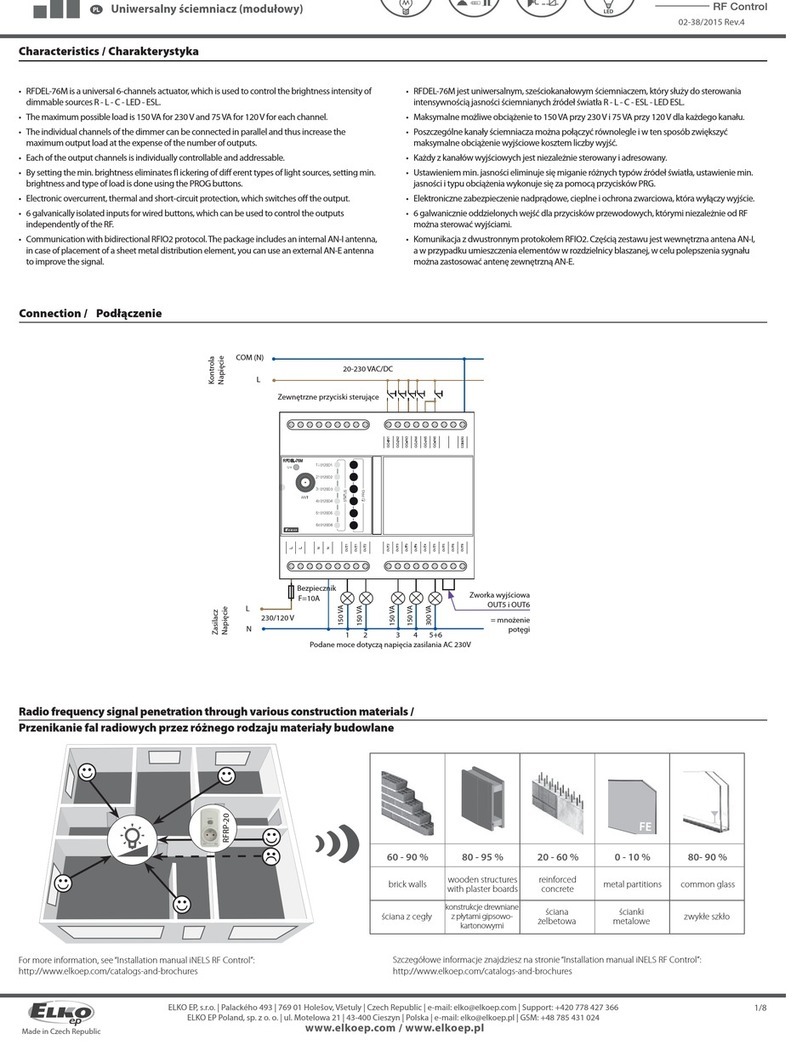
Radio frequence signal penetration through various construction materials /
x
RFRP-20
60 - 90 % 80 - 95 % 20 - 60 % 0 - 10 % 80- 90 %
brick walls wooden structures
with plaster boards
reinforced
concrete metal partitions common glass
1 /4
• Sklenený dotykový ovládač je dizajnovým prvkom systému RF Control a je k dispozícii v
elegantnej čiernej a bielej variante.
• Hrúbka iba 8 mm.
• RFGB-20 / RFGB-220: 2 kapacitné tlačidlá umožňujú ovládať 2 prvky.
• RFGB-40 / RFGB-240: 4 kapacitné tlačidlá umožňujú ovládať 4 prvky.
• Po stlačení tlačidla vysiela nastavený povel (ON/OFF, stmievanie, časové vypnutie/zapnutie,
vytiahnutie/zatiahnutie). Vysielanie povelu je indikované červenou LED.
• Možnosť nastavenia scén, kedy jedným stlačením ovládate viac prvkov iNELS RF Control.
• Zadná základňa umožňuje priskrutkovanie na inštalačnú krabicu, prilepenie obojstrannou
páskou alebo obyčajné položenie na stôl.
• Batériové napájanie (2x 3 V batérie CR 2032 - súčasť balenia) so životnosťou cca 2 roky
podľa frekvencie používania.
• Dosah až 200 m (na voľnom priestranstve), v prípade nedostatočného signálu medzi
ovládačom
• a prvkom použite opakovač signálu RFRP-20 alebo prvky s protokolom RFIO2, ktoré túto
funkciu podporujú.
• Komunikačná frekvencia s protokolom iNELS RF Control.
RF ovladači lze ovládat:
• spínače
RFSA-11B, RFSA-61B, RFSA-62B, RFSA-61M, RFSA-66M, RFSAI-61B, RFSC-11, RFSC-61, RFUS-11,
RFUS-61,RFJA-12B
• stmievače
RFDA-73/RGB, RFDA-11B, RFDA-71B, RFDEL-71B, RFDEL-71M, RFDSC-11, RFDSC-71, RFDAC-71B
• osvetlenie
RF-RGB-LED-550, RF-White-LED-675
Charakteristika
Priestup rádiofrekvenčných signálov rôznymi stavebnými materiálmi
tehlové
steny
drevené
konštrukcie
so sádrokart.
doskami
vystužený betón kovové prepážky bežné sklo
Možnosti ovládání
Dotykové sklenené ovládače
SK
CR2032
+
CR2032
+
Mounting jig (with brackets) - 1x
Battery*- 2x
* Batteries are inserted in the product. Before using for the rst time, remove the insulating tape from the battery contacts by pulling in the direction
of the arrow.
Double-sided adhesive label - 4x
Package contents /
Screws- 2x
After inserting the battery, the red LED lights up continuously for 3 seconds and then for
5 seconds, the selected controller function is indicated by flashing LED.
• triple flash - standard RFIO operating mode
• rapid flashing - mode of compatibility with older actuators
If you do not want to change the function of the controller, you must not press any
buttons during this time
To switch between RFIO mode and compatibility mode:
If you need to change the operating mode of the controller, after inserting the battery,
when the LED is constantly lit. press buttons 1 and 2 simultaneously and hold until the
LED starts to signal the changed mode (double flash or rapid flash).
Then the buttons must be released. The selected function mode is stored in memory
and after replacing the battery, the controller continues to operate in the same mode.
If the controller is used in RFIO mode, then it is necessary to instruct the controller
and link to the actuators switch to learn mode not only the actuator (according to the
instructions for the actuator), but also the controller in the following way:
Remove the battery from the controller, press some of the buttons several times to
discharge the internal capacitors and replace the battery. When the LED lights up, press
button 1 and keep it pressed until the controller starts signaling the learning mode with
short flashing LEDs. Then release the button and the button now works in RFIO learning
mode. To end the learning mode, remove the battery, press some of the buttons several
times. and then replace the battery. Now we press any button and the controller will start
again in RFIO operating mode.
Indicators, settings /
Insertion and replacement of a battery /
1CR2032
+
CR2032
+
2
1
CR2032
CR2032
2
CR2032
3
Press to open the plug-in battery
holder (you can use a flat-blade
screwdriver to open it).
Insert the CR2032 battery into
Battery holder. Watch out for
polarity.
Insert the holder into the device.
or /
CR2032
+
CR2032
+
3
Never mix new and old batteries when replacing! It is always necessary to replace
both batteries at the same time with new ones
2 / 4
Po vložení batérie sa počas 3 sekúnd trvale rozsvieti červená LED a potom počas 5
sekúnd je indikovaná zvolená funkcia ovládača blikaním LED.
• dvojblik - štandardný prevádzkový režim RFIO
• rýchle blikanie - režim kompatibility so staršími aktormi Pokiaľ nechceme meniť funkciu
ovládača, nesmieme počas tejto doby stláčať žiadne tlačidlá.
Prepnutie medzi režimom RFIO a režimom kompatibility: Pokiaľ potrebujeme
prevádzkový režim ovládača zmeniť, po vložení batérie, ak trvale svieti LED, stlačíme
súčasne tlačidlo 1 a 2 a držíme pokiaľ LED nezačne signalizovať zmenený režim (dvojblik
alebo rýchle blikanie). Potom je nutné tlačidlá uvolniť. Zvolený režim funkcie je uložený
do pamäti a po výmene batérie pracuje ovládač ďalej v rovnakom režime.
Pokiaľ je ovládač používaný v režime RFIO, tak pre zaučenie ovládača do aktorov je nutné
do učiacieho režimu prepnúť nielen aktor (podľa návodu k aktoru), ale tiež ovládač a
to nasledujúcim spôsobom: Z ovládača vyberte batériu, niekoľkokrát stlačte niektoré z
tlačidiel, aby došlo k vybitiu vnútorných kondenzátorov a vložte batériu späť. V okamihu,
keď sa rozsvieti LED stlačíme tlačidlo 1 a držíme stlačené, pokiaľ ovládač nezačne
signalizovať učiaci režim krátkym blikaním LED. Potom tlačidlo uvoľníme a ovládač
teraz pracuje v učiacom režime RFIO. Pre ukončenie učiacieho režimu vyberte batériu,
niekoľkokrát stlačte niektoré z tlačidliel a potom vložte batériu späť. Teraz nestláčame
žiadne tlačidlo a ovládač sa rozbehne opäť v prevádzkovom režime RFIO.
Indikácia, nastavenie
Obsah balenia
Obojstranný lepiaci štítok - 4x
Montážny prípravok (s držiakmi) - 1x
Batéria* - 2x
* Batérie sú vložené vo výrobku. Pred prvým použitím ťahom v smere šípky odstráňte izolačnú pásku kontaktov batérie.
Vloženie a výmena batérie
lebo
Batérie CR2032 zasuňte do
držiaku batérie. Pozor na polaritu.
Stlačením otvorte zásuvný držiak
pre batérie (pre otvorenie môžete
použiť plochý skrutkovač). Držiak zasuňte do prístroja.
Skrutka - 2x
Pri výmene nikdy nekombinujte nové a staré batérie! Vždy je potrebné vymeniť
obe batérie súčasne za nové.
Technical parameters /
More detailed information can be found in the iNELS RF Control Installation Manual:
https://www.elkoep.com/catalogs-and-brochures
ELKO EP, sro hereby declares that the type of radio equipment RFGB-20, RFGB-40,
RFGB-220, RFGB-240 is in accordance with Directives 2014/53 / EU, 2011/65 / EU,
2015/863 / EU and 2014 / 35 / EU. The full text of the EU Declaration of Conformity is
available on the following websites:
www.elkoep.com/glass-touch-controllers-white-sharp-rfgb-20w
www.elkoep.com/glass-touch-controller---2-buttons-black-sharp-rfgb-20b
www.elkoep.com/glass-touch-controller---4-buttons-white-sharp-rfgb-40w
www.elkoep.com/glass-touch-controller-4-buttons-black-sharp-rfgb-40b
www.elkoep.com/glass-touch-controller---2-buttons-white-round--rfgb-220w
www.elkoep.com/glass-touch-controller---2-buttons-black-round-rfgb-220b
www.elkoep.com/glass-touch-controller---4-buttons-white-round-rfgb-240w
www.elkoep.com/glass-touch-controller---4-buttons-black-round-rfgb-240b
When handling a device unboxed it is important to avoid contact
with liquids. Never place the device on the conductive pads or
objects, avoid unnecessary contact with the components of the
device.
Safe handling /
Attention:
When you instal iNELS RF Control system, you have
to keep minimal distance 1 cm between each units.
Between the individual commands must be an
interval of at least 1s.
Instruction manual is designated for mounting and also for user of the device. It is
always a part of its packing. Installation and connection can be carried out only by a
person with adequate professional qualification upon understanding this instruction
manual and functions of the device, and while observing all valid regulations. Trouble-
free function of the device also depends on transportation, storing and handling. In
case you notice any sign of damage, deformation, malfunction or missing part, do
not install this device and return it to its seller. It is necessary to treat this product
and its parts as electronic waste after its lifetime is terminated. Before starting instal-
lation, make sure that all wires, connected parts or terminals are de-energized. While
mounting and servicing observe safety regulations, norms, directives and professional,
and export regulations for working with electrical devices. Do not touch parts of the
device that are energized - life threat. Due to transmissivity of RF signal, observe cor-
rect location of RF components in a building where the installation is taking place. RF
Control is designated only for mounting in interiors. The must not be installed into
metal switchboards and into plastic switchboards with metal door - transmissivity of
RF signal is then impossible. RF Control is not recommended for pulleys etc. - radiofre-
quency signal can be shielded by an obstruction, interfered, battery of the transceiver
can get flat etc. and thus disable remote control.
Warning /
Power voltage:
Battery life:
Transmission indication:
Number of capacitive buttons:
Communication Protocal:
Frequence:
Signal transmission method:
Range:
Other data
OperatingTemprature:
Working Position:
Mounting:
Protection:
Pollution degree:
Dimension:
Weight:
Related standards:
RFGB-20 RFGB-40 RFGB-220 RFGB-240
3 / 4
Technické parametre
Napájacie napätie:
Životnosť batérií:
Indikácia prenosu:
Počet kapacitných tlačidiel:
Komunikačný protokol:
Frekvencia:
Spôsob prenosu signálu:
Dosah:
Ďalšie údaje
Pracovná teplota:
Pracovná poloha:
Upevnenie:
Krytie:
Stupeň znečistenia:
Rozmery:
Hmotnosť:
Súvisiace normy:
Upozornenie:
Pri inštalácii systému iNELS RF Control musí byť
dodržaná minimálna vzdialenosť medzi jednotlivými
prvkami 1 cm. Medzi jednotlivými povelmi musí byť
rozostup minimálne 1s.
Pri manipulácii s prístrojom bez krabičky je dôležité zabrániť
kontaktu s tekutinami. Prístroj nikdy neklaďte na vodivé podložky
a predmety, nedotýkajte sa zbytočne súčiastok na prístroji.
Návod na použitie je určený pre montáž a pre užívateľa zariadenia. Návod je vždy
súčasťou balenia. Inštaláciu a pripojenie môžu vykonávať iba pracovníci s príslušnou
odbornou kvalifi káciou, pri dodržaní všetkých platných predpisov, ktorí sa dokonale
zoznámili s týmto návodom a funkciou prvku. Bezproblémová funkcia prvku je tiež
závislá na predchádzajúcom spôsobe transportu, skladovania a zaobchádzania. Pokiaľ
objavíte akékoľvek známky poškodenia, deformácie, nefunkčnosti alebo chýbajúci
diel, tento prvok neinštalujte a reklamujte ho u predajcu. S prvkom či jeho časťami
sa musí po ukončení životnosti zaobchádzať ako s elektronickým odpadom. Pred
začatím inštalácie sa uistite, že všetky vodiče, pripojené diely či svorky sú bez napätia.
Pri montáži a údržbe je nutné dodržiavať bezpečnostné predpisy, normy, smernice a
odborné ustanovenia pre prácu s elektrickými zariadeniami. Nedotýkajte sa častí prvku, ktoré
sú pod napätím - nebezpečenstvo ohrozenia života. Z dôvodu priepustnosti RF
signálu dbajte na správne umiestnenie RF prvkov v budove, kde sa bude inštalácia
prevádzať. RF Control je určený iba pre montáž do vnútorných priestorov. Prvky nie
sú určené pre inštaláciu do vonkajších a vlhkých priestorov, nesmú byť inštalované
do kovových rozvádzačov a do plastových rozvádzačov s kovovými dverami -
znemožní sa tak priepustnosť rádiofrekvenčného signálu. RF Control sa neodporúča
pre ovládanie prístrojov zaisťujúcich životné funkcie alebo pre ovládanie rizikových
zariadení ako sú napr. čerpadlá, el. ohrievače bez termostatu, výťahy, kladkostroje a
pod. - rádiofrekvenčný prenos môže byť tienený prekážkou, rušený, batéria vysielača
môže byť vybitá a pod., a tým môže byť diaľkové ovládanie znemožnené.
2x 3 Vbattery CR 2032/ 2x 3 Vbatéria CR 2032
about 2years depending on the frequency of use / cca 2roky podľafrekvencie používania
Red LED/ červená LED
24 24
RFIO
866–922 MHz
one-way addressed message/ jednosmerne adresovaná správa
in the open up to 200 m/ na voľnom priestranstve až 200 m
-10 ... +50 °C
any / ľubovoľná
adhesive, screw / lepením, skrutkovaním
IP20
2
94 x 94 x 8mm 100 x 100 x 8mm
122 g 122 g 122 g 122 g
EN 60669, EN 300 220, EN 301 489 RTTE Directive,NVNo. 426/2000 Coll.(Directive 1999 / EC),
EN 60669, EN 300 220, EN 301 489 smernica RTTE, NVč.426/2000Sb(smernica 1999/ES)
Varovanie
Bezpečná manipulácia s prístrojom
13
2
Push the brackets out of the
mounting fixture.
Assembly /
Push the holders into the holes.
Free tting /
1 32
Peel off one protective
layer on the doublesided
adhesive sheets and stick them
to the marked places on the
controller.
Peel off the second protective
layer on the double-sided
adhesive sheets and place the
control in the prepared place.
Adhesive /
Depending on the type of
surface, clean (remove dust or
degrease) the place where
you want to place the controller.
13
Place the mounting jig on the
KU box and screw it on.
Screw /
Snap on the controller.
Made in Czech Republic
Z montážneho prípravku
vytlačte držiaky.
Držiaky zatlačte do otvorov.
Montáž
Voľne položené
Zlupnite jednu ochrannú
vrstvu na obojstranných
lepiacich lístkoch a prilepte
ich na vyznačené miesta na
ovládači.
Miesto, kde chcete mať
umiestnený ovládač, podľa
typu povrchu očistite
(zbavte prachu či odmastite).
Zlupnite druhú ochrannú
vrstvu na obojstranných
lepiacich lístkoch a ovládač
umiestnite na pripravené miesto.
Na krabici KU priložte montážny
prípravok a priskrutkujte.
Lepením
Nacvaknite ovládač.
Skrutkováním
ELKO EP, s.r.o. | Palackého 493 | 769 01 | Holešov, Všetuly | Czech Republic | e-mail: [email protected] | Support: +420 778 427 366
ELKO EP SLOVAKIA, s.r.o. | Fraňa Mojtu 18, 949 01 Nitra | Telefón: +421 37 6586 731 | E-mail: [email protected]
www.elkoep.com / www.elkoep.sk
4 /4

This manual suits for next models

11

Other Elko Controllers manuals

Elko RFDAC-71B User manual

Elko

Elko RFDAC-71B User manual

Elko RFDEL-76M User manual

Elko

Elko RFDEL-76M User manual

Elko iNELS GSB3-40 User manual

Elko

Elko iNELS GSB3-40 User manual

Elko iNels RFSAI-161B User manual

Elko

Elko iNels RFSAI-161B User manual

Elko iNELS RFGB-20 User manual

Elko

Elko iNELS RFGB-20 User manual

Elko iNELS Air AirSLC-100 User manual

Elko

Elko iNELS Air AirSLC-100 User manual

Elko iNELS AirSLC-100L/LWES Series User manual

Elko

Elko iNELS AirSLC-100L/LWES Series User manual

Elko RFWB-20/G User manual

Elko

Elko RFWB-20/G User manual

Elko iNELS RFGB-20 User manual

Elko

Elko iNELS RFGB-20 User manual

Elko RFWB-20/G User manual

Elko

Elko RFWB-20/G User manual

Elko LIC-2 User manual

Elko

Elko LIC-2 User manual

Elko RFDAC-71B User manual

Elko

Elko RFDAC-71B User manual

Elko iNELS AirSLC-100NB/NEMA/DALI User manual

Elko

Elko iNELS AirSLC-100NB/NEMA/DALI User manual

Elko iNels LBC3-02M User manual

Elko

Elko iNels LBC3-02M User manual

Elko RFDEL-76M User manual

Elko

Elko RFDEL-76M User manual

Elko RFDAC-71B User manual

Elko

Elko RFDAC-71B User manual

Elko RFSA-61B User manual

Elko

Elko RFSA-61B User manual

Elko COS-1 User manual

Elko

Elko COS-1 User manual

Elko inels RFSTI-11B User manual

Elko

Elko inels RFSTI-11B User manual

Elko iNels BPS3-02M User manual

Elko

Elko iNels BPS3-02M User manual

Elko RFDAC-71B User manual

Elko

Elko RFDAC-71B User manual

Elko iNELS RFSTI-111B User manual

Elko

Elko iNELS RFSTI-111B User manual

Elko iNels DA2-22M User manual

Elko

Elko iNels DA2-22M User manual

Elko iNELS RFGB-20 User manual

Elko

Elko iNELS RFGB-20 User manual

Popular Controllers manuals by other brands

cashco D Installation, operation & maintenance manual

cashco

cashco D Installation, operation & maintenance manual

EP Solar LS1024RD instruction manual

EP Solar

EP Solar LS1024RD instruction manual

Caen V2495 user manual

Caen

Caen V2495 user manual

Phocos CIS05 user manual

Phocos

Phocos CIS05 user manual

Jung RCD 20 series operating instructions

Jung

Jung RCD 20 series operating instructions

Phason SEC-HD user guide

Phason

Phason SEC-HD user guide

THK THC instruction manual

THK

THK THC instruction manual

CMX VS-C200 Installation and operation manual

CMX

CMX VS-C200 Installation and operation manual

Carel pCO3 series Technical leaflet

Carel

Carel pCO3 series Technical leaflet

MPPT S3 Series quick start guide

MPPT

MPPT S3 Series quick start guide

Holman CLXRGB60 user guide

Holman

Holman CLXRGB60 user guide

Philips DYNALITE DMC4 Installation instructions manual

Philips

Philips DYNALITE DMC4 Installation instructions manual

Schischek InMax-8-F1 quick start guide

Schischek

Schischek InMax-8-F1 quick start guide

DROPLUX HX-DLV004-RFBK Product introduction

DROPLUX

DROPLUX HX-DLV004-RFBK Product introduction

Assa Abloy CLIQ CLM installation instructions

Assa Abloy

Assa Abloy CLIQ CLM installation instructions

ProMinent PROFIBUS DP DULCOMETER diaLog DACb Supplementary instructions

ProMinent

ProMinent PROFIBUS DP DULCOMETER diaLog DACb Supplementary instructions

Walchem W600 Series instruction manual

Walchem

Walchem W600 Series instruction manual

BIFFI HLRA Installation, operation and maintenance manual

BIFFI

BIFFI HLRA Installation, operation and maintenance manual

manuals.online logo
manuals.online logoBrands
  • About & Mission
  • Contact us
  • Privacy Policy
  • Terms and Conditions

Copyright 2025 Manuals.Online. All Rights Reserved.