Endura TWC12M User manual

Twelve Unit Rapid Charger
FOR RECHARGEABLE LMR BATTERIES
User Manual
Model TWC12M
™

Topic Page
Introduction 1
Important 2
Caution 2-3
Features 4-5
Replacing A Charging Pod 6
Charging A Battery 7 – 8
Battery Fault Conditions 9
Warranty And Service 10
Specications 11
Table of Contents
ENDURA™ TWC12M

1
Introduction
Thank you for purchasing an ENDURA™ TWC12M, Twelve Unit Rapid Charger. This high
quality product is designed for charging two-way radio batteries whether on or off a radio.
Using six replaceable pods, the TWC12M can charge twelve batteries at the same time
and the batteries may be the same or different chemistries. Separate LEDs conrm the
charge status of each battery.
The six replaceable pods may be mixed. For example, six different pods could be installed
allowing two batteries for each of six different radio brands to be charged.
With the appropriate charging pod installed, TWC12M can charge these battery chem-
istries: lithium ion (Li-Ion), lithium polymer (LiPo), nickel-metal hydride (NiMH), or nickel
cadmium (NiCd). For a complete list of charging pods available for this charger, contact
your Power Products dealer or call customer service at 800-529-1618.

2
Important
1. Read all Caution statements below and this User Manual before attempting to charge
a battery.
2. Always charge new batteries completely before initial use. Recycle batteries when
they can no longer be used. Do not discard unwanted batteries in the trash or inciner-
ate. Batteries exposed to re or excessive heat may explode.
3. For best battery performance, charge NiCd and NiMH batteries when they are fully
discharged.
Caution
1. Never charge alkaline or dry cell batteries with this charger. Do not charge Li-Ion,
LiPo, NiMH, or NiCd batteries unless they are designed with overcharge protec-
tion.
2. Use charger in areas protected from the weather. Do not expose the charger to rain,
any liquids, or excessive moisture.

3
3. Do not attempt to charge a battery without rst installing the appropriate charging
pod. Use only charging pods designed for the ENDURA TWC12M charger. Disconnect
charger from power supply before installing, adjusting, or removing the charging pod.
4. Make sure contacts in charging pod and battery are clean. Do not allow wire or metal
objects to touch contacts in charging pod or any internal part of the charger.
5. Do not remove the charger’s housing or make any modication to the charger.
6. Use only the power supply provided with the ENDURA TWC12M charger. If a replace-
ment power supply is required, order part number TWC12M-PS. Use of other power
supplies may damage the charger or batteries you may be attempting to charge.
Caution (continued)
The exclamation point within the triangle is a warning sign
alerting you of important instructions accompanying the
product.
CAUTION
RISK OF ELECTRIC SHOCK
DO NOT OPEN
CAUTION: TO REDUCE THE RISK OF ELECTRIC SHOCK, DO NOT REMOVE COVER. NO
USER SERVICEABLE PARTS ARE INSIDE. REFER ANY SERVICING TO QUALIFIED SER-
VICE PERSONNEL.
The lightning ash and arrowhead within the triangle is a
warning sign alerting you of ‘dangerous voltage’ inside the
product.
4
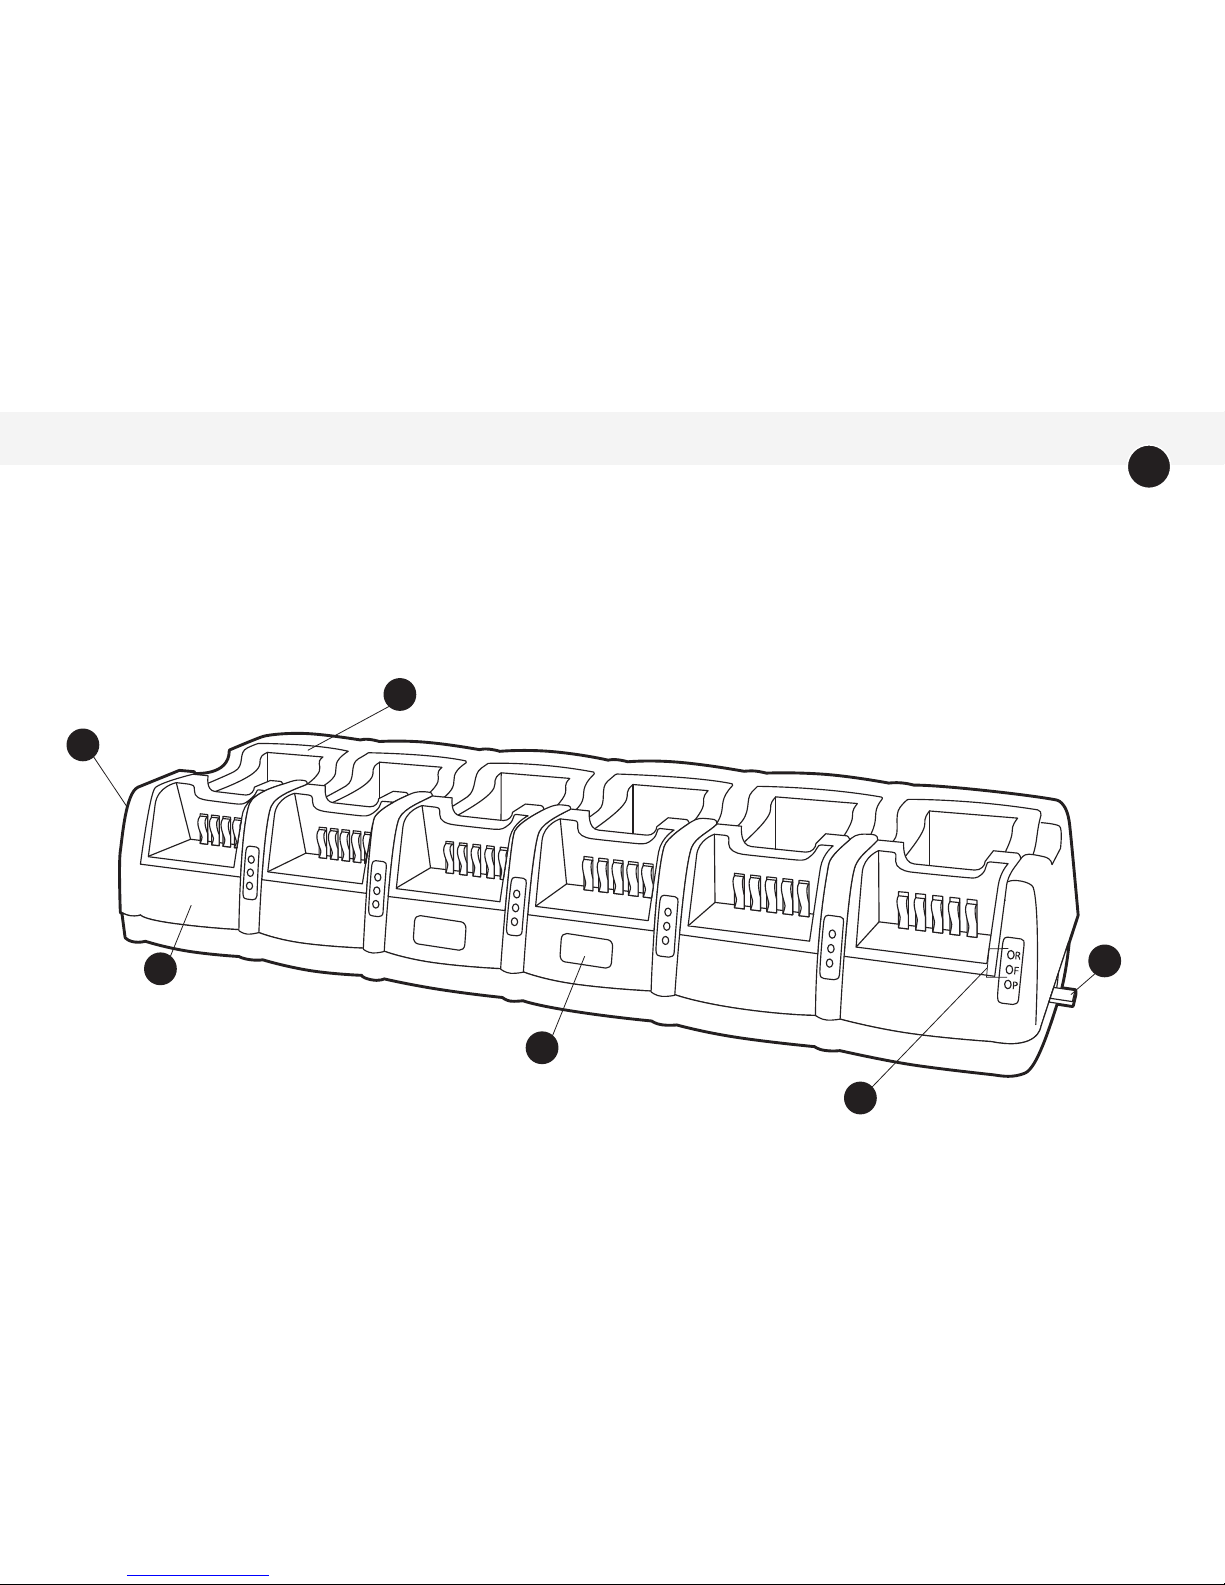
Note: Additional reference information for
charge status LEDs is located on bottom of
charger.
ENDURA TWC12M Features
1. DC power connection (see next page).
2. Charge status LEDs – for front and rear
positions.
3. Quick reference information for charge status
LEDs.
4. TWC12M – rapid charger base.
5. Power on/off switch (left side of unit).
6. Removable charging pod for two batteries
(shown for rst position only).
1
5
6
2
3
4

5
Note: DC power connection (7) is a custom
design that securely holds the DC plug (8).
ENDURA TWC12M Features (continued)
7. DC power connection.
8. DC plug from power supply.
9. TWC12M-PS - power supply for TWC12M (UL listed).
10. TWC6M-PC - power cord to connect TWC12M-PS
with AC wall outlet.
9
8
10
7

6
Replacing A Charging Pod
The charging pod is made from quality materials and designed to provide years of service
when properly used. In most cases, the charging pod will only be replaced when you want
to use the charger with a different battery. Each pod charges two batteries for a specic
radio; the two batteries may have different capacities or chemistries.
Follow these steps to change the charging pod:
1. Obtain a charging pod made specically for the TWC12M. Conrm that the charging pod is
compatible with the battery you want to charge.
2. Unplug the power supply from the TWC12M.
3. The charging pod is secured to the base with a single screw. Turn the locking screw on the bot-
tom of the rear charging pod counter-clockwise until it no longer holds the pod. Lift the charging
pod from the charging base.
4. Insert the replacement charging pod into the charging base and secure with the locking screw.
Do not over tighten the screw.
5. Inspect the charging contacts to ensure they are clean and unobstructed.
6. Connect the power supply to the TWC12M. You are now ready to charge a battery compatible
with the charging pod.

7
R - Status LED for rear position.
F - Status LED for front position.
P - Illuminates GREEN when TWC12M is connected to power.
Charging A Battery
1. Conrm that the charging pod and battery are compatible.
2. Insert the DC plug from the power supply into the opening on
the right side of TWC12M, connect the AC wall plug to a 120V
outlet, and turn the power switch (left side) to the on position.
The status LEDs marked “P” illuminate GREEN to conrm the
front and rear positions for each pod are receiving power.
3. Place the battery to be charged in either the front or rear posi-
tion of the charging pod. The status LED marked “F” or “R” will
illuminate to conrm which position is charging the battery. The
battery may be charged while attached to the radio and two
batteries may be charged simultaneously.

8
4. When a battery is placed in the charging pod and while charging, the charge status
LED (F or R) will illuminate RED with no ashing. If the charge status LED is red and
ashes, a fault has been detected. The ash pattern represents a specic fault condi-
tion. See section Fault Conditions for details.
5. When the battery is charged to 80% of capacity, the charge status LED will change to
GREEN and begin to ash. It is recommended that the battery be charged to at least
80% capacity before use.
6. The charge status LED will illuminate GREEN with no ashing when the battery is fully
charged.
7. After removing a fully charged battery, the charge status LED will illuminate ORANGE
for a few seconds. Allow the charge status LED to go off before placing another bat-
tery in the charging pod.
8. The TWC12M is designed to operate at room temperatures between 15°C and 30°C
(59° F – 86° F). Do not charge batteries at temperatures below 0°C (32° F) or above
45°C (113° F).
Charging A Battery (continued)

9
Fault Conditions
When the F or R charge status LED ashes RED, a fault condition exists. There are three
different ash patterns, each indicating a specic type of fault. The ash patterns and fault
conditions are as follows:
Flash Pattern Fault Type
Flashes 1 Time Indicates charging complete, but battery is under charged.
Battery voltage is below minimum level required. This warning is
provided after the rapid charging stage is complete.
Flashes 2 Times Indicates battery contact is “open” and current is not passing
through the (+) and (-) contacts on the battery. This warning is
provided after the initial diagnostic stage is complete. Check
charging pod to conrm compatibility with battery.
Flashes 3 Times Indicates over-current condition caused by battery short circuit.
Have the battery checked by a qualied technician. Do not
attempt charging the battery if a short circuit exists.

10
Warranty And Service During Warranty
The ENDURA TWC12M is made from high quality materials and designed to provide years of reliable
service. The following warranty applies:
Power Products Unlimited, Inc. (PPU) warrants this product to be free from defects in workmanship and materials
for one-year from date of purchase by the end user. This warranty applies to the original purchaser and is void
if the product has been altered, misused, damaged, neglected, or if repair is required because of normal wear
and tear. This is the only warranty made by PPU. In no event will PPU, its afliates, subsidiaries, related entities,
or their respective directors, ofcers, or employees, be liable for any damages beyond repair or replacement as
described above, including without limitation, indirect, incidental, or consequential damages.
For service under warranty, return the product along with dated proof of purchase to the retailer
where purchased or to Power Products. If returning directly to Power Products, follow these in-
structions:
1. Send item to Power Products – Warranty Service Department, 2170 Brandon Trail, Alpharetta, GA 30004. For
your protection, we recommend you obtain proof of delivery for your shipment.
2. Include with your product, dated proof of purchase, your name, email address, daytime telephone number,
and return address (street address only; return shipments cannot be made to a P.O. Box).
3. All items sent become the property of Power Products and will not be returned.

11
ENDURA TWC12M Specifications
Dimensions (W x L x H) 509 x 148 x 94 mm / 20.0 x 5.8 x 3.7 inches
Weight (Charger Only) 1.63 kg / 3.6 lbs
Weight (Power Supply) 0.86 kg / 1.9 lbs
Compatible Chemistries Li-Ion / LiPo / NiMH / NiCd
Recommended Operating Temperature 15º C – 30º C / 59º F – 86º F
Storage Temperature 0º C – 65º C / 32º F - 149º F
Power Supply Input (TWC12M-PS) 100V – 240V AC / 50 Hz – 60 Hz / 2.2A (max)
Charger Input 12-24V DC / 12.5A
Charge Rate 800 mA (10.6V – 13.5V)
Product Approval FCC, CE, UL (power supply)
Specications subject to change without notice.
This device complies with Part 15 of the FCC Rules. Operation is subject to the following conditions: (1) this device may not cause harmful interference,
and (2) this device must accept any interference received, including interference that may cause undesired operation.

ENDURA™ TWC12M Accessories
© 2014 Power Products Unlimited, Inc. Power Products is a registered trademark of Power Products Unlimited,
Inc. ENDURA and Smart • Adaptable • Reliable are trademarks of HT Mobile Products, Inc. All rights reserved.
2170 Brandon Trail • Alpharetta, GA 30004
www.powerproducts.com
ENDURA Chargers By Power Products
Smart • Adaptable • ReliableTM
Part Number Description
TWC12M-MB Bracket for mounting on a wall or horizontal surface.
TWC12M-PS Power supply (included with TWC12M).
TWC6M-PC Power cord for TWC12M-PS (included with TWC12M).
TWC6M-HW Hard wire kit for in-vehicle installations.
Table of contents
Other Endura Batteries Charger manuals

Endura
Endura TWC6M User manual

Endura
Endura TWC1M User manual

Endura
Endura EC-4173 User manual

Endura
Endura EVC User manual

Endura
Endura TWC2M User manual

Endura
Endura TWC1 User manual

Endura
Endura TWC6M User manual

Endura
Endura EC1 User manual

Endura
Endura EC6M-V2 User manual

Endura
Endura NCC0355 User manual


