manuals.online logo
Brands
  1. Home
  2. •
  3. Brands
  4. •
  5. Epson
  6. •
  7. Printer
  8. •
  9. Epson Stylus pro 7700m User manual

Epson Stylus pro 7700m User manual

Copyright© 2010 Seiko Epson Corporation. All rights reserved.
Printed in XXXXXX
<Copier Mode screen>
<Copy Setting Menu>
<Printer Mode screen>
Specify the number of copies (1 to 10) (on the scanner)
Enter the menu
Adjust the print density.
Default value is ±0.
Select Color or Black & White.
Select copy quality. The menu
may dier depending on the
selected paper.
Select the paper size, and then press the Right button to select
WITH BORDER or BORDERLESS.
Select whether paper is cut
after printing.
Reset all settings to their default factory
values except for PAPER TYPE and AUTO
CUT.Select the paper type.
(on the printer)
Select the menu
Select
a parameter
Set
or
Check the printer status (such as the•
amount of ink remaining).
Perform maintenance or adjustments•
(such as Nozzle check/Head
cleaning/Head Alignment).
NSee the Epson Stylus
Pro9700/7700/9710/7710 User’s Guide
.
Make Enlarged Copy
Change Copy Settings
Reset All Copy Settings
Change the Mode
Continue to the
back page.
This page can be used as a poster by making an enlarged copy.
If no buttons on the control panel are pressed for a certain period*
of time, the printer enters sleep mode and the LCD screen turns o.
Press any buttons except for the Power button to wake the printer.
Enlarge Copying Guide
The Epson Stylus Pro7700M/7710M is a wide-format printer that can enlarge
4x6 to A4 documents into A0 size by using Copier Mode when a GT-2500
scanner is connected. By changing to Printer Mode, you can use the printer
as an Epson Stylus Pro7700/7710.
1. Setting Up
1. Set up both the printer and the scanner.
You do not need to install any software if you only want to use the enlarged copy
function.
NSee the Epson Stylus Pro9700/7700/9710/7710 Setup Guide.
NSee the GT-2500 Start Here.
2. Turn o the printer and the scanner, and then connect them
using the USB cable supplied with your scanner.
cCaution:
You can only use the enlarged copy function when the GT-2500 is connected.•
You cannot use the enlarged copy function if you do not connect the printer•
and the scanner directly. In addition, you cannot use the scanner via a network
using the optional card while using it as a copier.
2. Making Enlarged Copies
1. Turn on the printer and the scanner.
It does not matter in which order the devices are turned on.
2. Load roll paper that supports enlarged copying.
For more information on supported paper types, see “3. Supported Paper for
Enlarged Copying”.
NSee the Epson Stylus Pro9700/7700/9710/7710 Setup Guide.
NSee "Paper Handling" in the Epson Stylus Pro9700/7700/9710/7710 User's Guide.
3. Place the original on the document table or in the scanner’s Automatic
Document Feeder (ADF).
NSee “5. Notes when Placing Originals”
4. Make necessary copy settings on the printer’s control panel, and
then press the OK button (on the printer) or the Start button (on the
scanner) to start copying.
For more information on the copy settings menu, see“4. Workow for Enlarged
Copy Settings”.
3. Supported Paper for Enlarged Copying
Some paper types that are available in Printer Mode may not be available in
Copier Mode. See the table below to check the availability of Epson genuine
paper for enlarged copying.
Paper Type Roll Paper Width
Singleweight Matte Paper 17"(432 mm), 24"(610 mm)
Doubleweight Matte Paper 24"(610 mm)
Enhanced Matte Paper 17"(432 mm), 24"(610 mm)
Premium Glossy Photo Paper (170) 16.5"(420 mm), 24"(610 mm)
Note:
You cannot make enlarged copies on cut sheets.•
You can select the•PAPER TYPE setting from Copier Mode and Printer Mode. When
you change the paper type in Printer Mode, the changed paper type is also applied
to Copier Mode.
4. Workow for Enlarged Copy Settings
Example: Output order when making two copies of a two page document.
A0
<Original>
Upper left corner
Example:
Roll paper width and output size
A2 ->
Width 16.5”(420 mm) x
Approx.46.8”(1188 mm)
24 inches ->
Width 24”(610 mm) x
Approx. 67.9”(1724 mm)
<Copy Result>
Example: When you set A2 width roll paper and select A4->A0(2SHEETS) as the output size.
A4
5. Notes when Placing Originals
Place the original horizontally.•
Do not place the original in the ADF when scanning the original on the document•
table. If the original is placed in the ADF and on the document table, the scanner
scans the original in the ADF.
The ADF is not available under the following conditions:•
- Premium Glossy 170 is selected as PAPER TYPE.
- The enlarged size is BANNER(AUTO) or A0(2SHEETS).
- The original size is 4x6.
- The original is thick (such as post cards or photos).
Do not open the document table until all copies have been made. When making•
two or more copies and the original is placed on the document table, scanning
may be performed for each copy.
Place the original in the ADF when copying a multi-page document. After•
copying starts, the printer outputs all copies for the scanned page before
scanning the next page.
6. SIZE Menu
In the SIZE menu, you can select the parameters from combinations of the original and
the output size.
Enlarge by selecting AUTO as the output size
The menu AUTO enlarges the original automatically to fit one of the following paper
widths.
- A2/16.5” (420 mm)
- 17” (432 mm)
- B2 (515 mm)
- A1 (594 mm)
- 24” (610 mm)
Note:
When using roll paper with a width not listed above, there may be an extra margin on
the side of the printouts.
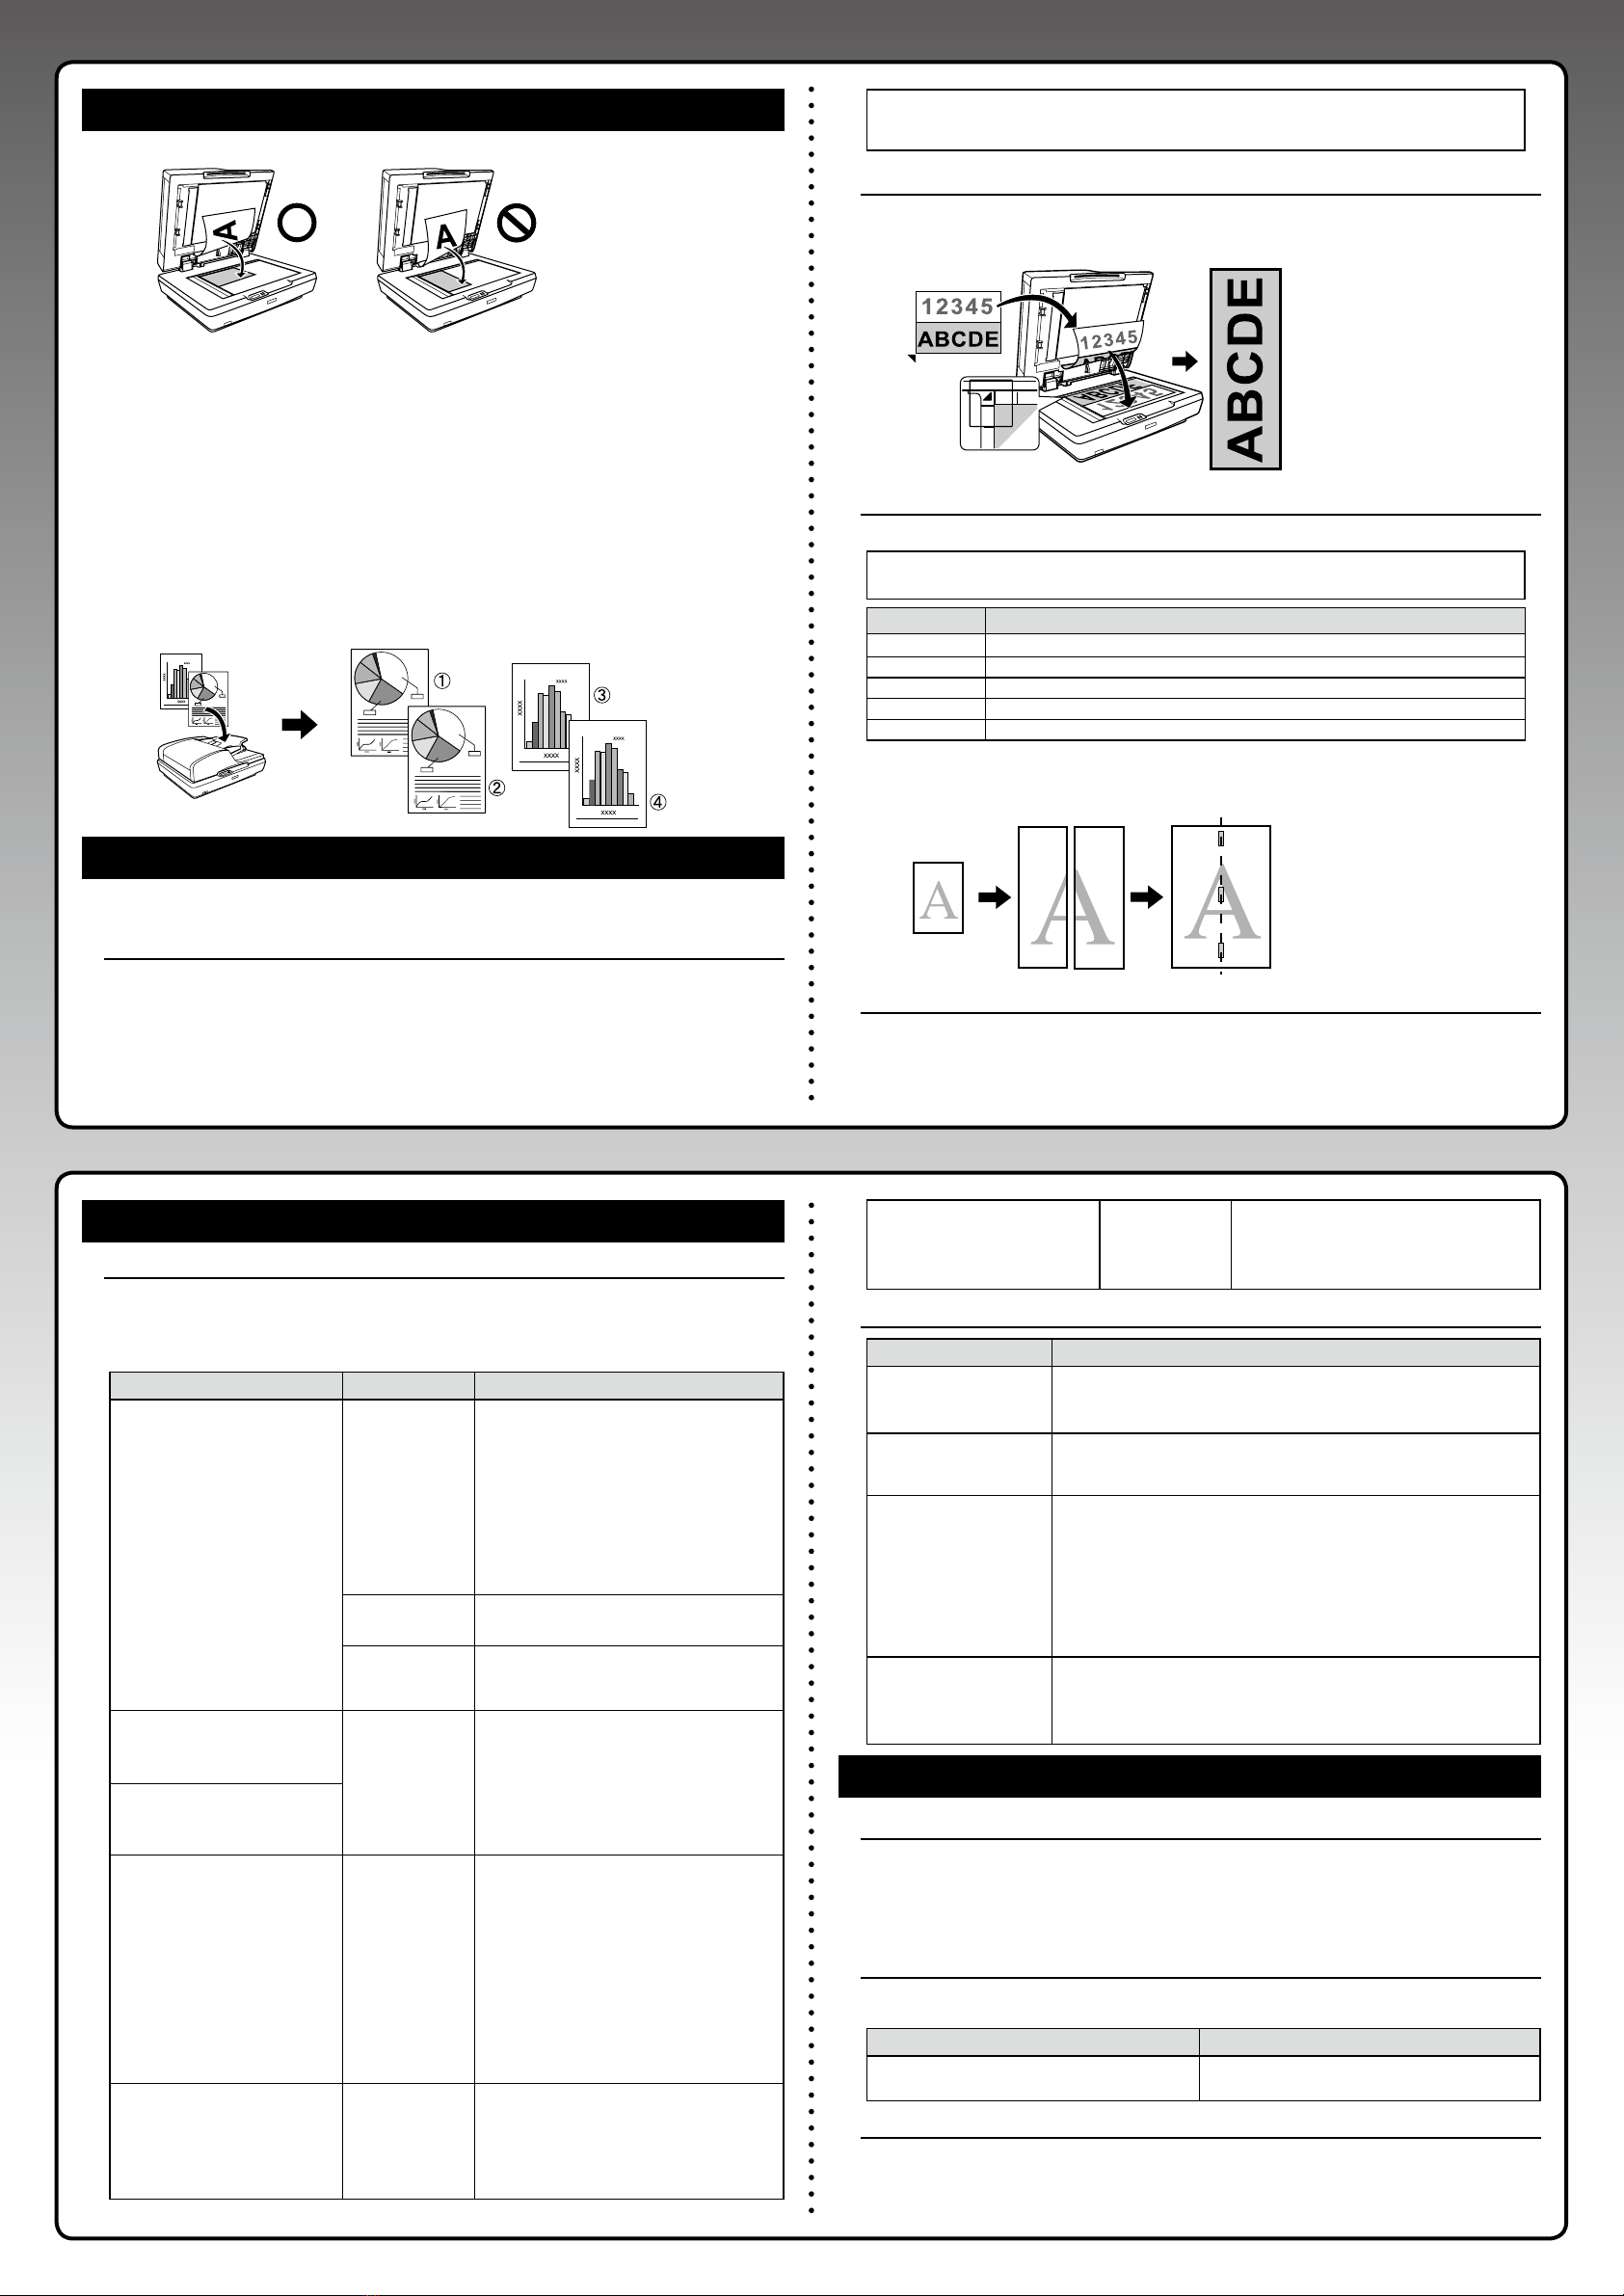
Banner Copy (A4/2->BANNER(AUTO))
This parameter automatically enlarges vertical half-sheet A4 originals to t the width of
the loaded roll paper. When placing the A4 size original, the area that touches the upper
left corner (the gray area) is enlarged.
Enlarge by the specied output size
You can select the following parameters as the output size.
Note:
Select AUTO as the output size when using roll paper with a width of 16.5”, 17”, or 24”.
Original Size Available Parameters
A4 A4->A1, A4->B2, A4->A2, A4->A0 (2SHEETS)
B5 B5->A1, B5->B2, B5->A2, B5->A0 (2SHEETS)
A5 A5->A1, A5->B2, A5->A2, A5->A0 (2SHEETS)
Letter(LTR) LTR->A1, LTR->B2, LTR->A2, LTR->A0 (2SHEETS)
4x6 4x6->A1, 4x6->B2, 4x6->A2, 4x6->A0 (2SHEETS)
When you select A0(2SHEETS), two sheets are output as shown in the illustration below.
Use A2 width roll paper and tape two sheets together to make A0 size output.
Notes for borderless printing
Borderless printing is not available under the following conditions:
- PlainPaper is selected as PAPER TYPE.
- The enlarged size is A2 or A0.
- PAPER SIZE CHECK is set to OFF in Printer Mode.
7. Troubleshooting
Error Messages Regarding Copying
When an error message is displayed on the printer’s LCD screen, see the table below
to troubleshoot the problem. When an error message is displayed, Printer Mode is
set automatically. For more information on other error messages, see the Epson Stylus
Pro9700/7700/9710/7710 User’s Guide.
Error Message Description What to do
SCANNER ERROR
REFER TO MANUAL FOR DETAILS.
ERROR CODE : NN
* Where NN is an error code num-
ber.
Number:01
System error
Slide the transportation lock to the unlocked•
position, and then restart the printer and the
scanner.
Turn o and on several times. If the error is•
cleared, use the scanner as it is.
If the same error occurs, contact Epson
support.
NSee “Where to Get Help” in the Epson
Stylus Pro9700/7700/9710/7710 User’s
Guide.
Number:02
ADF is open.
Close the ADF, and then copy again.
Number:03
ADF is jammed.
See the following to remove the jammed
original, and then copy again.
NSee the GT-2500 User’s Guide.
SCANNER NOT CONNECTED
CONNECT SCANNER TO PRINTER
THEN TURN ON SCANNER.
The scanner and
the printer are
not connected
correctly. (Or the
scanner is turned
o.)
Turn on the scanner.•
Connect the scanner using the following•
steps.
1. Turn o the printer.
2. Connect the printer and the scanner
correctly.
3. Turn on the printer.
CANNOT COPY
PAPER TYPE OF COPIER MODE IS
NOT SELECTED.
CONTINUE?
YES (PRINT)
NO (CANCEL)
Some papers
used in Printer
Mode are not
supported in
Copier Mode.
If you select YES (PRINT), you can continue
printing but the print result may not be
acceptable.
If you select NO (CANCEL), it returns to
Copier Mode menu.
See “3. Supported Paper for Enlarged Copy-
ing”to select a supported paper type, and
then load the paper correctly.
NSee the Epson Stylus
Pro9700/7700/9710/7710 Setup Guide.
NSee “Paper Handling”in the Epson Stylus
Pro9700/7700/9710/7710 User’s Guide.
COPY ERROR
CAN NOT START COPY WITH THIS
PRINTER SETTING.
REFER TO MANUAL FOR DETAILS.
PAPER SIZE
CHECK is set to
OFF.
When you select AUTO as the output size, set
PAPER SIZE CHECK to ON. If PAPER SIZE
CHECK is set to OFF, the printer cannot
detect the paper width.
NSee “The Control Panel”in the Epson Sty-
lus Pro 9700/7700/9710/7710 User’s Guide.
COPY ERROR
CAN NOT USE AUTO DOCUMENT
FEEDER WITH THIS COPY SETTING.
USE DOCUMENT TABLE.
The selected copy
setting is not
available for the
ADF.
See “5. Notes when Placing Originals” to place
the original on the document table, and then
copy again.
Diagnosing Problems and Solutions
Status What to do
Ink Check light or Paper
Check light is ashing or
on.
Change to Printer Mode and check the error message.
For more information on status and solutions, see the Epson Stylus
Pro9700/7700/9710/7710 User's Guide.
Some colors are missing. Depending on the original color, light or pale colors may not be printed
using the default settings. Set DENSITY to a positive (+) value, and then
copy again.
Enlarged size diers. See “6. SIZE Menu” to select the appropriate size. If the size setting is not•
appropriate, the enlargement may not be made correctly.
See “5. Notes when Placing Originals” to place the original correctly. If you•
do not set the original horizontally, the scan area may not be appropriate.
Use supported paper to obtain optimum print results.•
When you select AUTO as the output size, the enlarged copy may not be
made correctly if you use a paper type or paper size that is not listed in“3.
Supported Paper for Enlarged Copying”.
Copying does not start after
pressing the OK button or
the Start button.
The copy function is not available in Printer Mode. Change to Copier•
Mode, and then copy again.
N“4. Workow for Enlarged Copy Settings”
Check the error message displayed on the printer’s LCD screen.•
8. Appendix
Electrical Power Consumption (when using as an enlarged copier)
Since the Epson Stylus Pro7700M/7710M has an enlarged copy function, power consumption
diers from the description in the Epson Stylus Pro9700/7700/9710/7710 User’s Guide. The
following power consumption applies to the Epson Stylus Pro7700M/7710M.
Approx. 80W during operation / Approx. 16W in Sleep mode / Approx 1W or below in
Power o mode
Other manuals
This guide explains the enlarged copy function only. For more information on the printer
and the scanner, see the manuals below.
Printer Scanner
Epson Stylus Pro9700/7700/9710/7710 User’s Guide
Online manual (included on the printer CD-ROM)
GT-2500 User’s Guide
Online manual (included on the scanner CD-ROM)
Where to Get Help
For information on services and support, see “Where to Get Help” in the Epson Stylus
Pro9700/7700/9710/7710 User’s Guide.
NSee “Where to Get Help” in the Epson Stylus Pro9700/7700/9710/7710 User’s Guide.

Other manuals for Stylus pro 7700m

2

This manual suits for next models

1

Other Epson Printer manuals

Epson EPL-8000 User manual

Epson

Epson EPL-8000 User manual

Epson WorkForce Pro WF-C5710 Instruction Manual

Epson

Epson WorkForce Pro WF-C5710 Instruction Manual

Epson TM-T88V User manual

Epson

Epson TM-T88V User manual

Epson WorkForce 325 Series User manual

Epson

Epson WorkForce 325 Series User manual

Epson 1520 - Stylus Color Inkjet Printer User manual

Epson

Epson 1520 - Stylus Color Inkjet Printer User manual

Epson C12C823912 - Net 2 Print Server Dimensions

Epson

Epson C12C823912 - Net 2 Print Server Dimensions

Epson L120 User manual

Epson

Epson L120 User manual

Epson SureColor T-3270 User manual

Epson

Epson SureColor T-3270 User manual

Epson Stylus Pro XL User manual

Epson

Epson Stylus Pro XL User manual

Epson LQ-690 User manual

Epson

Epson LQ-690 User manual

Epson LX-300+II RTP User manual

Epson

Epson LX-300+II RTP User manual

Epson PM-400 Setup guide

Epson

Epson PM-400 Setup guide

Epson SC-P8500D Series User manual

Epson

Epson SC-P8500D Series User manual

Epson XP-710 User manual

Epson

Epson XP-710 User manual

Epson Stylus Photo 810 User manual

Epson

Epson Stylus Photo 810 User manual

Epson PictureMate Instruction Manual

Epson

Epson PictureMate Instruction Manual

Epson L Series Instruction Manual

Epson

Epson L Series Instruction Manual

Epson SQ-2550 User manual

Epson

Epson SQ-2550 User manual

Epson Stylus WorkForce 30 User manual

Epson

Epson Stylus WorkForce 30 User manual

Epson SC-T3170X SP Instruction Manual

Epson

Epson SC-T3170X SP Instruction Manual

Epson Stylus Photo RX640 series Assembly instructions

Epson

Epson Stylus Photo RX640 series Assembly instructions

Epson MX-80 IIIF/T User manual

Epson

Epson MX-80 IIIF/T User manual

Epson SL-D700 User manual

Epson

Epson SL-D700 User manual

Epson Mobilink TM-P60 Use and care manual

Epson

Epson Mobilink TM-P60 Use and care manual

Popular Printer manuals by other brands

Tally T8106 user guide

Tally

Tally T8106 user guide

Brady BradyPrinter S3000 user manual

Brady

Brady BradyPrinter S3000 user manual

Canon imagePROGRAF TA-30 quick guide

Canon

Canon imagePROGRAF TA-30 quick guide

Samsung CLP 610ND - Color Laser Printer Service manual

Samsung

Samsung CLP 610ND - Color Laser Printer Service manual

Lexmark C 750 Replacement guide

Lexmark

Lexmark C 750 Replacement guide

Konica Minolta magicolor 7450 installation guide

Konica Minolta

Konica Minolta magicolor 7450 installation guide

d.gen TELEIOS HEXA Operator's manual

d.gen

d.gen TELEIOS HEXA Operator's manual

DataSouth Documax A6300 Series user manual

DataSouth

DataSouth Documax A6300 Series user manual

BIXOLON SPP-R210 reference guide

BIXOLON

BIXOLON SPP-R210 reference guide

Canon imageRUNNER ADVANCE DX C357iF Service guide

Canon

Canon imageRUNNER ADVANCE DX C357iF Service guide

Konica Minolta magicolor 3730DN Firmware update guide

Konica Minolta

Konica Minolta magicolor 3730DN Firmware update guide

Samsung ML-1630W - Personal Wireless Mono Laser... user manual

Samsung

Samsung ML-1630W - Personal Wireless Mono Laser... user manual

Intermec EasyCoder PX6i quick start guide

Intermec

Intermec EasyCoder PX6i quick start guide

Canon imagePROGRAF iPF6400 Basic guide

Canon

Canon imagePROGRAF iPF6400 Basic guide

Printek FormsPro 4300 owner's manual

Printek

Printek FormsPro 4300 owner's manual

Ricoh Aficio MP1812L operating instructions

Ricoh

Ricoh Aficio MP1812L operating instructions

Ricoh Aficio SP 5200DN Hardware guide

Ricoh

Ricoh Aficio SP 5200DN Hardware guide

TransAct Ithaca 93PLUS Specifications

TransAct

TransAct Ithaca 93PLUS Specifications

manuals.online logo
manuals.online logoBrands
  • About & Mission
  • Contact us
  • Privacy Policy
  • Terms and Conditions

Copyright 2025 Manuals.Online. All Rights Reserved.