Espin Sport User manual


Table Of Contents
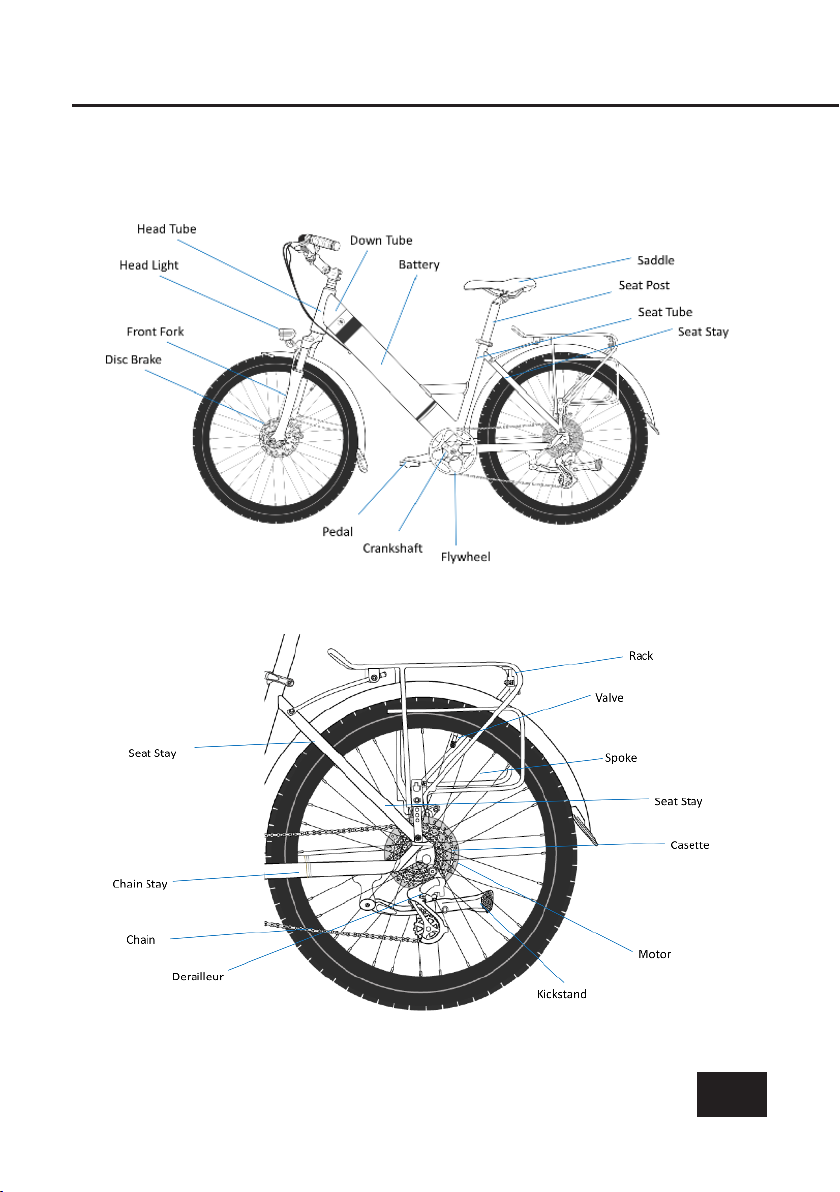
01 Meet Your Espin Bike
03 Assembly
04 Quick Start
05 Your rst Espin bike ride
06 Using the display + toggle functions
06 Display setup
07 Changing assist levels
08 Turn on/o headlight
08 Push mode
09 Parameter setting
12 Error code desciptions
13 Battery
14 Charging
14 Maintanance

1
About your new Espin Electric Bike.
We build Espin eBikes with quality, durability, and affordability in mind. In
order to safely enjoy your Espin eBike and to maintain its warranty, be sure to
read and follow the user and safety instructions.
The use of an electric bike assumes that you are familiar with and
comfortable riding a regular bicycle.
Although an electric bike feels and rides like a regular bike, you should rst
take the time to get acquainted with it. Espin eBikes are pedelecs, they need
to be pedaled in order for the electric motor to kick in. That takes a bit of
getting used to.
Electric power for the Espin eBike is provided by a 48 Volt, 14ah lithium-ion
battery which weighs just 7 lbs and is integrated into the frame. It is detach-
able and can be charged at home, in the ofce, or in a class room. It powers
a 500 Watt high torque electric hub motor allowing you to cruise uphill and
past trafc at up to 20 mph.
2

3
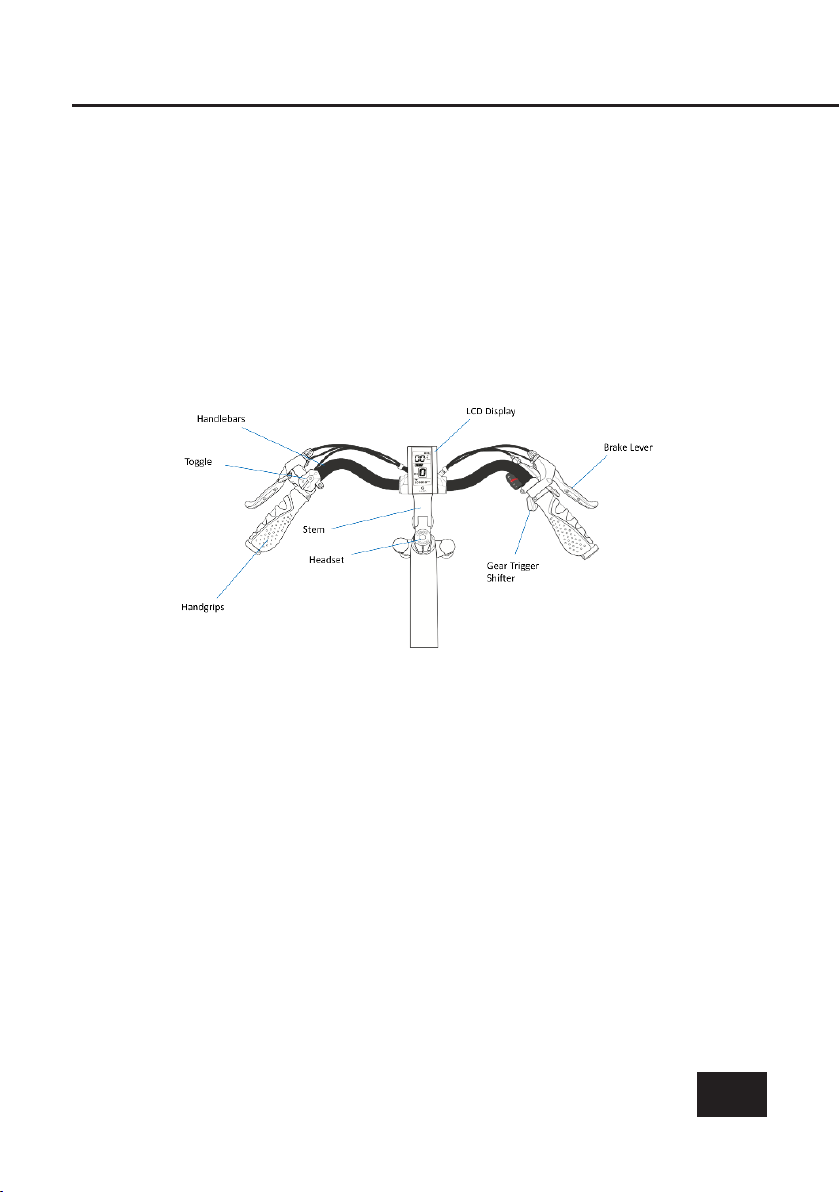
A toggle switch on the left side of the handle bar controls all electric functions of
the Espin eBike; in particular, it allows the user to choose between 5 pedal assist
levels or to switch on the LED headlight.
PAS 1 – Low Assist
PAS 2 – Medium Low Assist
PAS 3 – Medium Assist
PAS 4 – Medium High Assist
PAS 5 – High Assist
The digital LED panel mounted in the center of the handle bar displays the state
of all electric functions including speed, battery life, pedal assist level as well as
total miles traveled.

4
ASSEMBLY
Carefully remove your Espin eBike and all remaining contents from the
box. Please check that the following pieces are included in the box and
immediately contact Espin eBikes if anything is missing:
• Espin eBike (Sport or Flow)
• Pedals (Left and Right)
• Front wheel and front quick release pin
• Saddle and seat post
• Charger and pouch
• eBike Keys
• multi-purpose tool kit
1. Remove all packing and protective material from frame and components
2. Mount the front wheel by placing the front wheel in the fork and securing it
using the quick release pin. Make sure the disc brake is properly aligned.
3. Assemble the front headlight on the bolt above the front fork. Make sure to
secure the nut on the back of the bolt while tightening the bolt with the 5 mm
alan wrench key
4. Assemble the handle bar with the hand grips and LCD Display facing the rider
5. Attach Pedals. Note that the Left (L) pedal has a left thread meaning it is
6. tightened by turning it counterclockwise. The Right (R) pedal is tightened by
turning it clockwise
7. Install seat post. Secure it tightly using the quick release lever after adjusting it
to your desired height.
8. Inate tires to the desired PSI. Recommended PSI is between 40-65
9. Do a quick check of all the components on the bike to make sure no parts
have come loose during the transit and shipping of the eBike.
10. Completely charge the battery before your rst ride

5
Your First Espin ride
• Take a short ride without using the electric motor to check your balance,
the weight of the Espin eBike, and the ease of pedaling. Try the gear
shift and observe that you need to pedal harder as you shift into higher
gears.
• Once you feel comfortable on the bike you can switch on the motor with
the toggle switch of the power control system. Always start in PAS 1,
shown on the electronic display, and pedal slowly. Notice how the mo-
tor tries to “take over” after about half a rotation of the pedals and how
it stops helping you as soon as you stop pedaling. The power control
system does not control the speed; your pedaling and the setting of the
gear shift do - just like in a normal bike.
• Realize that the electric motor will have to work harder in higher gears.
Switch to a higher power level by moving the toggle to a higher PAS
level and notice the increased electric power.
• On level ground, a higher gear (and higher speed) usually require a
higher power setting to maintain the speed. Be careful to gauge your
speed: you will immediately notice that with the help of the electric mo-
tor you will get to higher speeds with much less effort. You will have to
get used to it.
• You will notice that hills are much easier to climb than with a normal
bike. But since the electric motor provides much of the climbing power,
you will need to increase the power settings even in low gears.
• Downhill make sure you don’t leave the power setting on the level you
used uphill: the bike may race uncomfortably fast. Stop pedaling and
use the brakes!
6
QUICK START
Before your rst Espin eBike ride
• Identify and familiarize yourself with the functions of various levers, switches,
and controls as well as the electronic display
• Adjust the seat to your height so your feet can touch the ground when you
don’t pedal
• Check the disc brakes by pulling rmly on the two brake levers. The levers
should not touch the handle
• Make sure the tires are fully inated. Low tire pressure will cause the bike to
feel unstable while you turn a corner
• Make sure the battery is fully charged and the power switch is “ON.”

7
Using the display
LCD display & toggle functions:
Display setup
Press and hold the power button for 1 second or longer to turn ON/OFF
the display. Automatic shut down of display can be congured in setting
if you wish to have the display turn off after not operating for a certain
amount of time.

8
Changing Assist Levels
Short press [+/-] button to change the assist level. In the pre-set option,
level 0 is zero assist and level is 5 is maximum assist.
Speed/Mileage mode switch
Short press [POWER] button to change the speed/mileage mode.
Speed AVG speed MAX speed ODO Time
*If nothing is done in 5 seconds, display will return to default setting automatically.
Press and hold [+/-] buttons together for one
second
or longer to
reset
several
temporary data points including; AVG Speed/MAX speed/Trip mode/Time
mode.

9
Turn ON/OFF headlight
Press and hold [+] button for one second to turn [ON/OFF] the headlight.
When the headlight is [ON] the headlight icon will show on the display.
Even when the battery is low, the headlight can still be powered by the
display.
Push mode
To activate Push mode, press and hold the [-] button for two seconds or
longer. In Push mode, the eBike is able to achieve a speed of up to 3.7
MPH solely by motor power, which helps you push the bike up steep
hills. When the Push mode is on, the display will show letter “P” in the
travel assist levels. To exit this mode, simply let go of the [-] button or
apply the break lever for a short period of time.

10
Data cleanup
Press and hold [+/-] buttons together for one second or longer to reset
several temporary data points including; AVG Speed/MAX speed/Trip
mode/Time mode.
parameter Setting
The parameter settings showcase the additional adjustments that can
be made to the display.
NOTE: The parameters are already set to our default settings. We do
not recommend adjusting the parameters for your Espin eBike.
To activate parameter setting, double press the [POWER] button
(interval press less then 0.3 seconds), when in parameter mode the
display twinkles.
When inside the parameter settings, short press [UP/DOWN] buttons
to change the parameter value, and short press [POWER] button to
switch to the next paramete
To quit the parameter settings, double press [POWER] button (inter-
val press less ten 0.3 seconds).
If nothing is done in 10 seconds, the display will return to default view
automatically.
11
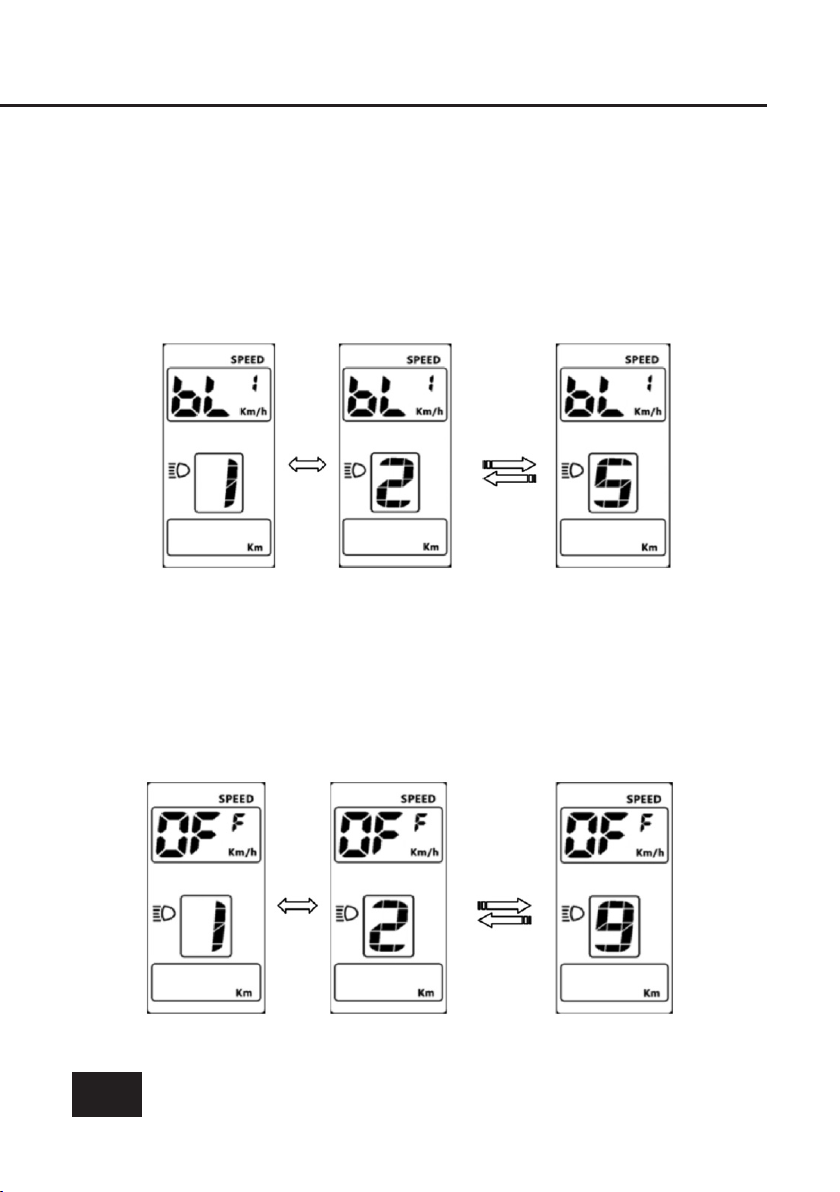
Display brightness
The conguration code is [bL1], press [+/-] button to change
brightness of the display. display brightness level ranges from 1-5.
Automatic time-off
The conguration code is [OFF], press [+/-] button to change the
value from 1-9, the numbers represent delay time (minutes) before
display shuts down automatically. Default value is set at 5 minutes.

12
The order of parameters category is as follows;
• Set speed unit (km/h or mph)
• Display brightness
• Automatic time-off
• Password
• Speed limit settings (do not adjust the pre-set congurations)
Set Speed Unit (km/h or mph)
The conguration code is [S7], press [+/-] button to choose the
desired unit (km/h or mph).
13
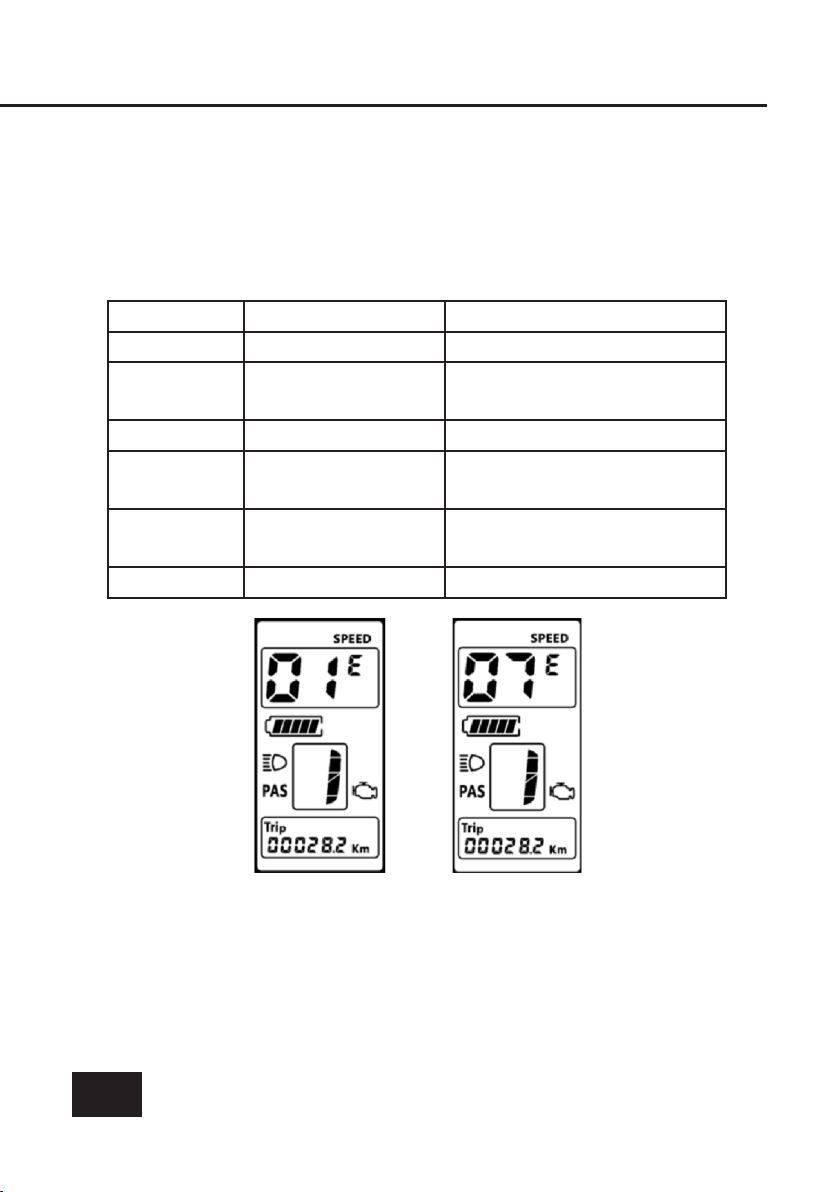
Error codes
When your Espin detects an error, the corresponding error code will display
on the screen. Based on the code display please read the error description
and follow the solution provided.
Code display Error description Solution
01-03E Communication error Check wire connections
04E Battery Battery empty, immediately re-
charge
05E Brake Error Check break cable connection
06E Throttle communication
error
Check wire connections
07E Motor Error Check the wire connection for
motor
08-09E Service settings Please contact espin eBikes
Service Setting
These adjustments must be performed by a technician (password needed)
Please contact espin eBikes on how to proceed.

14
Battery
Espin battery frames are made with customized aluminum tubes tailored for the
integrated frame. Powered by LG lithium ion (Li-ion) batteries, for their light weight and
high energy power density to optimize riding range.
This Espin battery can be used in both the Sport and Flow models and is also available
for purchase as an additional spare part..
When the eBike is not in use, it is always a good idea to charge the battery. There
is no advantage in waiting until the battery level is low before charging. In fact, the
battery performs best when charged often.
Charging time
The charging time from a completely
empty battery to fully charged is 4.5
hours.
Battery Removal
To remove the battery, turn the key
counter clockwise until the spring loaded
battery pops out of the frame.
Charger Features
The built-in safety features of the
“smart” charger prevent the following:
• Reverse polarity
• Current ow reversal
• Current and voltage uctuations
while charging
• Over charging
• Short circuit

15
Charging instructions
• Prior to connecting the charger to the battery and to an AC outlet, inspect the
plugs and ports for damage.
• Locate and remove the rubber cover to the charging socket
• Always charge the battery in a dry location and indoors, away from direct
• sunlight or rain
• Charging time is approximately 4.5 hours from a completely empty battery until
full
• At the end of the charging cycle, or in case of charge interruption, unplug the AC
power plug rst, then the DC plug from the charger.
LED Functions
Green light: No battery connected or charge complete
Red light: Charging
Maintenance and Warnings
• Prior to using the charger, please read these instructions completely.
• This Lithium Ion battery charger is to be used only with the original Espin
rechargeable battery. Using it with other batteries may damage it or cause
injury.
• If the charger is damaged or does not function properly, please contact your
authorized Espin dealer. Do not attempt to open or repair it.
• The charger is designed for indoor use only. Do not expose it to high tempera-
tures, high moisture, ammable liquids, or explosive substances.
• Any use of the charger other than described herein may cause damage or injury
and will void the warranty.

16
Maintenance
Regular maintenance is the key to ensuring maximum performance on your Espin.
Keep your bike indoors as much as you can, maintain tire pressure, and have your
Espin eBike checked by a qualied professional at your local bike shop each year. It
is also important to perform daily and monthly checks. Most simple adjustments can
be performed using the tool kit provided in the box.
The electrical components on Espin eBikes are built to last and come with an
extensive warranty. Always refer to the Error code table to identify the error shown on
the LCD display and make sure all powerlines are properly connected.
Other than the four electrical components, it’s like any regular bicycle. Meaning you
can get maintenance performed at any bike shop.

This manual suits for next models
1
Table of contents
Other Espin Bicycle manuals


