Etrel G6 User manual

05
30.3.2020
Ljubljana, september 2018
ELECTRIC VEHICLE CHARGING STATION MODEL G6
TECHNICAL DOCUMENTATION,
INSTALLATION AND MAINTENANCE
INSTRUCTIONS
Document version:
Document date:

1
Table of Contents
Foreword....................................................................................................................................3
1Safety precautions...............................................................................................................4
1.1 Intended use.................................................................................................................4
1.2 Compatibility with electric vehicles..............................................................................4
1.3 Safety regulations.........................................................................................................4
2Description of the product...................................................................................................5
2.1 Basic functionalities .....................................................................................................5
2.2 Overview of charging station components ....................................................................5
2.3 Optional and extra equipment.......................................................................................8
3Preparation before construction works and installation........................................................9
3.1 Permits.........................................................................................................................9
3.2 Grid connection..........................................................................................................10
3.3 Location.....................................................................................................................11
3.4 Placement of the charging station in the environment .................................................12
3.4.1 Required space....................................................................................................12
3.4.2 Possible charging station placements...................................................................12
3.4.3 Possible parking arrangements ............................................................................14
3.4.4 Recommendations...............................................................................................15
3.5 Electrical engineering works.......................................................................................15
4Construction works before installation..............................................................................17
4.1 Underground anchor...................................................................................................17
4.2 Excavation .................................................................................................................20
4.3 Construction of foundation.........................................................................................22
4.4 Installation of safety arches ........................................................................................23
4.4.1 Excavation and foundation construction for safety arches....................................23
4.5 Cabling.......................................................................................................................27
4.5.1 Insertion of cables through the installation pipe...................................................27
4.5.2 Cable types..........................................................................................................28
4.6 Communication and Internet connection.....................................................................29
5Installation and connection of the charging station............................................................31
5.1 Installation of the station on the foundation ................................................................31
5.1 Cabling route for the connection of multiple charging stations....................................31
5.2 Connection of charging station to the grid ..................................................................32
5.2.1 Connection of the PE (ground) wire ....................................................................33
5.2.2 Connection of the power cable ............................................................................33
5.3 Connection of the communication (SFTP/UTP) cable................................................. 34
5.4 Insulation of the charging station................................................................................34
6Initialisation of the charging station ..................................................................................36
6.1 Safety check of individual components.......................................................................36
6.2 Configuration of the charging station..........................................................................38
6.3 Configuration of the GPRS interface ..........................................................................42
7Instructions for use ...........................................................................................................43
8Service and maintenance...................................................................................................45
8.1 General inspection of the station.................................................................................45
8.2 Diagnostics of the functioning of the station...............................................................46
8.3 Installing new versions of charging station's firmware................................................48
8.4 Communication with the control centre ......................................................................48

2
8.5 Locking the charging plug into the socket...................................................................49
9Troubleshooting................................................................................................................50
10 Technical data...................................................................................................................51
11 Contact information..........................................................................................................53
11.1 Technical support department .................................................................................53
11.2 Customer support department..................................................................................53
11.3 Authorised service centres (as of 28.9.2018)...........................................................53

3
Foreword
The public charging station for electric vehicles is a part of the integrated charging system that
has been designed and developed by Etrel. The system consists of EV charging station(s)
described in this manual and the accompanying multi-tier software for EV charging
infrastructure operators, and end users. The system enables safe and simple EV charging for the
user and gives a comprehensive oversight and control of the charging for the operator,
including the data for billing of the consumed energy and service.
The manual with the installation instructions contains the latest information at the time of
purchase. Any unauthorised modification or tampering with the product may void the product
warranty. Etrel d.o.o. reserves the right to make changes to the product without further notice.
Etrel d.o.o. customer support department will assist you with any further inquiries about the
product.
Notes to the installer:
•Carefully read the installation instructions before installing the station. Follow all of the
instructions and recommendations.
•After the installation is completed, make sure to leave these instructions with the
customer.
Notes to the customer:
•Use the charging station only in accordance with instructions for use. Carefully read
these instructions and make sure to keep them for further reference. Ensure that the
charging station is installed by a licenced electrician and/or electrical contractor.

4
1Safety precautions
1.1 Intended use
The charging station is intended only for electric vehicle charging and should not be used to
charge any other appliances or devices or for any other purposes. No flammable materials or
liquids should be used or stored in the direct vicinity of the charging station. The manufacturer
accepts no responsibility for damage or injuries resulting from incorrect installation or
inappropriate use of the product. When conducting maintenance work on the station, the
power supply to the charging station needs to be turned off (see Chapter 8 Service and
maintenance). Any interference with the interior of the charging station can pose life-
threatening risks and may be conducted only by a certified and skilled professional.
1.2 Compatibility with electric vehicles
The charging station is compliant with the IEC 61851-1 international standard which defines
conductive AC electric vehicle charging (Part 1, Part 21 and Part 23). Different types of charging
connectors and converters are available as a part of optional equipment to allow safe charging
of any standard electric vehicle.
1.3 Safety regulations
The owner and operator of the charging station are required:
•To operate the charging station only with the necessary protective devices installed. All
safety components need to be properly installed and turned on after the installation or
maintenance of the charging station is completed,
•To prepare the site where the charging station will be installed in accordance with the
requirements and recommendations of this manual and the local regulation,
•To provide enough space around the charging station for needs of maintenance,
•To appoint a person responsible for the safe operation of the charging station and for
the coordination of work.

5
2Description of the product
2.1 Basic functionalities
The public charging station from Etrel is highly configurable and can be tailored to the client’s
specific needs. It allows simultaneous charging of two vehicles with power of up to 2x22 kW
and can be equipped with any standard Type 2 - IEC 62196-2 sockets. Certified utility-grade
meters as well as all optional utility feeder equipment are embedded in the station. The station
is equipped with an RFID identification module, which prevents unauthorised use and is
necessary to enable different billing and reservation processes and other advanced
functionalities. The station also supports remote identification with SMS or other external
identification means.
2.2 Overview of charging station components
The basic model of Etrel’s G6 public charging station contains the following components:
-casing of the station,
-two charging spots (Type 2 - IEC 62196-2 sockets, single- or three-phase),
-main controller of the station,
-LCD display that guides users through the charging process,
-user identification module with RFID card reader,
-Ethernet communication connection point,
-Built-in smart energy meters for each charging spot,
-electrical protection of each socket,
-three-phase grid connection point, optionally equipped with standard safety protection
required by local regulation.

6
Figure 1: Exterior dimensions of the charging station's casing
The casing of the charging station is robust enough to withstand any unfavourable weather
conditions and potential damage which may occur in open public areas. The compact
dimensions of the charging station allow its installation on a small area, for example close to
the edge of the pavement or roadside kerb. Modular design allows simple replacement of key
components that can become damaged due to wear and tear or vandalism (especially the
charging sockets). The station's service doors use a special single-point locking mechanism. The
doors open outwards and to the side to simplify the work of maintenance staff.

7
Figure 2: Arrangement of equipment inside the station
The figure above shows the general arrangement of equipment inside the charging station. The
station comprises several different functional units:
1. Grid connection module of the charging station, which contains terminals for all supply
wires (L1, L2, L3, PE, N);
2. Energy meters for each socket. For normal functioning of the station, a working
communication connection between the main station controller and the energy meters
is required;
3. Differential and overcurrent protection of each socket;
4. Module for communication with electric vehicle (compliant with the IEC 61851
standard), socket voltage monitoring components, socket contactors;
5. Main station controller with RFID reader, RFID antenna and LCD display, control circuit
power supply, and communication modules (Ethernet or GPRS router).
1
5
2
4
3

8
2.3 Optional and extra equipment
The table below shows the optional and extra equipment that can be added to the G6 charging
station:
Optional / Extra equipment
Use/Description
Sockets equipped with LED lights
LED lights allow the station to signal each
charging spot availability (available, occupied,
in fault)
Sockets equipped with extra lid locking
mechanism
The locking mechanism locks the lid of the
station which cannot be opened without prior
user identification
GPRS router with network switch
GPRS router can be used for communication
for several chargers on the same location
(required for control centre connection when
local connection via Ethernet is not possible).
Network switch can be used to connect
several stations on the same location with
one router.
Safety arches (Protection railing)
Protects the station from vehicle collisions
Different graphical user interface languages
Based on user identification, the station can
automatically adjust the language of the user
interface
Visual customisation of the station
Custom labels with client’s design, logotypes
or promotions
Connection of supply wires with greater
diameter (> 35 mm2)
Special connection terminals are built into the
station –can be used to connect several
stations in a row
DSM (Demand Side Management)
functionalities
Enables management of charging current
based on settings in the control centre for
management of charging infrastructure
Extra metallic plate for demo set-up
Can be used for temporary installation

9
3Preparation before construction works and installation
3.1 Permits
Location and building permit:
The charging station is considered to be a simple object; therefore there is usually no need to
acquire any building permits for its installation. If the installation site is a part of municipal
property, consent of the relevant authorities must be acquired before the charging station can
be installed.
Connection to the grid:
The charging station must be connected to the low-voltage electricity distribution network. No
special permit is required to connect to an existing network behind the metering point. The
connection can be done by any authorised electrician.
Parking permits:
Parking must be possible in the direct vicinity of the station and permitted by the operator or
owner of the parking area. Estimated time for a full charge depends on the current state of the
battery and the vehicle's charging power; it usually takes between 30 minutes and up to 8
hours.
The specially designated parking area for electric vehicles should be properly marked. When
the municipal decrees do not determine otherwise, the parking spaces should be marked by a
symbol denoting an electric vehicle, together with an explanatory sign that the parking space is
reserved for electric vehicles only. The parking regime should be monitored to prevent other
vehicles (with internal combustion engines) from parking on special EV parking places.
Connection to the station operator's communication network (charging infrastructure control
centre):
The charging station requires a connection to the station operator's WAN network. To access
the WAN network via an internet connection, some additional security requirements need to
be observed. The charging station uses network connection to communicate with the Control
centre in order to cyclically send information about its status, perform identification of users

10
(on the Control centre level), forward events that occur during its operation and execute billing
for the services performed. The connection also enables communication from the Control
centre towards the charging station, which enables remote access to the station for needs of
maintenance or remote control. Network connection can be executed in several different ways:
•Direct connection to the station operator's WAN network. Connection can be
established directly with a UTP cable or a fibre optic converter.
•Wireless connection. The station connects to an existing 2G/3G mobile network with an
GPRS/UMTS router built into the station.
3.2 Grid connection
The charging station can be connected directly to the electricity distribution network or to an
existing electrical installation nearby. Supply power depends on the charging power of each
socket (according to the configuration of the charging station). Current configurations require
the following supply power:
•14,8 kW:
o2x single-phase charging spots, maximum current 32 A per phase
•29,4 kW:
o1x single-phase and 1x three-phase charging spots, maximum current 32 A per
phase
•44 kW:
o2x three-phase charging spots, maximum current 32 A per phase
Supply power of the charging station must be dimensioned appropriately to enable
simultaneous charging of two vehicles. Charging power of each charging spot can be limited in
the settings of the charging station on the scale between 6 A and 32 A. The charging station can
also be set up to allow local power management so that when two vehicles are connected at
the same time, the available maximum power is split in half between the two vehicles
In the execution phase of the grid connection project, the following requirements need to be
met:
•Selectivity of the functioning of protection needs to be ensured;

11
oOvercurrent protection should be at least one class greater than the one used at
the grid connection point of the charging station;
oDifferential protection (RCD) which is used in the charging station operates at a
low current (ΔI is 30 mA and without delay). The selectivity of this protection on
the level of facility is achieved with a higher delay or a greater current
differential.
•Five wires are routed to the station, including three phase wires, grounding wire, and
the neutral wire (when connecting to an existing installation). For slow charging option,
only one phase wire with sufficient diameter can be routed to the station. Dimensioning
of the wires is determined in the project documentation. Grounding wire must be
connected to the main grounding busbar.
Own consumption of the charging station depends on the station's configuration and should
not exceed 20 W. Own consumption of the charging station is measured by energy meter 2.
3.3 Location
Location of the charging station must meet the following criteria:
•The charging station must not be submersed in water or any other fluid and should not
be installed in flood risk areas;
•The operational temperature of the charging station is between -20 and +50°C;
oFor locations where the charging station will be exposed to direct sunlight and
high ambient temperatures during the day, it is recommended to install
protection from direct sunlight, otherwise the temperature inside the station
may exceed 60°C.

12
3.4 Placement of the charging station in the environment
3.4.1 Required space
Basic installation of the charging station requires a space of approximately 650 mm x 390 mm.
If the charging station is installed together with safety arches, dimensions of the required space
are approximately 850 mm x 450 mm. Required dimensions are calculated as follows:
•Basic dimensions of the station's base: 350 mm x 200 mm.
•Free space:
-50 mm in the back
-150 mm on the left and right side
-140 mm at the front in order to open the station doors
•Two air vents are built into the station, one on the top of the back side and another in
the middle of the back side. Air vents must not be blocked or obstructed by other items
or objects. When applicable, air vents must be protected from being covered with snow.
•The height of the charging station is 1300 mm.
The charging station is equipped with standard sockets. Charging cables are not a part of the
station's equipment, therefore it is expected that the users carry charging cables in their
vehicles. EV parking places must be placed within the reach of the charging cable. Minimum
length of the charging cable should be 1,5 m (in the case of the most optimal EV parking).
3.4.2 Possible charging station placements
The placement of charging station into its environment must allow easy access to all electric
vehicles for which the station is intended. The charging station can be installed on the
pavement, parking lot, in a parking garage or elsewhere, taking into account the specific
conditions of each of these placements. In all these placement options, the station can also be
installed together with the safety arches. Each different placement has its own requirements as
described below. Due to the station's service doors opening outwards, the space in front of the
station (approximately 50 cm) needs to be free of any obstacles which could prevent the
opening of service doors. Safety arches or car park barriers can be used to prevent direct
contact of vehicles with the charging station.

13
•Street (pavement) placing
The charging station must be placed so that it does not interfere with pedestrian mobility while
providing EV charging services. When certain interference is unavoidable, the placement of the
station should prioritise pedestrian safety and minimise the risks of tripping over charging
cables or suffering collisions with the station. The charging station should be placed as close to
the roadside kerb as possible. When the charging station is combined with safety arches, these
need to be placed as close to the roadside kerb as possible, while the station is moved further
back from the roadside so that its back edge is aligned with the front side of the rear arches of
the safety arches (see Chapter 4.4.1 Excavation and foundation construction for safety arches).
The safety arches should be removed at least 15 cm from both sides of the station to enable
normal opening of the service doors.
•Parking lot placement
oSingle station
A single charging station is usually placed on one of the sides of the parking lot. The station
must be placed in a way to enable simple and practical charging of two electric vehicles at the
same time. The station should be placed in a medial position between two parking spaces, as
close to them as allowed by the kerb. It is recommended to install safety arches to prevent any
collisions with the station while parking the vehicle. Safety arches should be placed as close to
the kerb as possible and the back edge of the station should be aligned with the front side of
the rear arches of the safety arches. The safety arches must be removed at least 15 cm from
both sides of the charging station in order to simplify any maintenance. If several charging
stations are installed on the same parking lot, the stations should optimally cover two parking
spaces each.
oA pair of stations
Back-to-back placing of two charging stations can be used to place together a couple of
charging stations, usually in the central position of the parking lot. Minimum distance between
the rear sides of the two charging stations should be 50 mm. It is strongly recommended to add
safety arches to this placement. In this case, both charging stations can be placed inside a single
pair of safety arches. They can serve four electric vehicles at the same time.

14
•Parking garage placement
In the parking garage placement, the specific installation of supply cables needs to be
considered. These cables are usually routed on the ceiling of the parking garage. A wall mount
charging station is also available from the manufacturer. It can be equipped with one charging
socket and mounted directly to a concrete wall or column.
3.4.3 Possible parking arrangements
The charging station enables two vehicles to charge at the same time, one on each charging
spot. Accordingly, an appropriate number of parking places need to be maintained in the direct
vicinity of the station.
Figure 3: Possible parking arrangements
X = min. 2,5 m (standard cable length).

15
The figures above show some of the most often used parking arrangements. Both options (for
the charging cable to be plugged at either the front or the rear end of the vehicle) are
considered. The last figure shows the option of four EVs charging on two stations. Each charging
station can serve more than two parking spaces, taking into account that only two vehicles can
be actually plugged in at the same time.
3.4.4 Recommendations
•Use street signs or special marking to designate special EV parking places, which should
be easily distinguishable from conventional parking places.
•Car park barriers can be installed between the station and the parking place to ensure
extra protection of the charging station. It is also recommended to install safety arches,
which can be supplied by the manufacturer as an additional option.
•The arrangement of parking places should be planned in a way to ensure simple use of
the charging cable. Since there is yet no standard placement of the charging connector
on the EV (it is usually placed either at the front or on one of the rear corners of the
vehicle), each of these options must be taken into account. The user must be able to
reach any of these positions with a standard length charging cable.
•To provide a secure environment for EV users and prevent vandalism or theft:
-install the station in a location where it can be clearly seen and easily monitored;
-maintain a 24-hour security control of the station (from the charging
infrastructure Control centre);
-install sufficient lighting in the vicinity of the charging station to ensure better
safety and improved user experience;
-allow charging only for identified users. This means that only users who identify
themselves with their RFID card (or via SMS messages where applicable) can use
the charging station.
3.5 Electrical engineering works
Electrical installation must be performed in accordance with local laws and safety regulations.
The diameter of the electrical conductor (max. 35 mm2) depends on its length, method of
installation, etc. This must be determined by the contractor.

16
The figure below shows a typical circuit diagram for the G6 charging station.
Figure 4: G6 power circuit diagram

17
4Construction works before installation
4.1 Underground anchor
Figure 5: Assembled underground anchoring element
The self-standing charging station set contains an underground anchoring element which has a
double function:
•it supports the weight of the charging station, and
•it prevents any vertical incline of the charging station.
The dimensions of the underground anchoring element are:
•Width: 190 mm,
•Length: 470 mm,
18
•Basic depth without reinforcing steel: 380 mm.
The underground anchoring element is made of stainless steel.
The underground anchor is optimised for shipping and needs to be assembled before
construction by following the steps below:
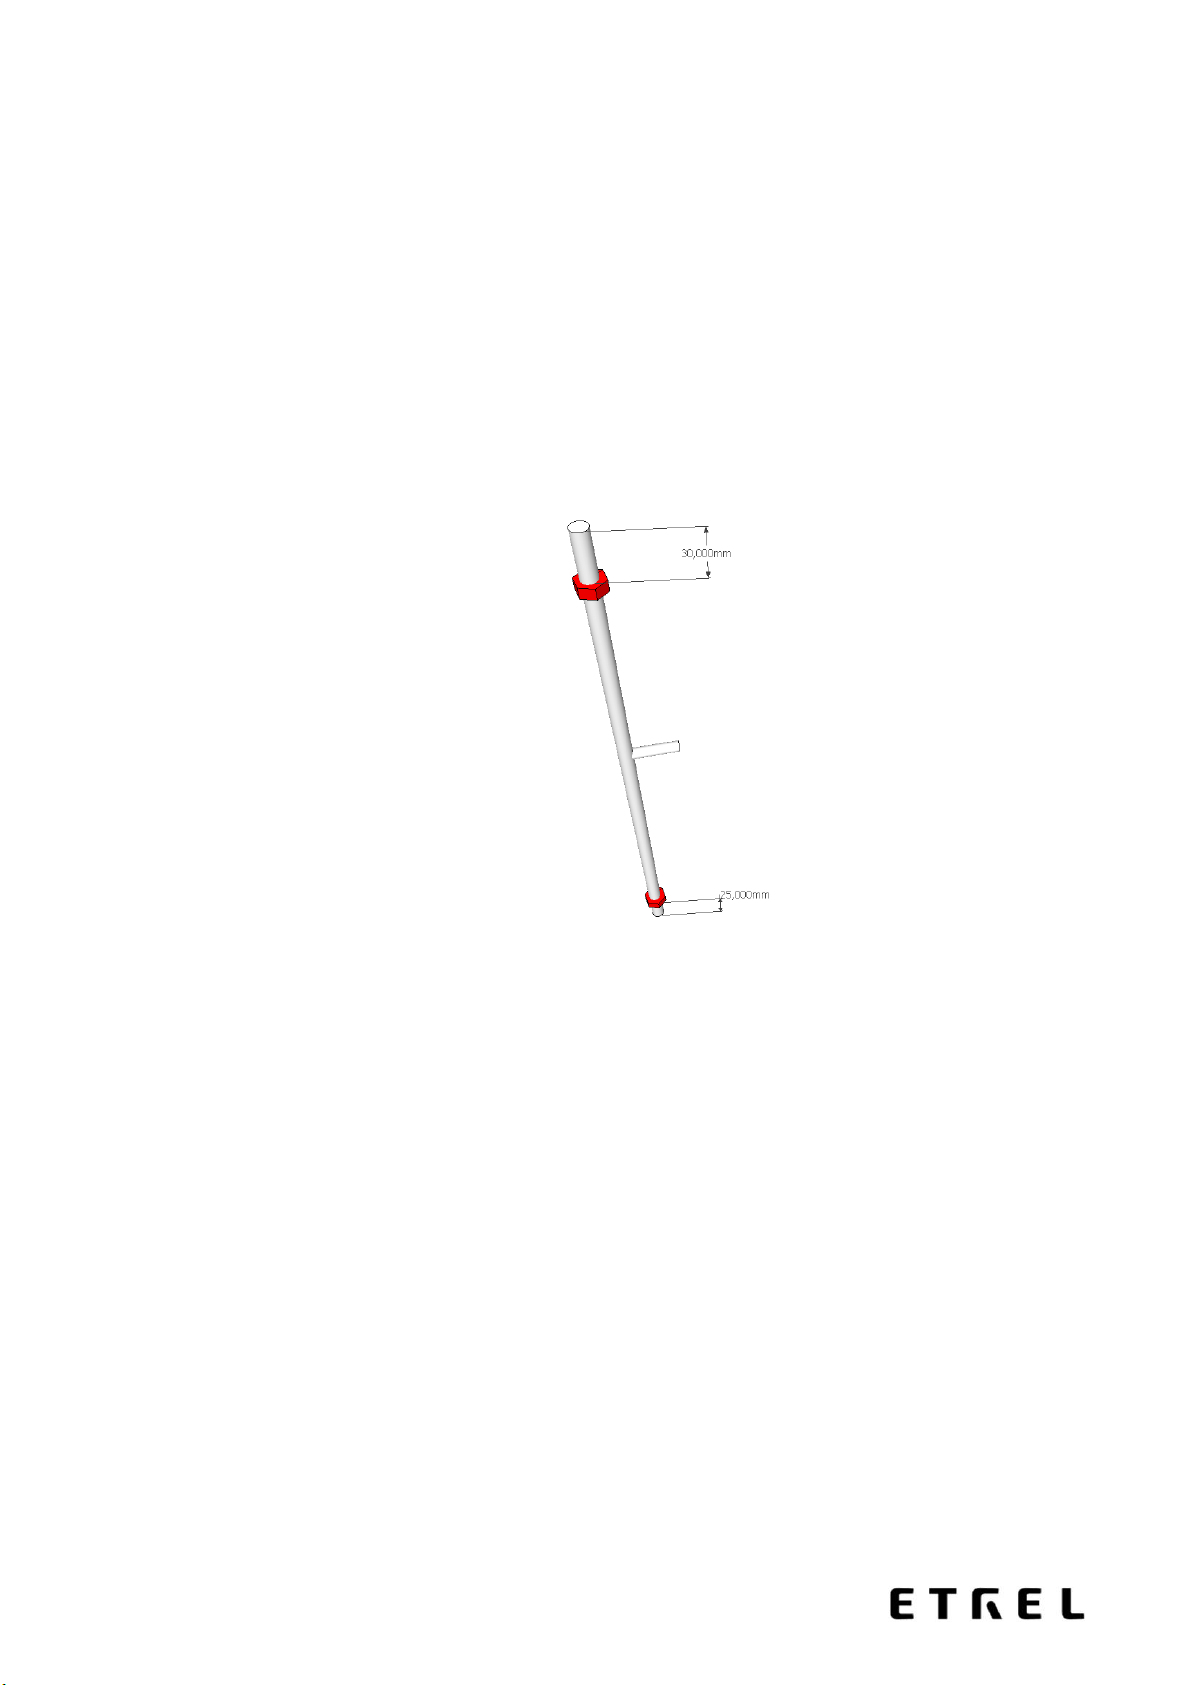
1. Screw nuts on each anchor rod. You have six (6) rods in the anchor package. Be careful
to observe the nut positions on the rod as pictured below:
Figure 6: Anchor rod with initial screw positions
2. Place the rods into the anchor frame holes. Screw nuts on the other side at the top of
the frame, where the rod enters through the frame. Tighten upper and lower nut firmly.
Repeat for all 6 rods.

19
Figure 7: Insertion of anchor rods into the upper frame
3. Place the L profile on the bottom of the anchor. Place all tree rods in one line into the L
profile holes and screw nuts also on the bottom of the L profile, where the rod enters
through the L profile. Tighten upper and lower nut firmly. Repeat for the second L
profile.
Figure 8: Insertion of anchor rods into the bottom L profile
The underground anchoring element is built into concrete foundation. The preparation of the
foundation (its dimensions) depends on the structure of the ground on the designated location.
The underground anchoring element can be combined with reinforcing steel. It is
recommended to add construction steel into the L profile side holes to strengthen the anchor.
You can use up to FI 12 construction steel.
Please note that the upper part of the underground anchoring element has a rounded corner at
its front left side. It should therefore be installed so that this round corner is matched by the
front left side of the charging station in final installation set-up.
Table of contents
Other Etrel Batteries Charger manuals


