Fac F300 VO L User manual

403250-300 en ma 2017 1
Fabbrica Affettatrici Cavaria
MADE IN ITALY
Use and maintenance manual
EN
*403.250 - *403.300

403250-300 en ma 2017 2
EN
CONTENTS
- TECHNICAL SPECIFICATIONS................................................................................... page 3
-------------------------------------------------------------------
- OVERALL SIZE ...............................................................................................................” 4
-------------------------------------------------------------------
1.1 - PURPOSE OF USER GUIDE ................................................................................” 5
1.2 - USER GUIDE CONSULTATION AND STORAGE...................................................” 5
1.3 - USER WARNINGS .................................................................................................” 6
1.4 - USING THE SLICER CORRECTLY .......................................................................” 7
1.5 - MANUFACTURER’S WARRANTY AND LIABILITY ...............................................” 8
1.6 - IDENTIFYING THE SLICER ..................................................................................” 8
1.7 - UNPACKING ...........................................................................................................” 9
-------------------------------------------------------------------
2.1 - DESCRIPTION OF THE SLICER............................................................................” 10
-------------------------------------------------------------------
3.1 - INSTALLING THE SLICER......................................................................................” 12
3.2 - FITTING THE FLYWHEEL AND OPERATING HANDLE ........................................” 13
3.3 - DESCRIPTION OF CONTROLS.............................................................................” 15
-------------------------------------------------------------------
4.1 - USING THE SLICER ..............................................................................................” 17
4.2 - PLACING PRODUCT ON PRODUCT HOLDER ....................................................” 17
4.3 - SLICING THE PRODUCT .......................................................................................” 18
-------------------------------------------------------------------
5.1 - CLEANING THE SLICER .......................................................................................” 21
5.2 - CLEANING THE BLADE .........................................................................................” 22
5.3 - CLEANING THE BLADE COVER ...........................................................................” 23
5.4 - CLEANING THE SLICE RECEIVING SURFACE....................................................” 23
-------------------------------------------------------------------
6.1 - ROUTINE MAINTENANCE .....................................................................................” 24
6.2 - OILING CARRIAGE GUIDE RAIL AND PRODUCT HOLDER AND
LUBRICATION POINTS ..........................................................................................” 25
6.3 - BLADE SHARPENING............................................................................................” 27
6.4 - OILING CHAIN AND BEVEL GEAR........................................................................” 30
-------------------------------------------------------------------
7.1 - TAKING THE SLICER OUT OF SERVICE..............................................................” 31
-------------------------------------------------------------------
8.1 - TROUBLESHOOTING ............................................................................................” 32
-------------------------------------------------------------------
- SPARES ............................................................................................................................” 33
-------------------------------------------------------------------
- GUIDE TO THE TREATMENT OF WASTE EQUIPMENT ...............................................” 42

403250-300 en ma 2017 3
EN
•Blade diameter ........................................ mm 300
•Slice thickness ........................................ mm 0 ÷ 2,5
•Effective slice
- Length................................................... mm 230
- Height.................................................... mm 190
•Product holder stroke.............................. mm 250
•Weight
- Slicer....................................................... kg 45,5
- Stand (optional)....................................... kg 57
TECHNICAL SPECIFICATIONS
(9 position)

403250-300 en ma 2017 4
EN
OVERALL SIZE
720mm
400mm
500mm
600mm
340mm
400mm
650mm
740mm
800mm

403250-300 en ma 2017 5
EN
When ordering “Spares”, DO NOT consider the numbering
utilised herein, but refer exclusively to the exploded drawing
“Spares” (page 33).
1.1 - PURPOSE OF USER GUIDE
•This guide is an integral part of the
machine and should be kept in a safe
place for further consultation.
•This publication contains all information
necessary for the installation use and
maintenance of F300 VO ywheel
slicers.
•The purpose of this use and maintenance
guide is to enable the end user to use the
slicer safely and guarantee its long-term
reliability.
Carefully read the warnings
contained herein as they provide
important information regarding safe
installation, use and maintenance.
______________________
1.2 - USER GUIDE
CONSULTATION AND
STORAGE
Keep this guide in a safe place for
further consultation.
•This guide MUST be kept throughout the
life of the slicer and if necessary (e.g.
damage that prevents, even partially, its
consultation, etc.) the user should ask
the manufacturer for another copy.
• When transferring ownership of the
slicer, please ensure the new owner
receives this guide as well.
If you have any doubts regarding the
contents of the user guide or require
additional information, please contact
the manufacturer or technical support
immediately quoting the clause number
of the topic in question.
No part of this publication shall
be reproduced or transmitted
without written permission from the
manufacturer.
______________________

403250-300 en ma 2017 6
EN
Use of the machine requires great
concentration, PAY ATTENTION AT
ALL TIMES!
• Do not wear loose-tting clothes particularly
with open sleeves; where necessary use
suitable headgear to cover hair.
• When slicing, do not allow anyone to
approach the slicer, especially the blade.
•Do not remove, cover or alter the rating
plates fitted to the machine body and
ensure their prompt replacement in case
of damage.
Do not remove safety devices and
do not alter or remove mechanical
guards.
•Only approved product types should be
sliced, do not attempt to slice products that
are specically excluded (see clause 1.4).
•Ensure that the product holder, receiving
tray, surrounding areas and oor are kept
clean and dry at all times.
•Do not use the slicer as a supporting
surface or lay any object on it that is
extraneous to normal slicing operations.
•Stop the machine immediately and
request the assistance of authorised
technical support staff in the event
of malfunction, suspected breakage,
improper movements, strange noises, etc.
Always use cut and tear-resistant
gloves when performing cleaning and
maintenance.
1.3 - USER WARNINGS
•Check the slicer’s mechanical integrity
prior to every use.
Components should show no signs of
damage or cracks.
If this is not the case, DO NOT use the
slicer and take it to an authorised service
centre so that the necessary checks can
be performed.
The slicer is not designed for use
by people (including children)
with physical, sensory or mental
difficulties unless supervised or
trained by persons responsible for
their safety.
Children and young people should be
supervised so that they do not play
with the slicer.
The blade is very sharp and should
be handled with extreme care.
Do not damage the blade by cutting hard
objects such as bones.
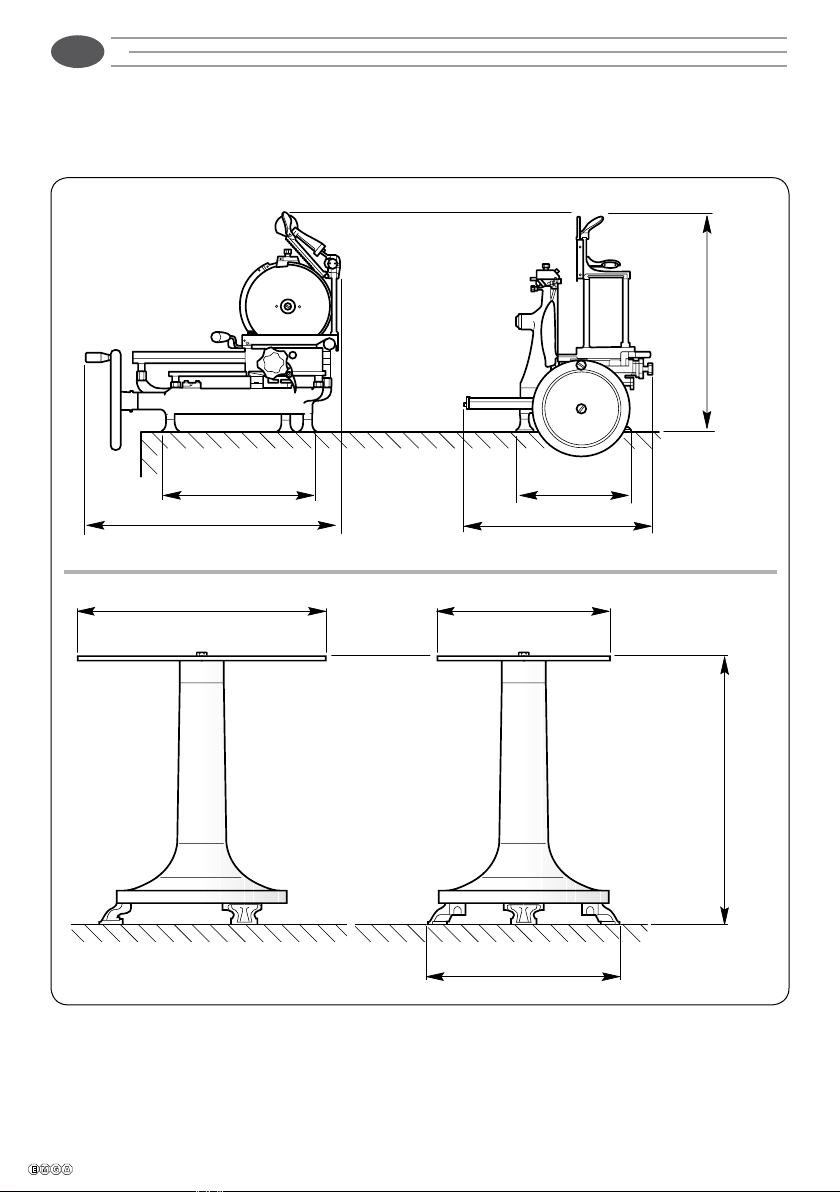
If the dimensions of the food to be
sliced exceeds those specied under
“Effective slice” in the table on page
3, reduce the size in order to work in
safety.
Safe use requires compliance with the
following warnings:
• Install the machine in accordance with
the instructions given under the heading
“Installation”.
•Install the machine in an area that cannot
be accessed by people who will not be
using it, especially children.

403250-300 en ma 2017 7
EN
•The product to be sliced should only be
placed on and removed from the feed
carriage when the latter is fully retracted
(furthest away from the blade) and the
carriage nearest the operator.
DO NOT use slicing accessories that
have not been supplied by the slicer
manufacturer.
Please contact the manufacturer or
an authorised service centre for all
extraordinary maintenance operations
(chain, blade replacement, etc.).
______________________
1.4 - USING THE SLICER
CORRECTLY
•The slicer is only designed to slice food
of the type and size specied herein.
The manufacturer shall accept no
liability for improper use or use by
staff who have failed to read and
fully understand the contents of this
manual; do-it-yourself alterations
and/or repairs; use of spares that
are non-original or not specically
designed for the slicer model covered
by this user guide.
The following products may be sliced:
• All types of cold cuts (raw and cooked
ham, bacon).
• Boneless meat (cooked or raw at a
temperature of not less than +3°C).
•Bread and cheese (obviously the
sliceable type such as Gruyère, Fontina,
etc.).
The following products CANNOT be sliced
as they are liable to cause serious harm
to the user and/or slicer itself:
•Frozen food.
•Deep-frozen food.
• Food with bones (meat and sh).
• Any other type of product specically
excluded product is sliceable but not
intended to be eaten.
Under no circumstances should
you attempt to slice a specically
excluded product.
______________________

403250-300 en ma 2017 8
XXXXX
EN
The rating plate should NOT be
removed and should remain legible at
all times.
In the event of damage or wear, the
user has a duty to contact the slicer
manufacturer and obtain a replacement.
Fig. 1 - Rating plate
1.5 - MANUFACTURER’S
WARRANTY AND LIABILITY
•The slicer described herein is covered by
a warranty as specied in the enclosed
certicate.
• The warranty guaranteeing that the slicer
is of merchantable quality and t for its
intended purpose is subject to correct
application of the provisions contained
herein.
The manufacturer shall accept no direct or
indirect liability arising from:
- Failure to comply with the instructions
given herein.
- Use by staff who have failed to read
and fully understand the contents of this
manual.
- Use that fails to comply with specic
current regulations in the country of
installation.
- Alterations and/or repairs to the machine
performed without prior authorisation.
- Use of accessories not supplied by the
manufacturer and non-original spares.
- Force majeure/acts of God.
When transferring ownership of the
slicer, failure to hand over this guide
to the new owner shall automatically
exempt the manufacturer from any
liability.
•In the event of any dispute regarding
the interpretation of this publication,
exclusive reference shall be made to the
original Italian text.
______________________
1.6 - IDENTIFYING THE SLICER
•The slicer mentioned in this instruction
booklet is designed and manufactured
according to current EU standards
with the CE marking conrming such
conformity.
In particular, the slicer complies with
standard EN 1974 (for requirements
deemed applicable).
•The rating plate is positioned on the
base of the slicer as shown in g.1.

403250-300 en ma 2017 9
EN
• Should any faults be noted, such as:
- dents to the frame or guards;
- controls that are either not working or
broken;
- missing items or other problems;
please advise the courier, manufacturer
and service centre immediately.
•Carefully dispose of packaging
components (bands, cardboard,
polystyrene, polythene bags, etc.).
Packaging components (bands,
cardboard, polythene, etc.) can be
treated as municipal solid waste and
therefore disposed of without any
problem.
1.7 - UNPACKING
•When taking delivery of the slicer, ensure
that the packaging is fully intact; if this is
not the case, please advise the courier
or local dealer immediately.
In order to remove the slicer from the
packaging, please proceed as follows:
•Cut and remove the plastic bands.
• Open the box and take out the instruction
booklet.
•Proceed as described hereafter.
- Remove the protective cardboard
covers from inside the box.
- Lift the machine with great care and
place on a solid surface.
- Remove the plastic bag in which the
slicer is wrapped.
- Check that all components specied
in the delivery note and this instruction
booklet are present and fully intact.
Fig. 2 - Removing the slicer from the packaging

403250-300 en ma 2017 10
EN
In any event, it is preferable to sort
products prior to disposal in accordance
with current recycling regulations.
12. Sliding product holder operating knob
13. Slice thickness control graduated knob
14. Blade cover
15. Supporting foot
16. Blade
17. Sharpener and cover
18. Grease collection pan
19. Blade drive chain
20. Bevel gear
DO NOT DUMP PACKAGING!
DISPOSE OF WASTE RESPONSIBLY!
2.1 - DESCRIPTION OF THE
SLICER
1. Slice receiving surface
2. Slice deector
3. Pusher
4. Sliding product holder
5. Carriage
6. Flywheel operating handle
7. Flywheel
8. Base
9. Blade guard
10. Pusher vertical slide lever
11. Sliding product holder fast forward lever

403250-300 en ma 2017 11
18
19
17
14
10
16
5
8
12
13
15
7
11
3
20
2
16
15
7
6
15
1
2
9
17 3
4
5
11
9
6
EN
Fig.3 - Description of components

403250-300 en ma 2017 12
EN
Fig. 4 - Use of “stand”
Positioning the slicer (g. 5)
•If not using the optional stand, carefully
lift the slicer and position on a level
surface (g. 5) that is dry and capable
of supporting the weight of both the
slicer and the product to be sliced (see
“Technical specications”).
Ensure that there are no obstructions to
the movement of the ywheel, carriage
stroke and loading of the product to be
sliced.
Ensure that all slicer feet are resting
correctly on the work surface.
Fig. 5 - Positioning the slicer
3.1 - INSTALLING THE SLICER
•Position the slicer in its allocated
workplace.
Use of stand (optional) (g. 4)
•If using the optional stand, this should be
positioned on the oor whilst checking
that it is level and that all three feet are
resting correctly on the ground.
•Carefully lift the slicer and position on the
stand.
Ensure that all slicer feet are resting
correctly on top of the stand.

403250-300 en ma 2017 13
Fig. 8
31
7
32
x
30
7
Fig. 7
31
32
30
Fig. 6 5
4
EN
•Remove the taper pin (30) from the
ywheel shaft (31).
Use a hammer to hit the taper pin (30)
on its smaller diameter.
• Fit the shim (32) to the ywheel shaft
(31).
• Insert the ywheel (7) so that the
operating handle (6) xing hole (x) is
positioned above and to the left of the
axis of the taper pin hole (g. 8).
Check that ywheel and shaft holes are
correctly aligned.
•Insert the taper pin (30) in the hole of the
sleeve
> > > > >
3.2 - FITTING THE FLYWHEEL
AND OPERATING HANDLE
In order to facilitate transport, the operating
handle (6) is delivered unattached to the slicer,
whilst the ywheel (7) may also be removed
in order to facilitate transport and/or packing.
In order to t components, please proceed as follows:
•Move the carriage (5) as near to the
operator as possible.

403250-300 en ma 2017 14
Fig. 9
Fig. 10
30
30
7
7
7a
1
2
Fig. 10a
35
35
36
7
7
36
3
4
Fig. 10b
37
35
6
EN
• Tighten the screw (7a).
• Screw pin (35) complete with nut (36)
onto ywheel (7); tighten nut (36).
•Insert handle (6) in pin (35) and tighten
screw (37).
•Use a hammer to insert the taper pin (30)
fully.

403250-300 en ma 2017 15
13
3
16
5
13
12
11
7
4
6
12
13
Fig. 11a
EN
Sliding product holder operating knob
The knob (12) allows you move the
product holder (4) towards or away from
the blade (16).
It can also be used to make slight
movements of the product holder (4).
Fig. 11a - Controls
3.3 -
DESCRIPTION OF CONTROLS
Flywheel
Clockwise rotation of the ywheel (7)
using the handle (6) will move the
carriage (5) with product holder (4),
whilst at the same time turning the blade
(16).
Slice thickness control knob
Turn the knob (13) clockwise in order to
obtain a thicker slice or anticlockwise for
a thinner one.
The knob (13) has a graduated scale
ranging from “1” to “9” (thickness 2,5 mm).

403250-300 en ma 2017 16
Fig. 11b
103
3
16
4
11
EN
Fig. 11b - Controls
Sliding product holder fast forward lever
By lowering and holding in position the
lever (11) you can quickly move the
product holder (4) towards or away from
the blade (16) (with product).
The operation is quicker than when
using the knob (12).
Pusher vertical slide lever
By keeping pressed the lever (10) you
can quickly raise or lower the pusher (3).

403250-300 en ma 2017 17
5
7
Fig. 13
11
11
412
Fig. 14a
3
4
Fig. 12
EN
4.1 - USING THE SLICER
WARNING:
•DO NOT use the slicer if not fully
physically and mentally t.
•DO NOT allow anyone to come near to
the slicer whilst you are using it.
• Be extremely careful whilst loading/
unloading the product from the product
holder and whilst actually slicing.
PAY ATTENTION AT ALL TIMES!
______________________
• Move the product holder (4) away as
far as its limit of travel (furthest from the
blade) using either the knob (12) or the
fast forward lever (11).
•Position the product to be sliced on the
product holder (4) and hold in place with
the pusher (3) (so that it can’t move),
whilst adjusting the height.
4.2 - PLACING PRODUCT ON
PRODUCT HOLDER
• Turn the ywheel (7) in order to move the
carriage (5) to its forward limit (towards
the operator).

403250-300 en ma 2017 18
13
4
12
11
9a
9
16
9a 9
16
9
9a
Fig. 15
Fig. 14b
Fig. 16
EN
Failure to hold the product rmly in place
on the product holder could cause the
machine to cut uneven slices.
•Turn the knob (13) in order to set the
required slice thickness.
• Hold the handle (6) and turn the ywheel
(7) clockwise in order to begin blade
rotation and the alternating movement of
the product holder (4) (g. 17).
4.3 - SLICING THE PRODUCT
•Move the blade guard (9) to the left by
loosening the knob (9a).
WARNING:
Exercise great caution if the blade
guard (9) is not tted; the blade (16)
is extremely sharp.
• Bring the product holder (4) (with the
product) back from its limit of travel
(towards the blade) using either the knob
(12) or the fast forward lever (11).
Draw the product holder (4) closer to the
blade so as to leave a space between
the product to be sliced and the blade
of between 0.5 cm and 1.0 cm.

403250-300 en ma 2017 19
7
6
45
7
6
12
13
16
Fig. 17
11
16
4
12
11 Fig. 18
EN
DO NOT turn the flywheel (7)
anticlockwise.
Serious damage to the slicer could
be caused.
• You will need to turn the ywheel (7) 4/5
times before the product touches the
blade (16).
• Whilst the carriage (5) moves forward
(away from the operator), the blade (16)
enters the product.
Guided by the deector (2), the slice
is detached and drops onto the slice
receiving surface (1).
• As the carriage (5) returns (towards
the operator), a mechanical device is
operated that moves the product holder
(4) sideways towards the blade (16).
The amount of sideways movement is
set by using the slice thickness control
knob (13).
• You should stop turning the ywheel
(7) once the operation is complete; the
blade will halt its movement (16).
• Move the product holder (4) (with the
remaining product) away from the blade
(16) using either the knob (12) or the fast
forward lever (11).

403250-300 en ma 2017 20
Fig. 19
9a
9
9a
9
16
Fig. 20
310
10
3
4
EN
•Press the lever (10) and lift the pusher
(3).
•Remove the product from the table (4).
•Clean the slicer as described in the
relevant section.
•Reposition the blade guard (9) by
tightening the knob (9a) (g. 19).
WARNING:
Do not leave the slicer without
the blade guard (9) in the correct
position.
Cutting hazard!
Other manuals for F300 VO L
1
Table of contents
Other Fac Kitchen Appliance manuals