13
12
ENGLISH
ENGLISH
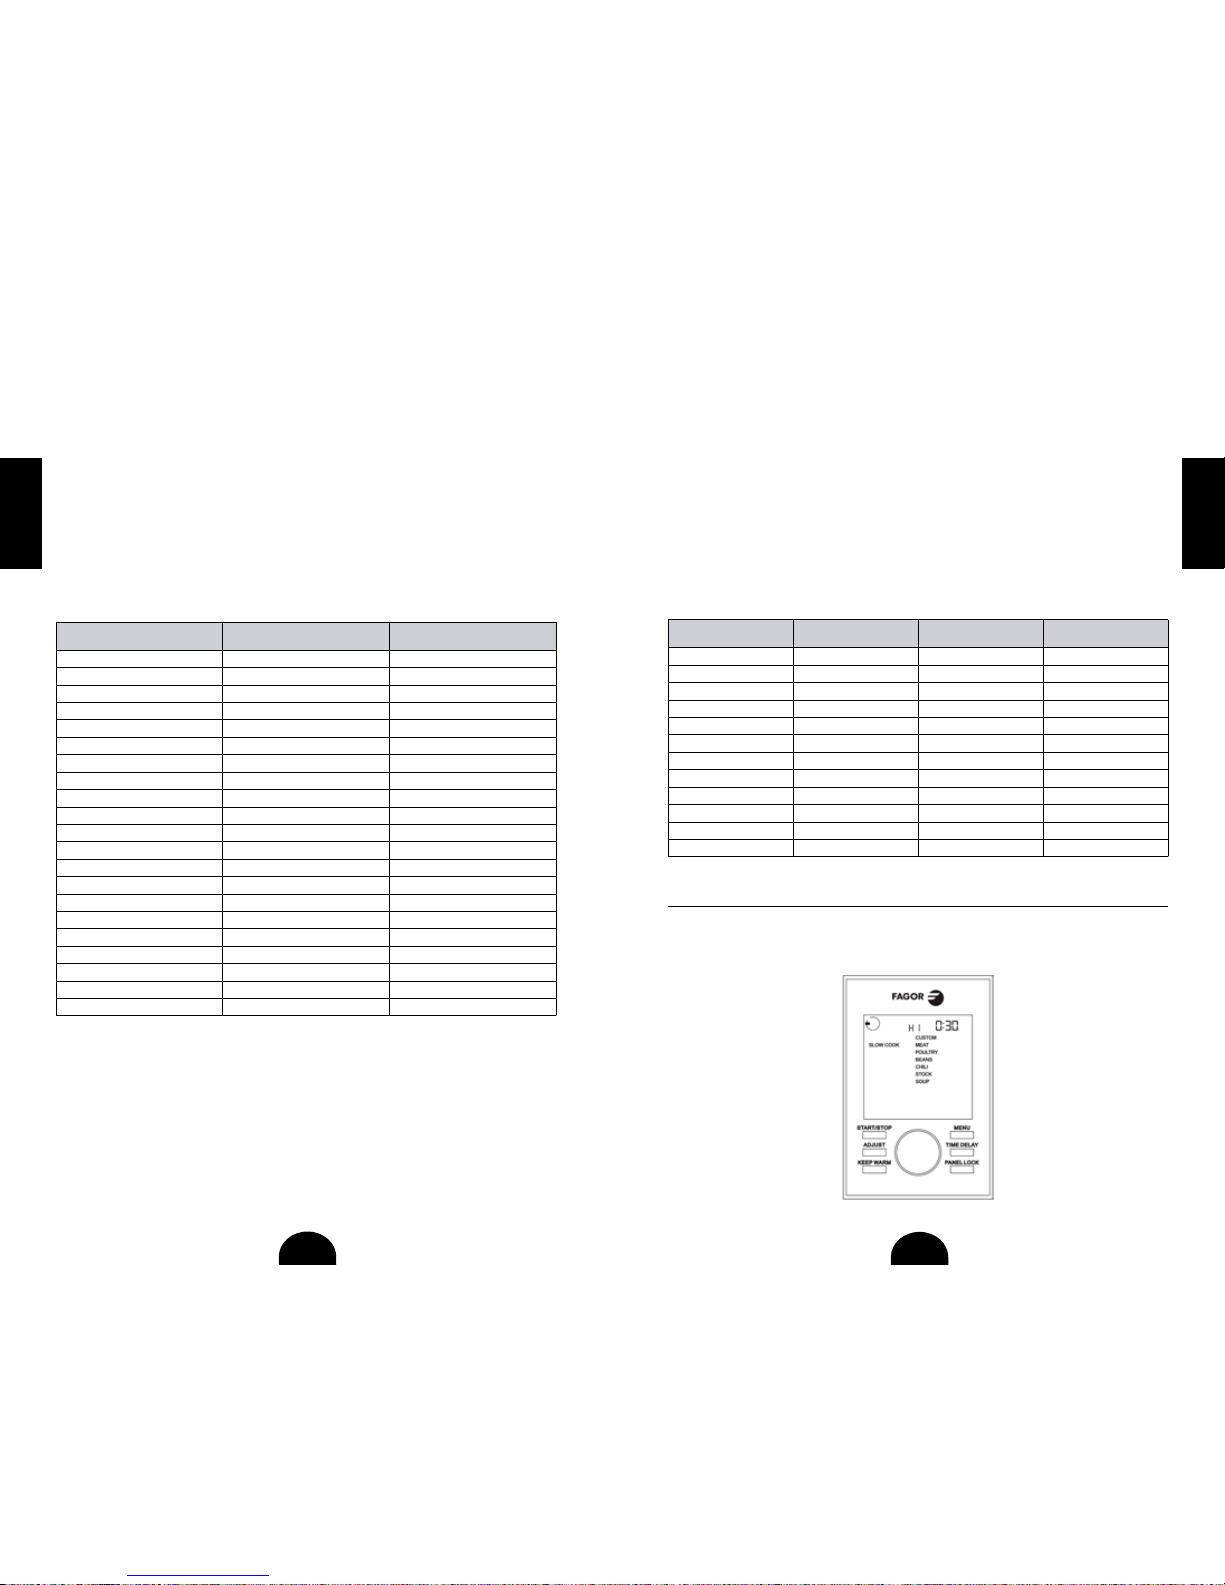
NOTE: Pressing the ADJUST button will only switch the programming option
between pressure level and cooking time.
8. After you press the START/STOP button, the screen will turn green and it will
display the programmed pressure setting and time at the top of the screen. You
will also see the preheat icon icon on the bottom of the screen.
NOTE: If you forget to press the START/STOP button, the unit will beep twice
after 30 seconds, the light on the screen will turn off and the unit will return to
standby mode.
9. Once pressure has been reached, the unit will beep and it will start to count
down. This is when your cooking time begins. The floating valve located in the lid
will rise, indicating that there is pressure inside the unit.
WARNING: NEVER TRY TO FORCE THE LID OPEN WHILE YOU ARE COOKING
UNDER PRESSURE, THIS CAN RESULT IN A SERIOUS ACCIDENT.
WARNING: NEVER DEEP FRY OR PRESSURE FRY IN THE MULTI-COOKER. IT IS
DANGEROUS AND MAY CAUSE A FIRE AND SERIOUS DAMAGE.
10. When the cooking time ends, the unit will beep and switch to the KEEP
WARM function, which will be displayed on the screen as . The unit will
beep periodically to let you know that there is pressure inside the unit. Once
you release the pressure, the unit will stop beeping and will remain on the KEEP
WARM function. Press the START/STOP button to cancel the program.
11. After the cooking time is up, release the pressure. You have two options for
releasing the pressure:
a. Quick Release Method: Release the pressure immediately by turning the
pressure regulator knob to STEAM.
CAUTION: THE STEAM COMING OUT OF THE COOKER WILL BE HOT, AND
MIGHT CONTAIN DROPLETS OF HOT LIQUID. BE SURE TO USE POT HOLDERS,
OVEN MITTS OR A KITCHEN TOWEL WHEN RELEASING PRESSURE.
b. Natural Release Method: Release the pressure by shutting the unit off
completely. This allows the pressure to drop naturally without turning the pressure
regulator knob to STEAM. This will take several minutes, during which the food
inside will continue cooking. Some recipes (such as risotto) benefit from this extra
cooking time. You will know when the pressure has been released because the
floating valve will drop and you will be able to open the lid.
12. Once all the pressure is released, remove the lid by turning it clockwise, lifting it
up and tilting it away from yourself to avoid getting burnt by any remaining steam
or hot water condensation dripping from the inner portion of the lid.
WARNING: AFTER COOKING, THE REMOVABLE COOKING POT WILL BE HOT.
USE POT HOLDERS, OVEN MITTS OR A KITCHEN TOWEL TO HANDLE IT OR
LET IT COOL DOWN BEFORE REMOVING.
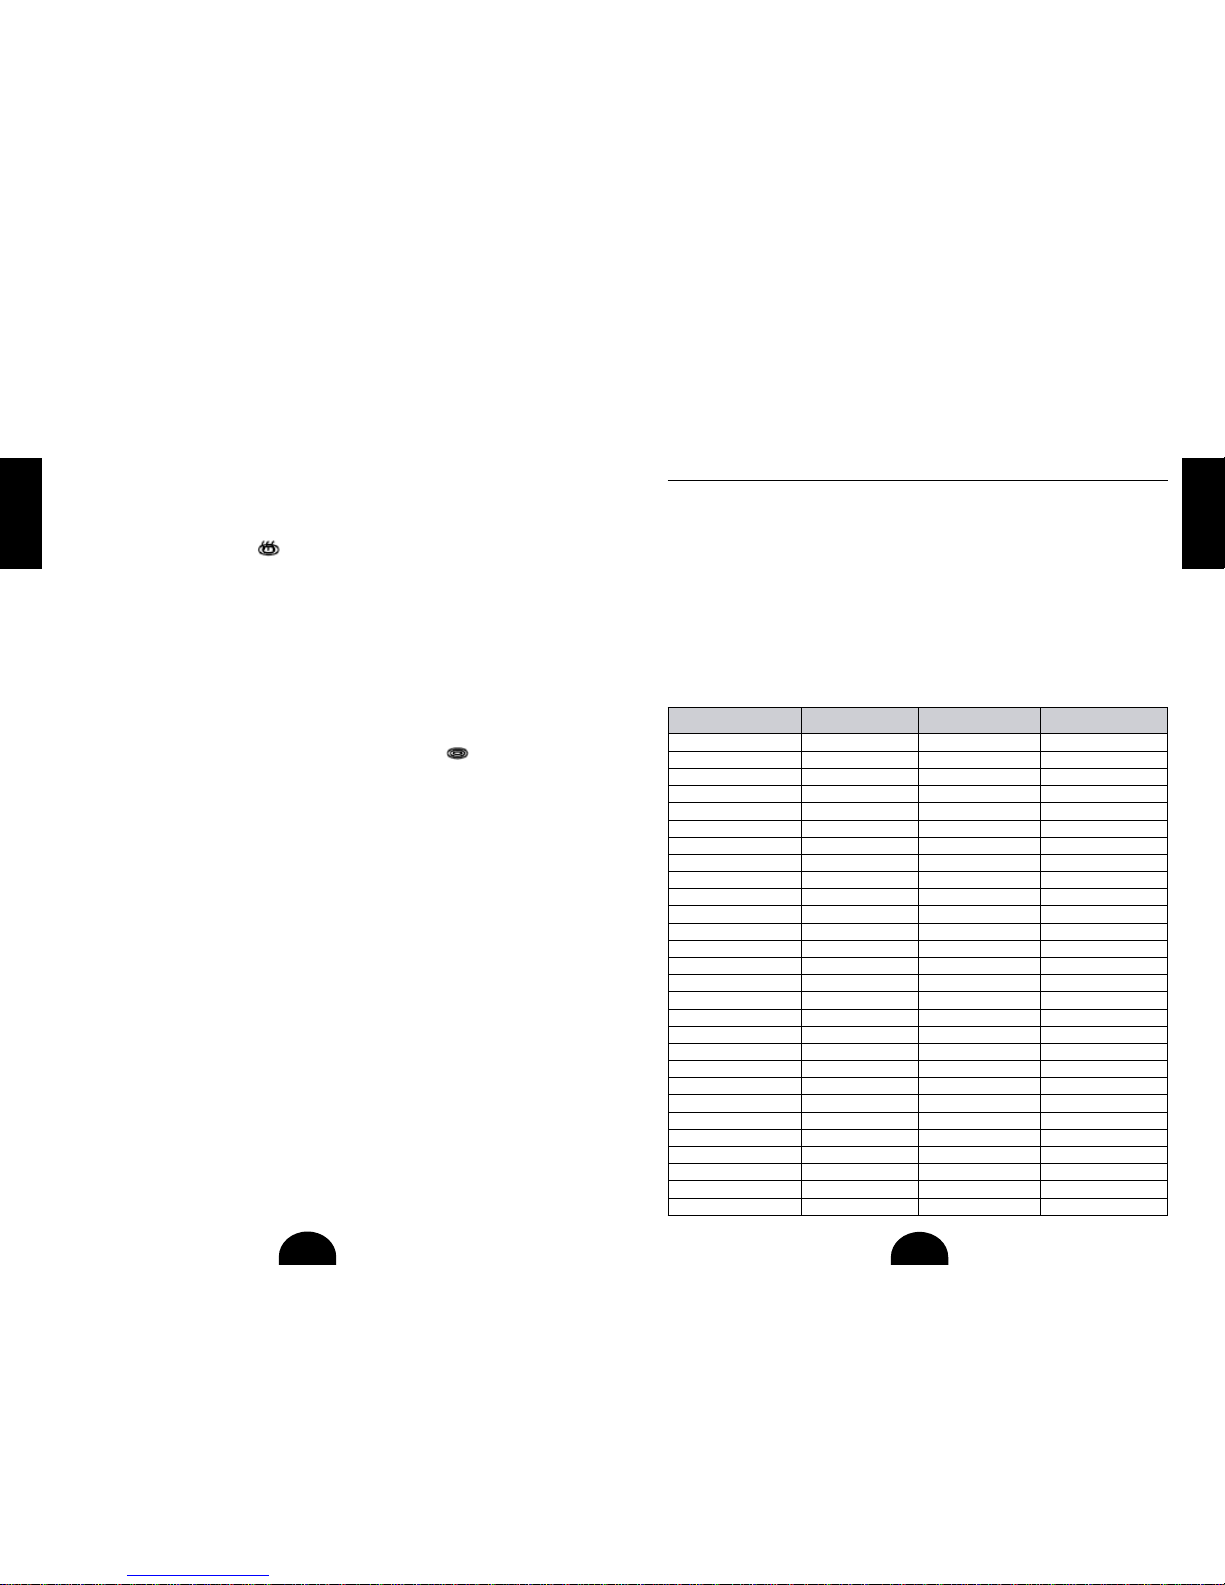
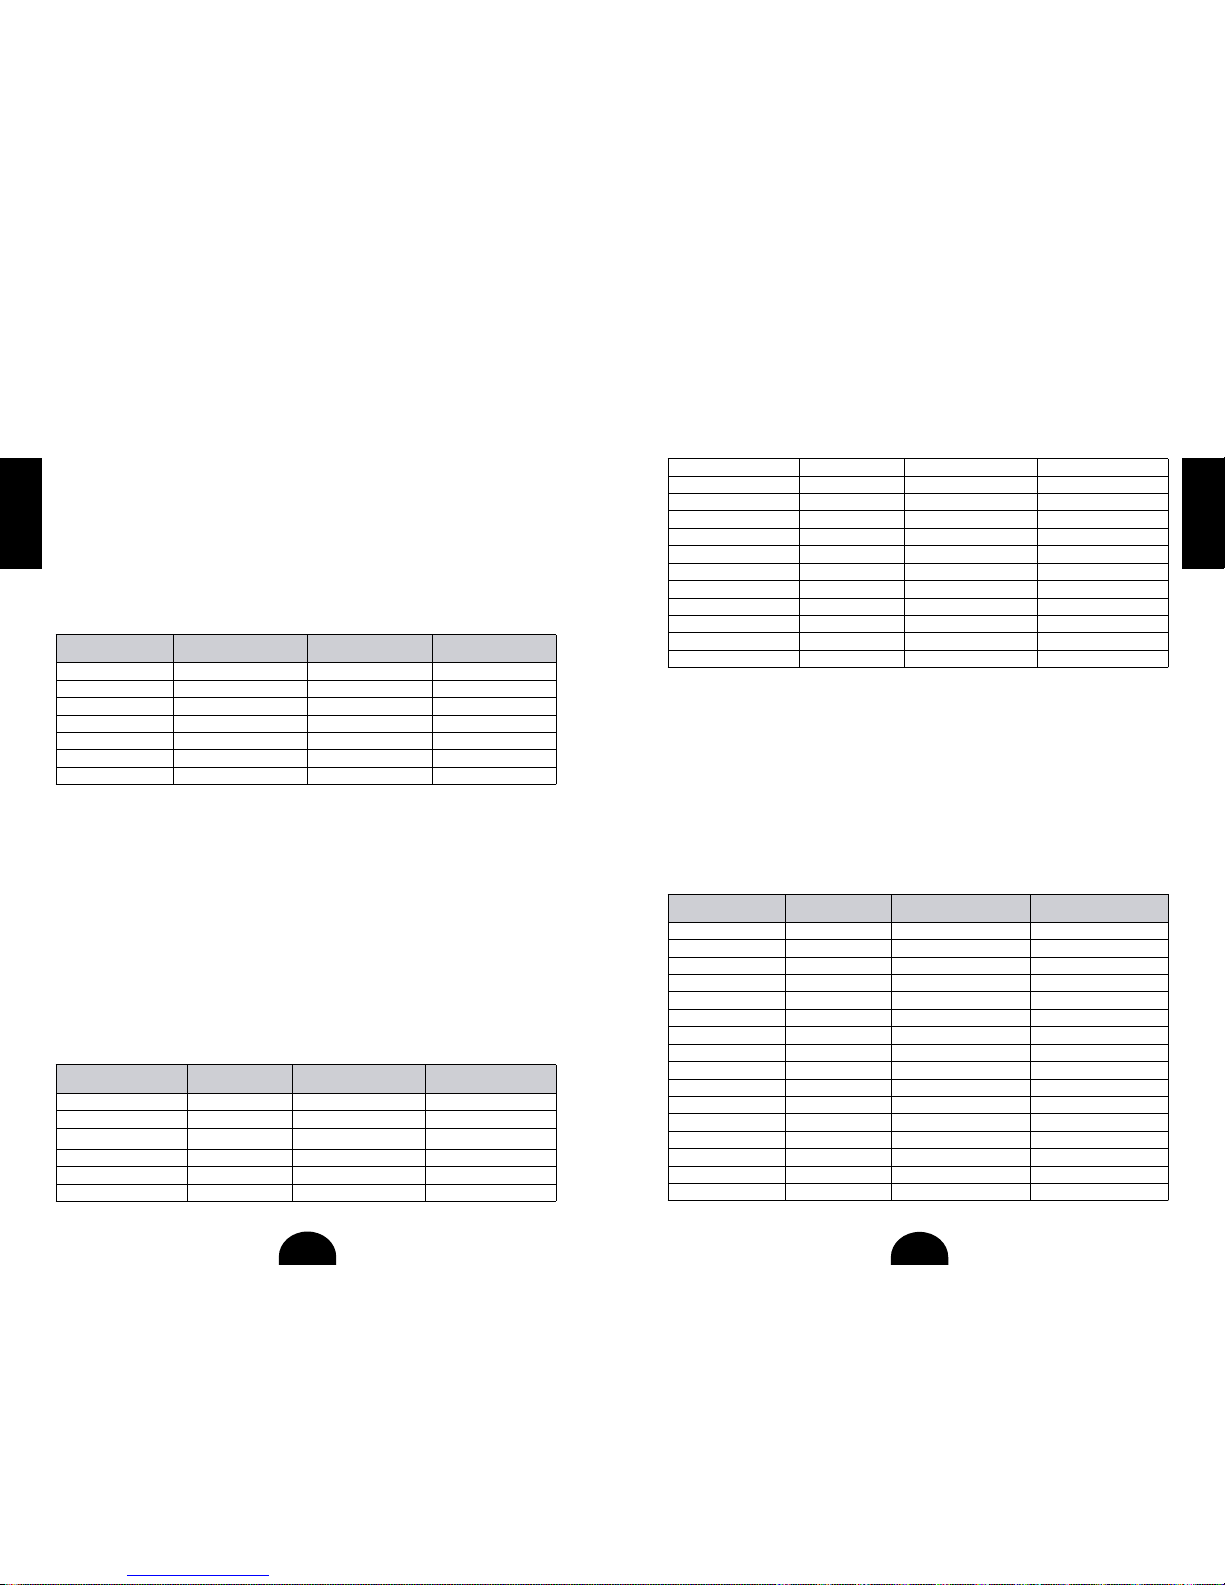
Pressure Cooking Charts
Pressure cooking times are approximate times. Use these cooking times as a general
guideline. The amount and type of food will alter cooking times.
Pressure Cooking Vegetables (Fresh & Frozen): To achieve best results when
pressure cooking fresh or frozen vegetables, please refer to the below tips and hints:
1. Use the Vegetables setting when attempting to pressure cook vegetables. Use the
STEAM function when attempting to steam vegetables.
2. Use the quick release method when pressure cooking vegetables so they do not
overcook.
3. Use a minimum of 1 cup of liquid when cooking vegetables.
4. When steaming vegetables, use the included Stainless Steel Steamer Basket and
Trivet.
Vegetable Pressure Cooking Chart:
Vegetable Pressure Setting Fresh
(Cooking Time) Frozen
(Cooking Time)
Acorn Squash, chunks High 6-7 minutes 8-9 minutes
Artichoke, 4 medium – large High 8-10 minutes 10-12 minutes
Asparagus High 1-2 minutes 2-3 minutes
Whole Beets, medium – large High 20-25 minutes 25-30 minutes
Broccoli, Florets High 2-3 minutes 3-4 minutes
Brussel Sprouts High 3-4 minutes 4-5 minutes
Butternut Squash, chunks High 8-10 minutes 10-13 minutes
Cabbage, Quartered High 3-4 minutes 4-5 minutes
Carrots, whole or chunk High 2-3 minutes 3-4 minutes
Cauliflower, florets High 2-4 minutes 3-5 minutes
Celery, chunks High 2 minutes 3 minutes
Collard Greens High 4-5 minutes 5-6 minutes
Corn on the Cob High 3-5 minutes 4-6 minutes
Edamame, in pod High 4-5 minutes 5-6 minutes
Eggplant High 2 minutes 3 minutes
Endive High 1-2 minutes 2-3 minutes
Kale, coarsely chopped High 1-2 minutes 2-3 minutes
Leeks High 2-4 minutes 3-5 minutes
Onions, sliced High 2 minutes 3 minutes
Potatoes, whole, small High 5-8 minutes 6-9 minutes
Potatoes, whole, large High 10-12 minutes 11-13 minutes
Potatoes, sliced or cubed High 5-8 minutes 6-9 minutes
Pumpkin, chunks High 4-8 minutes 6-12 minutes
Spinach High 1-2 minutes 3-5 minutes
Sweet Potatoes, cubed High 7-9 minutes 9-11 minutes
Sweet Potatoes, whole High 10-15 minutes 12-19 minutes
Tomatoes, quartered High 2 minutes 4 minutes
Zucchini High 2 minutes 3 minutes