Fanvil G100S User manual

[䭞ޕ᮷ᆇ]
G100S VoIP
Gateway User Manual

[䭞ޕ᮷ᆇ]
Document VER Firmware VER Explanation Time
V1.0 rc2.1.1136 Initial issue 20160808
V1.1 1.4.1505 Alter the router mode to LAN Port
Fixed the functional parameters
Add the shortcut keys note 20170908

[䭞ޕ᮷ᆇ]
Table of Content
1 Safety Instruction........................................................................................................................5
2 About Device...............................................................................................................................6
2.1 Product description..............................................................................................................6
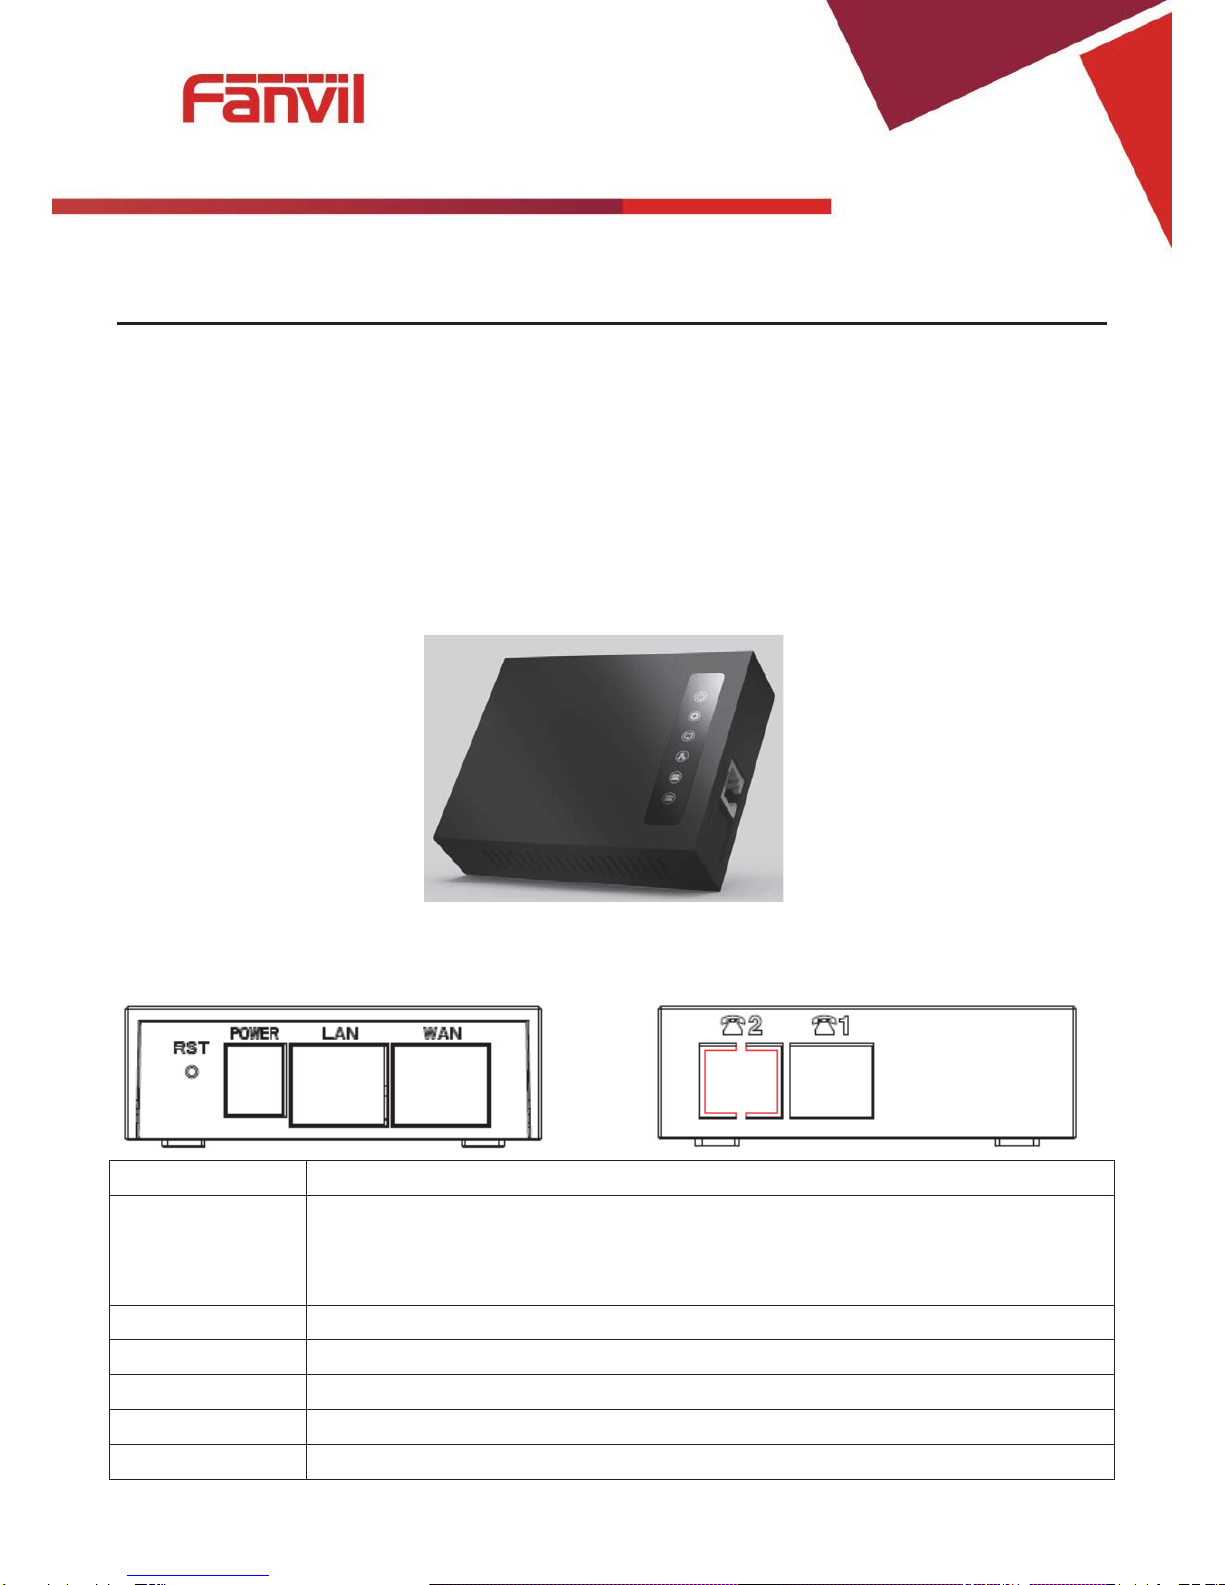
2.2 Device Appearance...............................................................................................................6
2.2.1 Interface and Buttons Description................................................................................6
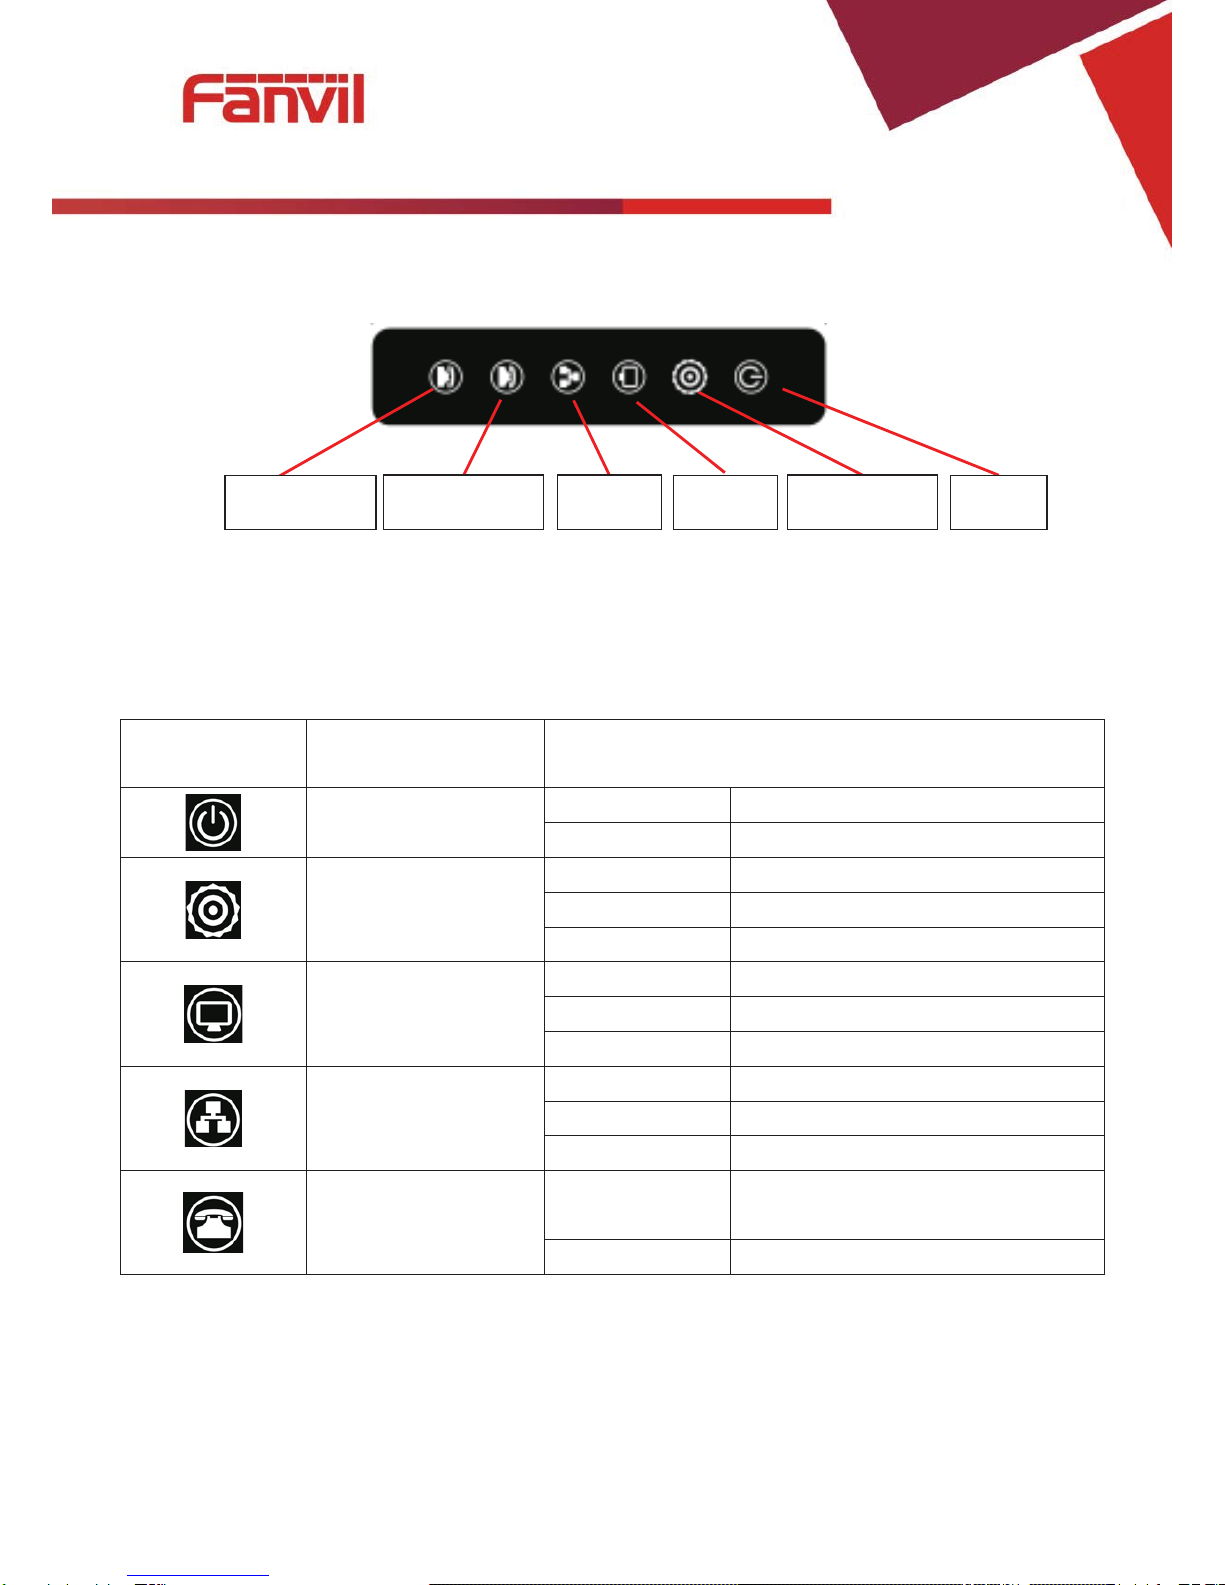
2.2.2 Indicator Lights Description ..........................................................................................7
3 Getting Started............................................................................................................................8
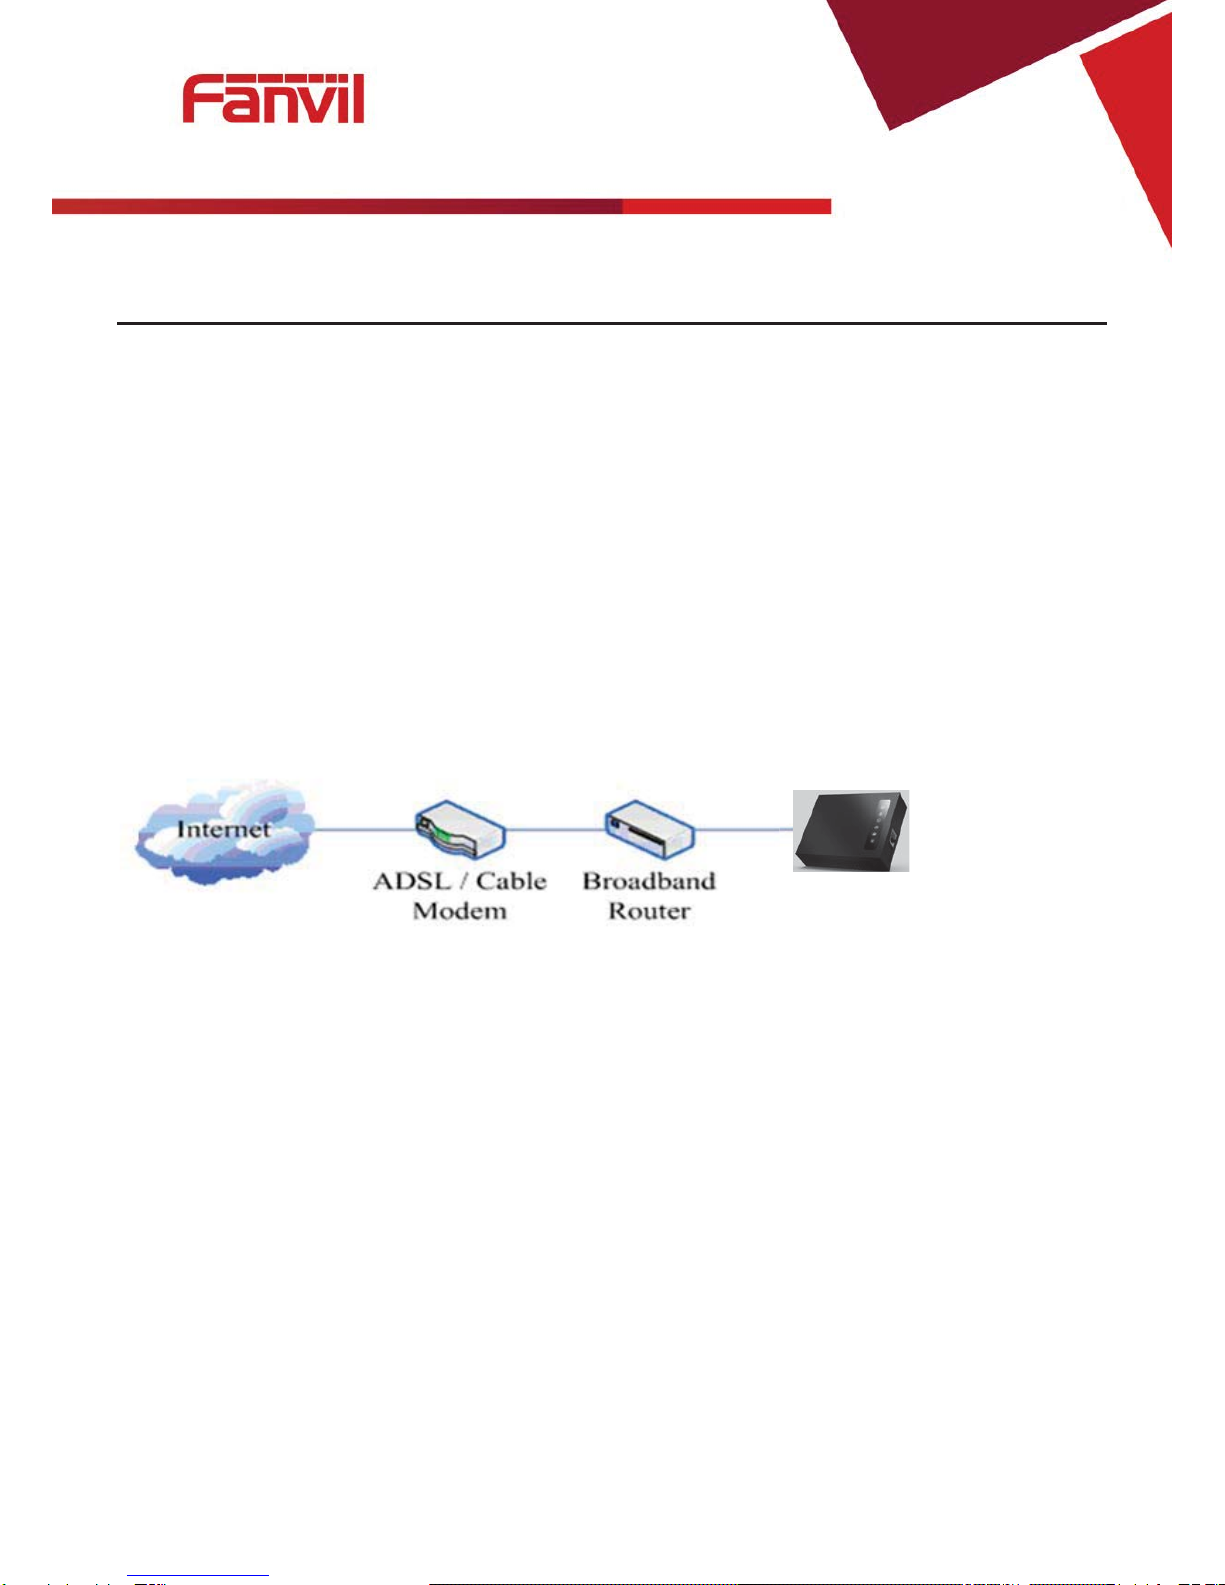
3.1 Connecting the Power and the Network.............................................................................8
3.1.1 Connecting the Network.................................................................................................8
3.1.2 Connecting the Power....................................................................................................8
4 Basic Phone Operation...............................................................................................................9
4.1 Call Transfer..........................................................................................................................9
4.2 Call Hold................................................................................................................................9
4.3 Shortcut key........................................................................................................................10
5 Web Configuration....................................................................................................................11
5.1 Ways to Configure ..............................................................................................................11
5.2 Password Configuration ....................................................................................................11
5.3 Browser Configuration.......................................................................................................11
5.4 WEB Pages Function Explanation.....................................................................................12
5.4.1 Status.............................................................................................................................12
5.4.1.1 Overview..................................................................................................................12
5.4.1.2 Routes .....................................................................................................................14
5.4.1.3 System Log .............................................................................................................14
5.4.2 System...........................................................................................................................15
5.4.2.1 System.....................................................................................................................15
5.4.2.1.1 General Settings...............................................................................................15
5.4.2.1.2 Logging .............................................................................................................15
5.4.2.1.3 Language...........................................................................................................16
5.4.2.2 Administration ........................................................................................................16
5.4.2.3 Time Synchronization ............................................................................................17
5.4.2.4 Backup/Flash Firmware .........................................................................................17
5.4.2.5 Auto Provision........................................................................................................18

[䭞ޕ᮷ᆇ]
5.4.2.6 Reboot.....................................................................................................................20
5.4.2.7 Auto-Reboot............................................................................................................20
5.4.3 Network..........................................................................................................................21
5.4.3.1 WAN .........................................................................................................................21
5.4.3.2 LAN ..........................................................................................................................22
5.4.3.3 Static Routes...........................................................................................................23
5.4.3.4 Diagnostics .............................................................................................................23
5.4.3.4.1 Diagnostics.......................................................................................................23
5.4.3.4.2 Network Packets Capture ................................................................................25
5.4.3.5 Check-WAN .............................................................................................................25
5.4.3.6 QoS..........................................................................................................................26
5.4.4 VoIP................................................................................................................................27
5.4.4.1 Line1 & Line2 ..........................................................................................................27
5.4.4.2 Common..................................................................................................................32
5.4.4.3 Dial Peer ..................................................................................................................33
5.4.4.4 Debug ......................................................................................................................33
5.4.5 Phone.............................................................................................................................34
5.4.5.1 Audio........................................................................................................................34
5.4.5.2 Call Feature.............................................................................................................35
5.4.5.3 Dial rules .................................................................................................................37
5.4.5.3.1 Dial Rules..........................................................................................................38
5.4.5.3.2 Digital Rule Table..............................................................................................38
5.4.6 Logout............................................................................................................................39
6 Trouble Shooting ......................................................................................................................40
6.1 Reboot Device.....................................................................................................................40
6.2 Reset Device to Factory Default........................................................................................40
6.3 Network Packets Capture...................................................................................................40
6.4 Common Problems.............................................................................................................41

[䭞ޕ᮷ᆇ]
5/41
Safety Instruction
Please use the external power supply that is included in the package. Other power supply may cause damage to
the device, affect the behavior.
zBefore using the external power supply in the package, please check the home power voltage. Inaccurate
power voltage may cause fire and damage.
zPlease do not damage the power cord. If power cord or plug is impaired, do not use it, it may cause fire or
electric shock.
zDo not drop, knock or shake the phone. Rough handling can break internal circuit boards.
zThis device is design for indoor use. Do not install the device in places where there is direct sunlight.Also
do not put the device on carpets or cushions. It may cause fire or breakdown.
zAvoid exposure the device to high temperature or below 0䉝or high humidity.
zAvoid wetting the unit with any liquid.
zDo not attempt to open it. Non-expert handling of the device could damage it. Consult your authorized
dealer for help, or else it may cause fire, electric shock and breakdown.
zDo not use harsh chemicals, cleaning solvents, or strong detergents to clean it. Wipe it with a soft cloth that
has been slightly dampened in a mild soap and water solution.
zWhen lightning, do not touch power plug, it may cause an electric shock.
zDo not install this device in an ill-ventilated place. You are in a situation that could cause bodily injury.
Before you work on any equipment, be aware of the hazards involved with electrical circuitry and be
familiar with standard practices for preventing accidents.

[䭞ޕ᮷ᆇ]
6/41
About Device
Product description
G100S is a new VoIP gateway, its core part is a proven solution for VOIP, and so the
performance is stable and reliable. Compact appearance, intelligent software and simple interface,
making IP gateway no longer limited to enterprise applications, but also for ordinary home users.
Device Appearance
Interface and Buttons Description
Description Function
RST Restore Default button. When the device is working properly, if you press this
button with a sharp object (such as a pencil) until the CPU fast twinkling (about
5 seconds).Restore function will take effect after you release it.
POWER PORT Connecting to a power source.
LAN PORT Connecting to a computer or a PBX and so on.
WAN PORT Connecting to the network.
FXS 1 Connecting to the analog phone.
FXS 2 N/A

[䭞ޕ᮷ᆇ]
7/41
Indicator Lights Description
After you insert the 12V DC power adapter to this device, power light starts to work, analog
phone light comes on, then off! Registered light twinkles for a moment, WAN light and LAN light
will be twinkling and then enter standby mode, when you pick up the analog phone, the analog
phone light will keep on, when you hang up, the light off!
Indicator
lights Description Function
Power Light off Power is invalid.
on Power supply is normal.
SIP Registered
Light
off SIP is not registered.
twinkle SIP registration is failed.
on SIP registration is successful.
LAN Light off LAN port is not connected.
twinkle LAN port is transmitting data.
on LAN port connection is normal.
WAN Light off WAN port is not connected.
Twinkle WAN port is transmitting data.
on WAN port connection is normal.
Analog Phone Light off Phone is in standby or not
connected.
on Phone is being off hook.
Analog phone WAN LAN Registered PowerOff

[䭞ޕ᮷ᆇ]
8/41
Getting Started
Before you start using the device, please make the following installation:
Connecting the Power and the Network
Connecting the Network
Before this step, please make sure your environment can satisfy the requirement of broadband
network access.
Please connect one end of the network cable to the device's WAN port and the other end connect
to your broadband router's LAN port. Now you have completed the network hardware connection.
In most of the cases, you need to set your device's network as the DHCP mode. (The default
mode of the device is DHCP)
Connecting the Power
Before proceeding with this step, please make sure your power connector and electrical outlet
for the agreement, at the same time, the voltage and current are also conform to what the device
need.
a) Put the DC port connect to the power port that on the back of the device.
b) Put the AC adapter plug connect to an electrical outlet, the device starts to boot.
c) At this point, all of your indicator lights (except the power light) will twinkle together. After the
boot is completed, the indicator lights will be on according to your current configuration. (If
your lights is unnormal, we need to further configure your network online mode)
d) If the device has landed on the server, you can start a call right now.
G100S

[䭞ޕ᮷ᆇ]
9/41
Basic Phone Operation
Call Transfer
a. Blind Transfer:
During a conversation, you press FLASH (Flash) button, enter * and the number you want to
transfer, then press [#] key to confirm, you can transfer the current call to the third party. (In order
to use the feature, you must enable the gateway Call Waiting function and Call Transfer function)
b. Attended Transfer:
During a conversation, you press FLASH (Flash) button, enter the number you want to
transfer ,wait until telephone connected, hang up directly, you can transfer success. (In order to use
the feature, you must enable the gateway Call Waiting function and Call Transfer function)
Notes:
Call Transfer function is implemented under certain condition: there is one way of the two
calls is in idle state.
The call between Gateway (transfer side) and phone A is established, then the gateway and
the phone C start another call, now you hang up the phone A, the gateway still can initiate a
transfer.
Only your network phone traffic service providers support the (RFC3515), can this function
work properly
Call Hold
a. Call Hold and Set Aside
During a conversation, you can press FLASH button, then enter the number to dial and the [#] key to confirm.
You can keep your current call and build the third party at the same time. If you press the FLASH (flash) button
again, you can switch back. You can only talk with one side while other parties cannot hear your conversation or
talk with you. During a conversation, if you press the [*] button, the device will enter the three-party call mode. (To
use this feature, you must enable the CallWaiting function of the gateway. To achieve the three-way calling mode,
you must enable the Gateway Three Way Call function)
b. Call Hold and Accept Call Waiting
During a normal conversation, if there is third-party dial-in, the handset will be heard beep ~
beep ~ tips, you can use FLASH (flash) button to accept the call waiting. If you press this button

[䭞ޕ᮷ᆇ]
10 / 41
again, you can switch back. You can only talk with one side while other parties cannot hear your
conversation or talk with you. (To use this feature, you must enable the Call Waiting function of
the gateway)
Shortcut key
The device can call the corresponding shortcut key through the RJ11 connected analog
telephone to realize the related operation.
After the network related operation has been modified, it will need to be restarted before it
becomes effective.
z#****: Reboot
z#*100: Switch to static IP mode
z#*101: Switch to DHCP mode
z#*102: Switch to PPPOE mode
z#*103: Switch to bridge mode
z#*104: Off to bridge mode
z#*111: Query IP of WAN port
z#*222: Read phone number
z#*50: Set IP of WAN port
z#*51: Set Gateway of WAN port
z#*52: Set DNS of WAN port
z#*53: Set Subnet Mask of WAN port
z#*90: Cancel the to call transfer
z#*91: Call transfer of busy
z#*92: Call transfer of unconditional
z#*93: Call transfer of no answer

[䭞ޕ᮷ᆇ]
11 / 41
Web Configuration
Ways to Configure
Device offers two different configure ways to different users:
zUse web browser: the computer users who are familiar with the operation of computers. (Recommended
use)
zUse the telnet tool: command line users.
Password Configuration
The setting of the device’s browser and command-line can be divided into two login modes: user mode and
supervisor mode, under the manager mode, you can view and edit all of the options; while the <Auto Provision>
option cannot be viewed under the user mode.
When a tip: ‘Please enter your password’ appeared on the device, you enter different information will into
different modes:
zUser mode:
Username: admin
Password: admin
zManager mode:
Username: root
Password: admin
Browser Configuration
When the device and computer are connected to the network successfully, you enter the device WAN port IP
address in the browser (gateway IP address can be get by dialing * 111 #) http://xxx.xxx.xxx.xxx / to see the web
management interface login page (as shown below). Enter username and password , click <Login> button ,you
will enter the setting pages .

[䭞ޕ᮷ᆇ]
12 / 41
If you have not save your settings, the settings will be restored to the previous state unchanged when you
boot phone next time .In order to save your settings, please click the <Save> button that belongs to
configuration settings in the System , after this process ,your device configuration will take effect immediately
without reboot again.
Note: LAN port IP address (192.168.10.1).
WEB Pages Function Explanation
Status
Overview

[䭞ޕ᮷ᆇ]
13 / 41
Name Explanation
System
Model Displays device model.
Hardware Version Displays device hardware version.
Firmware Version Displays device software firmware version number.
MACAddress Displays the current MAC address.
Serial Name Displays device serial number.
Local Time Displays the current system time
Uptime Displays device runtime
LoadAverage Displays the current average load value
MEM Info Displays the current memory status
Network (WAN Status)
Connection Type Displays the current networking way.
IPAddress Displays the current IP address.
Subnet Mask Displays the current subnet mask.
Default Gateway Displays the default gateway.
Primary DNS Displays the primary DNS.
Line status
Displays the current SIP line 1-2 registries number, server and status.
DND Open this option, any dial-in call will be blocked, the caller will be prompted
that the device cannot be used, but you can establish a call with the device.
DHCP Leases Displays host information that has been assigned IP parameters by DHCP

[䭞ޕ᮷ᆇ]
14 / 41
Routes
With this function, you can see the ARP table in the routes. The hosts IP MAC information that
had connected with the device recently will be stored in the ARP list.
System Log
It displays activity information of the system.

[䭞ޕ᮷ᆇ]
15 / 41
System
System
General Settings
Name Explanation
General Settings
Local Time Displays the current system time
Hostname Name of the device, similar to the computer’ name. The default is VoIP, you
can modify it by yourself.
Timezone Set the time zone of the area where you are.
Logging

[䭞ޕ᮷ᆇ]
16 / 41
Name Explanation
Logging
System log buffer size Set the log buffer size.
External log system
server Set the address of the external log server.
External Log server port Set the port of the external log server.
Log output level Set the level of log output.
Cron log level Set the level of Cron log.
Language
In this page, you can configure the language that the device currently uses.
Administration
In this page, you can modify the current user's password.

[䭞ޕ᮷ᆇ]
17 / 41
Time Synchronization
Name Explanation
Enable NTP client Set the enable or disable NTP client
NTP server
candidates Set the NTP server candidates
Backup/Flash Firmware
Name Explanation
Backup/Restore
Backup / Restore the current system configuration file or reset PandoraBox. (Squashfs only valid
firmware)
Flash new firmware image
Keep settings Preserving configuration that currently set. If the option is not selected, the

[䭞ޕ᮷ᆇ]
18 / 41
device will automatically restore to factory configuration after upgrade.
Image Selects the firmware you need to update, then click <Flash image...>.It is set
up.
Name Explanation
Export config
Export current device configuration file.
Import config
Select the profile you need, then click <import config.txt>.It is set up.
Auto Provision
Common Setting
Name Explanation
Configuration
File Version
Displays the version number of current system configuration file, if the Terminal
founds the CFG configuration file that has downloaded same with configuration
file that are running, the device will not run it. Or if the terminal matches

[䭞ޕ᮷ᆇ]
19 / 41
configuration file via Digest verification way, as long as the configuration on the
server has been modified, or the terminal configure do not match with the
configuration on the server, the terminal will to download and update.
Server
Address
Configures the FTP server address. The server address can be a IP form, such
as 192.168.1.1, it may in the form of domain names also, such as
ftp.domain.com. And the system also supports server setting subdirectory
function, such as the system can configure server address as
192.168.1.1/ftp/Config/form or ftp.domain.com/ftp/config form .It means, the
server address to access is 192.168.1.1 or ftp.domain.com, the file storage
path is / ftp / Config /. Subdirectory can end without "/".
Username Configures username of FTP server; TFTP protocol need not configuration; if
you are using ftp protocol download mode, here is no need to fill, the default is
the default user anonymous FTP.
Password Configures FTP server user’s password.
Configuration
File Name
Configures the name of these configuration file need to upgrade; if you use the
automatic upgrade feature , this project configuration is empty generally, so our
equipment will use its own MAC address as the file name to get the file on the
server.
Encryption
Key If the configuration file need to update has been encrypted, you need to enter
the encryption password in this configuration.
Protocol Type Selects the server type. There are three types: FTP, TFTP and HTTP
Update
Interval Configures the interval upgrade time in hours.
Update Type
Automatic Update Types:
1. Update after rebooting.
2. Deactivated.
3. Updated regularly.(How often interval updated)
Check Digest Configure whether to use Digest mode.
Enable DHCP
OPTION 66 Enable/Disable DHCP option 66

[䭞ޕ᮷ᆇ]
20 / 41
Name Explanation
Enable TR069 Enable/Disable TR069
ACS Server
type Used for choosing ACS server type, the terminal supports telecommunications
and the general two kindsACS server currently.
ACS Server
URL Enter theACS server address.
ACS User Enter theACS server verification username.
ACS
Password Enter the ACS server verification user password.
TR069 Auto
login
If you selected the automatic login, after rebooting the phone, you will not be
prompted to enter username and password, but the correct username and
password you entered before link to the ACS server.
INFORM
Sending
Period Check the system every 6 minutes by default.
Reboot
Clicking the <Execute Restart> button, the device will reboot.
Rebooting will not lost the saved configuration ,in the process of rebooting, the network
connection will be interrupted temporarily .
Note:During the rebooting, please ensure stable power supply, avoid forced interruption.
Auto-Reboot
ConfigAutoReboot to restart gateway at specific time every day.
Table of contents
Other Fanvil Gateway manuals

Fanvil
Fanvil PA2S Installation and user guide

Fanvil
Fanvil PA2 User manual

Fanvil
Fanvil ATA User manual

Fanvil
Fanvil PA3 User manual

Fanvil
Fanvil PA2S User manual

Fanvil
Fanvil G200S User manual

Fanvil
Fanvil LINKVIL W712 User manual

Fanvil
Fanvil GA10 User manual

Fanvil
Fanvil PA2S Installation and user guide

Fanvil
Fanvil PA3 User manual