FAZUA Evation 1.0 User manual
EN Original Instructions
DE Originalbetriebsanleitung
FR Notice Originale
ES Manual original
IT Istruzioni originali
NL Oorspronkelijke gebruiksaanwijzing

en Original instructions
Drivepack 25 km/h
1
EN
Safety instructions
Preserve all safety warnings and instructions for the future.
Do not open the Drivepack yourself. The Drivepack is free of
maintenance. It must only be opened by qualied experts and
repaired with original spare parts. Unauthorized opening of a system
would lead to its warranty expiration.
All components making up the Drivepack and eBike may only be
replaced with identical components or specically approved by your
eBike manufacturer. This protects your drivepack from damage.
Don’t modify the Drivepack or add any other non-approved product
to enhance performance.
Always remove the Drivepack from the eBike before working on your
eBike, transportation or storage. There is risk of accident in case of
accidental activation.
Be careful when touching the radiator of your Drivepack. The radiator
may heat up considerably and cause skin burns.
The walk-assistance function may only be used when pushing the
eBike. There is risk of injury if the wheels do not have ground contact
when using this function.
Use only original evation batteries approved by the eBike
manufacturer. Using unauthorized batteries may cause injuries or re.
FAZUA will not assume responsibility if unauthorized batteries are used.
Observe all national regulations in reference to eBikes and pedelecs.
Important! Please read carefully the safety warnings and
instructions for all components of the drive system as well as
your eBike.
Important! Read the safety instructions carefully. Negligence
in following these safety instructions could cause electric
shocks, re or severe injuries.
Cleaning, Maintenance and
Service
Keep all components of your eBike and the drive system clean. Pay special
attention to pins and interfaces between Battery Pack and Drivepack as well
as Drivepack and Bottom Bracket. Make sure they are completely dry before
each use.
Keeping the Drivepack radiator clean will improve its cooling performance.
Grease up your lock every few months or if its operation becomes rougher
over time. Do not submerge or clean with high-pressure cleaner any drive
system component. Clean all drive system components carefully with a cloth
or a soft brush.
For information about servicing your drive system, contact your FAZUA Service
Partner or visit the FAZUA Service Platform (www.fazua.com/service).
Disposal
Bottom Bracket, Drivepack, Remote, Battery,
Charger, accessories and packaging should be disposed
of in an environmentally appropriate manner. Don’t
throw e-Bikes and components into domestic waste.
EU countries only: According to EU directive 2012/19/EU
broken electric devices and according to EU directive
2006/66/EG used batteries must be stored separately and
disposed of in an environmentally appropriate manner.
2 3
EN
EN

Drivepack 1 Action A
Action B
1
5
2
4
3
6
10
7
8
10
9
1
6
Step 1
Step 2
1
Step 1
Step 2
4 5
EN
EN
Action C Action D
Action E
Step 1
-90° +90°
Step 3
Step 2
9 9
10
8
8
8
7
10
Description and
Specications
Purpose
The Drivepack is intended to be used only for driving your eBike and must not
be used for any other purpose.
Features
The numbering refers to the illustrations shown at the beginning of the manual.
The illustrations show the different components belonging to the Drivepack
and other FAZUA modules. Individual illustrations in the manual might differ
slightly from the real parts depending on the equipment of your eBike.
1. Drivepack
2. Battery slot
3. Interface to Bottom Bracket
4. USB connection
5. Drivepack lock
6. Release button
7. Pressing chock
8. Fastening hook
9. Lock cylinder
10. Lock key
Specications
Drivepack
Article number 01-2018-001
Rated continuous output W 250
Max. Output W 400
Torque at chain, max. Nm 60
Rated voltage V 36
Operating temperature °C -20 ... +60
Storage temperature °C -20 ... +60
Degree of protection IP 54
Weight , approx. kg 2
6 7
EN
EN
Assembly
Inserting/removing the Battery Pack
To insert/remove the Battery Pack in/from the eBike, follow the Battery Pack
Instructions.
Mounting the Drivepack in the eBike
After inserting the Battery Pack in the Drivepack (1) (see the Battery Pack
Instructions), lay the interface to Bottom Bracket (3) over the open interface
on your Bottom Bracket (Action A, Step 1). right underneath your eBike
downtube.
Now bring the upper part of the Drivepack (1) inside the downtube until the
fastening hook (8) hooks in (Action A, Step 2). Make sure the Drivepack (1) is
tightly anchored within the downtube and does not come out.
Dismounting the Drivepack from the eBike
Hold the mounted Drivepack (1) with one hand and press the release
button (6) with the other hand (Action B, Step 1). You can now remove the
Drivepack (1) easily (Action B, Step 2).
Important! Make sure that you are holding your Drivepack (1)
when dismounting it, otherwise the Drivepack (1) may fall freely
from the frame.
Note! Sometimes pushing up the Drivepack (1) against the frame
before pressing the release button (6) may result in a smoother
dismounting.
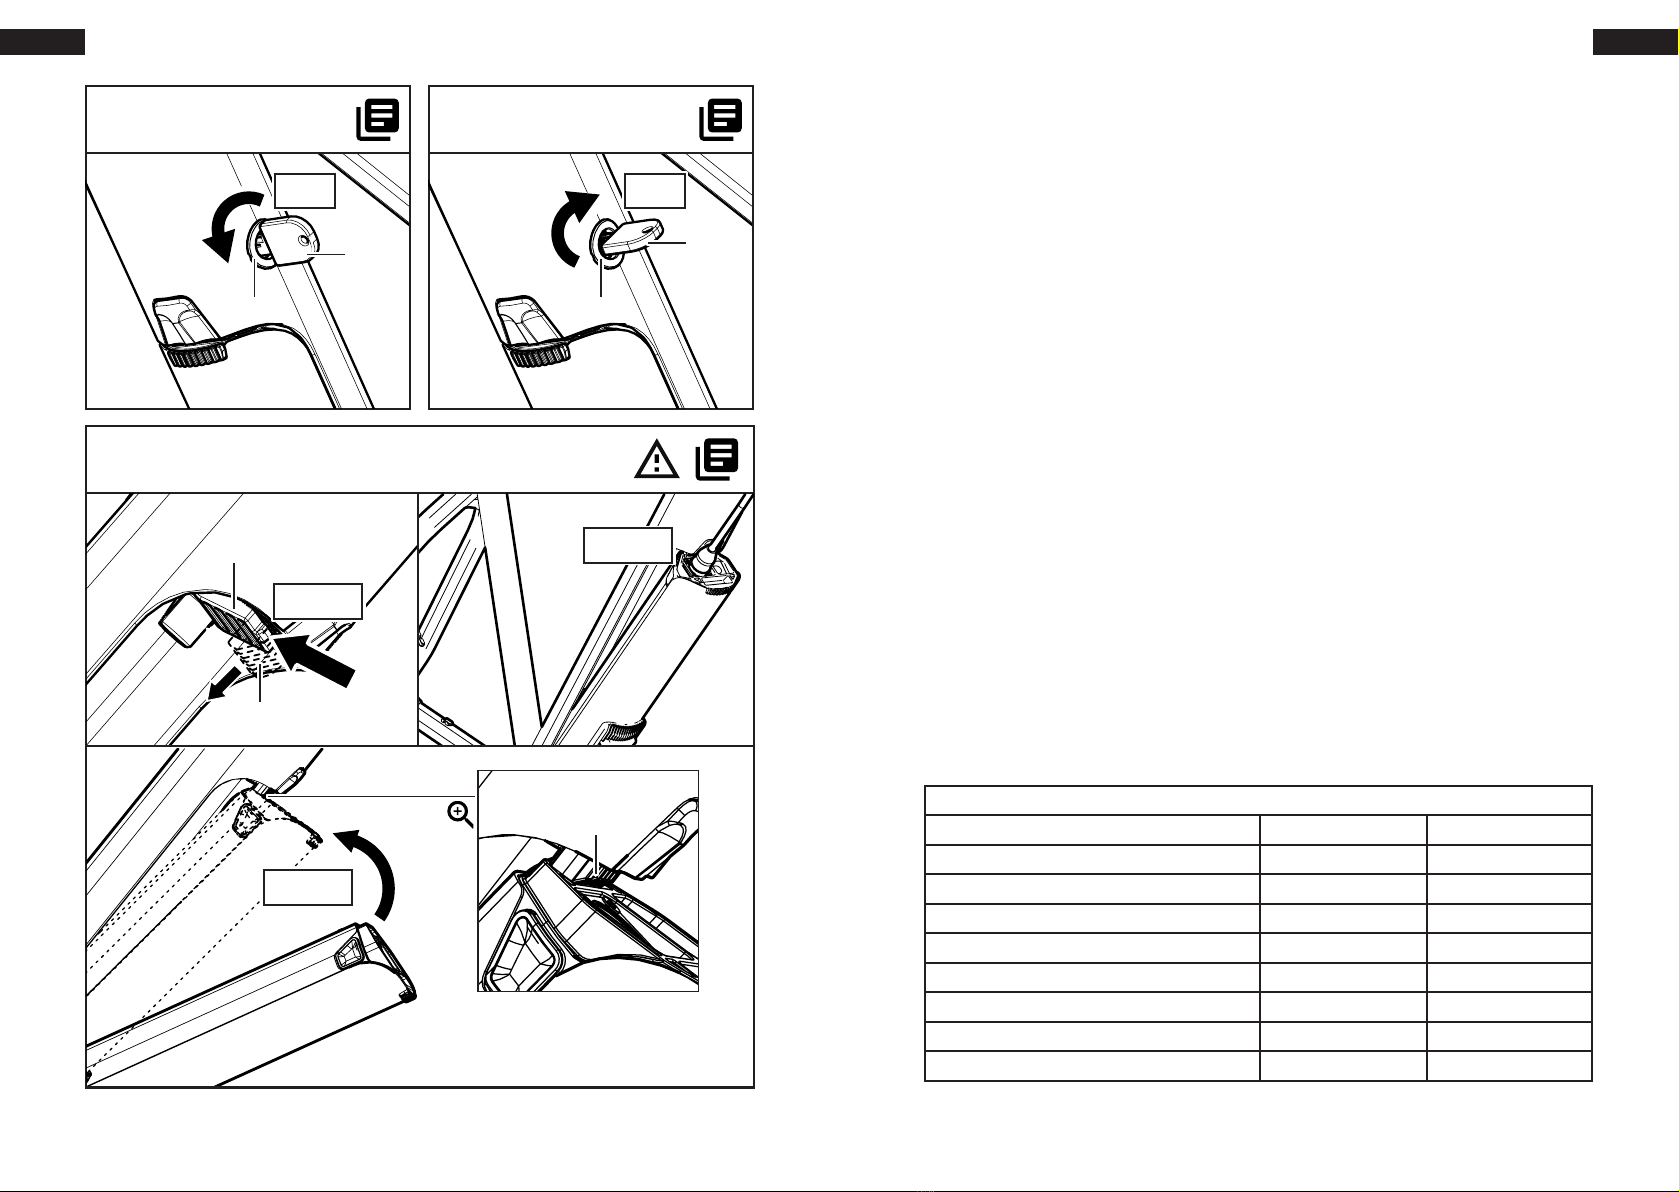
Locking/unlocking the drivepack within
your eBike
Once a Drivepack (1) is mounted in the eBike, it can be locked in so that the
Drivepack (1) cannot be removed. To lock a mounted Drivepack (1), insert
the key (10) into the lock cylinder (9) and turn it counter-clockwise (Action
C).
To unlock the Drivepack (1) from the eBike, insert the key (10) into the cylinder
(9) and turn it clockwise (Action D).
Charging the Battery Pack in your bike
The Drivepack (1) can be mounted in the eBike, leaving the charging port of
the Battery Pack accessible to connect the charger. For that, dismount the
Drivepack (1) from the eBike (Action B). Push up the pressing chock (7) at
the lock (5) and the fastening hook (8) will come out (Action E, Step 1). Now
mount the Drivepack (1) back into the bike without pushing the upper part
all the way in (Action E, Step 2). This way, the fastening hook (8) fastens the
Drivepack (1) without being completely inserted.
Warning! Read carefully and respect the battery instructions.
Warning! Pay attention to your battery before each use and before
charging. Make sure terminals and surfaces are clean.
Warning! Before using or charging your Battery Pack, always look
for signs of damage like cracks or burns. Never use or charge a
damaged Battery. Please contact your FAZUA Service Partner or
visit the FAZUA Service Platform (www.fazua.com/service).
8 9
EN
EN

Operation
Requirements
For running the eBike drive system, following requirements must be followed:
• The Battery Pack is sufciently charged, inserted and turned on (see
Battery Pack Instructions).
• Drivepack (1) is mounted in the eBike.
• The speed sensor is properly connected to the Bottom Bracket and
spoke magnet justly placed (see Bottom Bracket Instructions).
Switching eBike System On/Off
The system can be operated by a FAZUA approved Remote. Once the
Drivepack (1) is mounted in the eBike, the system can be switched on by
simply pressing any of the Remote buttons (see Remote Instructions).
The system output power depends on the support level settings on the Remote.
When you stop pedaling, or a speed of 25 km/h is reached, the support from
the drive system is gently switched off. The system switches on again when
you start pedaling and the speed is below 25 km/h.
There are different ways to switch off the system:
• Press and hold the middle button of the Remote for 2 s (see Remote
Instructions).
• Unmount the Drivepack (1) from the bike.
• Switch off the Battery Pack (see the Battery Pack Instructions).
• Let the eBike enter into inactivity.
Setting the Support Level
You can set on the Remote to what extent should the eBike system support
you when pedaling. The support level can be set at any time, even while
riding. To switch the support level, you must press the up/down buttons on the
Remote (see Remote Instructions).
The following support levels are available:
• No Support (white): The motor support is switched off. The eBike can
be driven as a normal bicycle.
• Breeze (green): Low but efcient support to maximize the eBike range.
• River (blue): Solid support suitable for most of scenarios.
• Rocket (pink): Maximum support for the most demanding tours.
Support Level Color Max. Support Factor Max. Power
No Support White 0% 0 W
Breeze Green 75% 125 W
River Blue 150% 250 W
Rocket Pink 240% 400 W
Switching the Walk-assistance mode on/off
The Walk-assistance function helps to push the eBike. The speed of the eBike
in Walk-assistance mode may vary depending on the set gear, with maximum
speed of 6 km/h. The user can reduce the speed of the eBike to his own by
holding it rmly while walking.
To activate the Walk-assistance mode, set your system to “No Support“ mode
on the Remote (See Remote Instructions). Then, press and hold the “Down“
button on the Remote. After 2 s the Walk-assistance mode switches on.
Warning! The Walk-assistance mode is intended to be used only
while pushing the eBike. A misuse of the Walk-assistance mode
assumes risk of injury.
Warning! Make sure your hands are rmly holding the handlebar
of your eBike when using this function, otherwise you may
momentarily lose control over the eBike.
10 11
EN
EN

The Walk-assistance is switched off when:
• You release the “Down“ button.
• The wheels of the eBike are blocked.
• The speed exceeds 6 km/h
Inactivity
If the eBike reaches inactivity, the system will automatically switch off the
Battery Pack. In order to start the system from inactivity you have to switch on
the Battery Pack (see Battery Pack Instructions). The eBike reaches inactivity
when:
• The eBike is not moved and no button is pressed on the remote for 10 h.
• The state of charge of the battery is below 30% and the bike is not
moved and no button is pressed on the remote for 3 h.
Notes when driving your eBike
• The bicycle gears must be used as with a standard bicycle. Regardless
of the kind of gears, it is recommended to briey interrupt the pedaling
while changing gears. This would reduce stress on your gearing and
drivetrain.
• Using the right gear increases the speed, power and range of your
eBike with the same pedaling effort.
• It is recommended to gradually gather experience with your eBike
far from roads and trafc. Test the range of your eBike under different
conditions before planning longer rides.
• It is not possible to accurately predict the range of your system before
or during a ride. The range of your eBike is inuenced by many factors:
- Support level
- Speed
- Gear management
- Tire type and pressure
- Route and atmospheric conditions
- Bike + rider weight
- Battery age
• Be careful with the operating and storage temperatures of the eBike
components. Specially the Battery Pack, it can get damaged through
extreme temperatures.
en Original instructions
Bottom Bracket
12 13
EN
EN

Safety instructions
Preserve all safety warnings and instructions for the future.
Do not open the Bottom Bracket yourself. The Bottom Bracket is free
of maintenance. It may only be opened by qualied experts and
repaired with original spare parts. Unauthorized opening of a system
would lead to its warranty expiration.
All components making up the Bottom Bracket and eBike may only
be replaced with identical components or specically approved by
your eBike manufacturer. This protects your Drivepack from damage.
Don’t modify the Bottom Bracket or add any other non-approved
product to enhance its performance.
Important! Please read carefully the safety warnings and
instructions for all components of the drive system as well as
your eBike.
Important! Read the safety instructions carefully. Negligence
in following these safety instructions could cause electric
shocks, re or severe injuries.
Cleaning, Maintenance and
Service
Keep all components of your eBike and the drive system clean. Pay special
attention to pins and interfaces between Battery Pack and Drivepack as well
as Drivepack and Bottom Bracket. Make sure they are completely dry before
each use.
Keeping the Drivepack radiator clean will improve its cooling performance.
Grease up your lock every few months or when its operation becomes rougher
over time. Do not submerge or clean with high-pressure cleaner any drive
system component. Clean all drive system components carefully with a cloth
or a soft brush.
For information about servicing your drive system, contact your FAZUA Service
Partner or visit the FAZUA Service Platform (www.fazua.com/service).
Disposal
Bottom Bracket, Drivepack, Remote, Battery,
Charger, accessories and packaging should be disposed
of in an environmentally appropriate manner. Don’t
throw e-Bikes and components into domestic waste.
EU countries only: According to EU directive 2012/19/EU
broken electric devices and according to EU directive
2006/66/EG used batteries must be stored separately and
disposed of in an environmentally appropriate manner.
14 15
EN
EN
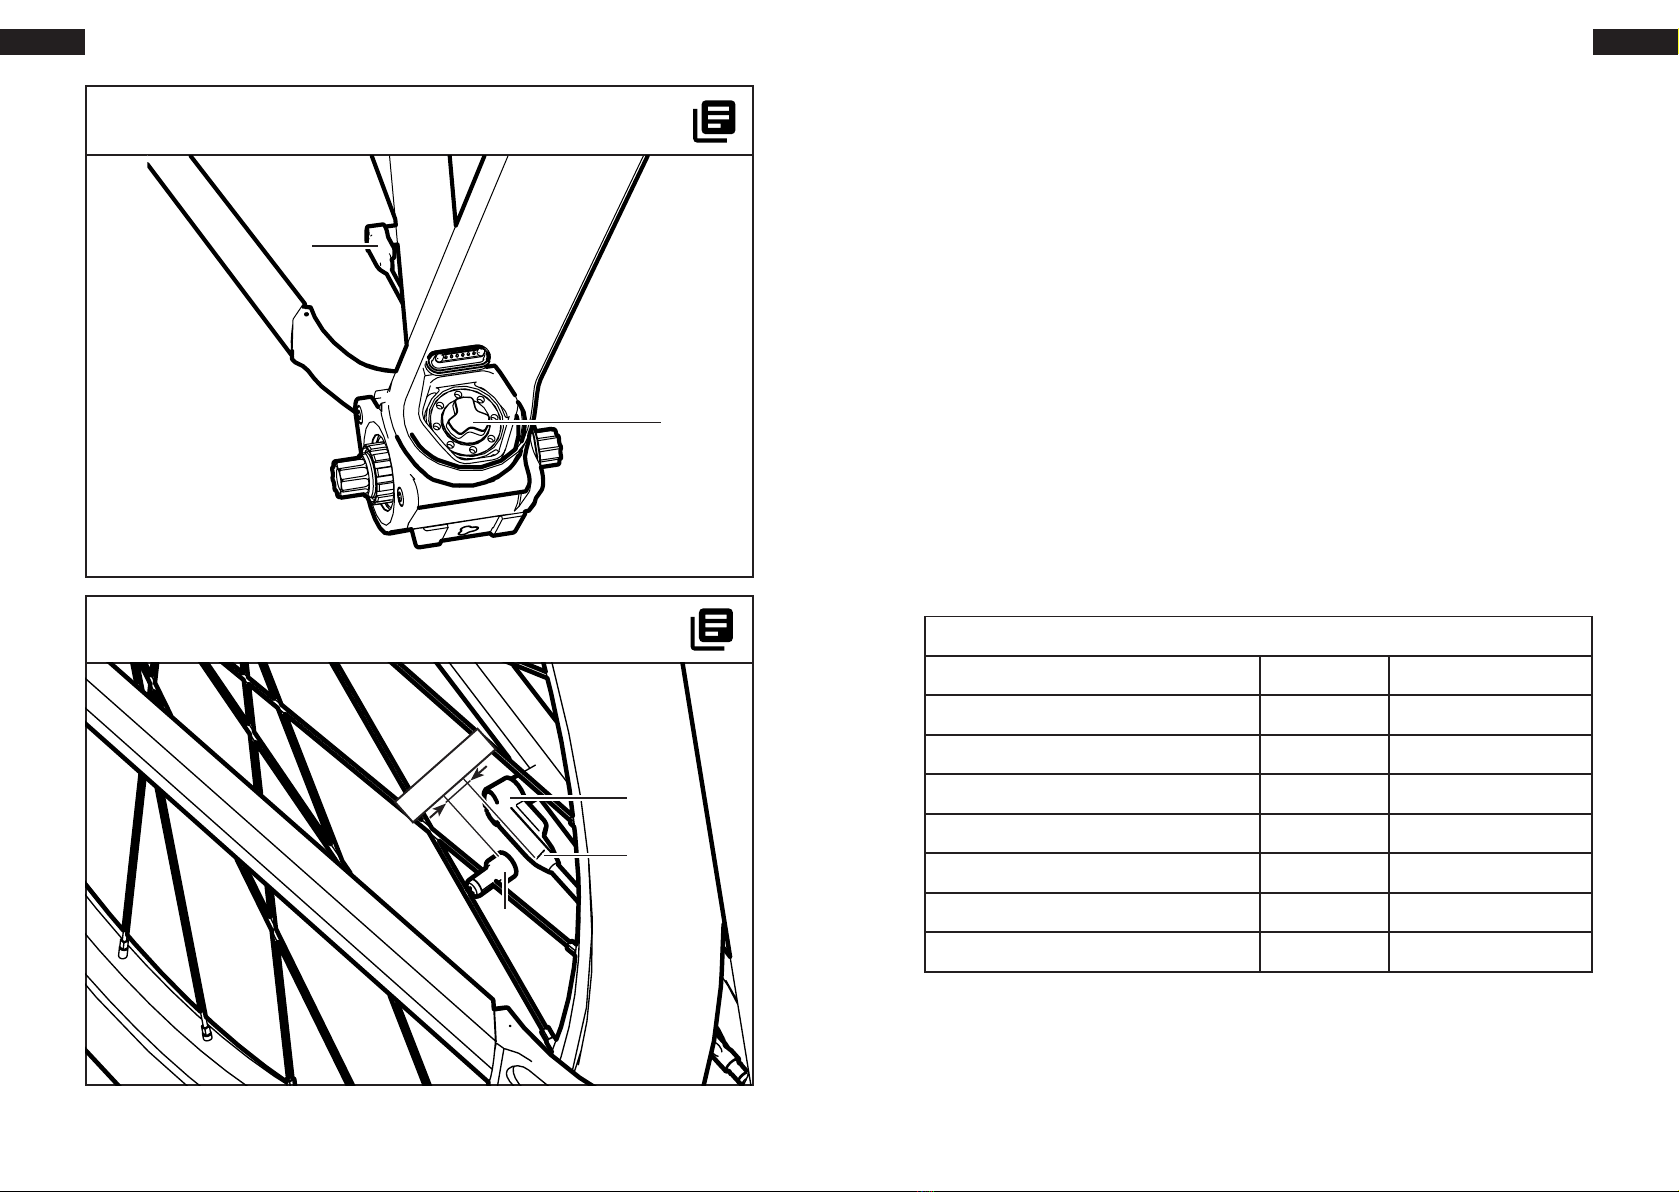
Bottom Bracket 1
Speed Sensor 2
2
4-15 mm
3
4
1
2
Description and
Specications
Features
The numbering refers to the illustrations shown at the beginning of the manual.
The illustrations show the different components belonging to the Bottom
Bracket. Individual illustrations in the manual might differ slightly from the real
parts depending on the equipment of your eBike.
1. Bottom Bracket
2. Speed Sensor
3. Magnet position mark
4. Spoke magnet of the speed sensor
Specications
Bottom Bracket
Article number 01-2018-002-01
Assistance Torque, max. Nm 60
Q Factor, min. mm 135 (w/o crank arms)
Operating temperature °C -20 ... +60
Storage temperature °C -20 ... +60
Degree of protection IP 54
Chainline mm 49, 52
Weight , approx. kg 1.3
16 17
EN
EN
Assembly
Speed Sensor adjustment
The speed sensor (2) and the spoke magnet (4) must meet 2 conditions:
• The position of the spoke magnet (4) at the spoke must let the magnet (4)
run past the magnet position mark (3).
• The distance between the speed sensor (2) and the spoke magnet (4)
when facing each other must be in a 4-15 mm range.
Note! When the distance between speed sensor (2) and spoke
magnet (4) is not right, or if the speed sensor (2) is not properly
connected, the ebike will run under a “Soft Fault” condition notied
on the Remote (see Remote Instructions). If this happens, loosen
the screw of the spoke magnet (4) and fasten it again ensuring
that it runs past the mark of the speed sensor (3) maintaining
the right distance. If the problem does not get solved, contact
an authorized bicycle dealer or visit the FAZUA Service Platform
(www.fazua.com/service)
en Original instructions
Remote
18 19
EN
EN

Safety instructions
Preserve all safety warnings and instructions for the future.
Do not open the drive system’s components by yourself. The
components are free of maintenance. They may only be opened with
qualied experts and repaired with original spare parts. Unauthorized
opening of a system would lead to its warranty expiration.
Stay aware of the trafc and your environment when manipulating
the evation Remote. There is a risk of accident if you do not focus on
the trafc.
Important! Please read carefully the safety warnings and
instructions for all components of the drive system as well as
your eBike.
Important! Read the safety instructions carefully. Negligence
in following these safety instructions could cause electric
shocks, re or severe injuries.
Cleaning, Maintenance and
Service
Keep all components of your eBike and the drive system clean. Pay special
attention to pins and interfaces between Battery Pack and Drivepack as well
as Drivepack and Bottom Bracket. Make sure they are completely dry before
each use.
Keeping the Drivepack radiator clean will improve its cooling performance.
Grease up your lock every few months or when its operation becomes rougher
over time. Do not submerge or clean with high-pressure cleaner any drive
system component. Clean all drive system components carefully with a cloth
or a soft brush.
For information about servicing your drive system, contact your FAZUA Service
Partner or visit the FAZUA Service Platform (www.fazua.com/service).
Disposal
Bottom Bracket, Drivepack, Remote, Battery,
Charger, accessories and packaging should be disposed
of in an environmentally appropriate manner. Don’t
throw e-Bikes and components into domestic waste.
EU countries only: According to EU directive 2012/19/EU
broken electric devices and according to EU directive
2006/66/EG used batteries must be stored separately and
disposed of in an environmentally appropriate manner.
20 21
EN
EN
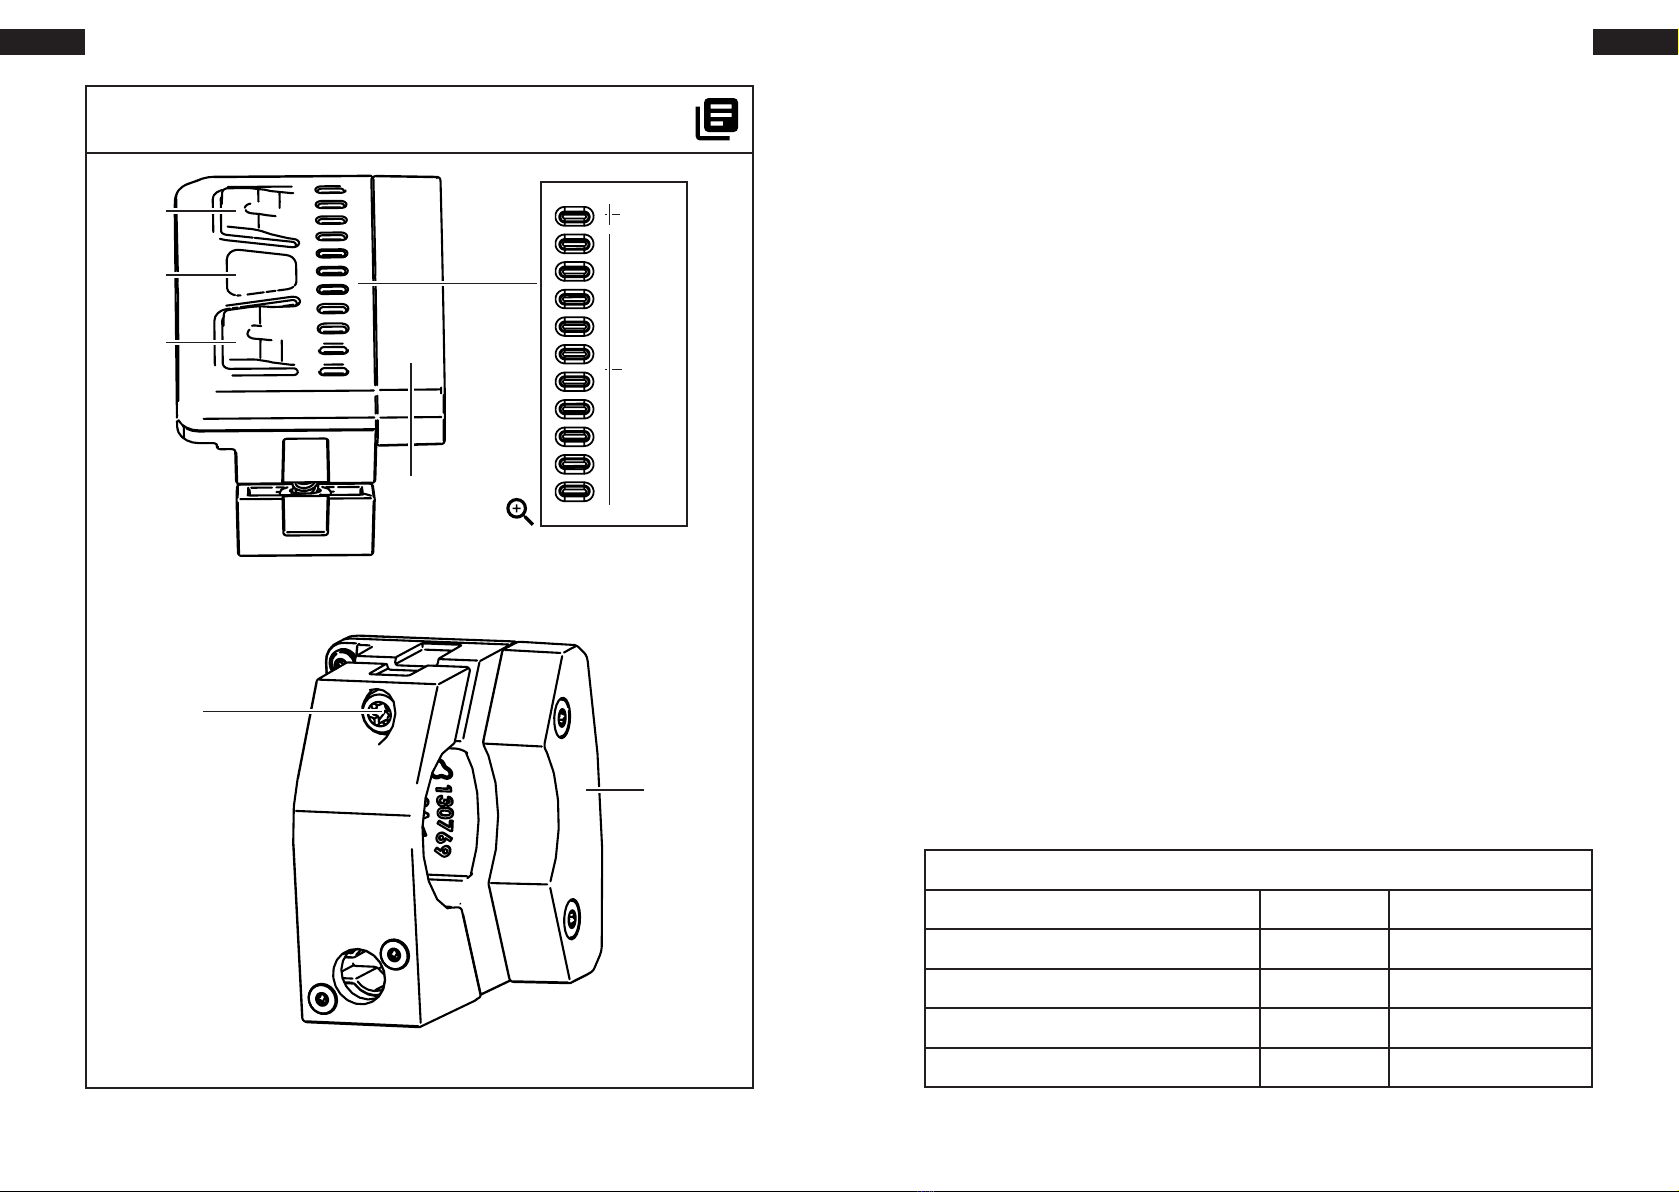
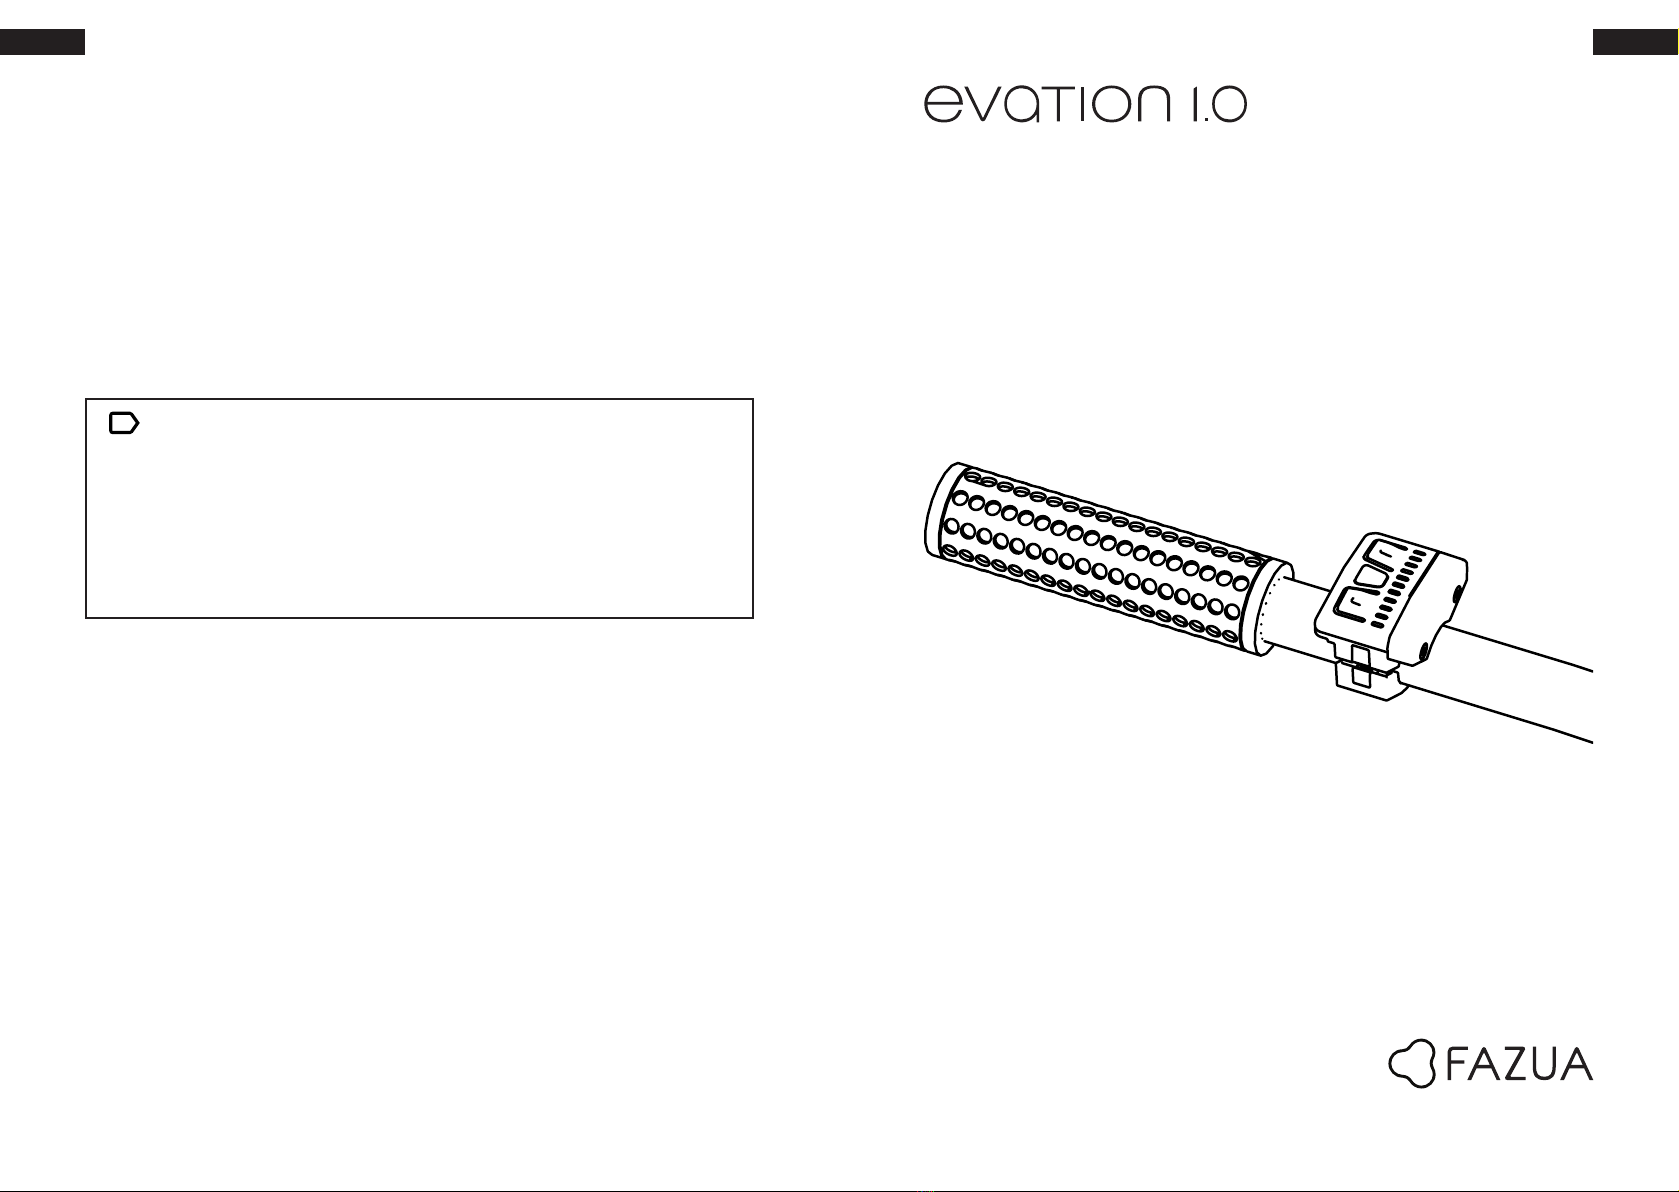
Remote 1 Description and
Specications
Purpose
The remote is meant to control the FAZUA evation drive system and display
certain riding data. The remote must not be used for any other purpose.
Features
The numbering refers to the illustrations shown at the beginning of the manual.
The illustrations show the different components belonging to the Remote.
Individual illustrations in the manual may differ slightly from the real parts
depending on the equipment of your eBike.
1. Remote
2. “Up“ button
3. Middle button
4. “Down“ button
5. Display bar
6. State of charge/support level bar
7. Notication indicator
8. Fastening screw
9. Add-on port
Specications
Remote
Article number 01-2018-003
Operating temperature °C -20 … +60
Storage temperature °C -20.. +60
Degree of protection IP 54
Weight , approx. kg 0.075
2
3
4
9
9
7
6
5
8
22 23
EN
EN

Operation
Requirements
For running the eBike drive system, following requirements must be met:
• The Battery Pack is sufciently charged, inserted and turned on (see
Battery Pack Instructions).
• Drivepack is mounted in the eBike.
• The speed sensor is properly connected to the Bottom Bracket and
spoke magnet justly placed (see Bottom Bracket Instructions).
Switching eBike System On/Off
To switch on the eBike press any of the Remote buttons (2,3,4). The Remote (1)
will shortly show the start-up animation and get into operation mode.
To switch off the eBike from the Remote (1) you have to press and hold the
middle button (3) of the Remote (1) for 2 s.
Other alternative options to switch off the eBike are:
• Unmounting the Drivepack from the bike (see Drivepack Instructions).
• Switching off the Battery Pack (see the Battery Pack Instructions).
• Letting the eBike enter into inactivity (see Drivepack Instructions).
Display of the Remote
The display bar (5) on the Remote (1) consists of 11 LEDs.
• The top LED is the notication indicator (7) meant for eBike status
notication.
• The remaining 10 LEDs are meant for the state-of-charge and support
level bar (6).
Note! Always switch off the eBike system when you park the eBike.
State-of-charge and support level bar
The state-of-charge and support level bar (6) shows 2 parameters:
• State-of-charge of your Battery Pack.
• Selected support level of your eBike.
The state-of-charge of your Battery Pack is indicated by the number of LEDs
that are lit. Each LED represents 10% of the total capacity. When charge at
the Battery Pack is full, all 10 LEDs are lit. However, if Battery Pack is empty,
then no LEDs will light up.
The selected support level is represented with the color of the bar (6). There
are 4 possible colors this bar (6) can show and they refer to the 4 different
support levels.
Notication indicator
The notication indicator (7) will show notications of errors or events in the
eBike in case they occur. If no errors are detected, the notication indicator
should not light up.
Different colors on the notication indicator (7) have different meanings :
• Green: The notication indicator (7) briey blinks green when the
Drivepack is mounted in the eBike. This provides visual feedback that
the system is ready to be switched on.
• Yellow: The notication indicator (7) lights up yellow if a “Soft Fault” is
detected. This means that temporary or minor aws are present and,
probably, a limitation in performance. Riding your eBike under a “Soft
Fault” is possible but not recommended.
• Red: The notication indicator (7) lights up red if a “Hard Fault”
is detected. The eBike system will not work under a “Hard Fault”
condition and your eBike will need Service.
In case of a permanent “Soft Fault”, try reassembling the speed sensor magnet
(See Bottom Bracket Instructions). If this problem persists contact your FAZUA
Service Partner or visit the FAZUA Service Platform (www.fazua.com/service).
In case of a permanent “Hard Fault”, contact your FAZUA Service Partner or
visit the FAZUA Service Platform (www.fazua.com/service).
Note! The most common cause for a “Soft Fault” in your eBike is
the missing information from the Speed Sensor (see the Bottom
Bracket Assembly instructions).
24 25
EN
EN

Setting the Support Level
You can set on the Remote (1) to what extent should the eBike system support
you when pedaling. The support level can be set at any time, even while
riding. In order to switch the support level, you must press the up/down buttons
(2,4) on the Remote (1).
The following support levels are available:
• No Support (white): The motor support is switched off. The eBike can
be driven as a normal bicycle.
• Breeze (green): Efcient support to maximize the eBike range.
• River (blue): Solid support suitable for most of scenarios.
• Rocket (pink): Maximum support for the most demanding tours.
Support Level Color Max. Support Factor Max. Power
No Support White 0% 0 W
Breeze Green 75% 125 W
River Blue 150% 250 W
Rocket Pink 240% 400 W
Switching the Walk-assistance mode on/off
The Walk-assistance function helps to push the eBike. The speed of the eBike
in Walk-assistance mode may vary depending on the set gear, with maximum
speed of 6 km/h. The user can reduce the speed of the eBike to his own by
holding it rmly while walking.
To activate the Walk-assistance mode, set your system to “No Support“ mode
on the Remote (See Remote Instructions). Then, press and hold the “Down“
button on the Remote. After 2 s the Walk-assistance mode switches on.
Warning! The Walk-assistance mode is intended to be used only
while pushing the eBike. A misuse of the Walk-assistance mode
assumes risk of injury.
Warning! Make sure your hands are rmly holding the handlebar
of your eBike when using this function, otherwise you may
momentarily lose control over the eBike.
The Walk-assistance is switched off when:
• You release the “Down“ button (4).
• The wheels of the eBike are blocked.
• The speed exceeds 6 km/h
Remote control quick guide
Action Button Duration
Switch On Any Any
Switch Off Middle 2 s
Increase support level Up Any
Decrease support level Down Any
Walk-assistance mode On
1. (In No Support
mode)
2. Down
> 2 s
26 27
EN
EN
en Original instructions
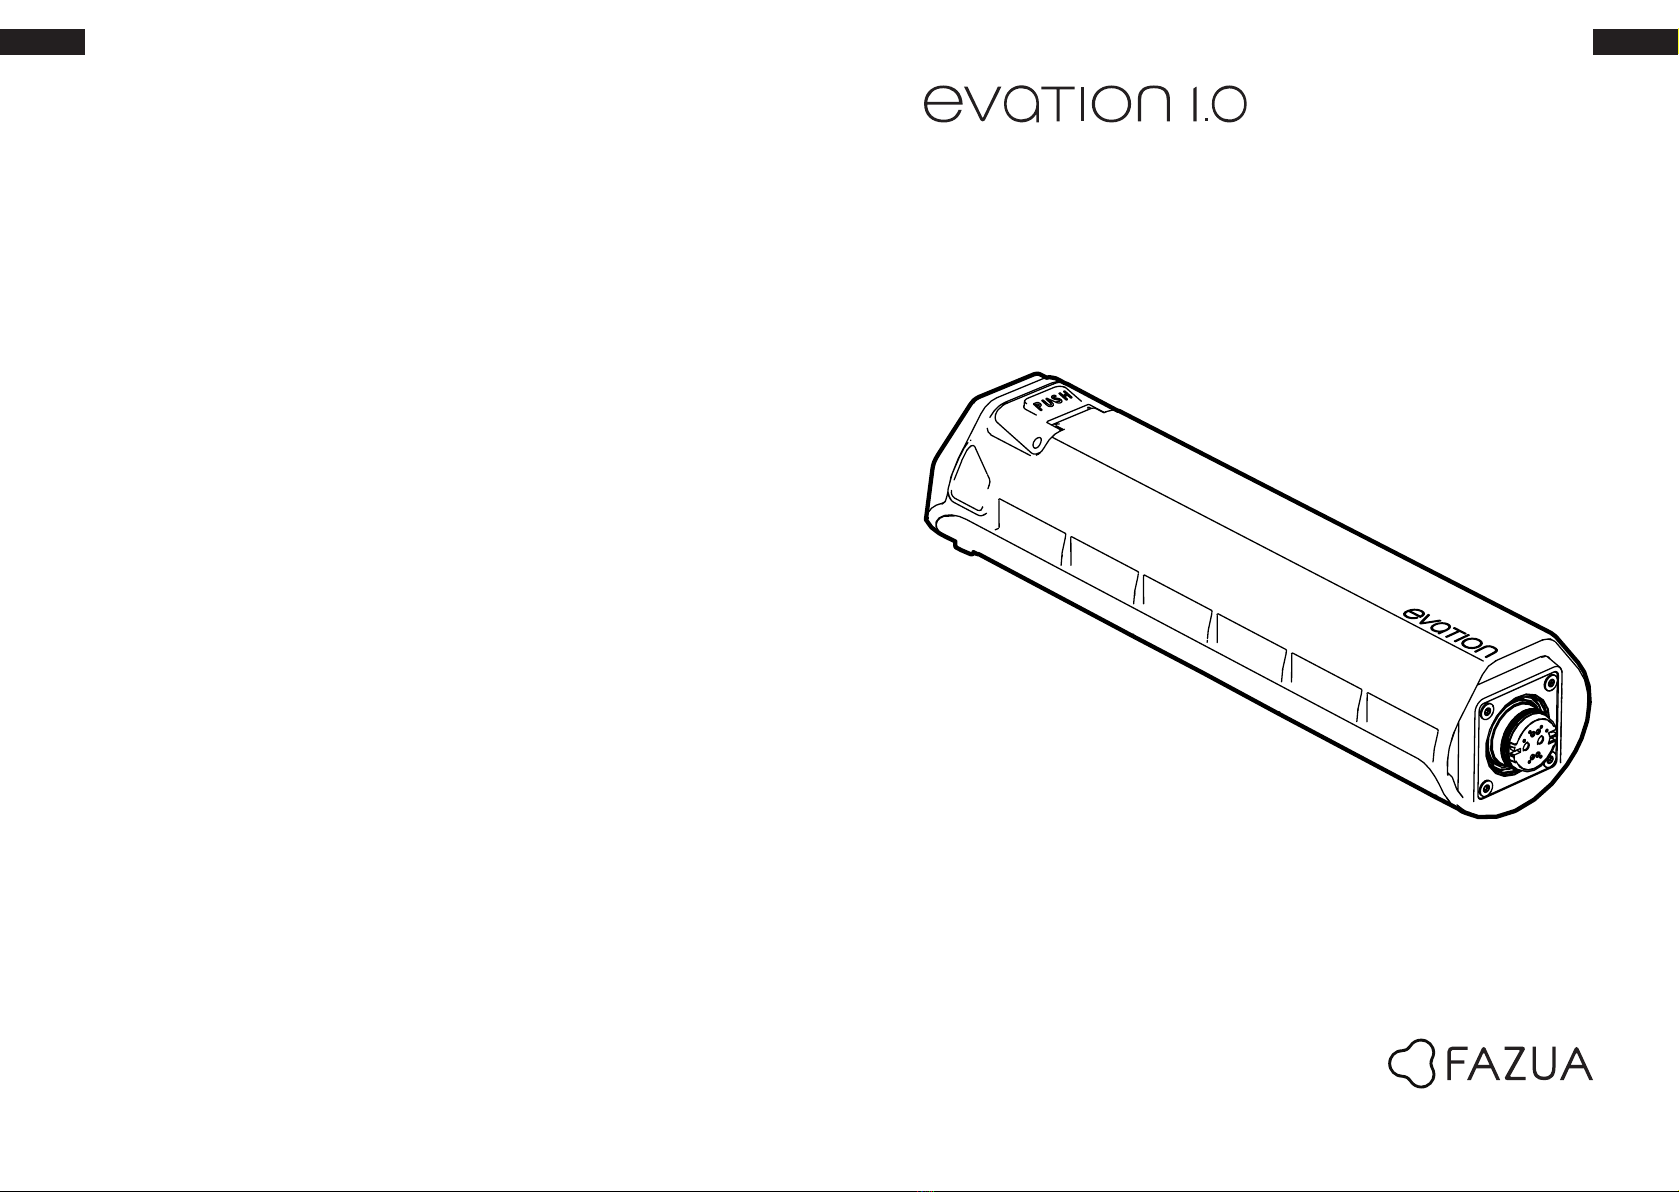
Battery Pack 7000
28 29
EN
EN
Safety instructions
Preserve all safety warnings and instructions for the future.
Remove the Battery Pack from the Drivepack before carrying out cleaning
works. Humidity on the contacts of your Drivepack when the Battery Back is
being inserted may damage your Battery Pack.
Do not open the Battery Pack. Danger of explosion. Opening the Battery Pack
assumes an automatic expiration of the warranty.
Use the Battery Pack exclusively with eBikes that have an original FAZUA
evation drive system.
Use only original evation Battery Packs approved by the eBike manufacturer.
Using unapproved batteries may cause injuries or re. FAZUA will not be liable
for using unapproved batteries.
Use only original FAZUA chargers for charging the Battery Pack. FAZUA will not
be liable for damage caused by the use of unapproved chargers.
Keep the Battery Pack away from heat, re and water. Risk of explosion.
Protect the Battery Pack from mechanical impacts or stress. Risk of damage
and emission of fumes, which can irritate the respiratory system. Provide fresh
air and seek medical assistance in case of discomfort.
Watch out for metal objects such as coins, paper clips, screws, etc etc. in the
vicinity of the Battery Pack. They can produce a connection between the
terminals of the Battery Pack. Danger of re. Damage caused this way will not
be covered by the warranty.
Keep the Battery Pack away from ammable materials. Make sure the Battery
Pack is dry and placed in a reproof area when charging. Heat produced
while charging may cause re.
Do not leave the Battery Pack unattended when charging.
Never use or charge a damaged Battery Pack.
Avoid contact with any liquid that may be discharged by the Battery Pack.
Flush with abundant water in case of contact with such liquid. Any contact
with such liquid may produce irritations and burns. If liquid contacts eyes, look
for medical assistance.
Important! Please read carefully the safety warnings and
instructions for all components of the drive system as well as your
eBike.
Important! Read the safety instructions carefully. Negligence in
following these safety instructions could cause electric shocks, re or
severe injuries.
Keep the Battery Pack and Charger away from pacemakers. Magnetic
connectors can affect their functionality.
Keep the Battery Pack out of reach of children.
Cleaning, Maintenance and
Service
Keep all components of your eBike and the drive system clean. Pay special
attention to pins and interfaces between Battery Pack and Drivepack as well
as Drivepack and Bottom Bracket. Make sure they are completely dry before
each use.
Keeping the Drivepack radiator clean will improve its cooling performance.
Grease up your lock every few months or when its operation becomes
rougher over time. Do not submerge or clean with high-pressure cleaner any
drive system component. Clean all drive system components carefully with a
cloth or a soft brush.
For information about servicing your drive system, contact your FAZUA Service
Partner or visit the FAZUA Service Platform (www.fazua.com/service).
Transportation
Batteries are subject to regulation for dangerous goods. Undamaged
batteries can be transported by road by private persons. For commercial
transportation, observe the regulation for packaging, identication and
transportation of dangerous goods. Cover open pins and pack the battery
tight. Make your parcel service aware of transporting a dangerous goods.
For any further questions contact a FAZUA Service Partner or visit the ofcial
FAZUA Service Platform (www.fazua.com/service).
Disposal
Bottom Bracket, Drivepack, Remote, Battery, Charger,
accessories and packaging should be disposed of in
an environmentally appropriate manner. Don’t throw
e-Bikes and its components into domestic waste.
EU countries only: According to EU directive 2012/19/EU
broken electric devices and according to EU directive
2006/66/EG used batteries must be stored separately and
disposed of in an environmentally appropriate manner.
30 31
EN
EN

Battery Pack 1 Action A
Action B
6
6
5
23
4
1
8
7
6
7
1
6
6
Step 1
Step 2
Do not crush, heat or incinerate. Do not short circuit. Do
not dismantle. Do not immerse in any liquid, it may vent
or rupture. Respect Charging Instructions. Charge: 0°C
to 45°C. Discharge -20°C to 60°C
32 33
EN
EN

Description and
Specications
Features
The numbering refers to the illustrations shown at the beginning of the manual.
The illustrations show the different components belonging to the Battery Pack.
Individual illustrations in the manual might differ slightly from the real parts
depending on the equipment of your eBike.
1. Battery Pack
2. On/Off Button
3. Operation and charge-control indicator
4. Socket for charge connector
5. Connector to Drivepack
6. Fastening lid
7. Drivepack
8. Battery slot
Specications
Lithium-ion Battery Pack 7000
Article number 01-2018-004
Rated voltage V 36
Rated capacity Ah 7
Energy Wh 252
Operating temperature °C -20 ... +60
Storage temperature °C -20 ... +60
Discharge temperature °C -20… +60
Charging temperature °C 0 ... +45
Degree of protection IP 54
Weight , approx. kg 1.4
* Exceeding these limits might lead to power derating.
Assembly
First check of the Battery Pack
Check your Battery Pack (1) before charging it or using it for the rst time.
Press the on/off button (2) on your Battery Pack (1). If all LEDs of the charge-
control indicator (3) are not lit, then fully charge the Battery Pack before rst
use. If no LED of the charge-control indicator (3) lights up, your Battery Pack
(1) is possibly damaged.
After the rst use, and before each use, always switch on your Battery Pack (1)
by pushing the on/off button (2).
Charging the Battery Pack
The Battery Pack (1) can be recharged at any time on its own, within a
Drivepack, or within your eBike(see Drivepack Assembly Instructions).
The charging process can be interrupted at at any moment.
To ensure the full Battery Pack (1) capacity, charge your Battery Pack (1)
before the rst use until full charge.
Warning! Pay attention to your Battery Pack (1) before each use
and before charging. Make sure terminals and surfaces are clean.
Important! Read carefully the instructions of the Charger before
proceeding with the rst charge.
Warning! Read carefully and observe the Battery Pack (1)
Instructions.
Warning! Before using or charging your Battery Pack (1),
always look for signs of damage like cracks or burns. Never
use or charge a damaged Battery Pack (1). Please contact
your FAZUA Service Partner or visit the FAZUA Service Platform
(www.fazua.com/service).
34 35
EN
EN

When the Battery Pack (1) is not within the charging temperature range, it will
not charge even when the Charger is connected. It will wait until the charging
temperature is reached before starting.
Charge-control indicator
When the Battery Pack (1) gets switched on, the start-up animation will be
shown on the charge-control indicator (3). After that, the LEDs will shortly show
the state-of-charge (3) of the Battery Pack (1).
Once the Battery Pack (1) is on, the state-of-charge can be checked by
briey pressing the on/off button (2).
Each LED corresponds to 20% of the capacity. When charge is full, all ve LEDs
light up. However, when the charge is empty, only the last LED will light up
intermittently. The state-of-charge of the Battery Pack (1) is also shown on the
Remote (see Remote Instructions).
Inserting/Removing the Battery Pack
To insert the Battery Pack (1) into the Drivepack (7), hold the Drivepack
(7) in one hand and Battery Pack (1) in the other hand. Make sure the
connector to the Drivepack (5) is facing the battery slot (8). Bring the
two together and gently let the Battery Pack (1) slip into the battery
slot (8) of the Drivepack (7) (Action A). Once the Battery Pack (1) is completely
inserted, the fastening lid (6) will automatically lock the Battery Pack (1).
To remove the Battery Pack (1) from the Drivepack (7), press down the
fastening lid (6) and, at the same time, pull the Battery Pack (1) out of the
battery slot (8) (Action B).
Warning! Make sure both Battery Pack (1) and Drivepack (7) are
clean, otherwise, the friction created by the dirt may complicate
this operation.
Operation
Switching Battery Pack On/Off
The Battery Pack (1) can equally be switched on/off when inserted/non-
inserted in the Drivepack (7).
To switch on the Battery Pack (1), press the on/off button (2). The LEDs at the
charge-control indicator (3) will show a start-up animation and then shortly
the state-of-charge.
To switch off the Battery Pack (1), press and hold the on/off button (2) for 2 s.
The LEDs at the charge-control indicator (3) will show a shutdown animation
and Battery Pack (1) will switch off.
If your eBike reaches inactivity, your Battery Pack (1) will switch off to save
the remaining energy (see Drivepack Inactivity Instructions). Equally, if
a standalone Battery Pack (1) spends 12 h without being inserted in a
Drivepack (7), connected to a Charger or having its button pushed, it will
switch off to save the remaining energy
Note! The Battery Pack (1) is protected against short-circuit,
overheating, overcharge and deep discharging. This
protection may automatically shut down the the Battery
Pack (1) if there is a risk.
36 37
EN
EN
Other manuals for Evation 1.0
1
Table of contents
Languages:
Other FAZUA Bicycle Accessories manuals

FAZUA
FAZUA RIDE 5 0 TRAIL/STREET User manual

FAZUA
FAZUA Evation User manual

FAZUA
FAZUA RIDE 50 TRAIL User manual

FAZUA
FAZUA RIDE 60 User manual

FAZUA
FAZUA RIDE 50 TRAIL/STREET User manual

FAZUA
FAZUA RIDE 60 User manual

FAZUA
FAZUA Evation User manual

FAZUA
FAZUA RIDE 60 User manual

FAZUA
FAZUA RIDE 50 TRAIL/STREET User manual

FAZUA
FAZUA Evation User manual


