FAZUA Evation User manual
EN Quickguide
DE Kurzanleitung
ES Guía rápida
FR Guide de démarrage rapide
IT Guida veloce


EN
pedelec drive system
English
Quickguide

4
EN
Contents
Fundamentals.......................................................................................5
Storage and transport ..........................................................................5
Overview: Components and part designations ..................................6
Handling steps before or during the trip .............................................9
Operating drive system ......................................................................11
Displays on the remote.......................................................................14
Bluetooth®function ............................................................................15
Notes ...................................................................................................16
5
EN
Fundamentals
This quickstart guide is part of the Fazua evation drive system.
evation is an electrical drive system designed for eBikes, and consists of
the following different components:
A→the Drivepack (incl. locker for locking to the frame)
B→the Bottom Bracket (incl. speed sensor + spoke magnet)
C→the Remote
D→the Battery
E→the charger
Depending on the model, different variants of the individual components
are installed in your eBike. Note, therefore, that for certain operating steps,
different instructions are described for the different model variants.
Detailed information on the drive system and the individual components,
as well as their model variants, can be found in the enclosed original
instructions.
WARNING
Serious hazards due to improper use!
If you do not completely read and observe the original
instructions, hazards can arise which can sometimes result in
serious injuries or even death for you or others.
►Read and observe the enclosed original instructions for the
evation drive system - especially before using your eBike
equipped with the drive system for the first time.
►Read and follow the manufacturer's instructions for your
eBike.
Storage and transport
►Always transport and store the battery separately from the eBike.
►Observe the detailed information on storage and transport in the
original instructions.

6
EN
Overview: Components and part designations
→The numbering of the individual parts within this quickstart guide may differ
in places from the numbering in the original instructions.
A1
A2
A3.1A3.2
A
B1
B
Model "fX"
C5
C4
C1
C2
C3
Model "b"
C4
C
4
C5
C1
C2
C3
Model "fX"
Model "b"
C
Model "250"
D3D4
D1D4
D3
D2
Model
"250"
D
7
EN
E2E3
E1
E
ADrivepack
A1→Interface (bottom bracket)
A2→Battery holder
A3→Push button (3.1)/locking lever (3.2)
BBottom bracket
B1→Interface (drivepack)
CRemote
C1→Button/touch sensor (top)
C2→Center button
C3→Button/touch sensor (bottom)
C4→Status display
C5→Display of charging level/support level
DBattery
D1→Interface (drivepack)
D2→Push button (battery lock)
D3→Charging socket
D4→On/off button
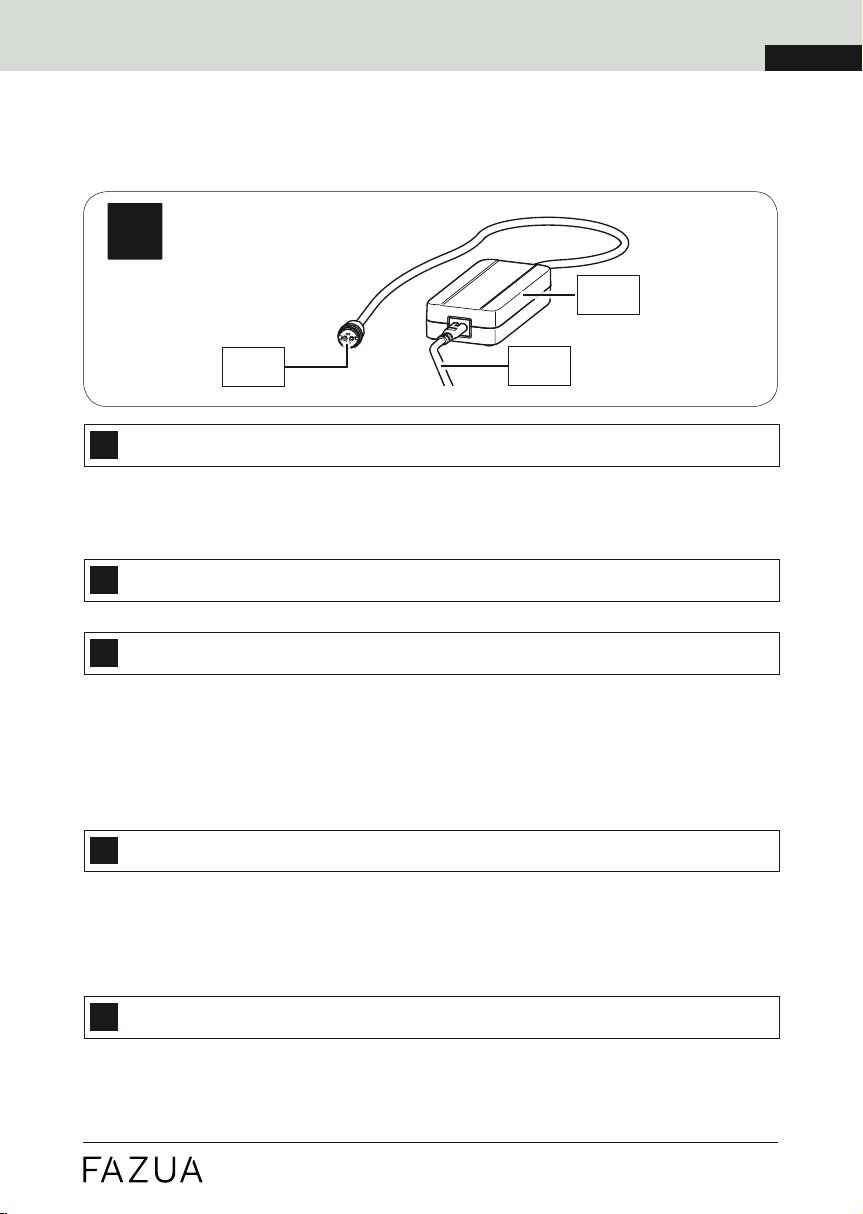
ECharger
E1→Mains adapter
E2→Charging plug
E3→Mains cable with mains plug

8
EN
Figure 1
D
A
A2
D1
D2
D2
Figure 2
B
A
B
A
B1
A1
D4
Figure 3
B
A
B
A
B1
A1
D4
A3.2
A3.1
Figure 4
E2D3
D
E
A

9
EN
Handling steps before or during the trip
→see figures page 8.
Insert battery Din drivepack A(→ Figure 1)
1. Make sure that the battery is undamaged (visual check).
2. Press the on/off button D41×, to turn on the battery.
3. Carefully insert the battery as far as possible into the battery
holder A2.
The battery is automatically locked when you have inserted it correctly.
IMPORTANT: Do not use the drive system if the battery cannot be
locked.
Remove battery Dfrom drivepack A(→ Figure 1)
1. Secure the battery with one hand and press the push button D2,
with the other hand to release the battery from the lock.
2. Hold down the push button D2, grasp the battery on the two side
handles and gently pull the battery out of the battery holder A2.
Insert drivepack A(inc. battery) in eBike (→ Figure 2)
1. Place the drivepack on the interface B1of the bottom bracket.
2. Swing the upper end of the drivepack into the down tube.
The drivepack is automatically locked in the locker when you have
correctly placed the drivepack and completely swiveled it into the
intended position in the down tube.
The push button A3.1or the locking lever A3.2automatically moves
into the closed position.
3. Check the drivepack makes a tight fit.
IMPORTANT: Do not use the drive system if the drivepack cannot be
locked to the eBike.

10
EN
Remove the drivepack Afrom the eBike (→ Figure 3)
→If you press the drivepack firmly against the frame before pressing the push
button or releasing the locking lever, it will be easier to release the drivepack
from the locking device on the frame when removing it.
1. Secure the drivepack with one hand and press the push button A3.1or
move the locking lever A3.2upwards as far as possible to release the
drivepack from the lock.
2. Hold down the push button A3.1and carefully lower the drivepack.
The locking lever A3.2automatically remains in the open position.
3. Remove the drivepack from the interface B1of the bottom bracket.
Charge battery Dwith charger E(→ Figure 4)
→The battery can remain in the drivepack during charging, or you can remove
the battery from the drivepack and charge it separately.
1. Before charging the battery, prepare the charger by connecting the
power cord E3to the power supply E1.
IMPORTANT: Only use the corresponding Fazua charger to charge the
battery.
2. Remove the drivepack from the eBike.
3. Insert the charging plug E2into the charging socket D3on the battery.
4. Plug the power plug into a suitable socket.The charging process starts
automatically after connection to the mains.
IMPORTANT: The charger may only be used in dry indoor areas!
5. Disconnect the charger from the mains by unplugging the mains plug
from the socket when charging is complete or to interrupt charging.
6. Disconnect the charger from the battery by pulling the charger plug E2
out of the charging socket D3on the battery.
11
EN
Operating drive system
Switch on drive system
►On the "b" model remote press one of the three buttons C1,
C2or C3.
or
►On the "fX" model remote press the center button C2.
Set support level
→The support level set is indicated by the color of the corresponding LEDs on
the remote (see overview table "Support levels" on Page 15).
►Press the upper button/upper touch sensor C1, to switch to the next
higher support level.
►Press the lower button/lower touch sensor C3, to switch to the next
lower support level.
Switch off drive system
►Hold down the center button C2for 2seconds (model "b") or 1second
(model "fX").
or
►Remove the drivepack from your eBike.
or
►Turn off the battery by holding down the on/off button D4for about
2seconds.
The successively extinguishing LEDs next to the on/off button D4
signal that the battery is switching off ("Off animation").
12
EN
Switching rain mode on/off
→Rain mode is available for equipment with the "fX" model remote.
The rain mode prevents rain drops from unintentionally adjusting the
support level of your eBike. If you have activated the rain mode, use the
center button to set the desired support level C2:
1. Activate the rain mode by holding down the center button C2for
2seconds. A short blue LED animation appears.
2. In rain mode, press the center button C21x briefly to switch to the next
higher support level.
By briefly pressing the center button C2again, you can switch to the
next higher support level in the following order:
no support →"Breeze" →"River" →"Rocket" →no support etc.
3. To return from the rain mode to the regular operating mode, hold down
the center button C2again for 2seconds.
Switching bicycle lighting on and off
→Depending on the model, your eBike has a bicycle light that you can switch on
and off using the remote.
IMPORTANT: The bicycle lighting can only be switched on and off in regular
operating mode using the remote, not in rain mode!
1. If necessary, deactivate the rain mode by holding down the center
button C2for about 2seconds.
2. Press the center button C2once briefly to turn on the bicycle lights.
3. Pressthecenterbutton C2againoncebrieflytoturnoffthebicycle lights.

13
EN
Turning drive system back on after a standstill
→Your eBike will come to a standstill as soon as it is switched off.
The drive system (not the battery!) automatically switches off:
• after being stationary for 15 minutes.
►Press the center button C2, to turn the drive system back on.
The battery automatically switches off:
• after 8hours of standstill (provided no button/touch sensor is
pressed during this time).
or
• after 3hours of standstill (provided that the charge level of the
battery falls below 30 % and no button/touch sensor is pressed
during this time).
►On the "250" model press the on/off button D4, to turn the battery back
on.
Switching the "Pushing support" mode on and off
→The "Pushing support" mode is available for model-dependent equipment
with remote "b".
1. Change to the support level "none".
2. Hold down the lower button C3. After 2seconds the pushing support
is activated and sets the eBike in motion as long as you keep the button
pressed (max. 6km/h).
3. Ride the eBike with both hands. Slow down the eBike to your walking
speed by holding or restraining the eBike.
4. Release the bottom button C3, to turn pushing support back off.

14
EN
Displays on the remote
→The display on the remote consists of 11 LEDs (for "b" model) or 5LED
(for "fX" model).
Remote Cmodel "b"
On the "b" remote you will find 11 LEDs:
• The bottom 10 LEDs C5serve as an indicator for the charge level
and the pedal support level set.
• The upper LED serves as a status indicator C4, informing you of
the status of your eBike.
Remote Cmodel "fX"
On the "fX" remote you will find 5LEDs:
• All five LEDs together C5serve as a display for the charge level and
the pedal support level set.
• The upper of the five LEDs C4also serves as a status indicator,
informing you about the status of your eBike.
Status display C4
The status display C4indicates a status change or an existing fault.
If no fault is detected:
• the LED of the status display C4does not light up (model "b").
or
• the LED of the status display C4functions as one of the five LEDs
to display the charge level or the support level set C5(model "fX").
OVERVIEW TABLE "STATUS DISPLAY"
C4lights up/flashing: Meaning
white* Battery flat
green Drive system ready for operation
yellow "Soft Fault"; possible to carry on riding, but not
advisable
red "Hard Fault"; not possible to carry on riding/
maintenance required
* Only applies for model "fX".

15
EN
Display of charging level/support level C5
►Read the charge status of the battery from the illuminated LEDs.
"b" model remote: Each of the 10 LEDs represents 10 % of the total
charging capacity. When the battery is fully charged, all 10 LEDs light up.
If the battery is flat, no LEDs light up.
Model "fX" remote: Each of the 5LEDs represents 20 % of the total
charging capacity. When the battery is fully charged, all 5LEDs light up.
If the battery is flat, the upper LED of the status indicator lights up white or
no LED lights up.
►Read off the support level set by the color in which the LEDs light up
(see overview table "Support levels").
OVERVIEW TABLE "SUPPORT LEVELS"
Support level: C5lights up: max. motor power:
none white 0W
Breeze green 400 W*
River blue 400 W*
Rocket pink 400 W
* The values given here are the "theoretical" maximum motor power. The "actual" maximum
motor power is configured by the manufacturer of your eBike, depending on the model.
Bluetooth®function
→Depending on the model, your remote is equipped with a Bluetooth®function.
All remotes with the serial number 1805113000 or higher are Bluetooth®
compatible ex works.
You can connect your cell phone with the remote via the Fazua app by
CoModule. If the connection has been established successfully, the LEDs
on the remote flash 3× blue.
►If you have any questions about the Fazua app, please contact a
Fazua Servicepartner or visit the official Fazua service platform
(www.fazua.com/service).
►Contact a Fazua Servicepartner if the remote you have installed is not
Bluetooth®-enabled.
16
EN
Notes

DE
pedelec drive system
Deutsch
Kurzanleitung
18
DE
Inhalt
Grundlegendes ...................................................................................19
Aufbewahrung und Transport............................................................19
Übersicht: Komponenten und Teilebezeichnungen.........................20
Handlungsschritte vor bzw. nach der Fahrt......................................23
Antriebssystem bedienen..................................................................25
Anzeigen am Remote.........................................................................28
Bluetooth®-Funktion...........................................................................29
Notizen ................................................................................................30
19
DE
Grundlegendes
Die vorliegende Kurzanleitung gehört zum Fazua Antriebssystem evation.
evation ist als elektrisches Antriebssystem für Pedelecs konzipiert und
setzt sich aus verschiedenen Komponenten zusammen:
A
→Drivepack (Motoreinheit)
[inkl. Locker (Verschluss) für die Arretierung am Rahmen],
B→Bottom Bracket (Tretlagergetriebe) [inkl. Speedsensor + Speichenmagnet],
C→Remote (Bedienelement),
D→Battery (Akku),
E→Ladegerät.
Modellabhängig sind bei Ihrem Pedelec unterschiedliche Varianten der
einzelnen Komponenten verbaut. Beachten Sie daher, dass bei bestimmten
Bedienschritten unterschiedliche Handlungsanweisungen für die verschie-
denen Modellvarianten beschrieben werden.
Detaillierte Informationen zum Antriebssystem und den einzelnen Kompo-
nentensowiederenModellvarianten findenSie inder beiliegendenOriginal-
betriebsanleitung.
WARNUNG
Erhebliche Gefährdungen bei unsachgemäßer Verwendung!
Wenn Sie die Originalbetriebsanleitung nicht vollständig lesen und
beachten, können Gefährdungen entstehen, die teilweise schwere
Verletzungen bis hin zum Tode für Sie oder andere Personen zur
Folge haben können.
►Lesen und beachten Sie die beiligende Orginalbetriebsanleitung
zum Antriebssystem evation - insbesondere bevor Sie Ihr mit dem
Antriebssystem ausgestattetes Pedelec erstmalig verwenden.
►Lesen und beachten Sie zusätzlich die Herstelleranleitung zu
Ihrem Pedelec.
Aufbewahrung und Transport
►Transportieren und lagern Sie die Battery immer separat vom Pedelec.
►Beachten Sie die ausführlichen Angaben zu Aufbewahrung und Trans-
port in der Originalbetriebsanleitung.

20
DE
Übersicht: Komponenten und Teilebezeichnungen
→Die Nummerierung der Einzelteile innerhalb dieser Kurzanleitung weicht teil-
weise von der Nummierung in der Originalbetriebsanleitung ab.
A1
A2
A3.1A3.2
A
B1
B
Modell "fX"
C5
C4
C1
C2
C3
Modell "b"
C4
C
4
C5
C1
C2
C3
Modell "fX"
Modell "b"
C
Modell "250"
D3D4
D1D4
D3
D2
Modell
"250"
D
Other manuals for Evation
4
Table of contents
Languages:
Other FAZUA Bicycle Accessories manuals

FAZUA
FAZUA RIDE 50 TRAIL/STREET User manual

FAZUA
FAZUA Evation User manual

FAZUA
FAZUA RIDE 50 TRAIL User manual

FAZUA
FAZUA Evation User manual

FAZUA
FAZUA RIDE 60 User manual

FAZUA
FAZUA RIDE 50 TRAIL/STREET User manual

FAZUA
FAZUA RIDE 60 User manual

FAZUA
FAZUA Evation User manual

FAZUA
FAZUA Evation 1.0 User manual

FAZUA
FAZUA RIDE 5 0 TRAIL/STREET User manual


Popular Bicycle Accessories manuals by other brands


Specialized
Specialized Elite CylcoComputer user manual

Sigma
Sigma BC 16.16 manual

Playcore
Playcore Dero Setbacks installation instructions

VDO Cyclecomputing
VDO Cyclecomputing x3dw instruction manual

Cateye
Cateye RAPID X2 manual

buratti meccanica
buratti meccanica Clorofilla Trail Use and maintenance manual


