manuals.online logo
Brands
  1. Home
  2. •
  3. Brands
  4. •
  5. Fermax
  6. •
  7. Intercom System
  8. •
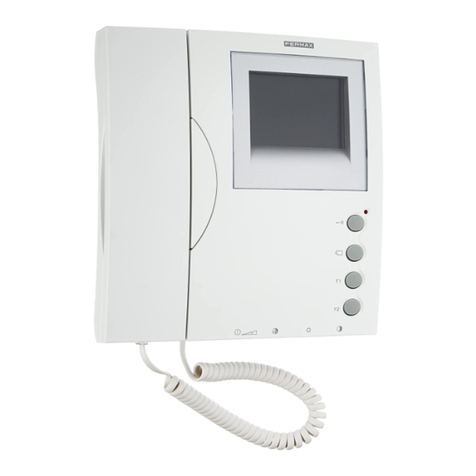
  9. Fermax LOFT Extra DUOX User manual

Fermax LOFT Extra DUOX User manual

5
A
5
A
COD.: 97718 V11_13
E
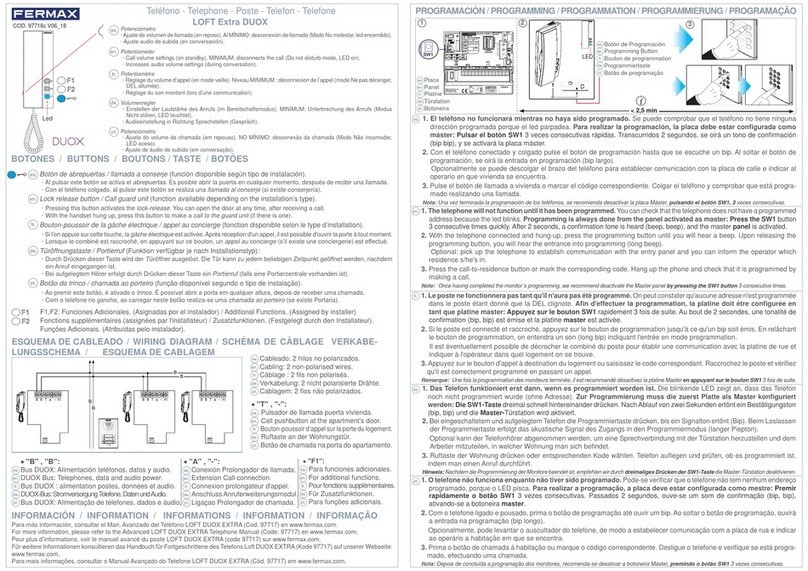
Botón de abrepuertas / llamada a conserje (función disponible según tipo de instalación).
· Estando en conversación con la Placa de Calle, al pulsar este botón se activa el abrepuertas.
· Con el teléfono colgado, al pulsar este botón se realiza una llamada al conserje (si existe conserjería).
EN
Lock release button / Call guard unit (function available depending on the installation’s type).
· When talking to the Outdoor Panel, press this button to activate the electric lock.
· With the handset hung up, press this button to make a call to the guard unit (if there is one).
F
Bouton-poussoir de la gâche électrique / appel au concierge (fonction disponible selon le type d’installation).
· Lors d’une communication avec la platine de rue, la gâche électrique est activée en appuyant sur ce bouton.
· Lorsque le combiné est raccroché, en appuyant sur ce bouton, un appel au concierge (s’il existe une conciergerie)
est effectué.
D
Türöffnungstaste / Portierruf (Funktion verfügbar jenach Installationstyp):
· Bei hergestellter Sprechverbindung mit der Türstation wird durch Drücken dieser Taste die Türöffnung ausgelöst.
· Bei aufgelegtem Hörer erfolgt durch Drücken dieser Taste ein Portierruf (falls eine Portierzentrale vorhanden ist).
P
Botãodo trinco / chamada aoporteiro(funçãodisponível segundo o tipo de instalação).
· Estando em conversação com a Placa da Rua, ao carregar neste botão activa-se o trinco.
· Com o telefone no gancho, ao carregar neste botão realiza-se uma chamada ao porteiro (se existe Portaria).
E
F1,F2:FuncionesAdicionales.(Asignadas por el instalador).
EN
F1,F2:Additional Functions. (Assigned by installer).
F
F1,F2: fonctions supplémentaires (assignées par l'installateur)
D
F1,F2: Zusatzfunktionen. (FestgelegtdurchdenInstallateur).
P
F1,F2: FunçõesAdicionais. (Atribuídas peloinstalador).
Teléfono - Telephone - Poste - Telefon - Telefone
E
BOTONES
EN
BUTTONS
F
BOUTONS
D
TASTE
P
BOTÕES
LL
LL
LOFT DUOOFT DUO
OFT DUOOFT DUO
OFT DUOX ExtrX Extr
X ExtrX Extr
X Extraa
aa
a
E
Potenciómetro
·Ajuste de volumen de llamada (en reposo).Al MÍNIMO: desconexión de llamada (Modo No molestar, led encendido).
· Ajuste audio de subida (en conversación).
EN
Potentiometer
· Call volume settings (on standby). MINIMUM: disconnects the call (Do not disturb mode, LED on).
· Increases audio volume settings (during conversation).
F
Potentiomètre
· Réglage du volume d’appel (en mode veille). Niveau MINIMUM : déconnexion de l’appel (mode Ne pas déranger, DEL
allumée).
· Réglage du son montant (lors d’une communication).
D
Volumenregler
· Einstellen der Lautstärke desAnrufs (im Bereitschaftsmodus). MINIMUM: Unterbrechung desAnrufs (Modus Nicht stören,
LEDleuchtet).
· Audioeinstellung in Richtung Sprechstellen (Gespräch).
P
Potenciómetro
·Ajuste do volumeda chamada (emrepouso). NOMÍNIMO:desconexão dachamada (Modo Nãoincomodar,LED aceso).
· Ajuste de áudio de subida (em conversação).
B
B
B
B
SW5
A
B B T F1/P
SW5
A
B B T F1/P
SW5
A
B B T F1/P
E
ESQUEMA DE CABLEADO
EN
WIRING DIAGRAM
F
SCHÉMA DE CÂBLAGE
D
VERKABELUNGSSCHEMA
P
ESQUEMA DE CABLAGEM
••
••
•
"B" , "B" :
E
Bus DUOX: Alimentación teléfonos, datos y audio.
EN
DUOX Bus: Telephones, data and audio power.
F
Bus DUOX : alimentation postes, données et audio.
D
DUOX-Bus: Stromversorgung Telefone, Daten undAudio.
P
Bus DUOX:Alimentação de telefones, dados e áudio.
••
••
• "T" , "-":
E
Pulsador de llamada puerta vivienda.
EN
Call pushbutton at the apartment’s door.
F
Bouton-poussoird’appelsurlaportedulogement.
D
Ruftaste an der Wohnungstür.
P
Botão de chamada na porta do apartamento.
••
••
• "A" , "-":
E
Conexión Prolongador de llamada.
EN
Extension Call connection.
F
Connexion prolongateur d'appel.
D
Anschluss Anruferweiterungsmodul.
P
Ligaçao Prolongador de chamada.
••
••
•"F1/P" :
E
Para funciones adicionales.
EN
For additional functions.
F
Pour fonctions supplémentaires.
D
Für Zusatzfunktionen.
P
Para funções adicionais.
E
Cableado: 2 hilos no polarizados.
EN
Cabling: 2 non-polarised wires.
F
Câblage : 2 fils non polarisés.
D
Verkabelung: 2 nicht polarisierte Drähte.
P
Cablagem: 2 fios não polarizados.
E
PROGRAMACIÓN
EN
PROGRAMMING
F
PROGRAMMATION
D
PROGRAMMIERUNG
P
PROGRAMAÇÃO
E
Botón de Programación
EN
Programming Button
F
Bouton de programmation
D
Programmiertaste
P
Botão de programação
< 2,5 min

12
1. Conelteléfono conectadoycolgado pulse el botón de programación hasta que se escuche un bip. Al soltar el botón de
programación,seoirá la entrada en programación (bip largo).
Opcionalmente se puede descolgar el brazo del teléfono para establecer comunicación con la placa de calle e indicar
aloperarioenqueviviendaseencuentra.
2. Pulse el botón de llamada a vivienda o marcar el código correspondiente. Colgar el teléfono y comprobar que está
programadorealizandounallamada.
* El teléfono no funcionará mientras no haya sido programado. Se puede comprobar que el teléfono no tiene
ninguna dirección programada porque el ledparpadea. Para realizar la programación, la placa debe estar configu-
rada como máster (ver instrucciones placa, según modelo). También se puede realizar la programación del
teléfono mediante el Programador DUOX, ver instrucciones cod. 97731 disponibles en www.fermax.es.
E
F
D
P
LED
E
Para más información, consultar el Man. Avanzado del Teléfono LOFT DUOX EXTRA (Cod. 97717) en www.fermax.com.
EN
For more information, please refer to theAdvanced LOFT DUOX EXTRATelephone Manual (Code. 97717) en www.fermax.com.
F
Pour plus d’informations, voir le manuel avancé du poste LOFT DUOX EXTRA (code 97717) sur www.fermax.com.
D
Für weitere Informationen konsultieren das Handbuch für Fortgeschrittene des Telefons Loft DUOX EXTRA (Kode 97717) auf
unserer Webseite: www.fermax.com.
P
Para mais informações, consultar o Manual Avançado do Telefone LOFT DUOX EXTRA (Cód. 97717) em www.fermax.com.
E
Información
EN
Information
F
Informations
D
Information
P
Informação
LED
EN
1. With the telephone connected and hung-up, press the programming button until you will hear a beep. Upon releasing the
programming button,you will hearthe entranceinto programming (longbeep).
Optional:pickupthe telephone to establish communication withthe entry panel and you caninform the operator which
residence s/he's in.
2.Pressthecall-to-residence button or mark the corresponding code. Hang up the phone and check that it isprogrammed
by making a call.
* The telephone will not function until it has been programmed. You can check that the telephone does not have a
programmed address because the led blinks. Programming is always done from the panel activated as master
(see panel instructions, depending on model). You can also program the telephone via the DUOX Programmer,
seeinstructions cod. 97731 available at www.fermax.es.
1. Si le poste est connecté et raccroché, appuyez sur le bouton de programmation jusqu'à ce qu'un bip soit émis. En
relâchantlebouton de programmation, on entendra un son (longbip)indiquant l'entrée en mode programmation.
Ilestéventuellementpossiblede décrocher le combiné du poste pourétablir une communication avec la platine de rue
etindiquer à l'opérateur dans quel logement on se trouve.
2.Appuyez sur le bouton d'appel à destination du logement ou saisissez le code correspondant. Raccrochez le poste et
vérifiezqu'il est correctement programmé en passant unappel.
* Le poste ne fonctionnera pas tant qu'il n'aura pas été programmé. On peut constater qu'aucune adresse n'est
programméedans le poste étant donnéque la DEL clignote. Afin d'effectuer la programmation, la platine doit être
configurée en tant que platine master (voir les instructions de la platine, en fonction du modèle). Il est également
possible d'effectuer la programmation du poste à l'aide du programmateur DUOX. Voir les instructions code
97731,disponibles sur www.fermax.es.
1. Bei eingeschaltetem Telefon die Programmiertaste drücken, bis ein Signalton zu hören ist (Bip). Beim Loslassen der
Programmiertaste erfolgtdas akustische Signaldes Zugangsin den Programmiermodus(langer Piepton).
Optional kann der Telefonhörer abgenommen werden, um eine Sprechverbindung mit der Türstation herzustellen und
demArbeiter mitzuteilen, in welcher Wohnung man sich befindet.
2.Ruftaste derWohnungdrückenoderentsprechendenKodewählen.Telefon auflegen und prüfen, obesprogrammiertist,
indemmaneinenAnrufdurchführt.
* Das Telefon funktioniert erst dann, wenn es programmiert worden ist. Die blinkende LED zeigt an, dass das
Telefon noch nicht programmiert wurde (ohne Adresse). Zur Programmierung muss die zuerst Platte als Master
konfiguriert werden (siehe Anleitungen der Türstation, nach Modell). Die Telefonprogrammierung kann auch
mithilfe der DUOX-Programmiervorrichtung durchgeführt werden, siehe Anleitung, Kode 97731, verfügbar auf
www.fermax.es.
1. Comotelefoneligadoepousado,primaobotãodeprogramaçãoaté ouvirumbip.Aosoltarobotãode programação,ouvirá
aentradanaprogramação(biplongo).
Opcionalmente, pode levantar o auscultador do telefone, de modo a estabelecer comunicação com a placa de rua e
indicarao operário a habitação emque se encontra.
2. Prima o botão de chamada à habitação ou marque o código correspondente. Desligue o telefone e verifique se está
programado,efectuandoumachamada.
* O telefone não funciona enquanto não tiver sido programado. Pode-se verificar que o telefone não tem nenhum
endereço programado, porque o LED pisca. Para realizar a programação, a placa deve estar configurada como
mestre (consulte as instruções da placa, conforme o modelo). Também é possível efectuar a programação do
telefone por meio do Programador DUOX, consulte as instruções cód. 97731 disponíveis em www.fermax.es.
¸
max. 30
Seg./Sec./Sek.
E
SELECCIÓN TONO DE LLAMADA
EN
CALL TONE SELECTION
F
SÉLECTION TONALITÉ D'APPEL
D
AUSWAHL RUFTON
P
SELECÇÃO DO SOM DE CHAMADA
E
CARACTERÍSTICAS TÉCNICAS
EN
TECHNICAL FEATURES
F
CARACTÉRISTIQUES TECHNIQUES
D
TECHNISCHE EIGENSCHAFTEN
P
CARACTERÍST. TÉCNICAS
Resist. dinámica 50 Ω - Dynamic Resist. 50
Ω
- Résist. dynamique 50 Ω - Dynamischer Widerstand 50
Ω
Resisência Dinâmica 50 Ω.
MelodíasdeLlamadaseleccionables- Call Ring tone Selection - Mélodies d'appel pouvant être sélectionnées
AuswählbareMelodien-Melodiasdechamadaseleccionáveis
Micrófono-Microphone-Microphone-Mikrofon-Microfone: Electret
Temperatura de funcionamiento - Working Temperature - Température de fonctionnement
Betriebstemperatur-Temperaturadefuncionamento
Alimentación -Power Supply - Alimentation - Stromversorgung -Alimentação
Consumo-Consumption -Consommation-Stromverbrauch-Consumo(±5%)
en reposo + led - in standby + led - en veille + led - Im Bereitschaftsmodus + LED - em repouso + led
máximo - maximum - maximal - maximum - máximo
Altavoz-Speaker-Haut-parleur - Lautsprecher-Altifalante
< 20 mA
320 mA
Númeromáximodeterminalesporvivienda-Maximumnumberofterminalsperresidence
Nombremaximaldeterminauxparlogement-MaximaleAnzahl Endgeräte pro Wohnung
Númeromáximodeterminaispor vivenda
Direcciónteléfono:6 dígitos decimales -Telephoneaddress: 6 decimal digits
Adresseposte: 6 chiffres-Telefonadresse: 6-stellige Zahl
Endereçodotelefone:6dígitos decimais
Númerodecanales de conversación: 2 por BUS - Number of communicationchannels: 2 per BUS
Nombre de canaux de communication : 2 par BUS -Anzahl Sprechkanäle: 2 pro BUS
Númerodecanaisdeconversação:2 por BUS
- 5 ºC, + 40 ºC
18 Vdc
1.75" 16 Ω
3
000001...999999
E
E
INSTALACIÓN
EN
INSTALLATION
F
INSTALLATION
D
INSTALLATION
P
INSTALAÇÃO
153 42
EN
F
D
P
E
FUNCIONAMIENTO
EN
OPERATION
F
FONCTIONNEMENT
D
FUNKTIONSELEMENTE
P
FUNCIONAMENTO
Llamada
Call
Appel
Anruf
Chamada
E
EN
F
D
P
Abrirla puerta al visitante
Open the door to the visitor
Ouverturedelaporteauvisiteur
TüröffnungfürBesucher
Abrira porta ao visitante
E
EN
F
D
P
Atenderlallamada
Answer the call
Réceptiondel’appel
Anrufbeantwortung
Atenderachamada
E
EN
F
D
P
Autoencendido(teléfonoyaprogramado)
Auto-start(thetelephone is already programmed)
Insertionautomatique(postedéjàprogrammé)
Eigenstart(programmiertesTelefon)
Ligaçãoautomática(telefonejáprogramado)
E
EN
F
D
P
¸
bla bla
bla ...
bla bla
bla ...
max. 90 Seg./Sec./Sek.
¸
max. 90
Seg./Sec./Sek.
E
Si no está programado el teléfono, éste no realizará la función de autoencendido.
· Esta funcionalidad es posible con la placa de su mismo bloque, si la placa está en reposo y programada como "0" y existe
algún canal de conversación disponible.
EN
If the phone is not programmed, the auto-start will not function.
· This function is possible with the panel in the same block; if the panel is in standby and programmed as "0"; and if there is a
conversation channel available.
F
Si le poste n'est pas programmé, la fonction d'insertion automatique ne pourra pas être activée.
· Cette fonction peut avoir lieu avec la platine d'un même immeuble, si cette dernière est en veille et est programmée en tant
que « 0 ». Un canal de communication doit également être disponible.
D
Falls das Telefon nicht programmiert ist, kann es die Funktion Eigenstart nicht ausführen.
· Diese Funktion ist verfügbar für die Türstation des gleichen Wohnblocks, und falls die Türstation im Bereitschaftsmodus und
als "0" programmiert wurde und ein Sprechkanal vorhanden ist.
P
Se o telefone não estiver programado, este não realizará a função de ligação automática.
· Esta funcionalidade é possível com a placa do seu próprio bloco, se a placa estiver em repouso e programada como "0" e se
existir algum canal de conversação disponível.
1. Call from panel tone selector: With the telephone in standby and hung-up, press the telephone's programming
button(you will hear a beep), and without releasing it, press the open door button and you will hear the current melody.
Releasetheprogrammingbutton. Everytimeyouperformanewshortpressoftheopendoorbutton,youpasson to the
next ring tone.
2. Call from guard unit tone selector: Withthetelephonein the ring tone selection menu from the panel, if you maintain
the open door button pressed for 5 seconds you will hear the current ring tone from the guard unit. Every time you
perform a new short press of the open door button, you pass on to the next ring tone.
* Notes:
- If you maintain the open door button pressed for 5 seconds you will exit the guard unit ring tone menu (panel or guard unit), returning to
standby and storing the selected ring tone. You confirm the exit with: 1 beep: from the panel and double beep: from the guard unit.
- You can also exit the guard unit ring tone menu after inactivity for 10 seconds (storing the last ring tone played).
1. Auswahl Rufton Türstation: Bei aufgelegtem Telefon im Bereitschaftsmodus die Programmiertaste des Telefons
drücken(esertönteinPiepton)undohneloszulassendieTüröffnungstastedrücken,woraufdieaktuelleMelodieertönt.
Programmiertaste loslassen. Jedes Mal, wenn die Türöffnungstaste erneut gedrückt wird, ertönt die nächste
Klingelmelodie.
2. Auswahl Rufton Portierzentrale: Wenn im Menü Ruftonauswahl der Türstation die Türöffnungstaste 5 Sekunden
lang gedrückt gehalten wird, ertönt die aktuelle Melodie, wenn einAnruf über die Portierzentrale eingeht. Jedes Mal,
wenndieTüröffnungstaste erneut gedrückt wird, ertönt die nächste Klingelmelodie.
* Hinweis:
- Durch 5 Sekunden langes Drücken der Türöffnungstaste wird das Menü Melodiewahl verlassen (Türstation oder Portierzentrale) und der
Bereitschaftsmodus ausgelöst, wobei die ausgewählten Melodien gespeichert werden. Das Verlassen des Menüs wird durch einen
Signalton quittiert: 1 Piepton (Bip): über die Türstation und doppelter Signalton (Bip-Bip): über die Portierzentrale.
- Das Menü Melodieauswahl wird nach 10 Sekunden ohne Tasteneingabe automatisch verlassen (dabei wird die zuletzt abgespielte
Melodie gespeichert).
1. Selecção do som de chamada da placa: Comotelefoneemrepouso e pousado, prima o botão de programação do
telefone (ouve-se um bip) e, sem o soltar, pressione o botão do trinco para ouvir a melodia actual. Solte o botão de
programação.De cada vez que efectuar novamente umapressão no botão do trinco, passará àmelodia seguinte.
2. Selecção do som de chamada da portaria: Estando no menu de selecção do som de chamada da placa e
mantendo pressionado o botão do trinco durante 5 segundos, ouvir-se-á a melodia actual de chamada a partir da
portaria.De cada vez que efectuar novamente uma pressão no botão do trinco, passará à melodia seguinte.
* Notas:
- Se o botão do trinco continuar pressionado durante 5 segundos, sai-se do menu de melodias (da placa ou da portaria), regressando ao
repouso e guardando a(s) melodia(s) seleccionada(s). Essa saída é confirmada com: 1 bip: a partir da placa e duplo bip: a partir da
portaria.
- Também se sai da selecção de sons de chamada após um período de 10 segundos de inactividade (guardando na memória a
última melodia reproduzida).
1. Selección tono de llamada de placa: Con el teléfono en reposo y colgado pulsar el botón de programación del teléfono
(seescuchaun bip)ysinsoltarlopulsar elbotóndeabrepuertas se oirálamelodíaactual. Soltarelbotóndeprogramación.
Cadavezque serealiceunanuevapulsación enelbotónde abrepuertas, sepasaráala siguientemelodía.
2. Selección tono de llamada de conserjería: Estando en el menú de selección de tono de llamada de placa, si se
mantienepulsadoelbotóndeabrepuertasdurante5segundos,seoirálamelodíaactualdellamada desde conserjería.
Cadavez que se realice unanueva pulsación en el botón de abrepuertas, se pasará a la siguiente melodía.
* Notas:
- Si se mantiene pulsado el botón de abrepuertas durante 5 segundos, se sale del menú de melodías (placa o conserjería), volviendo a
reposo y almacenando la/s melodía/s seleccionada/s. Se confirma dicha salida con: 1 bip: desde placa y doble bip: desde conserjería.
- También se sale de la selección de tonos de llamada, tras un periodo de 10 segundos de inactividad, (almacenando en memoria
la última melodía reproducida).
1. Sélection tonalité d'appel de la platine : Si le poste se trouve en veille et est raccroché, appuyez sur le bouton de
programmationduposte(unbipestémis)et,sans le relâcher,appuyezsurleboutondelagâcheélectrique.Onentend
alors la mélodie actuelle. Relâchez le bouton de programmation. À chaque fois que l'on appuie sur le bouton de la
gâche électrique, on passe à la mélodie suivante.
2. Sélection tonalité d'appel de la conciergerie : Une fois dans le menu de sélection de la tonalité d'appel de la
platine, si l'on maintient le bouton de la gâche électrique enfoncé pendant 5 secondes, on entend l'actuelle mélodie
d'appel issue de la conciergerie. À chaque fois que l'on appuie sur le bouton de la gâche électrique, on passe à la
mélodiesuivante.
* Remarques :
- Si l'on maintient le bouton de la gâche électrique enfoncé pendant 5 secondes, on quitte le menu des mélodies (platine ou conciergerie) ; on
retourne en veille et les mélodies sélectionnées sont mémorisées. La sortie de ce mode est confirmée via : 1 bip à partir de la platine et
un double bip à partir de la conciergerie.
- On quitte également la sélection des tonalités d'appel au bout de 10 secondes d'inactivité (la dernière mélodie lue est mémorisée).

Other manuals for LOFT Extra DUOX

1

This manual suits for next models

1

Other Fermax Intercom System manuals

Fermax 6553 User manual

Fermax

Fermax 6553 User manual

Fermax DUOX plus 970050b User guide

Fermax

Fermax DUOX plus 970050b User guide

Fermax MEET KIN 1445 User guide

Fermax

Fermax MEET KIN 1445 User guide

Fermax Minicentral MDS Digital Assembly instructions

Fermax

Fermax Minicentral MDS Digital Assembly instructions

Fermax CITY PRIVATE VIDEO DIGITAL KIT 1 Line Instruction Manual

Fermax

Fermax CITY PRIVATE VIDEO DIGITAL KIT 1 Line Instruction Manual

Fermax VDS BASIC iLOFT TELEPHONE User manual

Fermax

Fermax VDS BASIC iLOFT TELEPHONE User manual

Fermax KIN PANEL User guide

Fermax

Fermax KIN PANEL User guide

Fermax DUOX User guide

Fermax

Fermax DUOX User guide

Fermax LOFT Extra DUOX User manual

Fermax

Fermax LOFT Extra DUOX User manual

Fermax FVQ-6020APP User guide

Fermax

Fermax FVQ-6020APP User guide

Fermax VEO DUOX User guide

Fermax

Fermax VEO DUOX User guide

Fermax VDS MEMOPHONE KIT Series Instruction Manual

Fermax

Fermax VDS MEMOPHONE KIT Series Instruction Manual

Fermax MILO 1W PANELS User guide

Fermax

Fermax MILO 1W PANELS User guide

Fermax CITY 4+N OUTDOOR PANEL User guide

Fermax

Fermax CITY 4+N OUTDOOR PANEL User guide

Fermax Loft Universal 3399 User manual

Fermax

Fermax Loft Universal 3399 User manual

Fermax DUOX CITYLINE Series Product guide

Fermax

Fermax DUOX CITYLINE Series Product guide

Fermax House Keeper User manual

Fermax

Fermax House Keeper User manual

Fermax MEMORY 4+N LOFT COMPACT User manual

Fermax

Fermax MEMORY 4+N LOFT COMPACT User manual

Fermax MEET DIGITAL VIDEO PANEL User manual

Fermax

Fermax MEET DIGITAL VIDEO PANEL User manual

Fermax VDS VIDEO CITYLINE iLOFT KIT Instruction Manual

Fermax

Fermax VDS VIDEO CITYLINE iLOFT KIT Instruction Manual

Fermax MEET MILO 1W PANEL User guide

Fermax

Fermax MEET MILO 1W PANEL User guide

Fermax LOFT BUS2 User manual

Fermax

Fermax LOFT BUS2 User manual

Fermax LOFT VDS User manual

Fermax

Fermax LOFT VDS User manual

Fermax LOFT VDS User manual

Fermax

Fermax LOFT VDS User manual

Popular Intercom System manuals by other brands

Commax DR-24ML user manual

Commax

Commax DR-24ML user manual

Commax DR-2GN user manual

Commax

Commax DR-2GN user manual

Sonifex Station Master & Talkback Intercoms User handbook

Sonifex

Sonifex Station Master & Talkback Intercoms User handbook

PSA Products PAN780SK instruction manual

PSA Products

PSA Products PAN780SK instruction manual

SCS Sentinel VisioKit 7 Installation and user manual

SCS Sentinel

SCS Sentinel VisioKit 7 Installation and user manual

SSS Siedle AFS 870-0 operating instructions

SSS Siedle

SSS Siedle AFS 870-0 operating instructions

Telex CIA-1000 User instructions

Telex

Telex CIA-1000 User instructions

Bticino elkesan BASIC 344652 user manual

Bticino

Bticino elkesan BASIC 344652 user manual

SSS Siedle BTSV 850-0 operating instructions

SSS Siedle

SSS Siedle BTSV 850-0 operating instructions

Videx 4836 installation instructions

Videx

Videx 4836 installation instructions

Aiphone LAM-1 instructions

Aiphone

Aiphone LAM-1 instructions

Commax CDV-43N user manual

Commax

Commax CDV-43N user manual

Norcon Communications TTU-7 Installation & operating instructions

Norcon Communications

Norcon Communications TTU-7 Installation & operating instructions

Steren INT-550 instruction manual

Steren

Steren INT-550 instruction manual

Aiphone DA-1MD installation manual

Aiphone

Aiphone DA-1MD installation manual

Busch-Jaeger Busch-Welcome IP H8303-03 product manual

Busch-Jaeger

Busch-Jaeger Busch-Welcome IP H8303-03 product manual

Dnake 280SD-C12 user manual

Dnake

Dnake 280SD-C12 user manual

urmet domus 1083/12 Configuration guide

urmet domus

urmet domus 1083/12 Configuration guide

manuals.online logo
manuals.online logoBrands
  • About & Mission
  • Contact us
  • Privacy Policy
  • Terms and Conditions

Copyright 2025 Manuals.Online. All Rights Reserved.