FKG S-Apex User manual

Thank you for purchasing the S-Apex.
For optimum safety and performance, read this manual thoroughly before using the unit and pay close
attention to warnings and notes. Keep this manual in a readily accessible place for quick and easy ref-
erence.
FKG Dentaire SA
Apex Locator
Operation Instructions

1Operation 2017-03-17
Table of Contents
Prevent Accidents 3
Warnings and Prohibitions 5
Indications for Use 5
Parts Identification and Accessories 6
Usage 7
1. Before Using the Unit 7
Installing the Batteries 7
Connecting the Probe Cord 8
Checking the Function 8
2. Operating the Unit 10
Operation Panel Display and Switches 10
Settings 11
Meter Display 13
Root Canal not suitable for Electronic Measurement 16
S-Apex Meter Reading and Radiography 18
3. After Using the Unit 19
4. Replacing Batteries 20
Maintenance 22
Cleaning 22
Disinfection 23
Disinfection (other components): Wipe with Ethanol 23
Packing 24
Sterilization 24
2Operation 2018-01-22
Replacement Parts,Transport and Storage Conditions 25
Replacement Parts 25
Transport and Storage Conditions 25
Inspection and Warranty 26
Maintenance and Inspection Items 26
Warranty 27
Troubleshooting 28
Technical Specifications 30
Specifications 30
Symbols 31
Appendix – Electromagnetic Declaration 32
NOTICE TO PROTECT INTELLECTUAL PROPERTY
US PAT. 8920166
US DESIGN 601262
3Operation 2018-01-22
The warning symbols ( ) and caution symbols ( ) that appear next to the main text on the
right hand side of the page refer to and are explained by the Warnings and Cautions at the bottom
of the page.
Prevent Accidents
Do not fail to receive clear instructions concerning the various ways to use this equipment as de-
scribed in this accompanying Operator’s Manual.
Most operation and maintenance problems result from insufficient attention being paid to basic
safety precautions and not being able to foresee the possibilities of accidents. Problems and acci-
dents are best avoided by foreseeing the possibility of danger and operating the unit in accordance
with the manufacturer’s recommendations. First thoroughly read all precautions and instructions
pertaining to safety and accident prevention; then, operate the equipment with the utmost caution
to prevent either damaging the equipment itself or causing bodily injury.
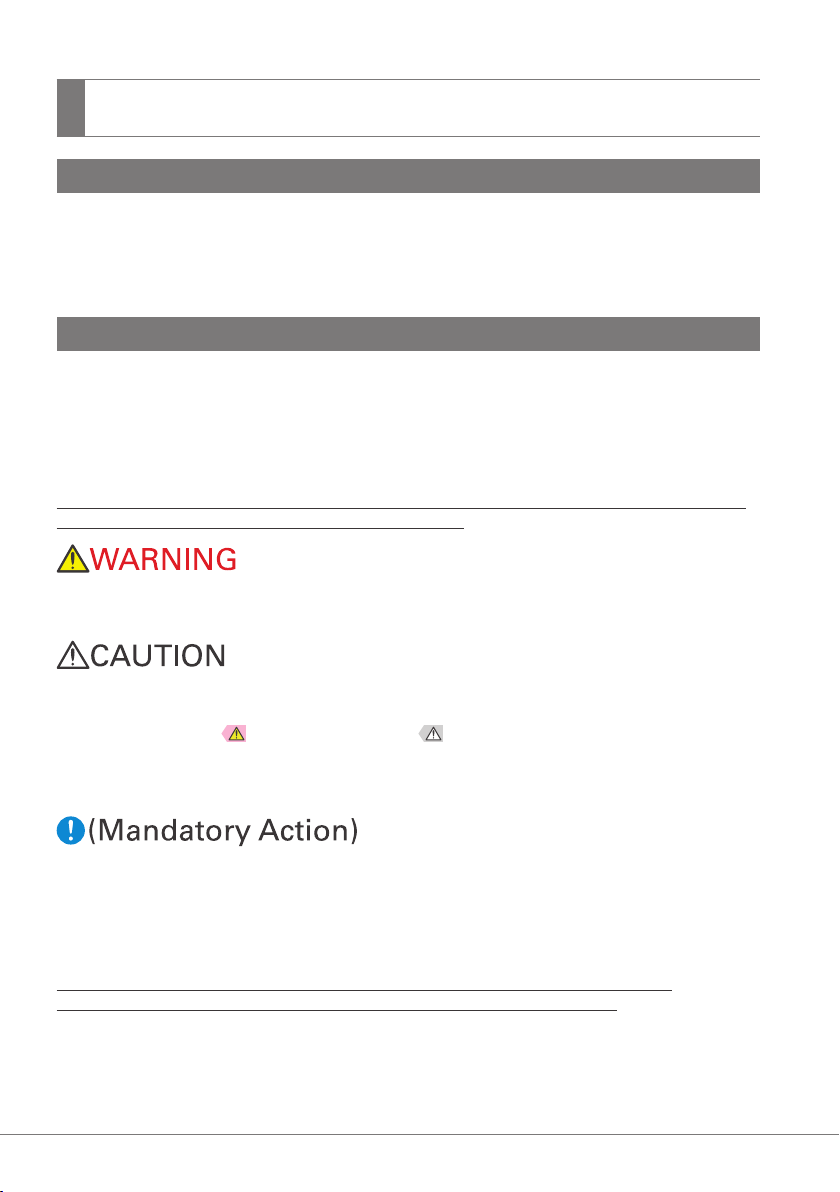
The following symbols and expressions indicate the degree of danger and harm that could
result from ignoring the instructions they accompany:
This alerts the user of important points concerning operation or the risk of equipment
damage.
The user (e.g., healthcare facility, clinic, hospital etc.) is responsible for the management, mainte-
nance and use of medical device.
This equipment must only be used by dentists and other legally licensed professionals.
Do not use this equipment for anything other than its specified dental purpose.
This warns the user of the possibility of extremely serious injury or complete destruc-
tion of the equipment as well as other property damage including the possibility of fire.
This warns the user of the possibility of mild injury or damage to the equipment.
Attention Customers
Prevent Accidents
4Operation 2018-01-22
■FKG will not be responsible for accidents, equipment damage, or bodily injury resulting from:
1. Repairs made by personnel not authorized by FKG.
2. Any changes, modifications, or alterations of its products
3. The use of products or equipment made by other manufacturers, except for those by FKG.
4. Maintenance or repairs using parts or components other than those specified by FKG and
other than in their original condition
5. Operating the equipment in ways other than the operating procedures described in this man-
ual or resulting from the safety precautions and warnings in this manual not being observed
6. Workplace conditions and environment or installation conditions which do not conform to
those stated in this manual such as improper electrical power supply
7. Fires, earthquakes, floods, lightning, natural disasters, or acts of God.
If an accident occurs, the S-Apex must not be used until repairs have been completed by a quali-
fied and trained technician authorized by the manufacturer.
The S-Apex must only be used by dentists and other legally licenced professionals.
Disclaimer
In Case of Accident
Intended Operator Profile
Patient Population
Age Child to Elderly
Weight N/A
Nationality N/A
Sex N/A
Health It is not intended for use on patients wearing pacemakers or ICDs.
Condition Conscious and mentally alert person. (Person who can stay still dur-
ing treatment.)
• The S-Apex is not recommended for use in children under 12 years of age.
5Operation 2018-01-22
• Accurate canal measurement is not always possible depending on the shape and condition of the tooth as well
as a decline in the equipment’s performance.
• Do not use damaged file holders; an accurate measurement cannot be made with a damaged file holder.
• When a continuous tone is heard while the main power switch is on and without any operation, some electrical
part may be malfunctioning. Do not use the unit and send the unit to FKG for repairing.
• A rubber dam should be used when performing endodontic treatment.
• Some care must be taken concerning electromagnetic compatibility (EMC) when using the S-Apex. Refer to
the user’s manual and other attached documents for EMC information regarding installation and operation.
• Both portable and movable radio frequency transmitters may have some effect on the S-Apex.
• Using replacement parts or accessories not supplied by FKG could adversely affect the EMC performance of
the S-Apex.
• As far as possible, do not use the S-Apex near or simultaneously with other devices. If this cannot be avoided,
observe carefully and make sure both the S-Apex and the other device operate normally.
• Do not use this device in conjunction with an electric scalpel or on patients who have a pacemaker.
• Blocked canals cannot be accurately measured.
• Except for ways described in this manual, this unit must not be connected to or used in combination with any
other apparatus or system. It must not be used as an integral component of any other apparatus or system.
FKG will not be responsible for accidents, equipment damage, bodily injury or any other trouble which results
from ignoring this prohibition.
• Illumination devices such as fluorescent lights and the Film viewer which use an inverter can cause the S-Apex
to operate erratically. Do not use the S-Apex near devices such as these.
• Electromagnetic wave interference could cause this device to operate in an abnormal, random and possibly
dangerous manner. Cellular phone, transceivers, remote controls and all other devices which transmit electro-
magnetic waves located inside the building should be turned off.
• Do not perform maintenance while using the instrument for treatment.
* FKG is not responsible for any accidents or other types of trouble that are caused by not follow-
ing the warnings and important precautions noted above.
Warnings and Prohibitions
Indications for Use
: This indicates when not to use the equipment.
The S-Apex is a dental device, Apex Locator.
It can be used to detect the apex of root canal.
6Operation 2018-01-22
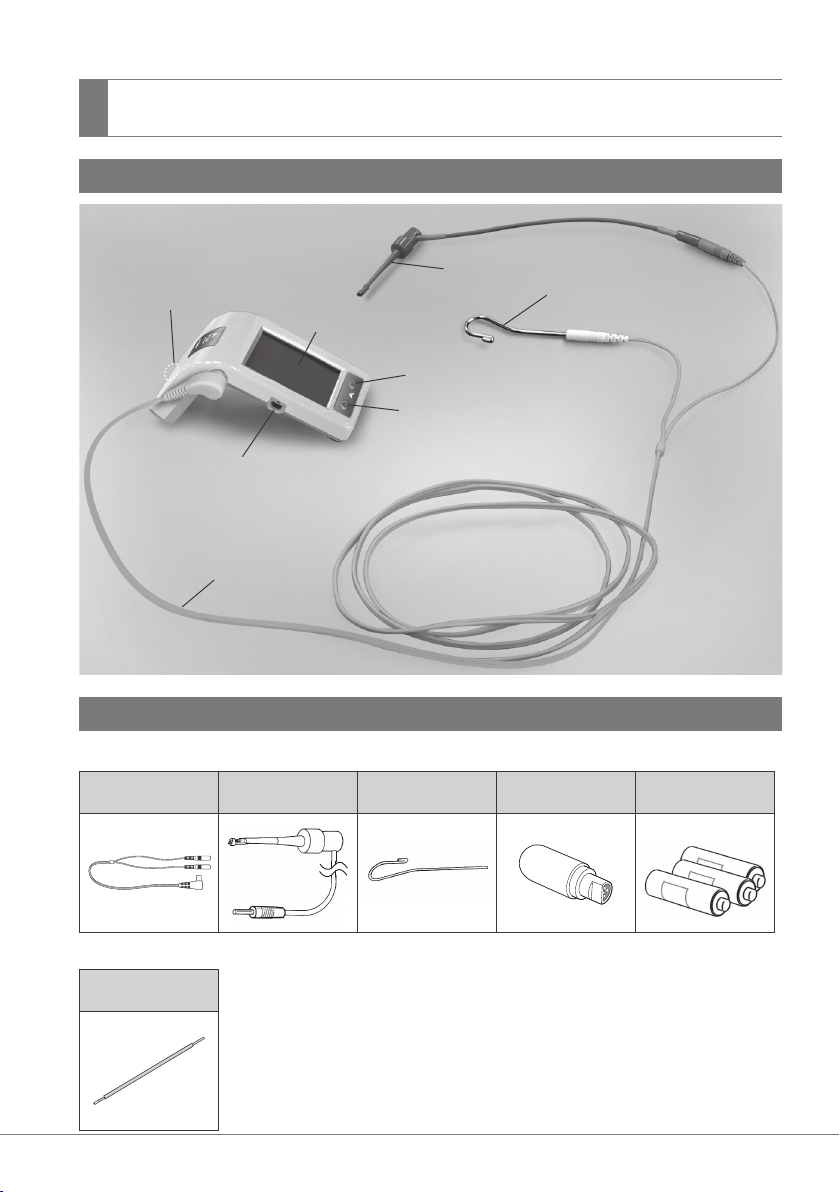
Parts Identification and Accessories
Contrary Electrode
File Holder
Set Switch
Power Switch
Data Output Port
(to transmit display data)
Probe Cord
Strap Holes
LCD Screen
Accessories
⹅Standard Accessories
Parts Identification
Probe Cord
(1)
File Holder
(3)
Contrary Electrode
(5)
Tester
(1)
Alkaline Dry Cells
(3)
Long File Holder
(1)
(LR03 (AAA size) batteries)
⹅Optional Accessories

7Operation 2018-01-22
• The S-Apex is shipped without the batteries installed. Remove the cover and install the 3 LR03 (AAA size)
batteries.
• Do not reverse the plus and minus poles.
• Never allow the spring contact to push against the edge of the battery. This could damage the outer cover
causing a short or a leakage of battery liquid.
• After installation, give the cover a light tug to confirm it is securely attached.
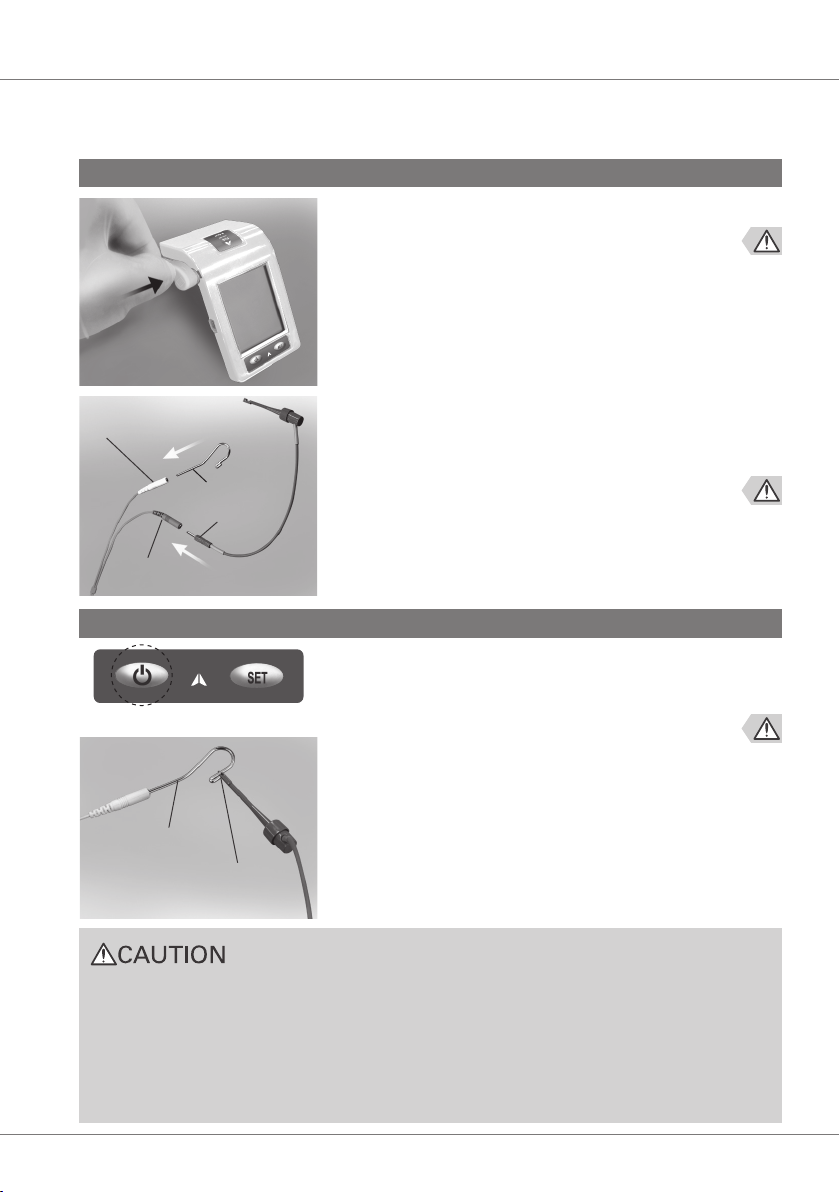
1. Before Using the Unit
1. Slide the cover in the direction by the arrow in the illus-
tration and remove it from the S-Apex.
Check the following before using the instrument.
• Have autoclavable components been sterilized? Refer to page 24 “Sterilization”.
2. Insert the 3 LR03 (AAA size) batteries included in the
package.
(1) Insert the batteries by first pressing center of the
minus end against its spring contact.
(2) Slide the plus end down into place and make sure
the contacts are not bent or damaged.
3. Slide the cover all the way down until it is securely
closed.
BAD
Installing the Batteries
Usage
8Operation 2018-01-22
• Handle the S-Apex carefully; do not drop, bump or expose the unit to other kinds of impacts or shocks.
Rough handling could cause damage.
• Make sure the probe cord plug is securely plugged into the jack. A poor connection can prevent measure-
ment.
• Do not drop anything on or bang the probe cord plug after it has been inserted into the jack.
• Make sure to match colors of the file holder and contrary electrode to the probe cord.
Measurements cannot be made if these connections are reversed.
• The unit may turn off if its side is bumped.
1. Insert the probe cord completely into the jack on the
left side of the S-Apex.
1. Press the Power switch to turn the unit on. The display
will appear in the LCD screen.
* The instrument turns itself off if it is not used for 10 min-
utes.
2. Check that the probe cord is properly plugged into the
jack.
3. Check that the file holder and contrary electrode are
properly connected to the probe cord.
4. Touch the metal part of the file holder with the contrary
electrode. Check that all the meter indicator bars on
the display light up.
2. Insert the file holder’s gray male plug into the gray
female connector on the probe cord. Insert the contrary
electrode into the white female connector on the probe
cord.
Probe Cord
Connector (white)
Probe Cord
Connector (gray)
File Holder Contact
Power Switch
Contrary Electrode
Contrary Electrode
File Holder Plug
Connecting the Probe Cord
Checking the Function

9Operation 2017-03-17
• Check the S-Apex operation before each patient. If the indicators in the display do not all appear normally,
the instrument may not be able to make an accurate measurement. In this case, stop using the instrument
and have it repaired.
Checking the Function
⹅Checking the Function with theTester
Check the S-Apex’s performance with the tester once a
week.
1. Press the Power switch to turn the unit on.
2. Insert the tester into the probe cord jack.
Check that the meter indicates within ±3 bars away
from (above or below) 1.
* The meter may jump when the tester is inserted. If it
does, wait for about one second until the meter stabilizes
and then check the reading.
* If the reading is 4 or more bars away from 1, the unit will
not make an accurate measurement. In this case, contact
FKG.
Must be
within
this range
Tester

10
OFF
Operation 2018-01-22
• Never connect the S-Apex to any device not approved by FKG.
• Never use the unit if the battery power indicator is flashing on and off. The unit may not function properly if
the battery power is low.
• The meter readings 1, 2, and 3 do not correspond to any actual distance and should only be used as esti-
mates.
2. Operating the Unit
Operation Conditions for the main unit
Temperature: +10°C to +35°C (+50°F to +95°F), Humidity: 30% to 80% (without condensation),
Atmospheric Pressure: 70 kPa to 106 kPa
* If the unit has not been used for some time, make sure it works properly before using it again.
Operation Panel Display and Switches
Sound VolumeCanal Length Indicator Bars
Meter
Power Switch Set Switch
Battery Power Indicator
Flash Bar
Memory Bar
Information Display
Off, Low, High
This bar graph indicates remain-
ing battery power. Replace the
batteries when this indicator
begins flashing.
* When battery power falls too
much, alarm will sound and
the unit will automatically turn
itself off.
* The unit will automatically turn
off after 10 minutes of non-
use.
Use this line as an estimate for
root canal measurement.
Use this as an estimate of some
intermediate point inside the
canal.
• Standby (file outside canal):
Memory Number for Flash Bar
• During Measurement (file inside canal):
Number of bars left before Flash Bar is reached
• When Flash Bar position is being set:
Position of Flash Bar

11 Operation 2017-06-09
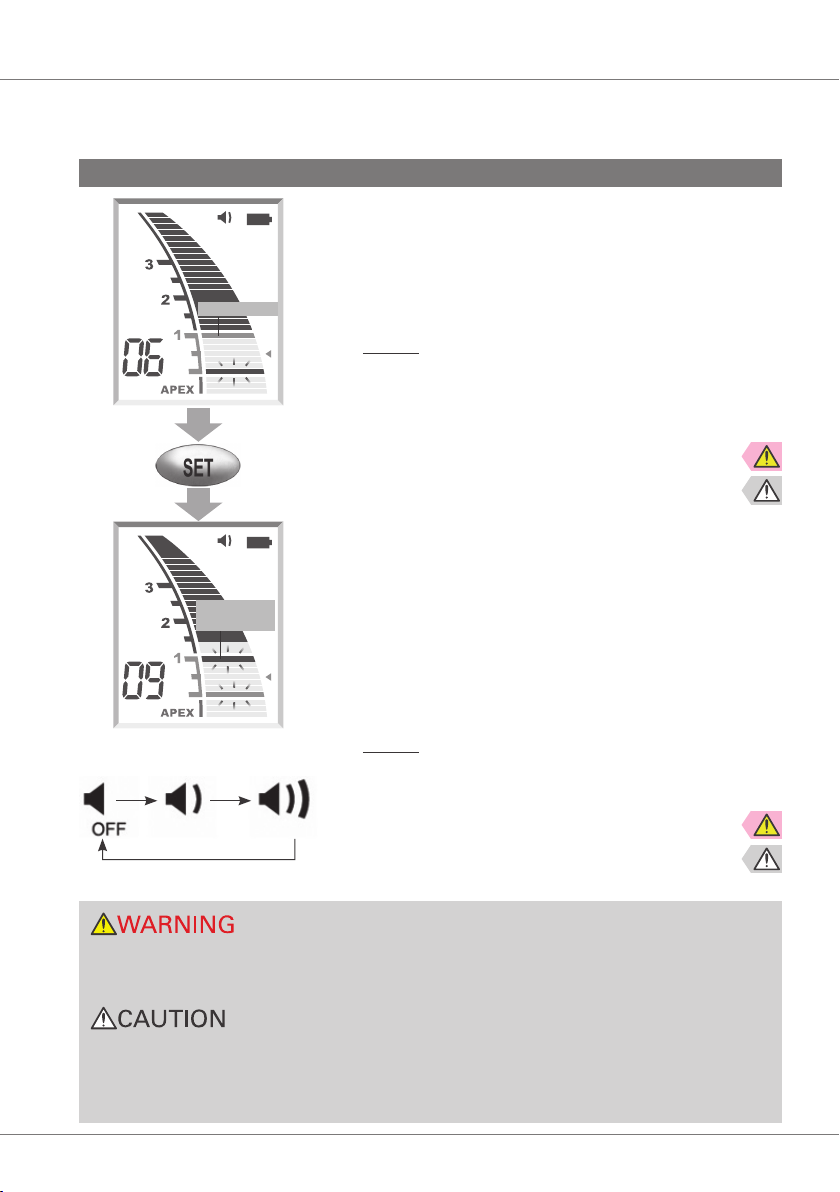
Settings
1. Select Memorized Flash Bar
Method
Press Set Switch. Each press of the Set Switch will change
the memory selected in the sequence 01 to 02 to 03 and
then back to 01 again. The Flash Bar set for each memory
will appear when that memory is selected. The memory
selected when the unit is turned off is the one that will be
selected when is it turned back on again.
2. Set the Flash Bar
The Flash Bar can be set anywhere from 2 to Apex (0).
Use it as an estimate of the canal’s working length.
Method
When the file is not inserted, hold down the Power Switch
and then press the Set Switch at the same time. Each
press of the Set Switch will move the Flash Bar one bar to-
wards the Apex. The position will be automatically memo-
rized.
• The Flash Bar cannot be set beyond the Apex.
Flashes
12Operation 2017-06-09
Settings
3. Memory Bar
The Memory Bar can be set anywhere up to APEX.
The Memory Bar can be set during treatment to mark
a point of interest inside the canal such as the begin-
ning of a curve, a certain distance from the apex, or the
point to change file size for enlargement.
Method
Insert the file up to the desired point and then press the
Set Switch. This will cause another bar to flash on and off
at a slightly slower speed that the main Flash Bar. This will
not change the point where the alarm is activated.
4. Beeper Volume
The volume of the beep can be set for Loud or Soft, or
it can be turned off.
Method
Hold down the Set Switch and turn the S-Apex on.
This will change the setting of the beep from Loud
to off. Repeat the procedure to change it from off
to Soft. The setting will be memorized and stay the
same the next time you turn the unit on.
• The Memory Bar should only be used as an estimate. You may need to change it during enlargement and
cleaning. If there seems to be some problem, stop using the instrument immediately.
• Check the settings displayed after selecting memories.
• The Memory Bar cannot be set beyond the Apex.
• The Memory Bar can be set at a different point for each of the 3 memories.
• The Memory Bar will stay wherever you set it until the S-Apex is turned off, but it will not be memorized.
• The volume of the beep that sounds when the unit is turned on cannot be adjusted.
Memory Bar
starts flashing
File position
13 Operation 2017-06-09
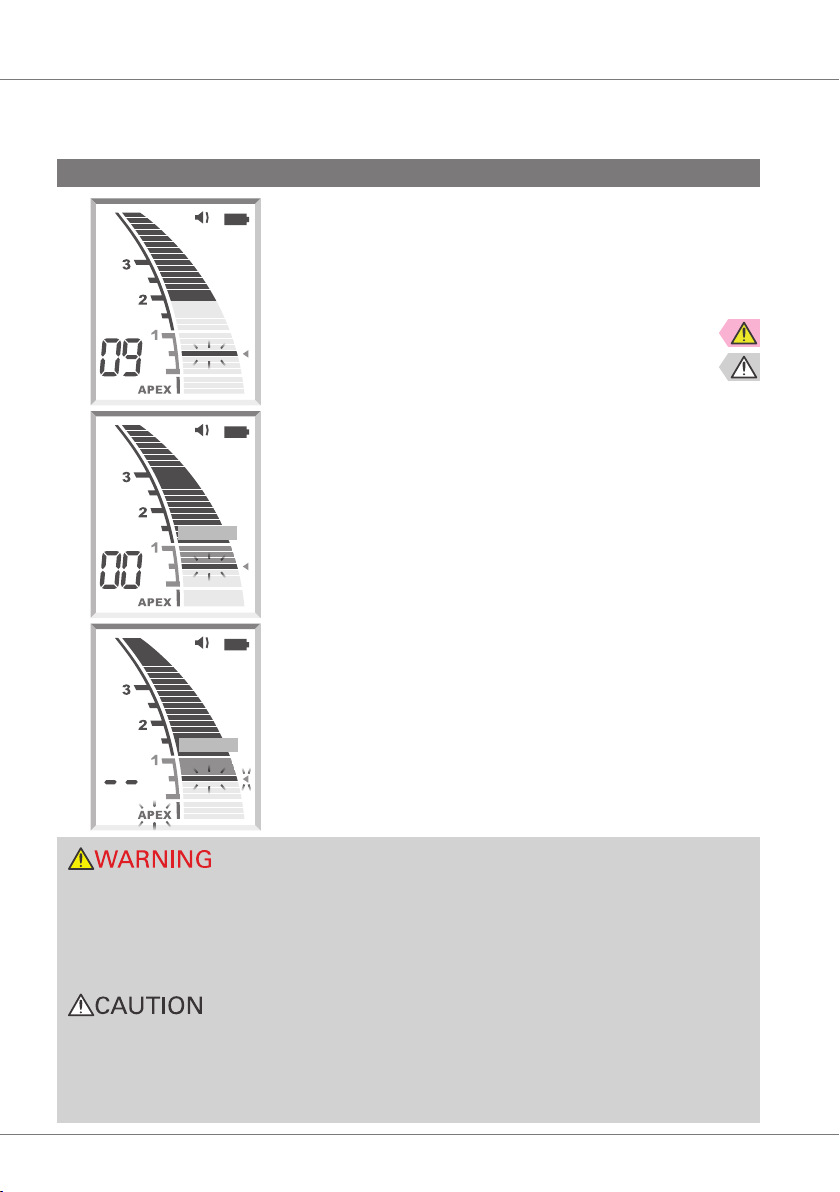
Meter Display
The position of the file tip is shown by the canal length
indicator bar on the display. The Flash Bar flashes on and
off once file is inserted into the root canal.
The meter’s 0.5 reading indicates that the tip of the file is
in or very near the apical constriction.
* The numerals on the meter gauge do not represent mil-
limeters.
If the file tip reaches the apical foramen, a single, sus-
tained beep will sound, and the word “APEX” and the little
triangle next to the Flash Bar will start to flash on and off.
• In some cases such as a blocked canal, a measurement cannot be made. (For details “Root Canals not suit-
able for Electronic Measurement.”)
• Always check the measurement with an x-ray. In some cases, an accurate measurement cannot be made
because of the canal shape, unusual cases, or poor performance of the instrument.
• Stop using the instrument immediately if you sense something odd or abnormal while taking a measure-
ment.
• Do not let the file touch the gums. This will cause the meter to jump to Apex.
• If the canal is extremely dry, the meter may not move until it is quite close to the apex. If the meter does
not move, try moistening the canal with oxydol or saline.
• Occasionally the canal length indicator bar will make a sudden and large movement as soon as the file is
inserted into the root canal, but it will return to normal as the file is advanced down towards the apex.
Flashes
Flashes
Flashes
14Operation 2017-06-09
• Do not use an ultrasonic scaler with the contrary electrode attached to the patient. Electrical noise from
the scaler could interfere with canal measurements.
• Make sure that the contrary electrode, file holder etc. do not come into contact with an electric power
source such as an electrical socket. This could result in a severe electrical shock.
• The contrary electrode could cause an adverse reaction if the patient has an allergy to metals. Ask the
patient about this before using the contrary electrode.
• Take care that medicinal solutions such as formalin cresol (FC) or sodium hypochlorite do not get on the
contrary electrode or the file holder. These could cause an adverse reaction such as inflammation.
• Always clip the file holder to the upper part of file shaft, near the handle. The metal and plastic part of the
file holder can be damaged if they are attached to the file’s cutting part or the transition to the cutting part.
Operating the Unit
1. Turn the unit on.
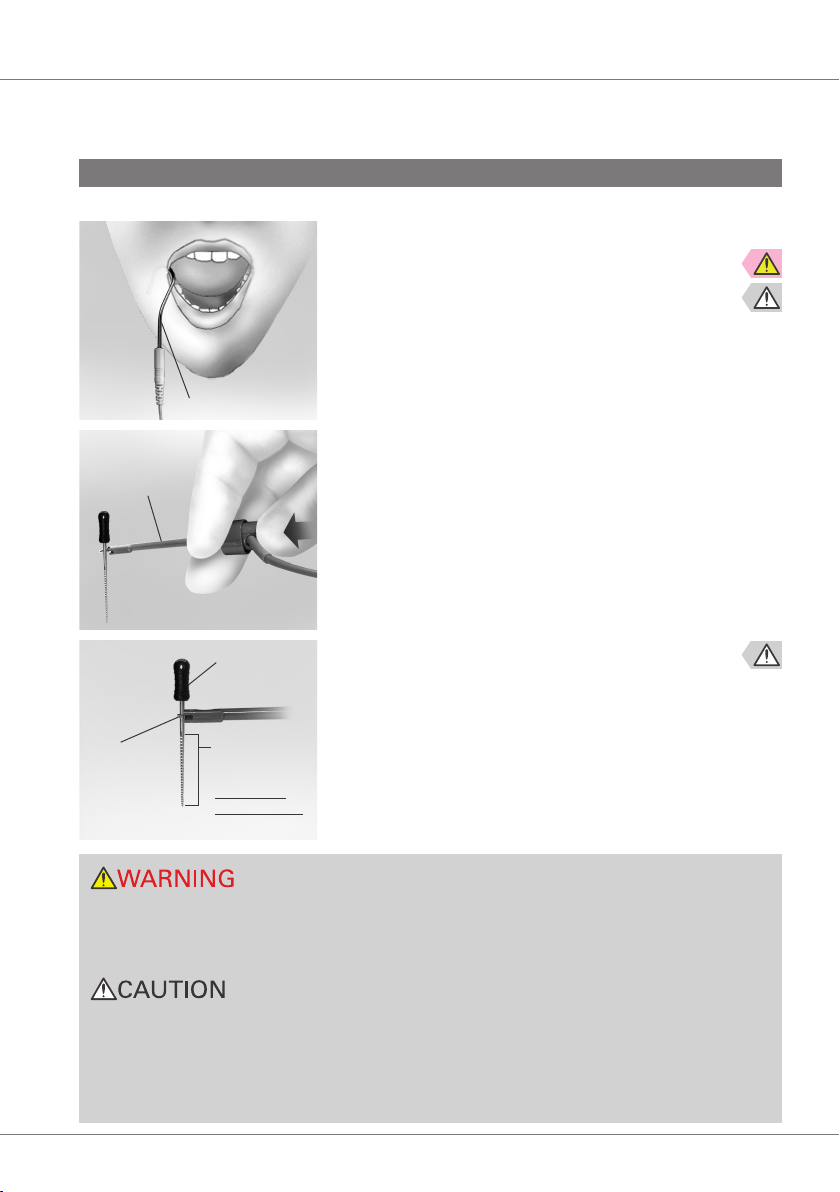
2. Hook the contrary electrode in the corner of the pa-
tient’s mouth.
3. Clip the file holder to the metal shaft of the file.
(1) Press in direction of arrow with the thumb.
(2) Clip file.
(3) Release thumb.
Contrary Electrode
File Holder
File or Reamer
Metal part of
file holder
Handle
Cutting part
and transition
to cutting part
Do not clip
onto this part!
Press
15 Operation 2017-06-09
Operating the Unit
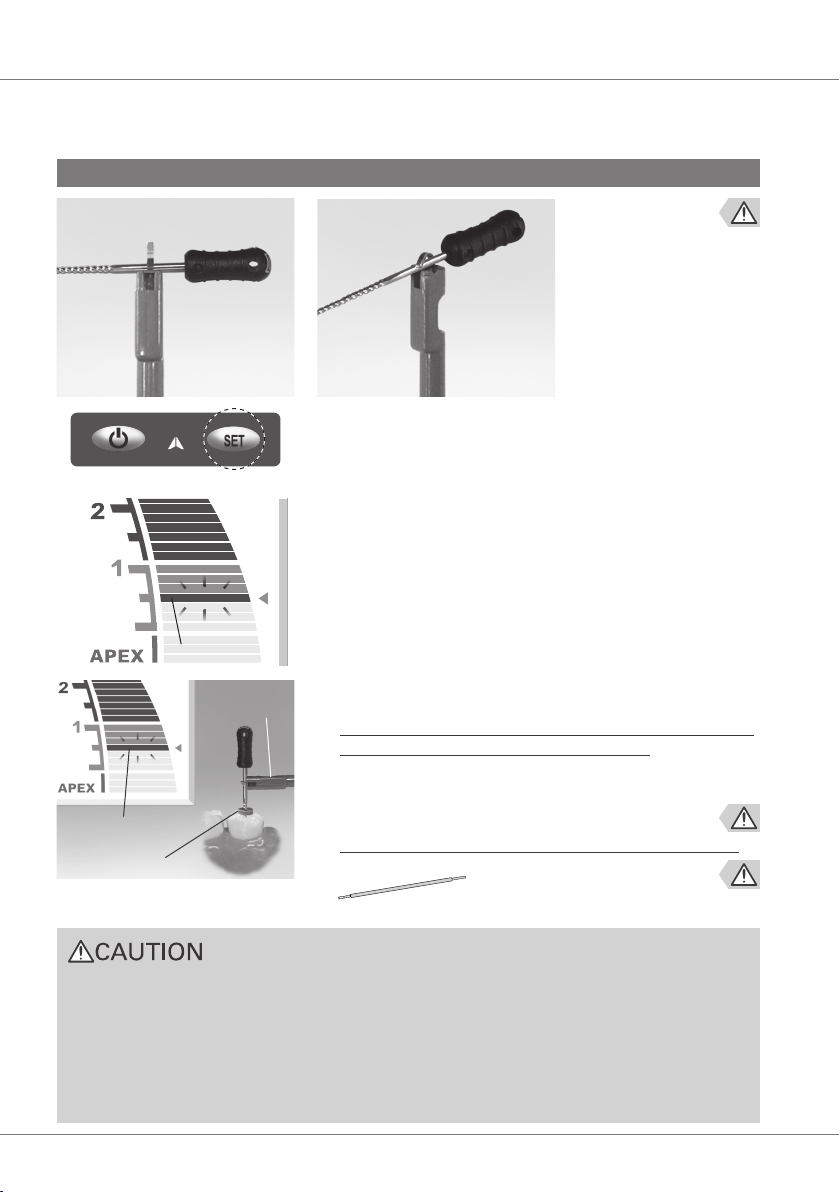
GOOD
12
BAD
• Use files and reamers with plastic handles only. If the file has a metal handle, electrical leakage will occur
when the handle is touched by fingers and it will prevent an accurate root canal measurement. Even if the
file handle is made of plastic, make sure not to touch the metal part of the file with finger.
• Do not use damaged file holders. An accurate measurement cannot be made using a damaged file holder.
• Clip the file as shown in illustration #1 to the left. If the file is in the position shown in illustration #2, it may
not make a correct measurement and the file holder could be damaged.
• Make sure to take an x-ray to check the results.
• Make sure the long file holder does not prick or pierce the patient’s oral mucosa .
4. Press the Set Switch to select Memory 01, 02 or 03.
5. Insert the file up to the Flash Bar (this point can also be
recognized by the change in the beeping). Position the
rubber stopper on the tooth surface as a reference point
to determine the root canal’s working length. Use the
0.5 reading on the meter to estimate the canal’s length.
6. Determine the working length.
If the file tip is at the 0.5 meter reading, subtract from 0.5
to 1.0 mm to determine the working length.
* The working length will differ somewhat depending on
each individual tooth. This discrepancy must be judged
by the dentist as he works on the tooth.
When using the long file holder instead of the file holder
Flash Bar
Set Switch
File Holder
Rubber Stopper
Long File Holder (Option)
0.5 Reading
16Operation 2017-03-17
Clean
Build-up
Fracture
Branch
Gutta-Percha
Root Canal not suitable for Electronic Measurement
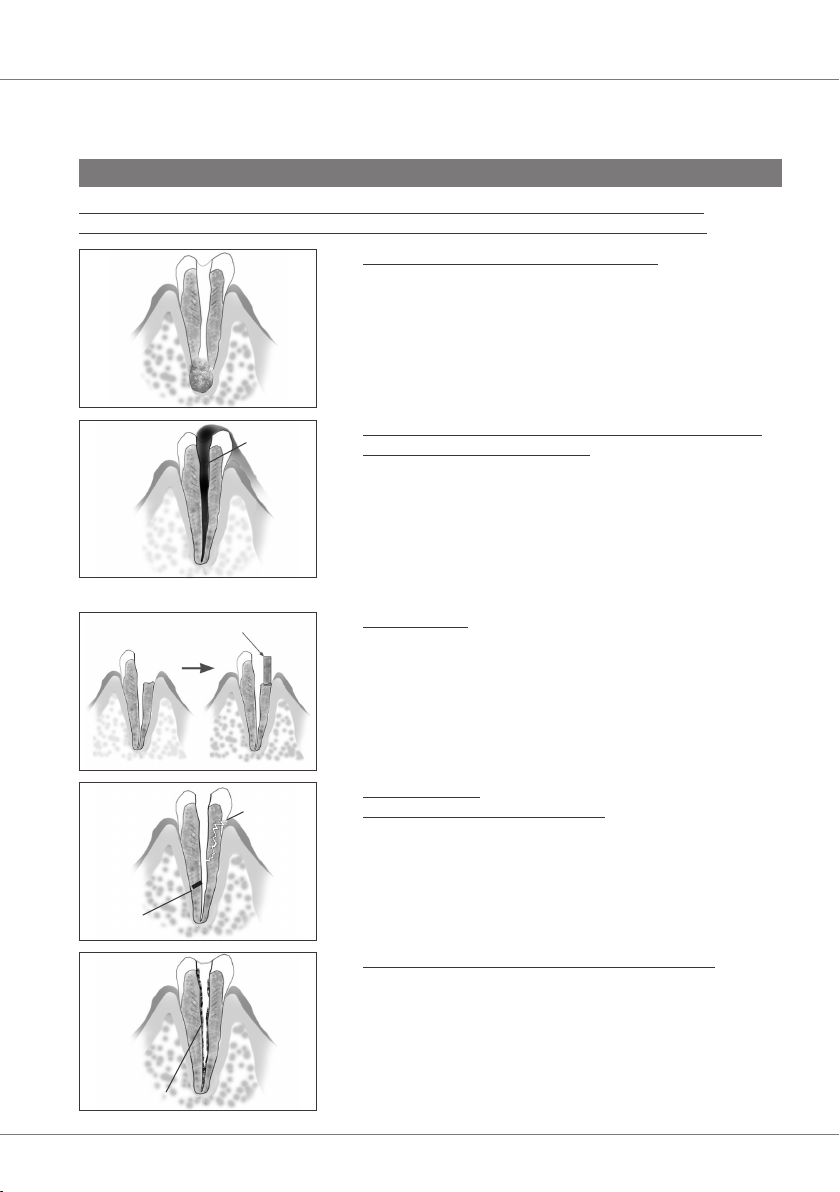
Accurate measurement cannot be obtained with the root canal conditions shown below.
There may be cases other than these where an accurate measurement cannot be made.
Root Canal with a large apical foramen
Root canal that has an exceptionally large apical foramen
due to a lesion or incomplete development cannot be ac-
curately measured; the results will show shorter measure-
ment than the actual length.
Root Canal with blood, saliva or a chemical solution
overflowing from the opening
If blood, saliva, or a chemical solution overflows from the
opening of the root canal and contacts the gums, this will
result in electrical leakage and an accurate measurement
cannot be obtained. Wait for bleeding to stop completely.
Clean the inside and opening of the canal thoroughly to
get rid of all blood, saliva and chemical solutions and then
make a measurement.
Broken crown
If the crown is broken and a section of the gingival tissue
intrudes into the cavity surrounding the canal opening,
contact between the gingival tissue and the file will result
in electrical leakage and an accurate measurement cannot
be obtained. In this case, build up the tooth with a suitable
material to insulate the gingival tissue.
Fractured tooth
Leakage through a branch canal
Fractured tooth will cause electrical leakage and an accu-
rate measurement cannot be obtained.
A branch canal will also cause electrical leakage.
Re-treatment of a root filled with gutta-percha
The gutta-percha must be completely removed to eliminate
its insulating effect. After removing the gutta-percha, pass
a small file all the way through the apical foramen and then
put a little saline in the canal, but do not let it overflow the
canal opening.

17 Operation 2017-03-17
Root Canal not suitable for Electronic Measurement
Crown or metal prosthesis touching gingival tissue
Accurate measurement cannot be obtained if the file
touches a metal prosthesis that is touching gingival tissue.
In this case, widen the opening at the top of the crown so
that the file will not touch the metal prosthesis before tak-
ing a measurement.
Cutting debris on tooth
Pulp inside canal
Thoroughly remove all cutting debris on the tooth.
Thoroughly remove all the pulp inside the canal; otherwise
an accurate measurement cannot be made.
Caries touching the gums
In this case, electrical leakage through the caries infected
area to the gums will make it impossible to obtain an ac-
curate measurement.
Blocked Canal
The meter will not move if the canal is blocked.
Open the canal all the way to the apical constriction to
measure it.
Extremely dry canal
If the canal is extremely dry, the meter may not move until
it is quite close to the apex. In this case, try moistening
the canal with oxydol or saline.
Crown
Debris
Pulp
Caries touch-
es gums
Blocked
Too Dry
18Operation 2017-03-17
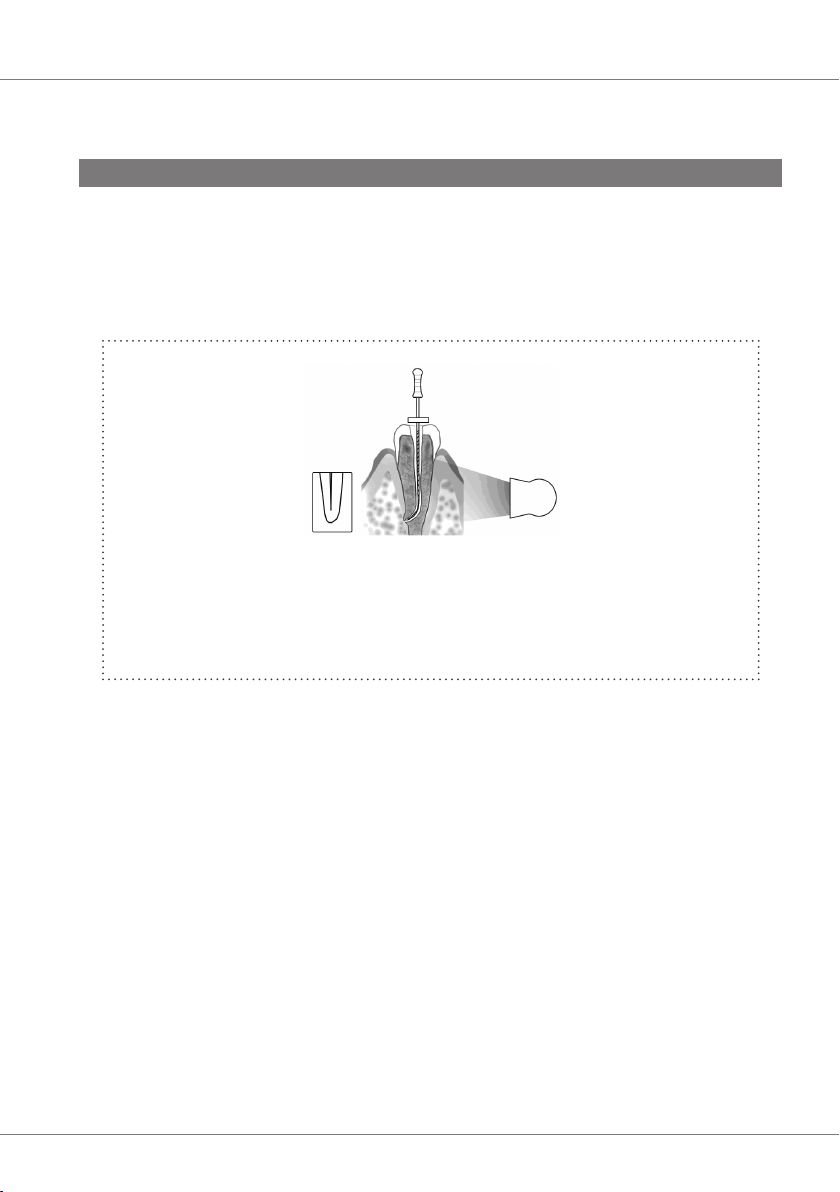
X-ray Tube
X-ray Film Apical foremen is located up
towards the crown.
* Depending on the angle of penetration of the X-ray beam, the apex may not appear
correctly, and the position of the apical foramen may appear to be located differently
than it actually is.
S-Apex Meter Reading and Radiography
Sometimes the S-Apex meter reading and the x-ray image will not correspond. This does not mean
that the S-Apex is not working properly or that the x-ray exposure is a failure.
* Occasionally, the actual apical foramen does not correspond exactly. The actual apical foramen
may be located up towards the crown. In these cases, the x-ray image will seem to indicate that
the file has not reached the apex.

19 Operation 2017-06-09
3. After Using the Unit
1. Turn the unit off.
* The unit will automatically turn off after 10 minutes of
non-use.
2. Disconnect the probe cord and other cords or cables.
• Do not pull directly on the cords when connecting or disconnecting the probe and file holder. Always grip
the connectors to connect and disconnect cords.
• Do not wrap the probe cord around the body of the main unit.
BAD
BAD
Cord
Always grip the connectors to
connect and disconnect cords.
Table of contents
Other FKG Dental Equipment manuals


Popular Dental Equipment manuals by other brands

Dentsply Sirona
Dentsply Sirona X-Smart Pro Instructions for use

BDS
BDS C-4250 Service manual

Renfert
Renfert Millo manual

Aseptico
Aseptico ECONO AIR SYSTEM ADU-07 Operation & instruction manual

Castellini
Castellini SKEMA 6 Series operating instructions

Bego
Bego 37600 Translation of the original instructions

Dentsply Sirona
Dentsply Sirona Midwest Stylus Plus operating instructions

Nouvag
Nouvag NM 3000 Operation manual

DENTSPLY
DENTSPLY Multimat Easy Instructions for use

Kodak
Kodak Ngenuity 9000 Series user guide

Ugin
Ugin e.ON SINTER + Instructions for use

Josef Ganter Feinmechanik
Josef Ganter Feinmechanik FB-EV 065 GA User instructions


