IAN 281806
SCHLAUCHREGNER, 20m
SCHLAUCHREGNER, 20m
Bedienungsanleitungen und Sicherheitshinweise
TUBO PER IRRIGAZIONE, 20m
Indicazioni per l’uso e per la sicurezza
ARROSEUR SOUPLE, 20m
Instructions d’utilisation et de sécurité
SPRINKLER HOSE, 20m
Directions for use and safety instructions
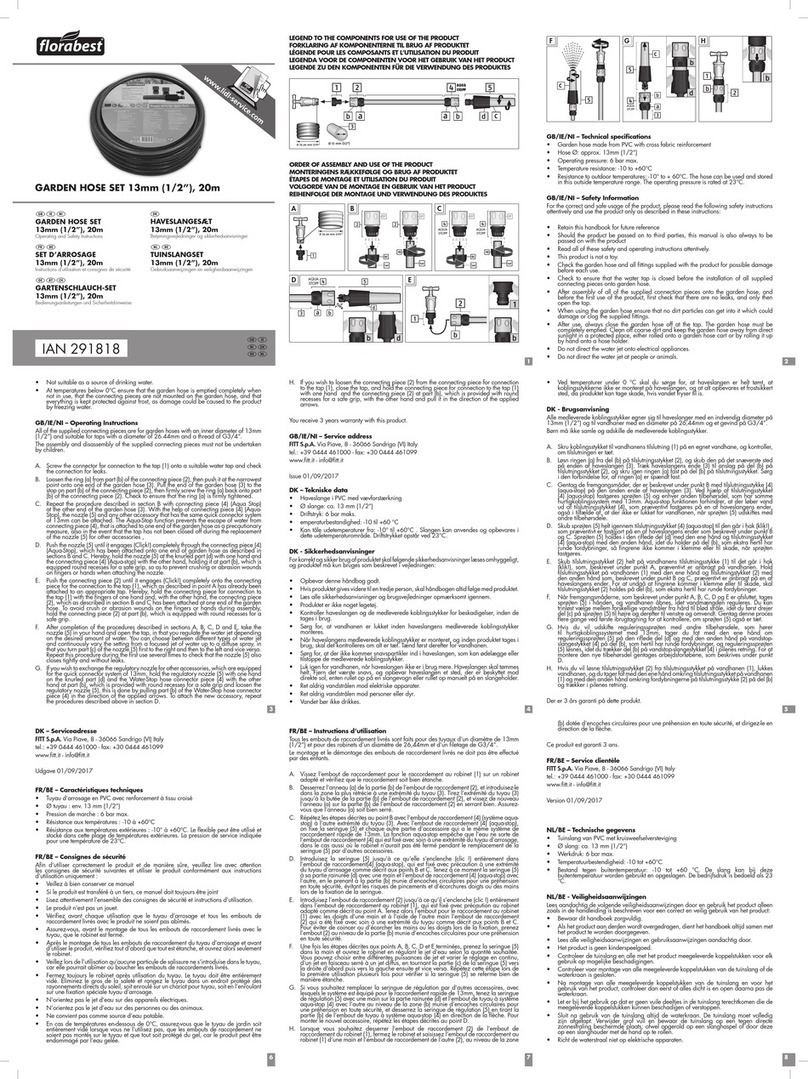
LEGENDE ZU DEN KOMPONENTEN FÜR DIE VERWENDUNG DES PRODUKTES
LÉGENDE POUR LES COMPOSANTS ET L‘UTILISATION DU PRODUIT
LEGENDA COMPONENTI PER UTILIZZARE IL PRODOTTO
LEGEND TO THE COMPONENTS FOR USE OF THE PRODUCT
REIHENFOLGE DER MONTAGE UND VERWENDUNG DES PRODUKTES
ÉTAPES DE MONTAGE ET UTILISATION DU PRODUIT
SEQUENZA OPERAZIONI DI MONTAGGIO E UTILIZZO DEL PRODOTTO
ORDER OF ASSEMBLY AND USE OF THE PRODUCT
E
Ea Eb
DC
B
DE/AT/CH - Technische Daten
Fein perforierter Schlauchregner, ausgestattet mit einem System aus drei Kanälen, die
gleichmäßig über die gesamte Länge des Schlauchs verteilt sind. • Schlauchbreite: ca.
19,4mm • Schlauchhöhe: ca. 6,4mm • Länge: ca. 20m • Betriebsdruck: min. 2bar –
max. 4bar •Temperaturbereich: -10°C +50°C • Beständigkeit gegen Außentemperatur:
-10° bis +50°C . Der Schlauch kann in diesem Außentemperaturbereich benutzt und
gelagert werden. Der Betriebsdruck versteht sich bei 23°C.
DE/AT/CH - Sicherheitshinweise
Für eine richtige und sichere Benutzung des Produkts lesen Sie bitte mit Aufmerksamkeit
die folgenden Sicherheitshinweise und nutzen Sie das Produkt nur wie in der Anleitung
beschrieben:
• Bitte bewahren Sie diese Bedienungs- und Wartungsanleitung auf. • Wird das
Produkt Dritten überlassen, händigen Sie auch die Bedienungs- und Wartungsanleitung
aus. • Lesen Sie alle Sicherheitshinweise aufmerksam durch und befolgen Sie die
Bedienungs- und Wartungsanweisungen. • Das Produkt ist nicht für den Durchgang von
Trinkwasser geeignet. • Nur mit Wasser mit Umgebungstemperatur benutzen. Nicht
mit Wasser mit höheren Temperaturen verwenden. Nicht mit anderen Flüssigkeiten
außer Wasser verwenden. • Kann nur im Freien verwendet werden. •Verwendbar nur
in Verbindung mit einem Gartenschlauch, der mit Schnellsteckanschlüssen und einem
geeigneten Wasserhahnanschluss ausgestattet ist. Diese Komponenten sind nicht in
der Verpackung enthalten. • Durch Einsatz des schraubbaren Endstücks und des
schraubbaren Schnellanschlusses beliebig kürzbar. • Richten Sie den Wasserstrahl nicht
auf elektrische Einrichtungen. • Richten Sie den Wasserstrahl nicht auf Personen oder
Tiere. • Schließen Sie immer den Wasserhahn, bevor Sie mit irgendwelchen Montage
oder Demontagearbeiten am Schlauchregner beginnen. • Kontrollieren Sie vor jeder
Verwendung,dassderSchlauchregnerundallemitgeliefertenAnschlüssenichtbeschädigt
sind. • Überprüfen Sie, ob alle mitgelieferten Anschlüsse korrekt zusammengesetzt sind
und am Schlauchregner gut festsitzen, um unerfreuliche Zwischenfälle zu vermeiden.
• Achten Sie während der Verwendung darauf, dass keine Schmutzpartikel in den
Schlauchregner gelangen und die mitgelieferten Anschlüsse beschädigen oder
verstopfen. • Schließen Sie nach der Verwendung des Schlauchregners immer den
Wasserhahn. • Sobald der Schlauchregner mit dem Wasserhahn verbunden ist, und
zwar durch einen Gartenschlauch mit Schnellsteckanschlüssen und einem geeigneten
Wasserhahnanschluss (nicht in der Verpackung enthalten), vergewissern Sie sich, dass
die Verbindung dicht hält und beginnen Sie erst dann mit der Verwendung des Produkts,
indem Sie den Wasserhahn öffnen. • Benutzen Sie das Produkt nur so, wie es in er
Bedienungs- und Wartungsanleitung beschrieben ist. • Nach der Verwendung des
Produkts führen Sie nacheinander die folgenden Arbeitsschritte aus: • A. Schließen Sie
immer den Wasserhahn. • B. Reinigen Sie das vollständige Produkt (Schlauchregner
und mitgelieferte Anschlüsse) grob von Schmutz und lagern Sie ihn geschützt vor
direkter Sonneneinstrahlung entweder per Hand aufgerollt am Boden oder in einem
Behälter. • Bei Frostgefahr Schlauchregner und Armaturen vollständig entleeren und an
einem frostsicheren Ort aufbewahren.
DE/AT/CH - Gebrauchsanweisungen
Die nachfolgend beschriebenen Arbeitsschritte dürfen nicht von Kindern ausgeführt
werden. Die mitgelieferten Anschlüsse (2) und (3) passen nur an den Schlauchregner
mit drei parallelen Kanälen über die gesamte Länge. Das Produkt wird verkauft mit
montiertem schraubbaren Endstück (2) an einer Seite des Schlauchregners (1) und mit
demSchnellanschluss (3)an deranderen Seite,der mitden meistenSchnellstecksystemen
kompatibel ist. Vor der Verwendung des Produkts führen Sie nacheinander die
folgenden Arbeitsschritte aus:
A. Nachdem Sie zuerst alle in der Bedienungs- und Wartungsanleitung beschriebenen
Hinweise befolgt haben, legen Sie den Schlauchregner (1) in die Mitte des Bereichs,
der bewässert werden soll, und zwar zur Beregnung mit dem fein perforierten Teil
nach oben (A1) oder zur Durchtränkung mit dem fein perforierten Teil zum Boden
gedreht (A2).
B. Verbinden SiedenSchlauchregner (1)mit Hilfeeines Gartenschlauchs, dermiteinem
Schnellsteckanschluss mit “Aqua-Stop”-System und einem passenden Schnellsteck-
Wasserhahnanschluss versehen ist, mit dem entsprechenden Wasserhahn. Mit
dem Wasserhahn kann die gewünschte Wassermenge reguliert werden.
C. Schieben Sie den Schlauchregner (1) mit dem Schnellsteckanschluss mit “Aqua-
Stop”-System, der vorher an einem Ende des Gartenschlauchs befestigt worden
ist, vollständig zusammen, bis er hörbar einrastet (Klick!). Dazu greifen Sie den
schraubbaren Schnellanschluss (3) am geriffelten Teil mit der einen Hand und mit
der anderen Hand den Schnellsteckanschluss mit “Aqua-Stop”-System. Fassen Sie
an einer geeigneten Stelle an, um Quetsch- oder Schürfwunden an den Fingern
oder Händen während des Einsteckens zu vermeiden. Dann öffnen Sie den
Wasserhahn.
D. Um den Schlauchregner (1) vom Schnellsteckanschluss mit “Aqua-Stop”-System
zu lösen, der an einem Ende des Gartenschlauchs befestigt ist, greifen Sie den
schraubbaren Schnellanschluss (3), der am Schlauchregner (1) befestigt ist, am
geriffelten Teil, wie in der Abbildung gezeigt ist, und mit der anderen Hand greifen
Sie den Schnellsteckanschluss mit “Aqua-Stop”-System an einer geeigneten Stelle.
Schließlich trennen Sie den Schlauchregner (1), indem Sie in Richtung der in der
Abbildung gezeigten Pfeile ziehen.
E. Im Bedarfsfall kann der Schlauchregner (1) gekürzt werden, indem man ihn nach
Belieben mit einem geeigneten Werkzeug, wie z.B. einer Schere, durchschneidet.
Nachdem Sie den Schlauchregner (1) abgeschnitten haben, führen Sie folgende
Anweisungen aus:
Ea. Demontieren Sie das schraubbare Endstück (2), indem Sie Teil (b) abschrauben,
und dann Teil (c) und anschließend Teil (a) vom Schlauchregner abziehen.
Eb. Befestigen Sie das schraubbare Endstück am neuen Ende des Schlauchregners
(1), indem Sie dieses Ende des Schlauchregners (1) in Teil (a) des schraubbaren
Endstücks (2) einschieben. Stecken Sie nun Teil (c) an das Ende des vorher in
Teil (a) eingeschobenen Schlauchs und verschließen Sie es mit dem Endstück (b)
durch festes Anziehen.
Sie erhalten auf dieses Produkt 3 Jahre Garantie.
Ausgabe 31/10/2016
FR/CH - Données techniques
Arroseur souple finement perforé, équipé d’un système de trois canaux répartis de
manière régulière sur toute la longueur du tuyau. • Largeur tuyau : env. 19,4mm •
Hauteur tuyau : env. 6,4mm • Longueur : env. 20m • Pression de service : min. 2bar
– max. 4bar • Domaine de température : -10°C +50°C • Résistance aux températures
extérieures : -10° à +50°C. Le flexible peut être utilisé et stocké dans cette plage de
températures extérieures. Pression de service indiquée pour une température de 23°C.
FR/CH - Instructions de sécurité
Pour une utilisation correcte et sûre du produit, veuillez lire attentivement les consignes de
sécurité suivantes, et utilisez le produit comme indiqué dans les instructions uniquement :
• Veuillez conserver ces instructions d’utilisation et d’entretien. • Si le produit est transmis
à des tiers, veuillez transmettre également les instructions d’utilisation et d’entretien.
• Veuillez lire attentivement les consignes de sécurité et d’entretien et les suivre. • Le
produit ne convient pas pour la distribution d’eau potable. • Utiliser avec de l’eau à
température ambiante uniquement. Ne pas utiliser avec de l’eau à des températures
plus élevées. Ne pas utiliser avec d’autres liquides que de l’eau. • Utilisable à l’air libre
uniquement. • Utilisable raccordé à un tuyau d’arrosage seulement, équipé d’un système
de raccordement rapide et d’un raccord pour robinet d’eau adapté. Ces composants ne
sont pas compris dans l‘emballage. • Ajustable selon vos besoins grâce à l’utilisation
de l’embout vissable et du raccord rapide vissable. • N’orientez pas le jet d’eau sur des
appareils électriques. • N’orientez pas le jet d’eau sur des personnes ou des animaux. •
Fermez toujours le robinet d’eau, avant de commencer quelque montage ou démontage
que ce soit au niveau du gicleur. • Contrôlez avant chaque utilisation que l’arroseur
souple et tous les raccords compris dans la livraison ne soient pas abîmés. • Vérifiez
que tous raccords compris dans l’emballage soient correctement fixés ensemble et bien
fixés à l’arroseur souple, afin d’éviter tout incident fâcheux. • Veillez pendant l’utilisation
à ce qu’aucune particule de saleté ne puisse entrer dans l’arroseur souple et ne puisse
abîmer ou obstruer le raccordement compris dans l’emballage. • Après avoir utilisé
l’arroseur souple, toujours fermer le robinet. • Dès que l’arroseur souple est relié au
robinet, à savoir par un tuyau d’arrosage, avec un système de raccordements rapides
et un raccord pour robinet d’eau adapté (non contenu dans l’emballage), assurez-vous
que le raccord est fixé de manière bien étanche, et commencez alors seulement à utiliser
le produit en ouvrant le robinet. • Utilisez le produit uniquement comme indiqué dans
les instructions d’emploi et d’entretien. • Après utilisation du produit, veuillez suivre les
étapes de travail suivantes : • A. Fermez toujours le robinet. • B. Nettoyez l’ensemble
du produit (gicleur et raccordements) pour éliminer d’abord grossièrement toute salissure
et stockez-le à l’abri des rayons directs du soleil enroulé manuellement soit sur le sol, soit
dans un contenant adapté. • En cas de gel, videz entièrement l’arroseur souple déposé
en surface et conservez-le dans un endroit à l’abri du gel.
FR/CH - Instructions d‘utilisation
Les étapes de travail décrites ci-dessous ne doivent pas être effectuées par des enfants.
Les raccords livrés (2) et (3) sont conçus pour l’arroseur souple uniquement avec trois
canaux parallèles sur toute la longueur. Le produit est vendu avec un embout vissable
déjà monté (2) sur un côté de l’arroseur souple (1) et avec un raccord rapide (3) sur
l’autre côté, qui est compatible avec la plupart des systèmes de raccordement rapide.
Avant d’utiliser le produit, veuillez suivre les étapes de travail suivantes :
A. Après avoir suivi au préalable l’ensemble des instructions d’utilisation et d’entretien
décrites déposez le (1) au milieu de la zone que vous souhaitez irriguer, pour
l’irrigation avec la partie finement perforée orientée vers le haut (A1) ou, pour
l’imprégnation, avec la partie finement perforée orientée vers le sol (A2).
B. Raccordez l’arroseur souple (1) à l’aide d’un tuyau d’arrosage doté d’un système
de raccordement rapide adapté avec système “Aqua-Stop”, et d’un système de
raccordement rapide pour robinet d’eau, avec le robinet d’eau correspondant. La
quantité d’eau souhaitée peut être régulée grâce au robinet
C. Emboîtez complètement l’arroseur souple (1) avec le raccordement rapide avec
système “Aqua-Stop” fixé au préalable à une extrémité du tuyau d’arrosage,
jusqu’à entendre un clic. Prenez alors le raccord rapide vissable (3) d’une main
au niveau de la zone rainurée et le système de raccordement rapide avec “Aqua-
Stop” de l‘autre. Tenez-les à un endroit adéquat, de manière à éviter tout pincement
ou éraflure aux doigts ou aux mains pendant que vous les emboîtez. Puis ouvrez
le robinet d’eau.
D. Pour dévisser l’arroseur souple (1) du système de raccordement rapide avec
“Aqua-Stop”, qui est fixé à une extrémité du tuyau d’arrosage, prenez la partie
rainurée du raccord rapide vissable (3), qui est fixé au niveau de l’arroseur souple
(1), comme indiqué sur l’illustration, et prenez de l’autre main le système de
raccordement rapide avec système “Aqua-Stop” à un endroit adéquat. Séparez
enfin l’arroseur souple (1), en tirant en direction de la flèche imprimée, comme
indiqué sur l‘illustration.
E. L’arroseur souple (1) peut au besoin être raccourci. Coupez-le selon vos besoins
avec un outil adapté, comme un ciseau par exemple. Après avoir coupé l’arroseur
souple (1), veuillez suivre les instructions suivantes :
Ea. Démontez l’embout vissable (2), en dévissant la partie (b), puis la partie (c) et
enfin la partie (a) de l’arroseur souple.
Eb. Fixez l’embout vissable à la nouvelle extrémité de l’arroseur souple (1), en
emboîtant l’extrémité de l’arroseur souple (1) dans la partie (a) de l’embout
vissable (2). Emboîtez ensuite la partie (c) sur l’extrémité du tuyau, emboîté au
préalable dans la partie (a), et fermez-la avec l’embout (b) en serrant fortement.
Ce produit est garanti 3 ans.
Édition 31/10/2016
IT/CH - Dati Tecnici
Tubo per irrigazione microforato dotato di un sistema a tre canali per una distribuzione
uniforme su tutta la lunghezza • Larghezza tubo: ca. 19,4mm • Altezza tubo: ca.
6,4mm • Lunghezza: ca. 20m • Pressione d’esercizio: min. 2bar – max. 4bar •
Temperatura di utilizzo: -15°C + 50°C • Resistenza alle temperature esterne: da -10°
a +50°C. Il tubo flessibile può essere utilizzato e conservato in questo intervallo di
temperature esterne. La pressione d’esercizio è intesa a una temperatura di 23°C.
IT/CH - Avvertenze sulla sicurezza
Per un corretto e sicuro uso del prodotto si raccomanda di leggere il presente manuale
di sicurezza, uso e manutenzione e di conservarlo con cura:
• Si prega di conservare il presente manuale d’uso e manutenzione. • Nel caso il
prodotto venga ceduto a terzi, consegnare anche il manuale d’uso e manutenzione.
• Leggere attentamente tutte le avvertenze sulla sicurezza e seguire le istruzioni
d’uso e manutenzione. • Il prodotto non è idoneo al passaggio di acqua potabile. •
Utilizzare sempre con acqua a temperatura ambiente. Non utilizzare con acqua ad
elevate temperature. Non utilizzare con liquidi diversi dall’acqua. • Utilizzabile solo
all’aperto. • Utilizzabile solo in collegamento con un tubo flessibile da giardino dotato
di raccordi ad innesto rapido e un raccordo allacciamento rubinetto idoneo. Tali
componenti non sono compresi nella confezione. • Accorciabile a piacere tenendo
il raccordo con l’elemento finale avvitabile e il raccordo rapido avvitabile. • Non
indirizzare il getto d’acqua verso apparecchiature elettriche; • Non indirizzare il getto
d’acqua verso persone o animali; • Chiudere sempre il rubinetto prima di iniziare
qualsiasi lavoro di montaggio o smontaggio con il tubo flessibile irrigatore; • Prima
di ogni utilizzo controllare che il tubo per irrigazione e tutti i raccordi in dotazione
non siano danneggiati; • Verificare che tutti i raccordi in dotazione siano assemblati
correttamente e ben stretti al tubo per irrigazione, al fine di evitare spiacevoli incidenti;
• Durante l’utilizzo fare attenzione che alcune particelle di sporco non entrino
all’interno del tubo per irrigazione e danneggino o intasino i raccordi in dotazione;
• Una volta finito di usare il tubo per irrigazione chiudere sempre il rubinetto; • Una
volta collegato il tubo per irrigazione al rubinetto, tramite un tubo flessibile da giardino
dotato di raccordi ad innesto rapido e un raccordo allacciamento rubinetto idoneo
(non compresi nella confezione), assicurarsi della tenuta del collegamento e solo a
questo punto cominciare ad utilizzare il prodotto aprendo il rubinetto; • Utilizzare il
prodotto esclusivamente come descritto nel manuale d’uso e manutenzione; • Una
volta terminato di usare il prodotto seguire in sequenza le seguenti operazioni: • A.
Chiudere sempre il rubinetto, • B. Pulire il prodotto completo di tubo per irrigazione,
raccordi in dotazione grossolanamente dallo sporco e riporlo al riparo dalle radiazioni
dirette del sole, arrotolato manualmente e posato a terra o all’interno di un contenitore.
• In caso di pericolo di gelo, svuotare completamente il tubo per irrigazione e i giunti
e custodirli in un luogo al riparo dal gelo.
IT/CH - Istruzioni d’utilizzo
Le operazioni di seguito descritte non devono essere svolte da bambini. Tutti i raccordi
in dotazione (2) e (3) sono adatti al solo tubo per irrigazione microforato dotato di
canali paralleli lungo tutta la lunghezza. Il prodotto viene venduto con il raccordo
con elemento finale avvitabile (2) montato su una parte del tubo per irrigazione (1) e
dall’altra parte il raccordo rapido (3) compatibile con i più comuni sistemi di innesto
rapido. Prima di utilizzare il prodotto, eseguire in sequenza le seguenti operazioni:
A. Avendo prima seguito tutte le avvertenze scritte nel manuale d’uso e manutenzione,
posare il tubo per irrigazione (1) al centro della zona che si vuole irrigare, nella
modalità irrorazione a pioggia tenendo la parte microforata verso l’alto (A1) o
impregnamento con la parte microforata rivolta verso il terreno (A2).
B. Collegare il tubo per irrigazione (1) ad un rubinetto idoneo, tramite un tubo flessibile
da giardino dotato di un raccordo ad innesto rapido con sistema “aqua-stop”, e
un raccordo ad innesto rapido con presa allacciamento rubinetto adatto al proprio
rubinetto. Con il rubinetto si può regolare la quantità di acqua desiderata.
C. Inserire completamente fino a che lo si sente scattare (clic!!), il tubo per irrigazione
(1) nel raccordo ad innesto rapido dotato di sistema “aqua-stop” preventivamente
fissato ad una delle estremità del tubo flessibile da giardino. Per farlo impugnare
il raccordo rapido avvitabile (3) dalla parte zigrinata con una mano e con l’altra
mano il raccordo ad innesto rapido dotato di sistema “aqua-stop” prendendolo in
posizione idonea in modo da evitare schiacciamenti o pizzicamenti delle dita o
delle mani durante l’operazione di inserimento, quindi aprire il rubinetto.
D. Per sganciare il tubo per irrigazione (1) dal raccordo ad innesto rapido dotato di
sistema “aqua-stop” fissato ad una delle estremità del tubo flessibile da giardino,
impugnare il raccordo rapido avvitabile (3) fissato al tubo per irrigazione (1) dalla
parte zigrinata come indicato in figura e con l’altra mano il raccordo ad innesto
rapido dotato di sistema “aqua-stop” prendendolo in posizione idonea quindi
sganciare il tubo per irrigazione (1) tirando in direzione delle frecce indicate in
figura;
E. In caso di necessità si può accorciare il tubo per irrigazione (1), tagliandolo a
piacere con un attrezzo idoneo quale una forbice. Dopo aver tagliato il tubo per
irrigazione (1) eseguire le seguenti istruzioni:
Ea. Smontare il raccordo con elemento finale avvitabile (2) svitandone la parte (b)
e di seguito sfilando dal tubo per irrigazione (1) la parte (c) e successivamente
la parte (a).
Eb. Fissare il raccordo con elemento finale avvitabile (2) alla nuova estremità del
tubo per irrigazione (1), inserendo tale estremità del tubo per irrigazione (1) alla
parte (a) del raccordo con elemento finale avvitabile (2). Infilare quindi la parte
(c) all’estremità del tubo preventivamente inserito nella parte (a) e chiudere con
il tappo (b) assicurandosi di stringere bene.
Prodotto garantito 3 anni.
Edizione 31/10/2016
1
GB - Technical Specifications
Finely perforated sprinkler hose, fitted with a system comprising three channels which
are distributed uniformly over the entire length of the hose. • Hose width: approx.
19.4mm • Hose Height: approx. 6.4mm • Length: approx. 20m • Operating
pressure: min. 2bar - max. 4bar • Temperature range: -10°C to +50°C • Resistance to
outdoor temperatures: -10° to + 50°C. The hose can be used and stored in this outside
temperature range. The operating pressure is rated at 23°C.
GB - Safety Instructions
For a correct and safe usage of the product, please read the following safety instructions
attentively and use the product only as described in these instructions:
• Please retain these operating and maintenance instructions. • Should the product be
transferredtothirdparties,alsohandovertheseoperatingandmaintenanceinstructions.•
Attentively read all of these safety instructions and comply with the operating and
maintenance instructions. • The product is not suitable for the transmission of potable
water. • Use only with water at ambient temperatures. Do not use with water at higher
temperatures. Do not use with liquids other than water. • Usable only outdoors. • Can
only be used together with a garden hose which is fitted with quick-release plug-in
connectors and a suitable tap connector. These components are not included in the
package. • Can be shortened as required through use of the screw-type end piece and
screw-type quick connector. • Do not direct the water jet at electrical equipment. • Do
not direct the water jet at people or animals. • Always close the tap before starting any
assembly or disassembly work on the sprinkler hose. • Before every use check that the
sprinkler hose and all supplied connections are not damaged. • Check that all supplied
connections are assembled correctly and firmly seated on the sprinkler hose, so as to
avoid unpleasant incidents. • During use ensure that dirt particles cannot get into the
sprinkler hose and cause damage to or clogging of the supplied connectors. • After
using the sprinkler hose always close the water tap. • As soon as the sprinkler hose has
been connected to the tap, by means of a garden hose with quick plug-in connections
and a suitable tap connector (not included in the package), ensure that the connections
are watertight and only then start using the product, by opening the tap. • Only use
the product as described in the operating and maintenance instructions. • After using
the product successively carry out the following tasks: • A. Always close the tap. • B.
Clean coarse dirt from the complete product (sprinkler hose and supplied connectors)
and store it, protected him from direct sunlight, either rolled-up by hand on the ground
or in a container. • If there is a risk of frost, completely drain the sprinkler hose and
fittings and store them in a frost-protected location.
GB - Directions for use
The set-up operations described below may not be performed by children. The supplied
connectors (2) and (3) are suitable only for a sprinkler hose with three parallel channels
over its entire length. The product is sold with a mounted screw-type end piece (2) on
the one end of the sprinkler hose (1) and a screw-type quick connector (3) on the other
end, which is compatible with most quick-release plug-in systems. Before using the
product successively carry out the following tasks:
A. After you have first taken note of all instructions described in the operating and
maintenance instructions, place the sprinkler hose (1) in the middle of the area
to be irrigated, and namely, for spraying with the finely perforated part facing
upwards (A1) or, for soaking, with the finely perforated portion facing the ground
A
A1 A2
