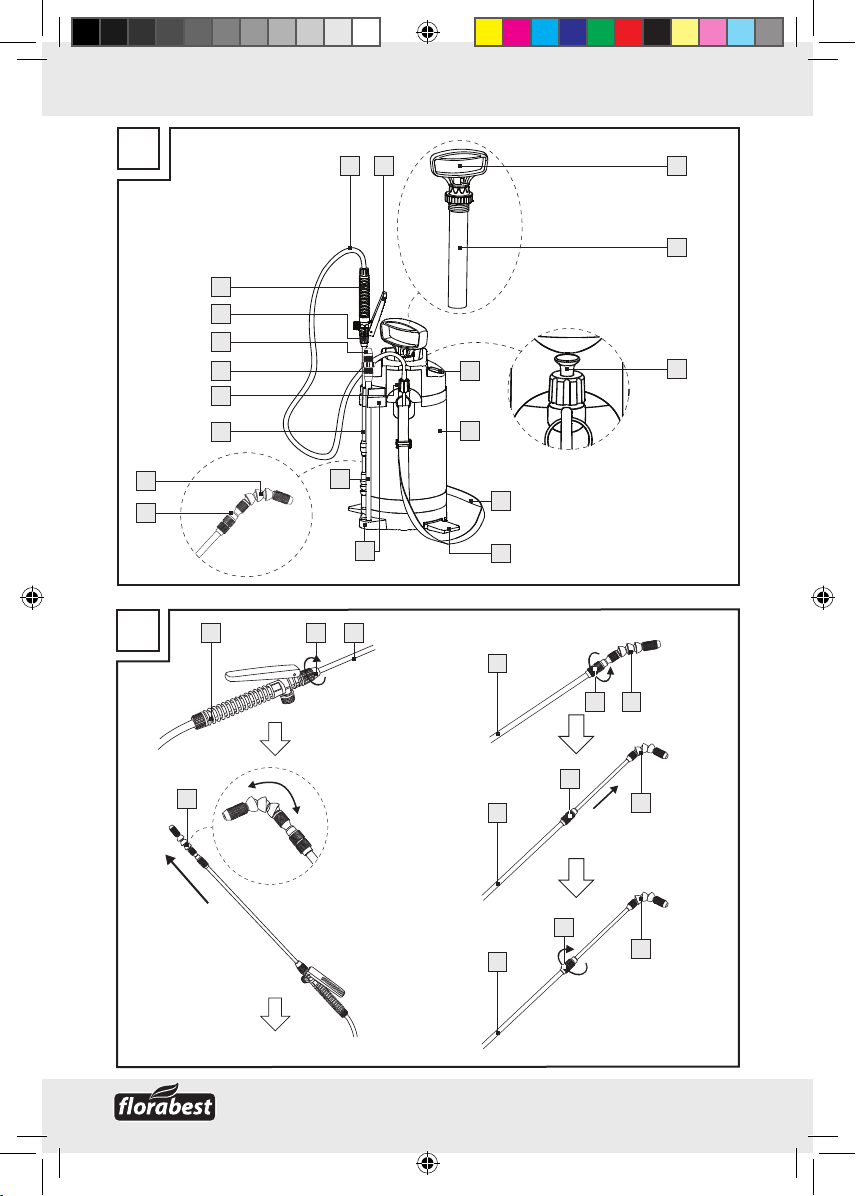
FLORABEST Z30597 User manual

3
®
A
B
1
2
3
4
5
6
9
14
13
15
16
12
10
11
17
7
8
1918
11
17 16 12
12
12
12
10
10
10 11
11
11
56222_flo_Drucksprüher_Content_LB7.indd 3 02.12.10 16:15

4
®
D
1 1
E
3
1 1
2 2
C9
915
15
12
16 9
12
17
12
56222_flo_Drucksprüher_Content_LB7.indd 4 02.12.10 16:15

5
®
7
11
11
1911
17
1
4
4
2
F
G
7
77
56222_flo_Drucksprüher_Content_LB7.indd 5 02.12.10 16:15

6 GB/CY
®
Table of contents
Introduction
Proper use .................................................................................................................Page 7
Description of parts and features............................................................................Page 7
Technical data...........................................................................................................Page 7
Included items...........................................................................................................Page 8
Safety advice
General safety advice..............................................................................................Page 8
Before use ............................................................................................................Page 10
Bringing into use
Attaching the spray tube without the extension tube ............................................Page 10
Attaching the spray tube with the extension tube..................................................Page 10
Filling the pressure sprayer tank..............................................................................Pa g e 11
Building up the operating pressure.........................................................................Pag e 11
Spraying....................................................................................................................Pa g e 11
Cleaning and care
Clean the pressure sprayer......................................................................................Page 12
Clean the suction hose.............................................................................................Page 12
Store the pressure sprayer.......................................................................................Page 12
Disposal..................................................................................................................Page 12
56222_flo_Drucksprüher_Content_LB7.indd 6 02.12.10 16:15

7GB/CY
®
Pressure Sprayer
Q
Introduction
These operating instructions are
intended to help you use the
pressure sprayer in a proper, safe
and efficient manner. Every person who uses,
cleans or disposes of this pressure sprayer
must have taken note of the content of these
operating instructions. These operating instruc-
tions form a part of the pressure sprayer.
Always keep these instructions together with
the pressure sprayer in a safe place. If you
pass the pressure sprayer on to a third party,
please ensure that you also pass on these
operation instructions.
Q
Proper use
The product is used for spraying liquids in the
home, garden and greenhouses. The liquids
include water, insecticides and fungicides
for plants, disinfectants and water-soluble
fertilisers that are allowed to be used in your
country. The insecticides, fungicides and
fertilisers for plants may only be sprayed in
the concentrations given in the instructions
from the sprayed medium manufacturer. The
spraying of solvents or solvent-containing
liquids or oil is a particular example of
improper use of the product. Any use other
than that described here or modification to
the product is not permitted and could lead
to injury and / or damage to the product.
The manufacturer does not accept any liability
for damage resulting from improper use.
This product is intended for private use only.
Q
Description of parts and
features
1Pump handle
2Pump
3Safety valve
4Pressure gauge
5Container
6Carrying strap
7Footplate
8Holder for extendible spray tube and
the extension tube
9Extension tube
10 Locknut
11 Spray nozzle, adjustable
12 Spray tube (extendible)
13 Union nut (suction hose)
14 Connector
15 Union nut (extension tube)
16 Union nut
17 Spray tube handle
18 Suction hose
19 Trigger
Q
Technical data
Container
dimensions (ø×H): approx. 180x450mm
Weight, empty: approx. 1.6kg
Length of spray
tube (extendible): approx. 450-750mm
Length of
extension tube: approx. 350mm
Capacity: approx. 5l
Gross capacity: approx. 5.7l
Permissible operating
pressure: approx. 2.5bar
Operating
temperature: 0-40°C
Introduction
56222_flo_Drucksprüher_Content_LB7.indd 7 02.12.10 16:15

8 GB/CY
®
Introduction/Safety advice
Carrying method: At the operator‘s side,
using the carrying strap
Volume flow
(l/min.): max. 0.7
Q
Included items
Check that the product and all the parts are
present and have no defects immediately
after unpacking. Do not use the product if
any of the included items listed below are
missing.
1 Pressure sprayer
1 Extendible spray tube
1 Extension tube
1 Carrying strap
1 Operating instructions
Safety advice
Q
General safety advice
KEEP ALL THE SAFETY ADVICE AND
INSTRUCTIONS IN A SAFE PLACE FOR
FUTURE REFERENCE!
J WARNING!DAN-
GER OF LOSS OF LIFE
AND ACCIDENT TO
INFANTS AND CHILDREN! Never
leave children unsupervised with the
packaging materials. Danger of suffo-
cation. Keep out of the reach of children.
J Children or persons who lack the
knowledge or experience to use the
device or whose physical, sensory or
intellectual capacities are limited must
never be allowed to use the device
without supervision or instruction by a
person responsible for their safety.
Children must never be allowed to play
with the device.
WARNING!RISK OF INJURY!
Do not use the product if it is damaged.
J Please ensure that no parts are damaged
and that all parts are correctly assembled.
Incorrect assembly could lead to injury.
WARNING!RISK OF INJURY!
There is a risk of injury to the skin resulting
from contact with the spray product.
Always wear suitable protective clothing,
gloves and breathing protection when
spraying plant protection products, ferti-
lisers, disinfectants or cleaning agents.
J Do not place any acidic, corrosive or
combustible liquids in the pressure
sprayer.
J Never spray people, animals, electrical
devices or electrical wiring.
J Never spray against the wind direction.
J Do not operate the pressure sprayer if it
is visibly damaged.
J No modifications may be carried out to
the safety valve.
J Pull the safety valve upwards to release
any residual pressure.
J If the nozzle seems to be blocked, do
not try to blow it free with your mouth.
J The pressure sprayer is not suitable for
spraying liquids that have to be used at
temperatures higher than the maximum
permissible usage temperature of 40°C.
WARNING!Do not carry out any
repairs or modifications to the pressure
sprayer.
J Release any residual pressure still present
in the container after use. To do this,
pull the safety valve button upwards
until you can no longer hear the hiss of
escaping air.
56222_flo_Drucksprüher_Content_LB7.indd 8 02.12.10 16:15

9GB/CY
®
Safety advice
J Do not eat, smoke or drink while you are
working with plant insecticides, fungicides,
fertilisers or liquid cleaning agents.
J Wash your hands and face after each
spraying session.
J Thoroughly clean the device and allow
it to dry before you put it away for the
winter. This will avoid frost damage.
J CAUTION! RISK OF
EXPLOSION! Do not place
the device (empty or full) in
direct sunlight!
J Do not open the device or carry out
any maintenance of the device if there
is any pressure still present in the tank.
J Always read and observe the information
provided by the chemical manufacturer
when working with or mixing spray
solutions.
J Fill the tank with only as much liquid as
you will need for that particular spraying
session.
J Keep the pressure sprayer in the upright
position while operating or moving it.
J Observe the pressure gauge indicator
on the container while you are pumping.
Do not exceed the maximum permissible
pressure of 2.5bar.
J Release the residual pressure in the
container by pulling the safety valve
upwards before you open the container
(Fig. D).
J Release the residual pressure after use
by pulling the safety valve upwards.
Explanation of the symbols used:
5- l pressure sprayer
Max. filled capacity:
Approx. 5 litres or 8.8 pints
Permissible operating pressure:
Approx. 2.5bar
Protect the container from solar
radiation!
Not for use with corrosive
substances!
Not for use with readily
flammable liquids!
Do not spray on electrical devices,
electrical cables or wires.
Do not spray on people!
Do not spray on animals!
Spray on plants only!
56222_flo_Drucksprüher_Content_LB7.indd 9 02.12.10 16:15

10 GB/CY
®
Safety advice/Before use/Bringing into use
Do not use the product for
drinks!
Fill the device only with liquids at
temperatures of 0-40°C.
Q
Before use
mCAUTION! Check that the device is
functioning properly! Check the pressure
sprayer before each use to ensure that it
is free of visible damage and is func-
tioning safely. To do this, carry out the
following tests and inspections:
Check the pressure sprayer for
visible signs of damage
j Check the container 5for visible signs
of damage.
j Check the suction hose 18 for visible
signs of damage.
j Check the carrying strap 6for visible
signs of damage.
Check connections
j Check that the hose connections are fitted
tightly.
j Check that the pipe connections are fitted
tightly.
Check that the pressure sprayer is
tight and leak-free
j Pump the empty pressure sprayer to
approx. 2bar.
The pressure must not fall more than ap-
prox. 0.5bar in a space of 30 minutes.
Check operation of the safety
valve
j Pump the pressure sprayer to approx.
2bar.
j Pull the safety valve 3up to the stop.
You must be able to hear the pressure
escaping.
Q
Bringing into use
Q
Attaching the spray tube
without the extension
tube (Fig. B)
j Turn the union nut 16 anticlockwise to
release it from the handle 17. Push the
spray tube 12 into the handle 17 as
far as it will go.
j Tighten the union nut 16 by turning it
clockwise.
Note: You can also extend the spray
tube 12 by turning the lock nut 10 anti-
clockwise to release it and then pulling
out the extension. Then retighten the
lock nut 10 (see Fig. B).
Q
Attaching the spray tube
with the extension tube
(Fig. C)
j Loosen the union nut 15 slightly by turn-
ing it anticlockwise. Insert the spray
tube 12 into the union nut 15.
j Tighten the union nut 15 by turning it
clockwise.
j Insert the extension tube 9into the
union nut 16.
j Tighten the union nut 16 by turning it
clockwise.
56222_flo_Drucksprüher_Content_LB7.indd 10 02.12.10 16:15

11GB/CY
®
Bringing into use
Q
Filling the pressure
sprayer tank (Fig. E)
Note: Before using the product, check to
see that it is in good condition and free of
defects.
j Press the pump handle 1downwards
and turn it anticlockwise.
Note: Before you open the tank, pull
the safety valve 3upwards to release
any residual pressure still present in the
container 5.
j Draw the pump 2out of the container
5.
j Now fill the tank. Ensure that the use of
the pesticide, liquid fertiliser or cleaning
agent is permitted in your country and
that it is compatible with your pressure
sprayer.
Note: Fill the tank with only the
amount of liquid that you actually need
for that particular spraying session (not
more than 5l).
j Place the pump 2back into the con-
tainer 5and turn the pump handle 1
clockwise as far as it will go.
Q
Building up the operating
pressure (Fig. F)
j Fold out the two footplates 7.
j Before you start pumping, place your
feet on the footplates 7to ensure that
the pressure sprayer is held in a stable
position during the pumping process.
j Move the pump handle 1up and down
until the pressure sprayer has been
pumped up to a pressure not exceeding
the maximum permissible operating
pressure of 2.5bar. To ensure this value
is not exceeded, monitor the pressure
gauge 4during the pumping process.
Note: If the pressure of the air in the
container 5exceeds 2.5 bar, the pres-
sure is automatically released through
the safety valve 3.
j Press the pump handle 1downwards
into the recesses.
j Turn the pump handle 1clockwise as
far as it will go. This secures the handle.
j Now take the spray tube 12 out of the
holder.
j Fold in the two footplates 7.
Q
Spraying (Fig. G)
j Hang the pressure sprayer over your
shoulder by the carrying strap 6.
Note: Ensure that the pressure sprayer
is always kept upright. Only when held
in this orientation will the sprayer work
properly.
j Hold the spray tube firmly by the han-
dle 17 and direct the adjustable spray
nozzle 11 e.g. at a plant.
j Set the adjustable spray nozzle 11 to
provide the desired spray cone. To create
a broad spray cone, turn the front part
of the adjustable spray nozzle 11 clock-
wise. To create a concentrated jet, turn
the front part of the adjustable spray
nozzle 11 anticlockwise.
j Press the trigger 19 to start the spraying
process.
j Release the trigger 19 to stop the
spraying process.
Note: When the pressure in the con-
tainer 5is no longer sufficient to spray,
pump the container 5to increase the
pressure again up to but not exceeding
the maximum permissible operating
56222_flo_Drucksprüher_Content_LB7.indd 11 02.12.10 16:15

12 GB/CY
®
Bringing into use/Cleaning and care/Disposal
pressure of 2.5bar. You can check the
operating pressure using the pressure
gauge 4(see “Building up the operat-
ing pressure”).
j Pull the safety valve 3upwards as far
as it will go to release the residual pres-
sure in the container 5.
Q
Cleaning and care
Note: Clean the pressure sprayer after
each use!
Q
Clean the pressure
sprayer
j Unscrew the spray nozzle 11.
j Clean the spray nozzle 11 under running
water.
j If the spray nozzle 11 is clogged,
clean it by pushing a needle through it.
j Flush through the pressure sprayer,
pipes and tubes with water.
j Clean the surfaces of the product with
a moist cloth.
Q
Clean the suction hose
Clean the suction hose 18 as follows:
j Loosen the union nut of the suction hose
13 on the container 5.
j Pull the suction hose 18 out of the
tank 5.
j Clean the suction hose 18 under running
water.
j After cleaning, insert the suction hose
18 back in its opening on the tank 5.
j Tighten the union nut 13 hand-tight.
Q
Store the pressure
sprayer
j Clean the pressure sprayer before storing
it away.
j Remove any leftover spray product from
the tank and the pipes.
j Store the pressure sprayer in a dry,
dust-free place.
Q
Disposal
The packaging is made entirely
of recyclable materials, which
you may dispose of at local
recycling facilities.
Contact your local refuse disposal authority
for more details of how to dispose of your
worn-out product.
Product Information:
Pressure Sprayer
Model no.: Z30597
Version: 11 / 2010
56222_flo_Drucksprüher_Content_LB7.indd 12 02.12.10 16:15

13HR
®
Uvod
Namjenska uporaba......................................................................................... Stranica 14
Opis dijelova...................................................................................................... Stranica 14
Tehnički podaci.................................................................................................. Stranica 14
Opseg pošiljke................................................................................................... Stranica 15
Sigurnosne upute
Opće sigurnosne upute..................................................................................... Stranica 15
Prije stavljanja u pogon.................................................................... Stranica 16
Stavljanje u pogon
Montiranje cijevi za rasprskivanje bez produženja ....................................... Stranica 17
Montiranje cijevi za rasprskivanje s produženjem ......................................... Stranica 17
Punjenje spremnika tlačnog
rasprskivača........................................................... Stranica 17
Stvaranje pogonskog tlaka............................................................................... Stranica 18
Rasprskivanje ..................................................................................................... Stranica 18
Čišćenje i njega
Čišćenje tlačne prskalice .................................................................................. Stranica 18
Čišćenje usisne cijevi......................................................................................... Stranica 19
Skladištenje tlačne prskalice............................................................................. Stranica 19
Zbrinjavanje otpada............................................................................ Stranica 19
Popis sadržaja
56222_flo_Drucksprüher_Content_LB7.indd 13 02.12.10 16:15

14 HR
®
Uvod
Tlačna prskalica
Q
Uvod
Ove upute za uporabu služe Vam
pri namjenskoj, sigurnoj i ekono-
mičnoj primjeni tlačnog rasprski-
vača. Svaka osoba, koja rabi, čisti ili uklanja
ovaj tlačni rasprskivač, treba se prije toga
upoznati sa sadržajem ovih uputa za upo-
rabu. Ove upute za uporabu su sastavni dio
tlačnog rasprskivača. Molimo sačuvajte iste
zajedno sa tlačnim rasprskivačem. U slučaju
proslijeđivanja tlačnog rasprskivača, predajte
također upute za uporabu.
Q
Namjenska uporaba
Proizvod služi za rasprskivanje tekućina
po kući, vrtu i staklenicima. Tim tekućinama
pripadaju voda, sredstva za zaštitu bilja,
sredstva za dezinfekciju i u vodi otopljena
umjetna gnojiva, koji su u Vašoj zemlji do-
pušteni za uporabu. Sredstva za zaštitu i
gnojenje bilja smije se rasprskivati isključivo
u koncentraciji navedenoj od strane proizvo-
đača sredstva za rasprskivanje. Posebno
rasprskivanje otapala ili tekućina koje sadrže
otapala kao ulje, smatra se nenamjenskim.
Druga uporaba osim prethodno opisane ili
promjene proizvoda nisu dozvoljene i mogu
prouzročiti ozljede i/ili oštećenje proizvoda.
Proizvođač ne jamči za štete nastale od
nenamjenske uporabe. Proizvod je isključivo
namjenjen za privatnu uporabu.
Q
Opis dijelova
1ručka pumpe
2pumpa
3sigurnosni ventil
4manometar
5posuda
6naramenica
7nožna pedala
8pričvršćenje za produljivu cijev za
rasprskivanje i produžna cijev
9produžna cijev
10 kontra matica
11 sapnica za rasprskivanje, namjestiva
12 cijev za rasprskivanje (na izvlačenje)
13 slijepi vijak (usisna gipka cijev)
14 spojni komad
15 slijepi vijak (produžna cijev)
16 slijepi vijak
17 ručka cijevi za rasprskivanje
18 usisna gipka cijev
19 okidna poluga
Q
Tehnički podaci
Mjere posude (øxv): cca.
180x450mm
Vlastita težina: cca. 1,6kg
Duljina cijevi za
rasprskivanje (na izvlačenje): cca.
450-750mm
Duljina produžne cijevi: cca. 350mm
Zapremina punjenja: cca. 5l
Ukupna zapremina: cca. 5,7l
Dozvoljeni pogonski tlak: cca. 2,5bar
Uporabna temperatura: 0 - 40 °C
Način nošenja: bočno sa
naramenicama
Prostorna struja (l/min.): maks. 0,7
56222_flo_Drucksprüher_Content_LB7.indd 14 02.12.10 16:15

15HR
®
Uvod/Sigurnosne upute
Q
Opseg pošiljke
Nakon otpakiranja, smjesta provjerite opseg
pošiljke na potpunost kao i besprijekorno
stanje proizvoda i svih dijelova. Ne rabite
proizvod ni u kojem slučaju, ako opseg
pošiljke nije potpun.
1 tlačni rasprskivač
1 produljiva cijev za rasprskivanje
1 produžna cijev
1 naramenice
1 upute za uporabu
Sigurnosne upute
Q
Opće sigurnosne upute
SAčUVAjTE SVE SIgURNOSNE NAPO-
mENE I UPUTE zA bUDUćNOST!
J UPOZORENJE!
OPASNOST PO ŽIVOT I
OD NEZGODA ZA DJECU!
Ne ostavljajte djecu nikad bez nadzora
u blizini omotnog materijala. Prijeti opa-
snost od gušenja. Držite proizvod podalje
od djece.
J Djeci ili osobama, koje nemaju dostatno
znanje ili iskustvo u uporabi uređaja, ili
kojima su ograničene tijelesne, senzoričke
ili mentalne sposobnosti, zabranjeno je
korištenje uređaja bez nadzora ili nad-
gledanja osobe koja je odgovorna za
njihovu sigurnost. Potrebno je nadzirati
djecu, kako se nebi igrala sa uređajem.
UPOZORENJE! OPASNOST OD
OZLJEDA! Ne rabite proizvod ako je
oštećen.
J Osigurajte, da su svi dijelovi neoštećeni
i stručno montirani. U slučaju nestručne
montaže prijeti opasnost od ozljeda.
UPOZORENJE! OPASNOST OD
OZLJEDA! Prijeti opasnost od ozljeda
kože u slučaju dodira sa sredstvom koje
se prska. Nosite prikladnu zaštitnu odjeću,
rukavice i zaštitu za usta, tijekom prska-
nja sredstava za zaštitu bilja, sredstava
za dezinfekciju ili sredstava za čišćenje.
J Ne punite tlačni rasprskivač kiselim,
nagrizajućim ili zapaljivim tekućinama.
J Ne prskajte nikad na osobe, životinje,
električne uređaje i električne vodove.
J Ne prskajte nikad u vjetar.
J Ne stavljajte vidno oštećenu tlačnu
prskalicu u pogon.
J Ne poduzimajte nikakve promjene na
sigurnosnom ventilu.
J Otvorite sigurnosni ventil povlačenjem,
kako bi otpustili preostali tlak.
J Ne ispuhujte sapnicu usno, ako je zače-
pljena.
J Tlačni rasprskivač nije namjenjen za
rasprskivanje tekućina, koje prekoračuju
maksimalnu uporabnu temperaturu od
40°C.
UPOZORENJE! Ne izvodite poprav-
ke ili promjene na tlačnom rasprskivaču.
J Nakon uporabe, otpustite eventualno
preostali tlak u posudi. Za to potegnite
dugme na sigurnosnom ventilu prema
gore, sve dok se više ne čuje pištanje.
J Ne jedite, ne pušite i ne pijte tijekom
rada sa sredstvima za zaštitu, gnojenje
bilja i tekućinama za čišćenje.
J Nakon rasprskivanja, očistite Vaše ruke
i lice.
J Temeljito očistite uređaj i pustite da se
osuši, prije skladištenja preko zime. Na
taj način sprječavate oštećenja od mraza.
56222_flo_Drucksprüher_Content_LB7.indd 15 02.12.10 16:15

16 HR
®
Sigurnosne upute/Prije stavljanja u pogon
J OPREZ! OPASNOST OD
EKSPLOZIJE! Ne izlažite
uređaj (prazan ili napunjen)
izravnom suncu!
J Otvarajte uređaj i izvodite radove redo-
vitog održavanja isključivo kad spremnik
više ne sadrži tlak.
J Pri radu i miješanju sa otopinama za
rasprskivanje, vodite uvijek računa o
kemičkim podacima proizvođača.
J Napunite spremnik samo sa toliko teku-
ćine koliko je potrebno.
J Pomičite tlačni rasprskivač i stavljajte ga
isključivo u okomitom položaju u pogon.
J Tijekom pumpanja vodite računa o
pokazivanju manometra na posudi. Ne
prekoračujte maks. dozvoljeni pogonski
tlak od 2,5bar.
J Prije svakog otvaranja posude, ispustite
preostali tlak povlačenjem sigurnosnog
ventila (prik. D).
J Nakon uporabe, otpustite preostali tlak
povlačenjem sigurnosnog ventila.
Pojašnjenje znakova:
5- l -tlačni rasprskivač
maks. zapremina punjenja:
cca. 5 litara tj. 8,8 Pints
dozvoljeni pogonski tlak:
cca. 2,5bar
Zaštite posudu od sunca!
Ne rabite nagrizajuće tvari!
Ne rabite lako zapaljive tekućine!
Ne prskajte na električne
uređaje, električne kabele i
vodove.
Ne prskajte na osobe!
Ne prskajte na životinje!
Prskajte isključivo na bilje!
Ne pijte iz proizvoda!
Punite proizvod isključivo
tekućinama od 0-40°C.
Q
Prije stavljanja u pogon
mPOGON! Provjerite sigurno funkcioni-
ranje! Prije svake uporabe, provjerite
tlačni rasprskivač na vidljiva oštećenja i
sigurno funkcioniranje. Izvodite za to
slijedeće provjere:
Provjera tlačne prskalice na vidljiva
oštećenja
j Provjerite spremnik 5na vidljiva ošte-
ćenja.
56222_flo_Drucksprüher_Content_LB7.indd 16 02.12.10 16:15

17HR
®
Prije stavljanja u pogon/Stavljanje u pogon
j Provjerite usisnu gumenu cijev 18 na
vidljiva oštećenja.
j Provjerite nosivi stremen 6na vidljiva
oštećenja.
Provjera priključaka
j Provjerite dali su dobro postavljeni
priključci gumenih cijevi.
j Provjerite dali su dobro postavljeni
priključci metalnih cijevi.
Provjera nepropusnosti tlačne
prskalice
j Napumpajte praznu tlačnu prskalicu na
cca. 2 bara.
Pritisak ne smije u roku od 30 minuta
opasti vište od cca. 0,5 bara.
Provjera funkcije sigurnosnog
ventila
j Napumpajte tlačnu prskalicu na cca.
2 bara.
j Povucite sigurnosni ventil 3sve do
kraja prema gore.
Pritisak treba čujno izlaziti.
Q
Stavljanje u pogon
Q
Montiranje cijevi za raspr-
skivanje bez produženja
(prik. B)
j Otpustite slijepi vijak 16 u suprotnom
smjeru vrtnje kazaljke sata od ručke 17.
Utaknite cijev za rasprskivanje 12 sve
do konca u ručku 17.
j Zavijte slijepi vijak 16 u smjeru vrtnje
kazaljke sata.
Uputa: Cijev za rasprskivanje 12
možete također produžiti, na način da
otpustite kontra maticu 10 u suprotnom
smjeru vrtnje kazaljke sata i da izvučete
produženje. Nakon toga, molimo ponov-
no pritegnite kontra maticu 10 (vidite
prik. B).
Q
Montiranje cijevi za raspr-
skivanje s produženjem
(prik. C)
j Otpustite malo slijepi vijak 15 okretanjem
u suprotnom smjeru vrtnje kazaljke sata.
Utaknite cijev za rasprskivanje 12 u
slijepi vijak 15.
j Zavijte slijepi vijak 15 u smjeru vrtnje
kazaljke sata.
j Utaknite produžnu cijev 9u slijepi
vijak 16.
j Zavijte slijepi vijak 16 u smjeru vrtnje
kazaljke sata.
Q
Punjenje spremnika tlačnog
rasprskivača (prik. E)
Uputa: Prije primjene, uvjerite se u bespri-
jekorno stanje proizvoda.
j Pritisnite ručku pumpe 1prema dolje i
okrećite ju u suprotnome smjeru vrtnje
kazaljke sata.
Uputa: Kako bi otpustili u posudi 5
još preostali tlak, povucite sigurnosni
ventil 3prema gore, prije nego što
otvorite spremnik.
j Izvucite pumpu 2iz posude 5.
j Sad napunite spremnik. Vodite računa
o tome, da su rabljeni pesticidi, tekuća
gnojiva ili sredstva za čišćenje dozvolje-
na za uporabu u Vašoj zemlji, te da
odgovaraju tlačnom rasprskivaču.
Uputa: Napunite spremnik samo sa
toliko tekućine, koliko Vam je potrebno
56222_flo_Drucksprüher_Content_LB7.indd 17 02.12.10 16:15

18 HR
®
Stavljanje u pogon/Čišćenje i njega
za uporabu (ne više od maks. 5l).
j Umetnite pumpu 2ponovno u posudu
5i zakrenite ručku pumpe 1u smjeru
vrtnje kazaljke sata sve do konca.
Q
Stvaranje pogonskog
tlaka (prik. F)
j Rasklopite obje nožne pedale 7.
j Stavite noge na nožne pedale 7, prije
nego što počnete pumpati, kako bi tlačni
rasprskivač sigurno stajao tijekom pum-
panja.
j Pomičite ručku pumpe 1gore i dolje,
sve dok je tlačni rasprskivač napumpan
maksimalno do dozvoljenog pogonskog
tlaka od 2,5. Za tu svrhu, molimo vodite
tijekom pumpanja računa o manometru
4.
Uputa: Ako tlak zraka u posudi 5
prekorači 2,5bar, automatski se ispušta
tlak preko sigurnosnog ventila 3.
j Pritisnite ručku pumpe 1prema dolje
u otvore.
j Okrenite ručku pumpe 1u smjeru vrt-
nje kazaljke sata sve do konca. Ručka
je sad osigurana.
j Otpustite sad cijev za rasprskivanje 12
iz pričvršćenja.
j Zaklopite obje nožne pedale 7.
Q
Rasprskivanje (prik. G)
j Ovjesite tlačni rasprskivač sa narameni-
cama 6preko ramena.
Uputa: Osigurajte da se tlačni raspr-
skivač uvijek nalazi u okomitom položaju.
Samo tako je omogućeno sigurno funk-
cioniranje.
j Držite cijev za rasprskivanje čvrsto na
ručki 17 i usmjerite namjestivu sapnicu
za rasprskivanje 11 npr. prema biljki.
j Namjestite na namjestivoj sapnici za
rasprskivanje 11 željeni konus rasprski-
vanja. Kako bi stvorili široki konus raspr-
skivanja, okrenite prednji dio namjestive
sapnice za rasprskivanje 11 u smjeru
vrtnje kazaljke sata. Kako bi stvorili
usnopljeni mlaz, okrenite prednji dio
namjestive sapnice za rasprskivanje 11
u suprotnom smjeru vrtnje kazaljke sata.
j Pritisnite okidnu polugu 19, kako bi
započeli rasprskivanje.
j Otpustite okidnu polugu 19, kako bi
završili rasprskivanje.
Uputa: Ako tlak u posudi 5nije više
dostatan za rasprskivanje, ponovno
napumpajte posudu 5maksimalno do
dozvoljenog pogonskog tlaka od
2,5bar. Radni tlak možete provjeriti
manometrom 4(vidite „Stvaranje
pogonskog tlaka“).
j Kako bi otpustili preostali tlak u posudi
5, povucite sigurnosni ventil 3sve
do konca prema gore.
Q
Čišćenje i njega
Uputa: Čistite tlačni rasprskivač nakon
svake uporabe!
Q
Čišćenje tlačne prskalice
j Odvijte sapnicu 11.
j Čistite sapnicu 11 pod tekućom vodom.
j Ako je sapnica 11 začepljena, rabite
iglu kako bi probili sapnicu 11.
j Isperite tlačni rasprskivač i vodove vodom.
j Čistite površine vlažnom krpom.
56222_flo_Drucksprüher_Content_LB7.indd 18 02.12.10 16:15

19HR
®
Čišćenje i njega/Zbrinjavanje otpada
Q
Čišćenje usisne cijevi
Kako bi čistili usisnu gipku cijev 18, postupite
na sijedeći način:
j Otpustite slijepi vijak usisne gipke cijevi
13 na posudi 5.
j Izvucite usisnu cijev 18 iz spremnika 5.
j Čistite usisnu cijev 18 pod tekućom
vodom.
j Nako čišćenja ponovno umetnite usisnu
cijev 18 u za to predviđeni otvor spre-
mnika 5.
j Ručno zategnite slijepi vijak 13.
Q
Skladištenje tlačne
prskalice
j Prije skladištenja potrebno je čistiti tlačnu
prskalicu.
j Otklonite eventualno preostale količine
sredstava za prskanje u spremniku i
vodovima.
j Skladištite tlačni rasprskivač na suhome
mjestu, slobodnom od prašine.
Q
Zbrinjavanje otpada
Pakiranje se sastoji od ekološki
prihvatljivog materijala, kojeg
možete odložiti preko lokalnih
reciklažnih mjesta.
O mogućnostima zbrinjavanja dotrajalog
proizvoda možete se informirati pri Vašem
općinskom ili gradskom komunalnom uredu.
Opis proizvoda:
Tlačna prskalica
Model br.: Z30597
Verzija: 11/2010
56222_flo_Drucksprüher_Content_LB7.indd 19 02.12.10 16:15

20 RO
®
Cuprins
Introducere
Utilizare conform scopului..................................................................................Pagina 21
Descrierea componentelor .................................................................................Pagina 21
Specificaţii tehnice...............................................................................................Pagina 21
Pachet de livrare..................................................................................................Pagina 22
Indicaţii de siguranţă
Indicaţii generale de siguranţă...........................................................................Pagina 22
Înainte de punerea în funcţiune...................................................Pagina 24
Punere în funcţiune
Montarea ţevii de
pulverizare fără prelungire
...................................................Pagina 24
Montarea ţevii de pulverizare cu prelungire.....................................................Pagina 24
Umplerea rezervorului pulverizatorului cu presiune.........................................Pagina 25
Generarea presiunii de funcţionare...................................................................Pagina 25
Pulverizare............................................................................................................Pagina 25
Curăţare şi întreţinere
Curăţare pulverizator cu presiune......................................................................Pagina 26
Curăţare furtun de aspirare................................................................................Pagina 26
Depozitare pulverizator cu presiune..................................................................Pagina 26
Înlăturare.........................................................................................................Pagina 26
56222_flo_Drucksprüher_Content_LB7.indd 20 02.12.10 16:15

21RO
®
Introducere
Pulverizator sub presiune
Q
Introducere
Acest manual de utilizare vă ajută
la utilizarea corespunzătoarea,
sigură şi eficientă a pulverizato-
rului cu presiune. Fiecare persoană care,
utilizează acest pulverizator cu presiune, îl
curăţă sau înlătură, trebuie să ia la cunoştinţă
conţinutul acestui manual de utilizare. Acest
manual de utilizare este componentă a pul-
verizatorului cu presiune. Păstraţi-l întotdeauna
împreună cu pulverizatorul cu presiune. Daţi
manualul de utilizare mai departe la terţi
atunci când, daţi pulverizatorul cu presiune
mai departe.
Q
Utilizare conform scopului
Produsul serveşte la pulverizarea lichidelor în
casă, grădină şi seră. La lichide se numără
apa, substanţele de protecţia plantelor,
substanţe de dezinfecţie şi îngrăşămintele
dizolvate în apă, care sunt admise în ţara dvs.
pentru utilizare. Substanţele de protecţie a
plantelor şi îngrăşămintele au voie să fie
pulverizate numai în concentraţia indicată
de către producătorul acestora. Ca utilizare
necorespunzătoare este considerată în spe-
cial pulverizarea soluţiilor sau lichidelor ce
conţin soluţii ca uleiul. O altă utilizare decât
cea descrisă anterior sau o modificare a
produsului nu este permisă şi poate cauza
accidente şi/sau deteriorarea produsului.
Producătorul nu preia nicio responsabilitate
pentru daune, cauzate de o utilizare neco-
respunzătoare. Acest produs este destinat
exclusiv utilizării personale.
Q
Descrierea
componentelor
1Mânerul pompei
2Pompă
3Supapă de siguranţă
4Manometru
5Recipient
6Curea de purtat
7Pedală de picior
8Suport pentru ţeava de pulverizat
reglabilă şi ţeava de prelungire
9Ţeavă de prelungire
10 Contrapiuliţă
11 Duză de pulverizare, reglabilă
12 Ţeavă de pulverizare (telescopică)
13 Piuliţă olandeză (furtun de aspirare)
14 Piesă de legătură
15 Piuliţă olandeză (ţeavă de prelungire)
16 Piuliţă olandeză
17 Mânerul ţevii de pulverizare
18 Furtun de aspirare
19 Manetă de declanşare
Q
Specificaţii tehnice
Dimensiune
recipient (ø×Î): cca. 180 x 450mm
Greutate gol: cca. 1,6kg
Lungime ţeavă
de pulverizare
(telescopică): cca. 450-750mm
Lungime ţeavă
de prelungire: cca. 350mm
Volum: cca. 5l
Volum total: cca. 5,7l
Presiune admisă
de funcţionare: cca. 2,5bar
Temperatură de
funcţionare: 0-40°C
56222_flo_Drucksprüher_Content_LB7.indd 21 02.12.10 16:15

22 RO
®
Introducere/Indicaţii de siguranţă
Mod de purtare: lateral cu curea de
purtare
Debit volum
(l/min.): max. 0,7
Q
Pachet de livrare
După despachetare controlaţi dacă pachetul
de livrare este complet şi dacă produsul şi
toate componentele sunt într-o stare irepro-
şabilă. Nu folosiţi produsul în niciun caz
dacă, pachetul de livrare este incomplet.
1 Pulverizator cu presiune
1 Ţeavă de pulverizare reglabilă
1 Ţeavă de prelungire
1 Curea de purtare
1 Manual de utilizare
Indicaţii de siguranţă
Q
Indicaţii generale de
siguranţă
PăSTRAţI PENTRU VIITOR TOATE
INDICAţIILE DE SIgURANţă şI
INSTRUCţIUNILE!
J AVERTISMENT!
PERICOL DE MOARTE ŞI
DE ACCIDENTARE PEN-
TRU BEBELUŞI ŞI COPII! Nu lăsaţi
niciodată copii nesupravegheaţi în
apropierea materialului de ambalaj. Există
pericol de asfixiere. Păstraţi produsul la
distanţă faţă de copii.
J Copii sau persoanele, care nu deţin
cunoştinţele sau experienţa necesară
pentru utilizarea aparatului, sau care,
au capacităţile fizice, senzoriale sau
mentale limitate, pot utiliza aparatul
numai sub supravegherea sau ghidarea
de către o persoană responsabilă de
aceştia. Copii trebuie supravegheaţi
pentru a nu se juca cu aparatul.
AVERTISMENT! PERICOL DE
ACCIDENTARE! Nu folosiţi produsul
dacă, este deteriorat.
J Asiguraţi ca toate componentele să fie
nedeteriorate şi montate corect. În cazul
unui montaj incorect există pericol de
accidentare.
AVERTISMENT! PERICOL DE
ACCIDENTARE! Există pericol de
accidentare a pielii prin contactul cu
lichidul de pulverizare. În timpul pulveri-
zării substanţelor de protecţie a plantelor,
îngrăşămintelor, substanţelor de dezin-
fecţie sau celor de curăţare purtaţi
echipament corespunzător de protecţie,
mănuşi şi protecţie respiratorie.
J Nu alimentaţi pulverizatorul cu presiune
cu lichide acide sau inflamabile.
J Nu pulverizaţi niciodată către persoane,
animale, aparate electrice sau cabluri
electrice.
J Nu pulverizaţi niciodată contra direcţiei
vântului.
J Nu puneţi în funcţiune un pulverizator
cu presiune stricat.
J Nu efectuaţi modificări la supapa de
siguranţă.
J Pentru a evacua presiunea reziduală,
deschideţi supapa de siguranţă.
J Nu suflaţi cu gura în duze dacă, acestea
sunt înfundate.
J Pulverizatorul cu presiune nu este con-
ceput pentru pulverizarea lichidelor
care, depăşesc temperatura maximă de
funcţionare de 40°C.
56222_flo_Drucksprüher_Content_LB7.indd 22 02.12.10 16:15
Other manuals for Z30597
3
Table of contents
Languages:
Other FLORABEST Paint Sprayer manuals

FLORABEST
FLORABEST Z30597 User manual

FLORABEST
FLORABEST Z30597 User manual

FLORABEST
FLORABEST HG01829 User manual

FLORABEST
FLORABEST Z30597 User manual

FLORABEST
FLORABEST 280272 User manual

FLORABEST
FLORABEST Z31339 User manual

FLORABEST
FLORABEST 271130 Instruction Manual

FLORABEST
FLORABEST 94531 User manual

FLORABEST
FLORABEST Z31339 User manual
Popular Paint Sprayer manuals by other brands

Solo
Solo 425 Classic Original instructions

Graco
Graco 288048 Instructions - parts

WAGNER
WAGNER ProSpray 24 operating manual

Campbell Hausfeld
Campbell Hausfeld AL1860 - METAL Operating instructions and replacement parts list

Enduraplas
Enduraplas XSTREAM owner's manual

Fountainhead
Fountainhead DDS-1 owner's manual