Flyer Mountain User manual

FLYER FIT E-Bike System integration
MOUNTAIN/CROSSOVER/TOUR/URBAN
EN

1Saddle
2Seat post
3Seat post clamp
4Suspension rear fork/shock
5Battery
6Fork end
7Rear derailleur
8Chain
9Electrical motor
10 Crank arm
11 Pedal
12 Pivot points/bearings
13 Frame
14 Stem
15 Handlebars with handle
16 Display
17 Shift lever
18 Brake lever
19 Brake cable/line
20 Shift cable
21 Headset
22 Suspension fork
23 Disc brake calliper
24 Brake disc
Wheel
25 Front hub
26 Spoke
27 Rim
28 Tyre
29 Valve
The FLYER e-mountainbikes and its parts
5
1
2
3
29
7
6
17
12
9
20
8
19
18
26
16
10
28
27
15
23
21
24
25
11
22
14
13
4

3
1Seat
2Seat post
3Seat post clamp with quick release
4Rack
5Rear light
6Mudguard for the back tyre
7Battery
8Chain
9Dropout
10 Side stand
11 Hub gears
12 Electrical motor
13 Crank arm
14 Pedal
15 Frame
16 Pivot point/ Bearing
17 Stem
18 Display
19 Handlebars with grip
20 Front headlight
21 Shifter
22 Brake lever
23 Shifter cable
24 Brake cable
25 Stem bearing or headset
26 Front mudguard
27 Suspension fork
28 Safetyxturemudguard
29 Disc brake calliper
30 Brake disc
31 Reector
32 Rearreector
Wheel
33 Front wheel hub
34 Spoke
35 Rim
36 Valve
37 Reectorstripes
38 Tyres
The FLYER Urban e-bike and its components
7
1
2
16
3
4
5
6
9
11
812 13 14
17
18
19
20
21
22
23
24
25
26
36
27
28
29
33
30 34
35
37
38
31
16
32
15
10


EN
1. Foreword ..........................4
2. Denitionofterms...................4
3. Safetyinformation...................5
4. Safetyinstructionsforallelectrical
systems ...........................
6
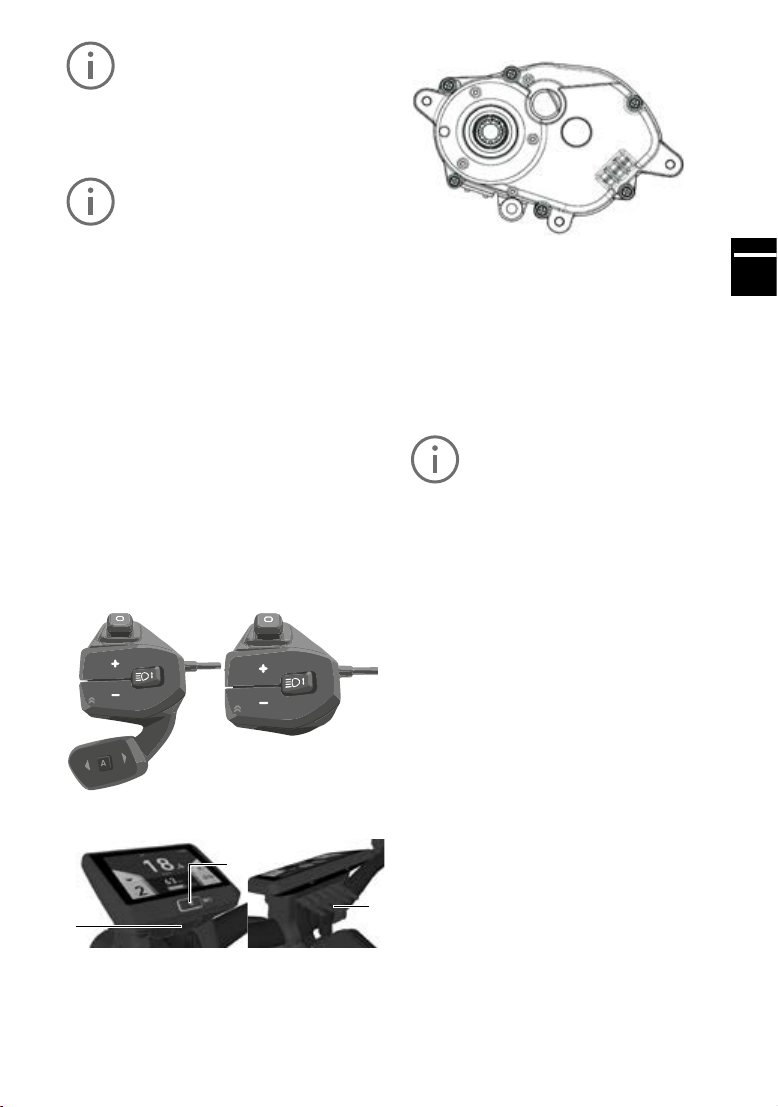
5. FLYER with Panasonic drive and FIT ...7
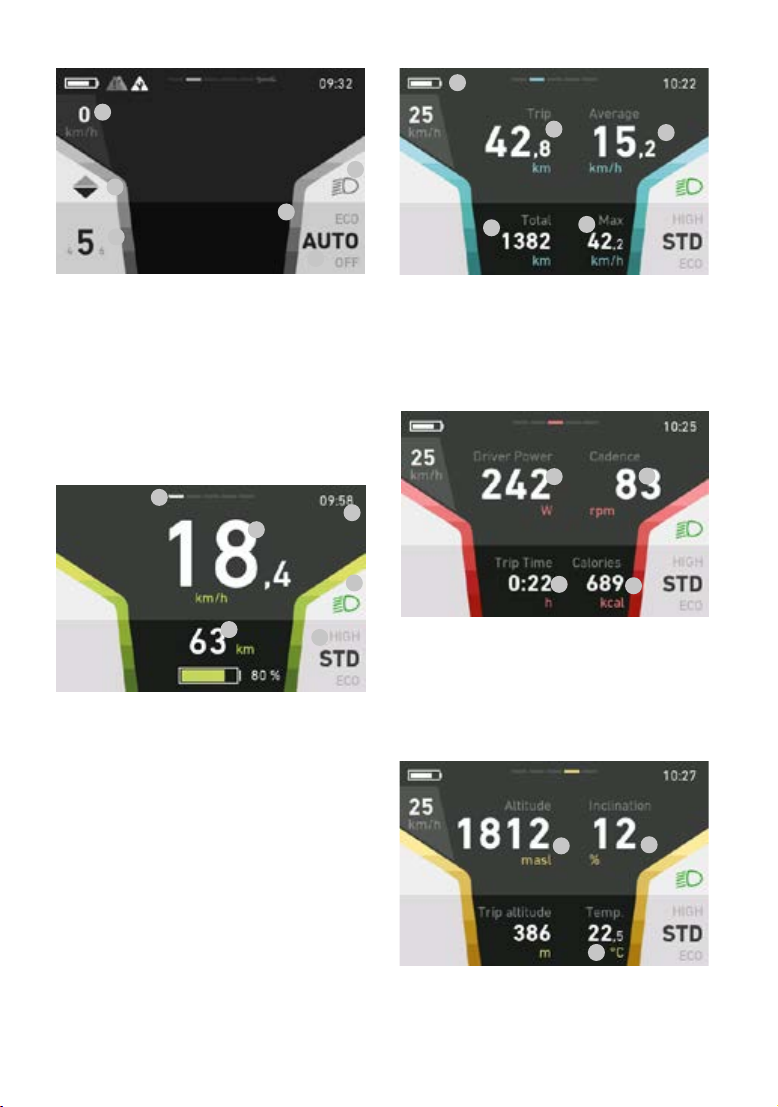
5.1 Operation with FLYER D1 display and
FLYER RC1 and RC2 remote controls ....7
5.2 Operation ......................7
5.3 Menu navigation and settings ...... 9
5.3.1 Select menu ...................9
5.3.2 Quit menu .....................9
5.3.3 Select menu item ...............9
5.4 Conrmingaselection ............9
5.5 Settings menu...................9
5.5.1 Menu structure ................10
5.5.2 Reset values – menu ...........10
5.5.3 Language menu ...............10
5.5.4 Time menu ...................10
5.5.5 Date menu ...................10
5.5.6 Units menu ...................11
5.5.7 Clock format menu .............11
5.5.8 Adjustingtheuser-denedassistance
11
5.5.9 Feedback menu ...............12
5.5.10 Backlight menu ................12
5.5.11 Wheel circumference menu ......12
5.5.12 Automaticpoweromenu .......13
5.5.13 Service menu .................13
5.5.14 Automatic gear changes .........13
5.5.15 Auto mode menu...............13
5.5.16 Elevation calibration menu .......14
5.5.17 enviolo TR automatiQ integrated ..14
5.5.18 komoot navigation..............15
5.5.19 Pulse ........................15
5.5.20 About menu...................16
5.5.21 Connection with Android
smartphones ..................16
5.5.22 Connection with iPhones ........20
5.5.23 Error display ..................24
5.5.24 Message display ...............24
5.6 Error codes ....................25
5.6.1 Identifying errors ...............25
5.7 Operation with FLYER D0 display
and FLYER RC0 remote control ...25
5.8 Error display . . . . . . . . . . . . . . . . . . .27
5.9 Message display................27
5.10 Settings menu..................27
5.11 Menu structure .................27
5.12 Menu navigation ................27
5.13 Reset menu ...................28
5.14 Language menu ................28
5.15 Time menu ....................28
5.16 Units menu . . . . . . . . . . . . . . . . . . . .29
5.17 Assistance menu ...............29
5.18 Light menu ....................30
5.19 Automatic light menu ............30
5.20 Service Menu ..................30
5.21 Wheel circumference menu ......31
5.22 Auto mode menu ...............31
5.23 About menu ...................31
5.24 Conguringtheassistancemodes . .32
5.25 Lights ........................32
5.26 Electrical motor.................32
5.27 Down tube battery...............34
5.28 seat tube battery STB............37
5.29 Battery-related error .............41
5.30 Storing the battery ..............42
5.31 Pushing aid....................42
6. ErrortablesDisplayD1andD0 .......43
7. Legal requirements .................47
8. Typeplateandapprovalnumber ......48
8.1 Type plate for pedelecs up to 25 km/h
48
8.2 Safety symbols ................48
8.3 Bicycle type....................48
8.4 Range of use ..................49
8.5 Approval number for S-pedelecs
with pedal assist up to 45km/h . . . . .49
9. Intended use ......................49
9.1 Riding your E-MTB responsibly ....52
10. Beforetherstride .................52
11. Beforeeachride ...................54
12. Afterafall.........................55
13. Adjusting the bike to the rider ........55
13.1 Operating quick-release fasteners
andaxles .....................56
13.2 Setting up the seating position . . . . .58
13.3 Setting up the brake levers........63
13.4 Suspension elements ............63
14. Wheelsandtyres...................65
14.1 Checking the rims...............65
14.2 Tyres and inner tubes ............65
14.3 Dealingwithaattyre ...........66
15. Bicyclegears ......................67
16. Bicyclechainandsprocket,beltdrive ...68
17. Brake ............................70
17.1 Hydraulic brakes................70
17.2 Disc brake.....................71
17.3 Hydraulic rim brakes.............71
17.4 Back pedal brakes ..............72
18. Lightingsystem....................72
18.1 Lights ........................72
19. Mudguard.........................73
20. Accessories and equipment..........73
21. Riding with additional load...........74
21.1 Bicycle trailers..................74
21.1.1 Beforeyourrsttripwiththe
approved bicycle trailer ..........75
21.1.2 Before every trip with the bicycle
trailer ........................75
21.2 Transporting children in child seats .75
21.2.1 Beforeyourrsttripwiththechild
seat on the approved rack .......75
21.2.2 Before every trip with the child seat 76
21.3 Roof and rear carrier on a car......76
22. Wearing parts .....................77
23. Generalwarranty...................77
23.1 General dealer’s warranty ........77
23.2 FLYER AG manufacturer’s warranty 77
24. Inspection plan ....................77
24.1 Maintenance and replacement of ....
wearing parts ..................79
25. Environmental protection tips ........79
Contents

4
1. Foreword
DearFLYERcustomer,
Thank you for choosing a FLYER. Enjoy your
journey of discovery on your FLYER
and have a safe ride.
Thank you for your trust in our product.
Your FLYER team
2. Denitionofterms
These original operating instructions contain the
most important information required to familiarise
yourself with your new FLYER, to get to know its
technology, to attend to safety aspects and pre-
vent damage to persons, goods and the environ-
ment.
You should therefore keep this manual in a safe
place, always have it to hand and observe the
pointers provided in this manual which have prov-
en to be helpful when using this FLYER.
Please provide these instructions with the FLYER
when you lend your FLYER to other persons.
Please make sure to read the enclosed instruc-
tions/documents carefully before rst using the
bike.
The following symbols are repeatedly shown on
the pages below:
DANGER: There is a risk of personal in-
jury.
NOTE: Here you can nd important in-
formation which will help you get the
most out of your FLYER e-bike.
WARNING: This is an indication of pos-
sible damage to property or the environ-
ment.
OBSERVE PRESCRIBED TORQUE:
Screw connections must be tightened
withaspecicfasteningtorque.This is
only possible with a special tool called a
torque spanner. Have this work per-
formed by your FLYER specialist retailer
if you do not have the right tools or spe-
cialised knowledge. Parts which have
beenttedwiththeincorrecttorquemay
breakorfallo,whichcanleadtoseri-
ous falls. The correct fastening torque is
either imprinted on the component or
see the separate “Technical Data” oper-
ating instructions document.
From now on, these symbols will be used with-
outfurtherexplanation.However,theywillalways
stand for the content and warning being men-
tioned.
Carefully read all the instructions.

5
EN
3. Safetyinformation
It is essential that you per-
form the tests and inspec-
tions stipulated. Protect
yourself and other road traf-
c participants by behaving
safely and responsibly and
always considering the dan-
gers to which you are subject
asacyclistamidroadtrac.
Always wear a well-tting
and suitable helmet.
AskyourFLYERspecialistretailerhowtotyour
helmet correctly so that it protects you properly.
These original operating instructions do
not instruct on how to assemble a
FLYER from individual parts, how to re-
pair it or how to get partially assembled
FLYERS ready to operate.
TheFLYERisttedwithhighlycomplex,
modern technology. It must be handled
withspecialisedknowledge,experience
and the specialised tools required.
Only allow your FLYER specialist retailer
to perform work on your FLYER.
We are therefore only able to discuss
the most important aspects in this op-
erating manual. In addition, there are
also notes and instructions from the re-
spective manufacturers of the individual
components used on the bicycle. These
must also be considered. The same ap-
plies here: If anything is unclear, do not
hesitate to ask your FLYER specialist
retailer.
Being seen on the road is just as important as
being able to see. Therefore, always wear bright
clothingorclothingwithreectiveelementswhen
you ride; sports clothing is the best option. Do not
wear loose clothes that might be caught on ob-
jects or might get tangled in the vehicle. Tie your
trouser legs on both sides tightly to the body. Tight
clothing on your lower body is also a must, you
should therefore use trouser clips if necessary.
Ride with sturdy shoes. The soles of your shoes
should be rigid and slip-proof. Never ride with
yourhandsothehandlebars.
Look ahead while riding and familiarise yourself
with the response of the brakes in a safe and traf-
c-freeareabeforeyourrstride.
Only one person may ride on the FLYER at a
time. Do not carry any loose, unattached objects
with you. Always remember to fold in the prop
stand before riding o. Check that the quick-re-
lease fasteners are fastened and secured each
time your FLYER has been left unattended – even
if it is for just a short time. Regularly make sure
that all screws and parts are securely fastened.
Your responsibility as the owner of the vehicle
includes the actions and the safety of possible
under-age users as well as the technical state of
the FLYER e-bike and its adaptation to the rider.
Ensure that under-age riders have learned safe
and responsible handling of the e-bike – prefer-
ably in the environment in which they will ride it.
Minors may only ride a FLYER once they
have reached the required age and hold
the necessary driving license.
ImportantpreparationsforridingyourFLYER
It is essential to read the operating instructions
carefully to familiarise yourself with your new
FLYER. Please read all of the instructions to en-
sure safe use.
This operating manual assumes that you and all
other users of this FLYER e-bike have a basic
knowledge of bicycles and e-bikes. Please con-
tact your FLYER specialist retailer if you have any
questions and for important maintenance tasks.
All persons using, cleaning, maintaining, repairing
and disposing of the FLYER must know and un-
derstand the content of these instructions.
Not observing this information may have consid-
erable consequences for your safety. If something
is out of place, it could cause severe accidents or
cause you to fall over – which could also lead to
additional costs and repair.
Along with reading the specic instructions on
how to use your FLYER, you need to familiarise
yourself with the rules and regulations that are en-
forced on public roads – these can change from
country to country.
Warningsandimportantinformation
• Please consider that the additional assistance
providedbythemotorhelpsyourideatsigni-
cantly higher speeds than you are used to with
your bicycle.
• Please note that the motor of your FLYER
e-bike may get hot during long ascents. Do not
touch it, as this could result in burns.
• The same applies to brake discs which can get
very hot when braking. Avoid continuous use of
thebrakeswhileriding,evenduringextended
or steep downhill rides.
• Never attempt to operate your FLYER with any
battery other than the original battery. Your
FLYER specialist retailer will advise you re-
garding the correct FLYER battery.
• Never remove component covers or parts. This
could expose live parts. Connecting points

6
4.
Safetyinstructions
forallelectrical
systems
Read all the safety instructions and regula-
tions.
Non-compliance with the safety instructions and
regulations may lead to electric shock, re and/
or severe injuries.
Keep all safety instructions and regulations for
future use.
The term “battery” in these operating instructions
refers to all standard batteries.
Your FLYER is supplied with the corresponding
operating manual for the integrated motor from
the component manufacturer. You are strongly
advised to carefully read the attached instruction
manual on the electric drive system before you
use your bike for the rst time. You should also
pay close attention to the safety guidelines.
Information concerning the FLYER e-bike’s oper-
ation, maintenance, care and technical data can
be found in this manual and online on the respec-
tive websites for the manufacturers’ components.
Remove the battery from the e-bike be-
fore you begin working on the it (i.e. in-
stallation, maintenance, working on the
chain). The same applies when storing
the bike or transporting it on a car, train
or plane. There is a risk of injury if the
electrical system is unintentionally acti-
vated.
The electric drive system built into your
FLYER e-bike is extremely powerful.
Correct and safe operation requires you
to have your FLYER regularly main-
tained by a specialist retailer.
Immediately remove the battery when
you notice damage to the electrical sys-
tem,particularlywhenlivepartsareex-
posed after an accident. Always contact
your FLYER specialist retailer when you
require repairs, want to ask a question,
have a problem or discover a defect. A
lack of technical knowledge can lead to
severe accidents, injuries or damage.
The FLYER was designed for driving
with the motor. Never drive without a
batteryorwith thesystemswitchedo,
as no light will be available without the
battery or system.
could also be live. Maintenance work may only
be performed by your FLYER specialist retail-
er. Improper work may lead to electrical shocks
and injuries.
• Take care not to damage or crush cables while
maintaining, cleaning, transporting or adjusting
your FLYER.
• If it is no longer possible to use the bike safely,
you may no longer use your FLYER. This is the
case when live parts or the battery are dam-
aged or when you detect cracks in the frame
or in components. The FLYER must be left un-
used and secured until it has been checked by
a FLYER specialist retailer.
• You should be particularly careful if children
have access to the bike. Prevent children from
inserting objects into openings in the bike.
They could suer a life-threatening electric
shock.
• To store your FLYER in an assembly stand, it
should be attached by the seat post. High-qual-
ity aluminium frames may be damaged by the
clamping force of the holder.

7
EN
Your FLYER has an automatic protection
against overheating. In the event of
overheating, this protection will switch
othemotorfunctionuntilthemotorhas
reached a non-critical temperature. The
remaining functions are continued, e.g.
you can still drive with the lights on.
When the bike is not in use, the system
will automatically turn o together with
the light function after 10 minutes. This
durationcanalsobecongured,as ex-
plained in section 5.5.9. Therefore, al-
ways be sure to turn on the display be-
fore each ride.
5. FLYER with
Panasonic drive
and FIT
5.1 Operation with FLYER D1
displayandFLYERRC1andRC2
remote controls
Your FLYER with Panasonic drive is operated via
the FLYER RC1 or RC2 remote control and the
FLYER D1 display.
FLYER RC1 and RC2 remote control operating
console
FLYERD1display
1
2
3
1. On/obutton(pressforatleast1secondto
switch on)
2. USB port
3. Display connector
RC1
RC2
Drive unit
The drive unit is an e-bike motor. The drive unit is
operated via the FLYER remote control (see
above).
5.2 Operation
Toactivatethesystem,presstheon/obuttonon
the display for at least one second.
The “Drive” menu will then be shown on the dis-
play.
The system can only be activated if a
sucientlychargedbatteryisused.
Toturnotheelectricalsystem,presstheon/o
button for at least one second.
If the system does not detect any rider activity
fortenminutes,itturnsoautomaticallytosave
energy (this idle time can be congured as ex-
plained in section 5.5.9).
The FLYER D1 display is operated using the
joystick on the FLYER remote control operating
console, so that your hands can remain on the
handlebars while you ride.
Move the joystick left or right to switch between
the individual main menus on the display.
The following main menus are available:
Drive: Main view with key information such
as speed, remaining range etc. The
system always starts up in this view.
Info: Information about the current journey
Fitness: Information about the rider’s athletic
performance
Data: Topographic data and
ambient temperature
Navi: Navigation with a smartphone

8
General vehicle settings
1.
2.
3.
4.
5.
6.
This display remains the same in all views and
shows you key settings and information on the
vehicle and the current journey.
1. Speed
2. Gear recommendation
3. Gear display
4. Light (high/low beam)
5. Current assistance level
6. Coloured bars: Assist power indicator
Drive
1.
2.
3.
4.
5.
6.
1. Current speed
2. Remaining range/battery level based on the
current assistance level (battery is red if
remaining range is below 20%)
3. Light (high/low beam)
4. Current assistance level
5. Time
6. Current screen top-centre bar
Info
1.
2. 3.
4. 5.
1. Charging status (top-left symbol)
2. Distance travelled on current tour (trip)
3. Average speed on current tour (trip)
4. Total distance travelled (cannot be reset)
5. Maximumspeedoncurrenttour(trip)
Fitness
1. 2.
3. 4.
1. Rider’s current power
2. Rider’s current cadence
3. Ride time on current tour (trip); ride time
alone is measured (no speed/standstill =
not added to ride time)
4. Energy consumed in kilocalories
Data
1. 2.
3.
1. Elevation
2. Route gradient in per cent
3. Ambient temperature

9
EN
Navi
3.
1. Navigation direction
2. Current road
3. Road ahead
4. Distancetonextnavigationpoint
5.3 Menu navigation and settings
Use the joystick to navigate through the menu.
Thenavigationbarthatappears(gure1indi-
cates which joystick movement triggers which
action.
5.3.1 Select menu
Move the joystick up and down to select the cor-
responding menu.
Joystick
5.3.2 Quit menu
Move the joystick to the left to return to the pre-
vious menu. Moving the joystick to the left in the
main menu will close the settings menu and the
data screen will be displayed.
5.3.3 Select menu item
Press the centre of the joystick to jump to the se-
lected menu.
5.4 Conrmingaselection
Whenyouconrmaselection,thefollowingview
is shown in the navigation bar:
Move the joystick left or right to select the desired
function.Pressthejoysticktoconrmorrejectthe
input.
5.5 Settings menu
Open the settings menu by navigating all the way
to the right with the joystick. You can only open
the settings menu while stationary.

10
5.5.1 Menu structure
i. Reset values
i. Reset trip data
ii. Factory Reset
ii. Localization
i. Language
ii. Time
iii. Date
iv. Units
v. Time Format
iii. My FLYER
i. Assistance
ii. Vibration feedback
iii. Backlight
iv. Wheel circumference
v. AutoPowerO
vi. Service
vii. Auto-Mode
iv. Calibration
i. Altitude
ii. enviolo
v. Connectivity
i. Navigation
ii. i. Pulse monitor
vi. About
5.5.2 Reset values – menu
In this menu, the trip data and the system can be
reset to the factory settings.
Selection Description
Reset trip data Resets the trip data
Restorefactory
settings
Returns the system to
its default state
Press the joystick to reset the data after conr-
mation.
5.5.3 Language menu
You can choose from the following languages in
the language menu:
• German
• French
• English
• Dutch
• Italian
The check mark indicates which language is cur-
rently applied. Press the joystick to apply the new
settingsafterconrmation(see5.3).
5.5.4 Time menu
You can set the current time in the time menu.
Move the joystick up and down to change the
numbers. Move the joystick left and right to switch
between numbers.
Press the joystick to apply the new settings after
conrmation(see5.3).
5.5.5 Date menu
You can set the current date in the date menu.
Move the joystick up and down to change the
numbers. Move the joystick left and right to switch
between numbers.
Press the joystick to apply the new settings after
conrmation(see5.3).

11
EN
5.5.6 Units menu
In the units menu, you can switch between the
metric and British system. The following units will
be changed:
• Distance kilometres <-> miles
• Speed km/h <-> mph
The check mark indicates which unit is currently
applied. Press the joystick to apply the new set-
tingsafterconrmation(see5.3).
5.5.7 Clockformatmenu
In the clock format menu, you can switch between
the 24-hour and 12-hour clock.
The check mark indicates which clock format is
currently applied. Press the joystick to apply the
newsettingsafterconrmation(see5.3).
5.5.8 Adjustingtheuser-denedassistance
You can individually adjust the amount of as-
sistance for the FLYER e-bike
In the “My Flyer” menu, select the sub-menu “As-
sistance” by pressing the “OK” button.
You can use the joystick to navigate to the left and
the right in the “Assistance” menu. This enables
you to set the desired level of assistance. The le-
vel of assistance is always set for all three levels
(“Eco”, “Standard” and “Auto”). The motor always
runs with full assistance at the “High” level.
Ifallthebarsonthedisplayareblack,themaxi-
mum possible amount of assistance is set in the
assistance levels “Eco”, “Standard” and “Auto”.
This setting has a lower range as a result.
If only the bar at the far left of the display is black,
the minimum amount of assistance is set in the
assistance levels “Eco”, “Standard” and “Auto”.
Thissettingenablesthemaximumpossiblerange
to be achieved in the “Eco” assistance level.

12
Press the “OK” button to save the setting. Select
thesub-menu“Conrm”andpressthe“OK”but-
ton again to activate the setting.
5.5.9 Feedback menu
Inthefeedbackmenu,youcancongurethevi-
bration feedback of the remote. The following set-
tings can be selected:
Selection Description
O No vibration feedback
On Every button press and every
active error message gener-
ates vibration feedback
Errorsonly Vibration feedback is only
generated by active error
messages
The check mark indicates which fee back setting
is currently applied. Press the joystick to apply the
newsettingsafterconrmation(see5.3).
5.5.10 Backlight menu
In the backlight menu, you can adjust the display
backlighting in the range from 10 to 100%.
Press the joystick to apply the new settings after
conrmation.
5.5.11 Wheelcircumferencemenu
In the wheel circumference menu, the wheel cir-
cumference used to calculate the speed can be
adjusted. You can adjust the wheel circumference
of your FLYER e-bike by ±5%.

13
EN
5.5.12 Automaticpoweromenu
Intheautomaticpoweromenu,youcansetthe
automaticpowerotimeintherangefrom10to
60minutes.Thesystemwill switchoautomati-
cally if the bicycle is not moved and no button is
pressed within the chosen time.
Press the joystick to apply the new settings after
conrmation.
5.5.13 Service menu
The service menu shows you when your FLYER
dealer next recommends that your bike be ser-
viced.
If the interval between services as recommended
byyourspecialist retailerhasbeenexceeded,a
message indicating that a service is due appears
when the system starts up.
5.5.14 Automatic gear changes
If your FLYER e-bike has an “enviolo TR auto-
matiQ integrated” gear hub, the automatic gear
changes can be adjusted in manual mode. The
following settings can be selected:
Selection Description
O The gears have to be changed
manually (to a lower gear) at
all times.
Onlywhen
braking hard
The e-bike will only change to
a lower gear when automati-
cally breaking very hard.
On When braking, the e-bike will
automatically change to a
lower gear.
5.5.15 Auto mode menu
In the auto mode menu, you can change the po-
sition of the auto mode when selecting the as-
sistance levels.
Sequence when “Position 1” is selected:
High
Std
Eco
Auto
O
Sequence when “Position 2” is selected:
High
Auto
Std
Eco
O

14
5.5.16 Elevation calibration menu
You can correct the actual elevation in the eleva-
tion calibration menu. Move the joystick up and
down to change the numbers. Move the joystick
left and right to switch between numbers.
Press the joystick to apply the new settings after
conrmation.
5.5.17 enviolo TR automatiQ integrated
If your FLYER e-bike has an “enviolo TR automa-
tiQ integrated” gear hub, the hub may need to be
recalibrated.This is the case if you suspect that
you are not getting the full transmission range.
In the settings menu, select the “Calibrate envio-
lo” submenu by clicking the OK button.
Now press the OK button again to start the ca-
libration.
The system can only calibrate successfully if you
pedal lightly or with no force throughout the pro-
cess.Aconrmationmessagewillappearonthe
display if the calibration has been successful.
enviolo TR automatiQ integrated
2.
3.
1.
The enviolo gear system is controlled with the
remote RC1. Button 2 can be used to switch bet-
ween manual and cadence mode.
In the manual mode, 8 gears can be selected on
e-bikes with pedal assist up to 25 km/h and 12
gears on e-bikes with pedal assist up to 45 km/h.
Use button 3 to go up a gear and button 1 to go
down a gear. Pressing and holding the button
enables you to change through several gears at
once.
In cadence mode, the same buttons can be used
to adjust the cadence. It is increased or decrea-
sed by 5 revolutions per minute.

15
EN
1. Currently selected gear (manual mode)
2.Conguredpedalfrequencyinrevolutionsper
minute. (automatic mode)
5.5.18 komoot navigation
The hard copy of the user manual may not be
consistent with the content on your smartphone.
Komoot continuously works to keep its app up-
to-date. We therefore reserve the right to publish
changes to the connection with komoot directly on
ourwebsite.Youcanndthelatestversionhere:
www.yer-bikes.com/navigation/
The outdoor navigation app komoot enables you
to use your FLYER e-bike as a navigation device.
This function is only available with the FLYER D1
display and in conjunction with a smartphone.
The procedure for starting up the app will dier
depending on whether you have an Android-ba-
sed smartphone or an iPhone.
Firstly the start-up sequence for Android smart-
phones will be shown below. The start-up sequen-
ceforiPhonesisdescribedinthenextchapter
Briefguide
1. Install the komoot app on your smartphone and
create your own komoot account, either in the
app itself or online at www.komoot.de.
2. Collect your komoot voucher code at
www.yer-bikes.com/navigation/
3. Activate komoot’s full range of maps using your
voucher code: www.komoot.de/g.
4. Connect your FLYER e-bike to the komoot app
andenjoyyourrsttourwithkomoot.
5. Please refer to section 5.5.19 onwards of the
user manual for more detailed information.
5.5.19 Pulse
Your FLYER e-bike can be connected to a pulse
measuring device via Bluetooth. Follow the steps
below to activate the pulse function. This function
is only available in conjunction with the FLYER
D1 display.
In the “Settings” menu, select the sub-menu
“Connections” by pressing the “OK” button.
n the “Connections” menu, select the sub-menu
“Pulse” by pressing the “OK” button.
In the “Pulse” menu, select the sub-menu “Pulse
On/O”bypressingthe“OK”button.

16
Inthe“PulseOn/O”menu,selectthesub-menu
“Pulse On” by pressing the “OK” button. The pul-
se function is now activated.
When the pulse function is activated, the FLYER
e-bike automatically searches for the nearest
Bluetooth pulse band or pulse watch and estab-
lishes a connection.
To deactivate the pulse function, select the sub-
menu“PulseO”bypressingthe“OK”button.
If a pulse measuring device is connected to the
FLYER e-bike, the pulse values are shown on the
tnessscreen.
5.5.20 About menu
The About menu shows the current software
versions of the individual components.
5.5.21 Connection with Android smartphones
Installing the komoot app
You can download the komoot app from the Goo-
gle Play Store. You will also have to install the
„komoot Connect” app from the Play Store.
If you cannot nd the „komoot Connect” app in
the store, your smartphone does not support this
function. It will not be possible to pair it with your
e-bike.
Setting up the komoot app and pairing it with
youre-bike
Once both apps have been installed, you must
createauserprolewithkomoot.
You can register directly in the app or via the ko-
moot website:
www.komoot.de/

17
EN
Activatingthemapsusingyourvouchercode
A voucher for the komoot app is included with
your e-bike purchase. Visit our website to collect
yourcode:www.yer-bikes.com/navigation/
You will then receive your voucher code by e-mail,
which you can use to activate the full range of
maps of the world at www.komoot.com/g
You must pair the app with your FLYER e-bike in
order to use the navigation function. Follow the
steps below to establish a connection:
1. Open the komoot app on your smartphone
2.Selectthe“Prole”symbol
3. Select the “Settings” symbol
4. Open the sub-menu “App Settings”
5. Select “BLE Connect”

18
6. Press switch 1 to establish a connection
Pop-up messages may appear that prompt you to
grant access rights to the app.
Important
After this step, leave the komoot app open and
switch to the FLYER display.
8. Open the settings menu on the e-bike display.
9. Select the sub-menu “Connections”.
10. Open the sub-menu “Navigation”.
11. Select “Pair with komoot“ to establish a
connection.
The komoot app must remain open on your
smartphone and the connection activated in order
for this to work.
The display now indicates that it is searching for
devices.
If no devices are found, you can start a new se-
arch by selecting “Pair with komoot“ again.
Other manuals for Mountain
1
This manual suits for next models
3
Table of contents
Other Flyer Scooter manuals