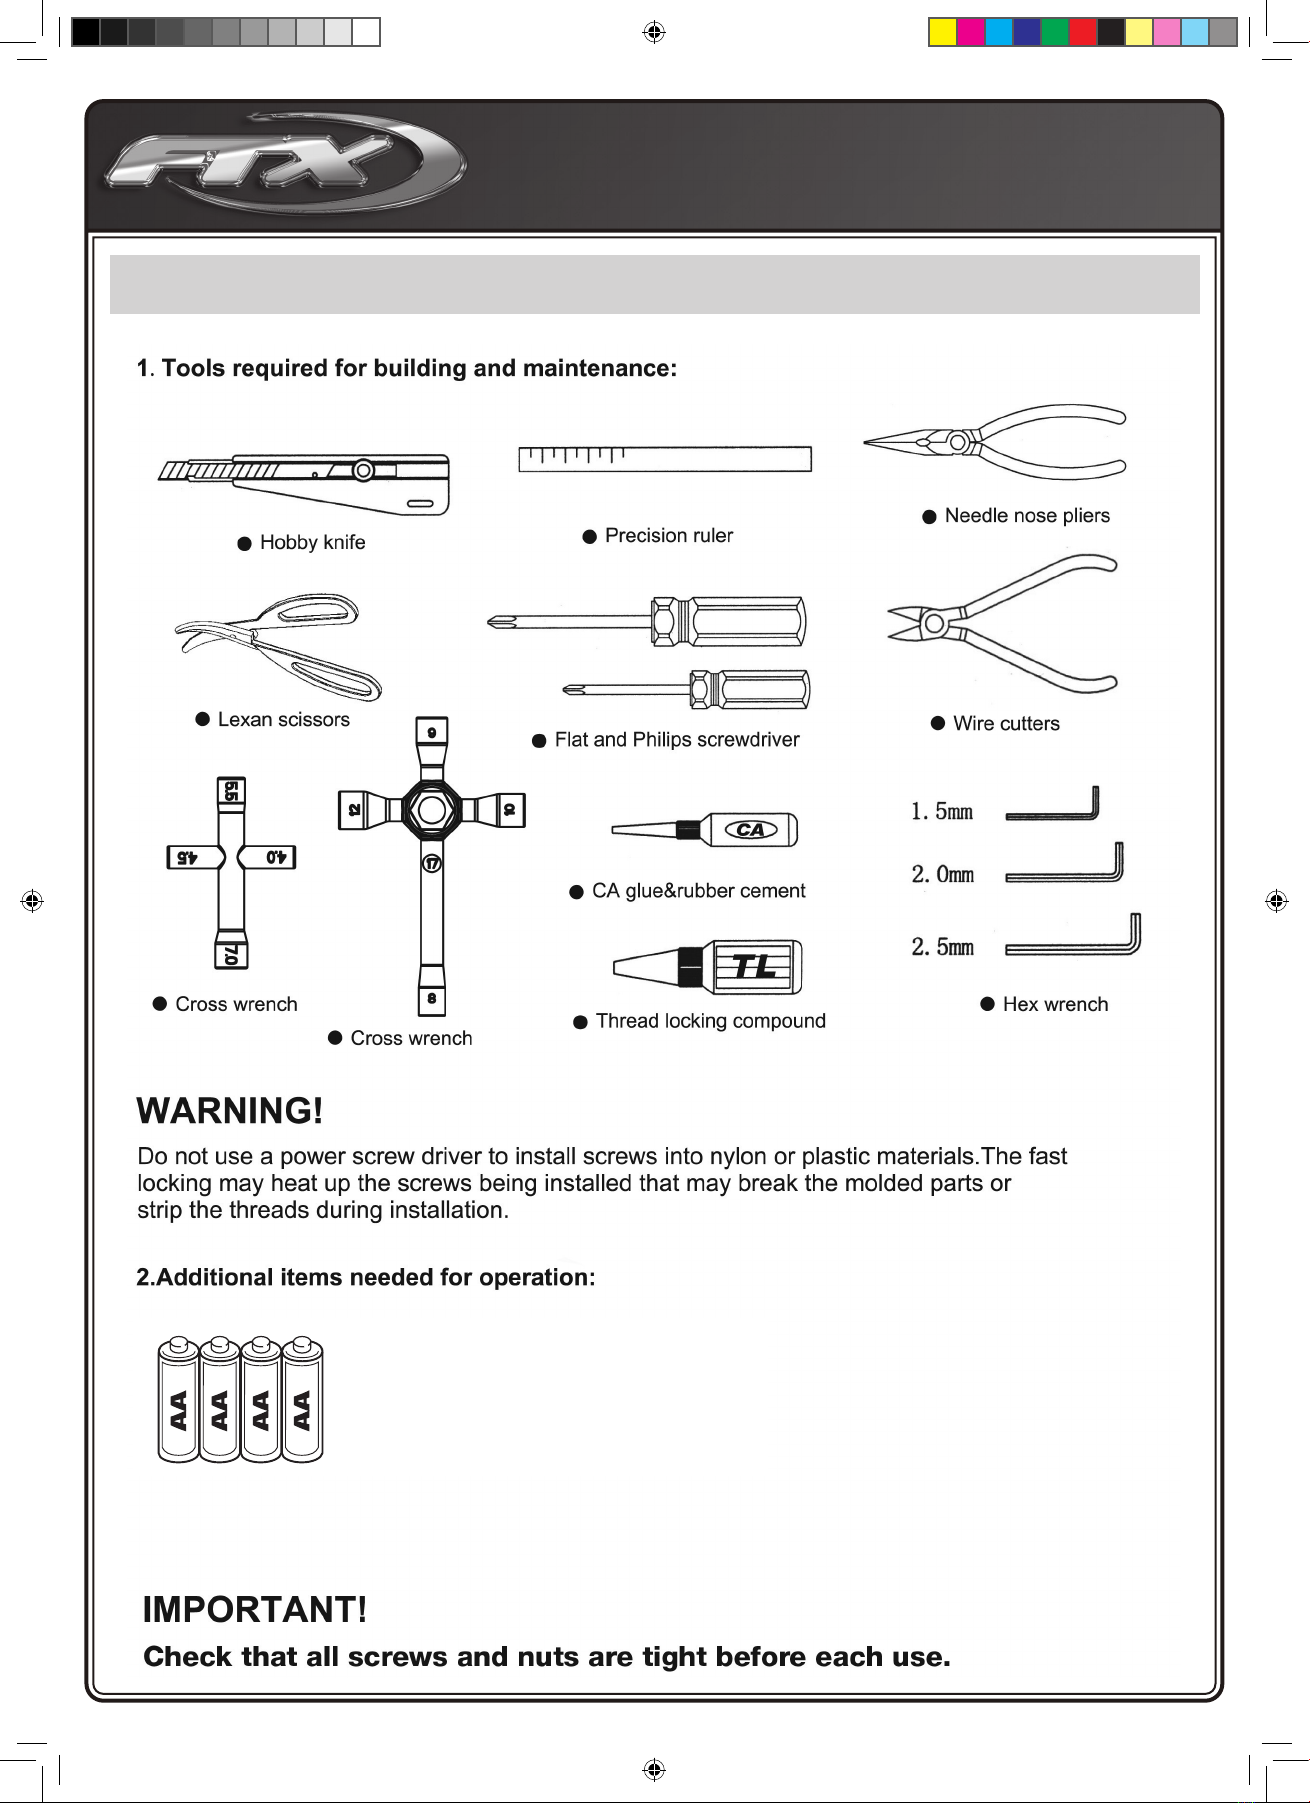
FTX Outback Hi-Rock User manual

1
ENGLISH INSTRUCTIONS – PAGE 2
FRANÇAIS INSTRUCTIONS – PAGE 19
FTX Outback Hi-Rock Manual.indd 1FTX Outback Hi-Rock Manual.indd 1 18/12/2019 14:5418/12/2019 14:54

2
FTX Outback Hi-Rock 1/10th
Scale 4WD Ready-To-Run
Rock Crawler
Congratulations on your purchase
of the FTX ‘Outback Hi-Rock’
electric off road car.
This 1/10th scale model has been factory assembled
and all electrics installed and set up to make it the
easiest possible introduction to the sport of driving
RC cars.
WARNING: Read the ENTIRE instruction manual to
become familiar with the features of the product
before operating.
Failure to operate the product correctly can result in
damage to the product, personal property and cause
serious injury.
This is NOT a toy and must be operated with caution and
common sense.
Failure to operate this product in a safe and responsible manner
could result in damage, injury or damage to other property. This product is
not intended for use by children without direct adult supervision. It is essential to read
and follow all the instructions and warnings in the manual, prior to assembly, set-up or use, in order to operate correctly and avoid damage or serious injury.
Safety Precautions and Warnings
• You are responsible for operating this model such that it does not endanger yourself and others, or result in damage to the product or the property of others.
• This model is controlled by a radio which is possibly subject to interference which can cause momentary loss of control so it is advisable to always keep a safe
distance to avoid collisions or injury.
• Age Recommendation: 14 years or over. This is not a toy. This product is not intended for use by children without direct adult supervision.
Carefully follow these directions and warnings, plus those of any additional equipment associated with the
use of this model, chargers, ESC and motors, radio etc.
• Never operate your model with low transmitter batteries.
• Always operate your model in an open area away from cars, trafc or people.
• Never operate the model in the street or in populated areas.
• Always keep the vehicle in direct line of sight, you cannot control what you cannot see!
• Keep all chemicals, small parts and anything electrical out of the reach of children.
• Although splash-proof the car and electronics are not designed to be subjected to
extended moisture exposure or submersion.
To do so will result in permanent damage.
• Avoid injury from high speed rotating parts, gears and axles etc.
• Novices should seek advice from more experienced people to operate the model
correctly and meet its performance potential.
• Exercise caution when using tools and sharp instruments.
• Do not put ngers or any objects inside rotating and moving parts.
• Take care when carrying out repairs or maintenance as some parts may be sharp.
• Do NOT touch equipment such as the motor, electronic speed control and battery, immediately after using your model because they can generate high temperatures.
• Always turn on your transmitter before you turn on the receiver in the car. Always turn off the receiver before turning your transmitter off.
• Keep the wheels of the model off the ground, and keep your hands away from the wheels when checking the operation of the radio equipment.
• Prolong motor life by preventing overheat conditions. Undue motor wear can result from frequent turns, rapid change of direction
forwards/backwards, continuous stop/starts, pushing/pulling objects, driving in deep sand and tall grass, or driving continuously up hill.
Contents:
FTX Outback Hi-Rock Crawler RTR Vehicle
Transmitter: 2.4ghz Steerwheel
Charger: Wall Charger NiMh 500mA
Battery: 2000mAH 7.2v
FTX Outback Hi-Rock Manual.indd 2FTX Outback Hi-Rock Manual.indd 2 18/12/2019 14:5418/12/2019 14:54

3
REQUIRED EQUIPMENT FOR OPERATION
4 pcs AA Alkaline Batteries
FTX Outback Hi-Rock Manual.indd 3FTX Outback Hi-Rock Manual.indd 3 18/12/2019 14:5418/12/2019 14:54

4
FAMILIARIZING YOURSELF WITH YOUR 2.4GHZ RADIO SYSTEM
SYSTEM FEATURES
• 2.4ghz FHSS
• Receiver 3mS response time
• 400-500m range
• Failsafe feature
• Transmitter voltage range 6V-7.4V (support 1s-2s)
automatic indentication of voltage, low voltage warning: 7.4V/4.8V
• Receiver voltage range: 3.3V-7.4V, working current 30mA, supports high voltage servos.
MENU SETTING:
To enter the program mode:
1. With the power o, move the steering wheel to its
maximum forward position, hold this position and
power on the transmitter.
2. The blue LED indicator will illuminate and remain solid,
return the steering wheel to its neutral position, and
press the CH3 button.
The LED indicator will now ash blue rapidly, indicating that
you have entered program mode.
PROGRAM THE TRANSMITTER:
Once in program mode, the travel end points of CH1 and
CH2 can be congured:
1. Rotate the steering wheel to its desired maximum
position in both directions, returning it to its neutral
position.
2. Pull/push the throttle trigger to its desired maximum
position, forwards and backwards, returning it to its
neutral position.
3. Once the steering wheel and throttle trigger have been
in their neutral positions for 3 seconds, press the CH3
button once to save these settings.
4. The LED indicator will now ash steady blue, and the
transmitter will operate normally.
(Default factory settings are maximum travel for CH1
and CH2).
IF CH3 AND CH4 REQUIRE PROGRAMMING:
When in program mode, CH1 and CH2 EPA dials on the
control panel can be used to set the travel of CH3 and CH4
respectively.
Once in program mode:
1. Rotate the steering wheel to its desired maximum
position in both directions, returning it to its neutral
position.
2. Pull/push the throttle trigger to its desired maximum
position, forwards and backwards, returning it to its
neutral position.
3. Rotate and position the CH1 dial to congure the
desired travel for CH3.
4. Rotate and position the CH2 dial to congure the
desired travel for CH4.
5. Once all end points and travel settings have been
adjusted, press the CH3 button to save these settings.
6. The LED indicator will now ash steady blue, and the
transmitter will operate normally.
Note: Each time program mode is initiated, all settings are
erased and must be recongured.
MODE SWITCH:
To switch from ‘Normal Mode’ to ‘Mixed Mode’:
1. Push the throttle trigger to the maximum forward
position and power on the transmitter. The LED
indicator will rapidly ash blue.
2. Pull the trigger backwards to its maximum position, and
release back to its neutral position. The LED indicator
will now ash steady red/yellow to indicate that ‘Mixed
Mode’ is enabled.
To return to normal mode, repeat the above process ^.
The LED indicator will ash steady blue to indicate that
‘Normal Mode’ is enabled.
MIXED MODE (RC TANK OPERATION):
Mixed mode will allow the connection of two ESC and
motor combinations, to channel 1 and channel 2 of the
receiver. With mixed mode is enabled, when the throttle
trigger (CH2) is pulled backwards or pushed forwards,
this will control the forward or backward movement of the
model. Each connected motor will operate at a continuous
speed, however, the speed of each individual motor can
be adjusted by rotating the steering wheel (CH1) in either
direction. See diagrams.
In mixed control mode, throttle direction, trim, neutral and
end points can all be congured separately using the dials
and switches on the control panel.
Binding Process
1. Press the receiver button and the LED indicator will
ash fast indicating it is entering bind mode.
2. Turn on transmitter. The receiver will automatically
look for the nearest transmitter signal.
3. Once binding is successful the LED will stop ashing
and remain on.
LED Light
1. Normal use: blue light ashes
slowly.
2. Mixed direction for Tank mode:
Red light is always on.
3. Low voltage warning: Yellow
light ashes slowly.
4. Entering second menu level
mode: Blue/Red light ashes
quickly.
Channel 5 for winch forward/reverse
Steering reverse switch
Throttle reverse switch
Steering Trim dial
Throttle Trim dial
Steering Dual/
Rate dial
Throttle Dual/Rate dial
Optional channel Throttle
Antenna
Steering Wheel
Battery compartment
Channel 3
On/Off
LED Light
Simulator/
PPM interface USB
Connection
TRANSMITTER BATTERY INSTALLATION
1. Press down on the battery cover and slide in the
direction of the arrow to remove.
2. Install 4 AA alkaline cells (or Ni-Cd, or Ni-MH)
as indicated inside the battery compartment.
Make sure to match the inside polarity the (+ and
-) as shown in the battery compartment or the
transmitter will not function.
3. Install the battery cover in place and slide to close.
WARNING:
Improper
installation of
transmitter
batteries can
cause serious
damage to
your system.
Internal battery
socket for 2S Li-Po.
LED indicator
LED light
Ch 1 Route setting Ch 2 Route Setting Submit Key
2. Turn On 1. Forward to the
Maximum
4. Press the
Ch 3
button
3. Release the
Wheel
Submit
Key
Ch 2
adjustment
for Ch 4
Ch1
adjustment
for Ch3
1. Push
trigger forward
maximum
3. After the LED ashes pull
the trigger all the way back
then release. The LED will
change colour.
2. Turn On
ESC
Receiver
FTX Outback Hi-Rock Manual.indd 4FTX Outback Hi-Rock Manual.indd 4 18/12/2019 14:5418/12/2019 14:54

5
ESC Operation
Thanks for purchasing our electronic speed controller(ESC). The power system for RC model
can be very dangerous, please read this manual carefully. In that we have no control over
the correct use, installation, application, or maintenance of our products, no liability shall be
assumed nor accepted for any damages, losses or costs resulting from the use of the product.
FEATURES:
• Water-proof and dust-proof for all weather races.
• Small size with built-in capacitor module.
• Automatic throttle range calibration, easy to use.
• Multiple protections: Low voltage cut-off protection for Lipo or NiMH battery /
Over-heat protection / Throttle signal loss protection.
• Easily programmed with the jumpers.
SPECIFICATION
* There are 2 kinds of WP-1040-BRUSHED-Crawler& Boat speed controllers, one has 1 output
for 1 motor, and the other one has 2 outputs for 2 motors (2 motors work synchronously).
** The WP-860-DUAL BRUSHED has 2 outputs to drive 2 motors synchronously. When driving 2
motors, the Turns of the motors need to be increased.
BEGIN TO USE
1. Connect the ESC, motor, receiver, battery and servo according to the following diagram:
“+” and “-” wires of the ESC are connected to the battery pack.
Attention: The incorrect polarity will damage the ESC immediately.
The control cable of the ESC (trio wires with black, red and white color) is connected to
the throttle channel of the receiver (Usually CH2). The “Motor +” and “Motor –” wires are
connected to ESC without any order.
If the motor runs in the opposite direction, please swap these two wire connections.
2. Set the Transmitter
Please set the “D/R”, “EPA” and “ATL” to 100% for throttle channel (for transmitter without
LCD, please turn the knobs to the maximum value), and set the “TRIM” of the throttle channel
to 0 (for transmitter without LCD, please turn the TRIM knob to its neutral position).
For FutabaTM and the similar transmitters, the direction of throttle
channel shall be set to “REV”, while other radio systems shall be set to “NOR”.
The “Fail Save” function of the radio system is strongly recommended to be activated. Please
make sure that the motor can be stopped when the “Fail Save” happens.
3. Throttle Range Setting (Throttle Range Calibration)
In order to make the ESC match the throttle range of different transmitters, the calibration of
the ESC is necessary.
To calibrate the ESC, please turn on the transmitter, keep throttle stick at its neutral position,
wait for 3 seconds to let the ESC execute self-test and automatic throttle calibration. When the
ESC is ready to run, a long beep sound is emitted from the motor.
Note: Please calibrate the throttle range again when using a new transmitter or changing the
settings of the neutral position of throttle channel, D/R, ATV, ATL or EPA parameters,otherwise
the ESC may not work properly.
BEEP SOUND AND LED STATUS
SET THE ESC
The ESC is programmed by the jumpers
(Tweezers are recommended to plug and unplug the jumper).
PROTECTION FUNCTIONS
1. Low voltage Cut-off (LVC) protection: If the voltage of battery pack is lower than the
threshold for 2 seconds, the ESC will enter the protection mode.
When the car stops, the red LED blinks to indicate the low voltage cut-off protection has been
activated.
Table A: LVC protection for WP-1060-BRUSHED, WP-1040-
BRUSHED, WP-860-DUAL BRUSHED (F/B/R or F/B mode).
Model WP-1040-BRUSHED
WP-1040-BRUSHED-Crawler & Boat *
Cont. / Burst Current Forward: 40A / 180A
Backward: 20A / 90A
Input 2-3S Lipo, 5-9 Cells NiMH
Cars Applicable 1:10 on-road, off-road Buggy, Truggy, SCT
1:10 Crawler, Tank & Boat
Motor
Limit
2S Lipo or
5-6 cells NiMH
3S Lipo or
7-9 cells NiMH
540 or 550 size motor ≥12T
or RPM < 30000 @7.2V
540 or 550 size motor ≥18T
or RPM < 20000 @7.2V
Resistance Fwd: 0.002 Ohm, Bwd: 0.004 Ohm
Built-in BEC 2A/6V (Linear mode BEC)
Dimension &
Weight WP-1040-BRUSHED: 46.5*34*28.5, 65g
WP-1040-BRUSHED-CRAWLER: 46.5*34*28.5, 70g
Neutral Point Top point of forward
direction Top point of backward
direction
THROTTLE STICK POSITION
User Manual of Water-Proof Brushed Speed Controller (RTR Version) HW-SM690ENG-V3-20160603Page - 1 -
Thanks for purchasing our electronic speed controller(ESC). The power system for RC model can be very
dangerous, please read this manual carefully. In that we have no control over the correct use, installation,
application, or maintenance of our products, no liability shall be assumed nor accepted for any damages,
losses or costs resulting from the use of the product.
【【FEATURES】】
1. Water-proof and dust-prooffor all weather races.
2. Small size with built-in capacitor module.
3. Automatic throttle range calibration, easy to use.
4. Multiple protections: Low voltage cut-off protection for Lipo or NiMH battery / Over-heat protection / Throttle signal
loss protection.
5. Easily programmed with the jumpers.
【【SPECIFICATIONS】】
* There are 2 kinds of WP-1040-BRUSHED-Crawler& Boat speed controllers, one has 1 output for 1 motor, and the other
one has 2 outputs for 2 motors (2 motors work synchronously).
** The WP-860-DUAL BRUSHED has 2 outputs to drive 2 motors synchronously. When driving 2 motors, the Turns of the
motors need to be increased.
【【BEGIN TO USE】】
1. Connect the ESC, motor, receiver, battery and servo according to the following diagram
“+” and “-” wires of the ESC are connected to the battery pack.
Attention: The incorrect polarity will damage the ESC immediately.
The control cable of the ESC (trio
wires with black, red and white color)
is connected to the throttle channel
of the receiver (Usually CH2). The
“Motor +” and “Motor –” wires are
connected to ESC without any order.
If the motor runs in the opposite
direction, please swap these two
wire connections.
2. Set the Transmitter
Please set the “D/R”, “EPA” and
“ATL” to 100% for throttle channel
(for transmitter without LCD, please
turn the knobs to the maximum
value), and set the “TRIM” of the
throttle channel to 0 (for transmitter
without LCD, please turn the TRIM
knob to its neutral position).
For FutabaTM and the similar
transmitters, the direction of throttle
channel shall be set to “REV”, while
other radio systems shall be set to “NOR”.
The “Fail Save” function of the radio system is strongly recommended to be activated. Please make sure that the motor
can be stopped when the “Fail Save” happens.
3. Throttle Range Setting (Throttle Range Calibration)
In order to make the ESC match the throttle range of different transmitters, the calibrationof the ESC is necessary.
To calibrate the ESC, please turn on the transmitter, keep throttle stick at its neutral position, wait for 3 seconds to let the
ESC execute self-test and automatic throttle calibration. When the ESC is ready to run, a long beep sound is emitted
from the motor.
Note: Please calibrate the throttle range again when using a new transmitter or changing the settings of the neutral
position of throttle channel, D/R, ATV, ATL or EPA parameters,otherwise the ESC may not work properly.
【【BEEP SOUND AND LED STATUS】】
The Meaning of Beep Sound
LED Status
1 short Beep: The battery is NiMH/NiCd
2 short Beeps: The battery is 2S Lipo
3 short Beeps: The battery is 3S Lipo
4 short Beeps: The battery is 4S Lipo
1 long Beep: Self-test and throttle calibration is
OK, the ESC is ready to run
When the throttle stick is in neutral range, red LED is off
Forward, brake or reverse at partial throttle, red LED blinks
Forward, brake or reverse at full throttle, red LED is solid
【【THROTTLE STICK POSITION】】
【【SET THE ESC】】
The ESC is programmed by the jumpers
(Tweezers is recommended to plug and unplug the jumper).
Model
WP-1040-BRUSHED
WP-1040-BRUSHED-Crawler& Boat *
WP-1060-BRUSHED
Cont. / Burst Current
Forward: 40A / 180A
Backward: 20A / 90A
Forward: 60A / 360A
Backward: 30A / 180A
Input
2-3S Lipo, 5-9 Cells NiMH
Cars Applicable
1:10 on-road, off-road Buggy, Truggy, SCT
1:10 Crawler, Tank &Boat
Motor
Limit
2S Lipoor
5-6 cells NiMH
540 or 550 size motor ≥12T
or RPM < 30000 @7.2V
540 or 550 size motor ≥ 8T
or RPM <45000 @7.2V
3S Lipo or
7-9 cells NiMH
540 or 550 size motor ≥18T
or RPM < 20000 @7.2V
540 or 550 size motor ≥13T
or RPM <30000 @7.2V
Resistance
Fwd: 0.002 Ohm, Bwd: 0.004 Ohm
Fwd: 0.0008 Ohm, Bwd: 0.0016 Ohm
Built-in BEC
2A/6V (Linear mode BEC)
3A/6V (Switch mode BEC)
Dimension&
Weight
WP-1040-BRUSHED: 46.5*34*28.5, 65g
WP-1040-BRUSHED-CRAWLER: 46.5*34*28.5, 70g
36*30*18, 40g
Model
WP-1625-BRUSHED
WP-1625-BRUSHED-Crawler
WP-860-DUAL BRUSHED
Cont. / Burst Current
Forward: 25A / 100A
Backward: 25A / 100A
Forward: 60A / 360A
Backward: 30A / 180A
Input
2-3S Lipo, 5-9 Cells NiMH
2-4S Lipo, 10-12 Cells NiMH
Cars Applicable
1:18 & 1:16 on-road, off-road
1:18 & 1:16 Crawler and Boat
1:8 on-road, off-road, Buggy, Truggy, Monster
Crawler and Boat
Motor
Limit
2S Lipoor
5-6 cells NiMH
280, 370 or 380 size motor
or RPM < 30000 @7.2V
540, 550 or 775 size motor ≥12T
or RPM < 30000 @7.2V
3S Lipo or
7-9 cells NiMH
280, 370 or 380 size motor
or RPM <20000 @7.2V
540, 550 or 775 size motor ≥18T
or RPM <20000 @7.2V
4S Lipoor
10-12cells NiMH
Not Available
540, 550 or 775 size motor ≥24T
or RPM <15000 @7.2V
Resistance
Fwd: 0.003 Ohm, Bwd: 0.003 Ohm
Fwd: 0.001 Ohm, Bwd: 0.002 Ohm
Built-in BEC
1A/6V(Linear mode BEC)
3A/5V(Switch mode BEC)
Dimension&
Weight
34mm*24mm*14mm, 23.5g
46mm*36mm*26.3mm, 73g
SPEED CONTROL CONNECTION DIAGRAM
The Meaning of Beep Sound
• 1 short Beep: The battery is NiMH/NiCd
• 2 short Beeps: The battery is 2S Lipo
• 3 short Beeps: The battery is 3S Lipo
• 4 short Beeps: The battery is 4S Lipo
• 1 long Beep: Self-test and throttle calibration is OK, the ESC is ready to run
LED Status
• When the throttle stick is in neutral range, red LED is off
• Forward, brake or reverse at partial throttle, red LED blinks
• Forward, brake or reverse at full throttle, red LED is solid
User Manual of Water-Proof Brushed Speed Controller (RTR Version) HW-SM690ENG-V3-20160603Page - 2 -
【PROTECTION FUNCTIONS】
1. Low voltage Cut-off (LVC) protection: If the voltage of battery pack is lower than the threshold for 2 seconds, the
ESC will enter the protection mode.
When the car stops, the red LED blinks to indicate the low voltage cut-off protection has been activated.
Table A: LVC protection for WP-1060-BRUSHED, WP-1040-BRUSHED, WP-860-DUAL BRUSHED (F/B/R or F/B
mode).
2S Lipo
3S Lipo
4S Lipo
5-9 cells NiMH
Output reduces 50% at 6.5V
Output cuts off at 6.0V,
cannot be recovered
Output reduces 50% at 9.75V
Output cuts off at 9.0V, cannot
be recovered
Output reduces 50% at 13V
Output cuts off at 12V, cannot
be recovered
Output reduces 50% at 4.5V
Output cuts off at 4.0V, cannot
be recovered
Table B: LVC protection for WP-1625-BRUSHED-Crawler, WP-1040-BRUSHED-Crawler&Boat, WP-860-DUAL
BRUSHED (Crawler or Boat mode).
2S Lipo
3S Lipo
4S Lipo
5-9 cells NiMH
Output cuts off at 6.5V.
If the throttle stick moves to
neutral and then up again, the
output can be recovered to
50%.
If the voltage drops to 6.5V
again, the above process
repeats in circles.
Output cuts off at 9.75V.
If the throttle stick moves to
neutral and then up again, the
output can be recovered to
50%.
If the voltage drops to 9.75V
again, the above process
repeats in circles.
Output cuts off at 13V.
If the throttle stick moves to
neutral and then up again, the
output can be recovered to
50%.
If the voltage drops to 13V
again, the above process
repeats in circles
Output cuts off at 4.5V.
If the throttle stick moves to
neutral and then up again, the
output can be recovered to
50%.
If the voltage drops to 4.5V
again, the above process
repeats in circles.
2. Over-heat protection: When the internal temperature of the ESC is higher than 100 Celsius degree or 212
Fahrenheit degree for 5 seconds, the ESC will reduce and cut off the output power.
When the car stops, the red LED blinks to indicate the over-heat protection has been activated. If the ESC cools
down to 80 Celsius degree (176 Fahrenheit degree) the output power is recovered to normal state.
3. Throttle signal loss protection: The ESC will cut off the output power if the throttle signal has been lost for 0.1 second.
The “Fail Save” function of the radio system is strongly recommended to be activated.
【THE DIFFERENCE BETWEEN “BRUSHED” AND “BRUSHED-CRAWLER& BOAT” ESC】
1. “Brushed” and “Brushed-Crawler& Boat” ESCs have different backward-running modes.
“Brushed” ESC uses “Double-Click” method to make the car go backward. When you move the throttle stick from
forward zone to backward zone for the first time, the ESC begins to brake the motor, the motor speeds down but
still running, so the backward action is NOT happened at this moment. When the throttle stick is moved to the
backward zone again (The 2nd “click”), if the motor speed is slowed down to zero (i.e. stopped), the backward
action will be activated. The “Double-Click” method prevents mistakenly reverse when the brake function is
frequently used in steering.
“Brushed-Crawler& Boat” ESC uses “Single-click” to make the car go backward. When you move the throttle stick
from forward zone to backward zone, the car will go backward immediately. This mode is common for the Rock
Crawler and tank.
2. The maximum reverse force (for backward running) is 50% for the general “Brushed” ESC, 100% for the “Crawler”
mode of a “Brushed-Crawler & Boat” ESC, and 25% for the "Boat" mode of a “Brushed-Crawler & Boat” ESC.
3. The Low Voltage Cut-off Protection modes are different (Please check the instructions in the section of
“PROTECTION FUNCTIONS”).
【TROUBLE SHOOTING】
Trouble
Possible Reason
Solution
After power on, motor can’t work, no
sound is emitted, and LED is off.
The ESC doesn’t get its working
voltage; Connections between
battery pack and ESC are
broken.
Check the battery wires connection
or replace the defective connectors.
Switch is damaged.
Replace the switch.
After power on, motor can’t work; red
LED blinks.
Throttle signal is abnormal.
Check the throttle wire connection;
make sure it is plugged into the
throttle channel of the receiver.
Automatic throttle range
calibration is failed.
Set the “TRIM” of throttle channel to
0 or turn the knob to its neutral
position.
The car runs backward while giving
throttle.
(The motor runs in the opposite
direction)
The wire connections between
ESC and the motor need to be
changed.
Swap two wire connections between
the ESC and the motor.
The car can’t go backward.
The jumper position is wrong.
Check the jumper and plug it to the
correct position.
The neutral point of throttle
channel is changed or drifted.
Set the “TRIM” of throttle channel to
0 or turn the knob to its neutral
position.
The car can’t go forward, but can go
backward.
The direction of throttle channel
is not correct.
Reset the direction of throttle
channel from original “NOR” to
“REV”, or from original “REV” to
“NOR”.
The motor doesn’t work, but the LED in
the ESC works normally.
The connections between motor
and ESC are broken.
Check the connections and replace
the defective connectors.
Motor is damaged.
Replace the motor.
The motor suddenly stops running
while in working state
The throttle signal is lost.
Check the transmitter and the
receiver.
Check the throttle wire connection.
Low voltage cut-offprotection
or Over-heat cut-off protection
has been activated.
Replace the battery pack, or cool
down the ESC.
The car cannot get top speed and the
red LED doesn’t solid on at full throttle
Some setting in the transmitter
are incorrect.
Check the settings.
Set D/R, EPA, ATL to 100% or turn
the knobs to maximum value.
Set TRIM to 0 or turn the knob to its
neutral position.
Motor is cogging when accelerated
quickly.
The battery has limited
discharge ability.
Use battery with better discharge
ability.
Motor RPM is too high, the gear
ratio is too aggressive.
Use motor with lower RPM, or use
smaller pinion to get softer gear
ratio.
Something wrong in the driving
system of the car.
Check the driving system of the car.
Output reduces 50%
at 6.5V Output cuts
off at 6.0V, cannot be
recovered
Output reduces 50%
at 9.75V Output cuts
off at 9.0V, cannot be
recovered
Output reduces 50%
at 13V Output cuts
off at 12V, cannot be
recovered
Output reduces 50%
at 4.5V Output cuts
off at 4.0V, cannot be
recovered
2S Lipo 3S Lipo 4S Lipo 5-9 cells NiMH
FTX Outback Hi-Rock Manual.indd 5FTX Outback Hi-Rock Manual.indd 5 18/12/2019 14:5418/12/2019 14:54

6
CHARGING/INSTALLING THE BATTERY.
Always store your model with
the battery pack unplugged and
removed. Always charge your
battery away from the vehicle.
The included 500mAh mains
charger will take approx 3-4
hours to charge a fully discharged
battery, but always remove it from
the charger if it becomes warm to
the touch. Always disconnect the
charger from the mains supply
and the battery pack when not in
use.
Keep children away from charger and battery during the charging process.
Notes on Battery use:
Always allow the battery cool after use, before recharging.
Always inspect the battery before charging.
Any bare wires, split heat shrink or leakage is a sure sign of abuse.
Never attempt to charge dead or damaged batteries.
Do not disassemble the battery or cut the connector wires.
If the battery connector gets hot enough to melt there is most likely a serious
problem with your model, driveline, battery wires or speed controller. Find and
correct the problem before installing another charged battery pack.
NEVER charge the battery unattended incase of overcharging, you need to be
able to monitor the battery during charging
Charge away from ammable objects and on a non-ammable surface incase
the battery becomes too hot.
Table B: LVC protection for WP-1625-BRUSHED-Crawler,
WP-1040-BRUSHED-Crawler&Boat, WP-860-DUAL BRUSHED
(Crawler or Boat mode).
2. Over-heat protection: When the internal temperature of the ESC is higher than 100 ˚C or 212
Fahrenheit degree for 5 seconds, the ESC will reduce and cut off the output power.
When the car stops, the red LED blinks to indicate the over-heat protection has been
activated. If the ESC cools down to 80 Celsius degree (176 Fahrenheit degree) the output
power is recovered to normal state.
3. Throttle signal loss protection: The ESC will cut off the output power if the throttle signal
has been lost for 0.1 second. The “Fail Save” function of the radio system is strongly
recommended to be activated.
THE DIFFERENCE BETWEEN “BRUSHED” AND “BRUSHED-CRAWLER
& BOAT” ESC
1. “Brushed” and “Brushed-Crawler& Boat” ESCs have different backward-running modes.
“Brushed” ESC uses “Double-Click” method to make the car go backward. When you move
the throttle stick from forward zone to backward zone for the rst time, the ESC begins to
brake the motor, the motor speeds down but still running, so the backward action is NOT
happened at this moment. When the throttle stick is moved to the backward zone again
(The 2nd “click”), if the motor speed is slowed down to zero (i.e. stopped), the backward
action will be activated. The “Double-Click” method prevents mistakenly reverse when the
brake function is frequently used in steering.
TROUBLE SHOOTING
• After power on, motor can’t work, no sound is emitted,
and LED is off.
• After power on, motor can’t work; red LED blinks.
• The car runs backward while giving throttle.
(The motor runs in the opposite direction).
• The car can’t go backward.
• The car can’t go forward, but can go backward.
• The motor doesn’t work, but the LED in the ESC works
normally.
• The motor suddenly stops running while in working state.
• The car cannot get top speed and the red LED doesn’t
solid on at full throttle.
• Motor is cogging when accelerated quickly.
• The ESC doesn’t get its working voltage; Connections
between battery pack and ESC are broken.
• Switch is damaged.
• Throttle signal is abnormal.
• Automatic throttle range calibration is failed.
• The wire connections between ESC and the motor need to
be changed.
• The jumper position is wrong.
• The neutral point of throttle channel is changed or drifted.
• The direction of throttle channel is not correct.
• The connections between motor and ESC are broken.
• Motor is damaged.
• The throttle signal is lost.
• Low voltage cut-offprotection or Over-heat cut-off
protection has been activated.
• Some setting in the transmitter are incorrect.
• The battery has limited discharge ability.
• Motor RPM is too high, the gear ratio is too aggressive.
• Something wrong in the driving system of the
car.
• Check the battery wires connection or replace the
defective connectors.
• Replace the switch.
• Check the throttle wire connection; make sure it is
plugged into the throttle channel of the receiver.
• Set the “TRIM” of throttle channel to 0 or turn the knob to
its neutral position.
• Swap two wire connections between the ESC and
the motor.
• Check the jumper and plug it to the correct position.
• Set the “TRIM” of throttle channel to 0 or turn the knob to
its neutral position.
• Reset the direction of throttle channel from original “NOR”
to “REV”, or from original “REV” to “NOR”.
• Check the connections and replace the defective
connectors.
• Replace the motor.
• Check the transmitter and the receiver.
• Check the throttle wire connection.
• Replace the battery pack, or cool down the ESC.
• Check the settings. Set D/R, EPA, ATL to 100% or turn the
knobs to maximum value. Set TRIM to 0 or turn the knob
to its neutral position.
• Use battery with better discharge ability.
• Use motor with lower RPM, or use smaller pinion to get
softer gear ratio.
• Check the driving system of the car.
Problem Reaction Solution
Output cuts off at
6.5V.
If the throttle stick
moves to neutral
and then up again,
the output can be
recovered to 50%.
If the voltage drops
to 6.5V again, the
above process
repeats in circles.
Output cuts off at
9.75V.
If the throttle stick
moves to neutral
and then up again,
the output can be
recovered to 50%.
If the voltage drops
to 9.75V again,
the above process
repeats in circles.
Output cuts off
at 13V.
If the throttle stick
moves to neutral
and then up again,
the output can be
recovered to 50%.
If the voltage drops
to 13V again, the
above process
repeats in circles
Output cuts off at
4.5V.
If the throttle stick
moves to neutral
and then up again,
the output can be
recovered to 50%.
If the voltage drops
to 4.5V again, the
above process
repeats in circles.
2S Lipo 3S Lipo 4S Lipo 5-9 cells NiMH
“Brushed-Crawler& Boat” ESC uses “Single-click” to make the car go backward. When
you move the throttle stick from forward zone to backward zone, the car will go backward
immediately. This mode is common for the Rock Crawler and tank.
2. The maximum reverse force (for backward running) is 50% for the general “Brushed” ESC,
100% for the “Crawler” mode of a “Brushed-Crawler & Boat” ESC, and 25% for the “Boat”
mode of a “Brushed-Crawler & Boat” ESC.
3. The Low Voltage Cut-off Protection modes are different (Please check the instructions in
the section of “PROTECTION FUNCTIONS”).
FTX Outback Hi-Rock Manual.indd 6FTX Outback Hi-Rock Manual.indd 6 18/12/2019 14:5418/12/2019 14:54

7
RUNNING YOUR CAR
1. TURNING ON THE RECEIVER OF YOUR CAR 2. TURN ON THE RADIO CONTROLLER
3. CHECK STEERING PERFORMANCE
The ESC
Receiver switch
is located under
the side plate
of the model.
Switch on the
ESC/Receiver
Switch as
shown in the
picture.
Switch on the
power switch
on the radio
controller.
Your radio is
bound with
your car
automatically.
CENTRE TURN RIGHT TURN LEFT
1. To keep the car running straight,
keep the streering wheel centered.
2. Turn the steering wheel to the right
to allow the car to right.
3. Turn the steering wheel to the left
to allow the car to turn to the left.
4. CHECK TRIGGER RESPONSE
PLEASE NOTE: THE MODEL SWITCHES BETWEEN
FORWARD AND REVERSE INSTANTLY FOR SLOW SPEED
MANEOUVABILITY. EXCESSIVE USE OF THIS FEATURE
CAN CAUSE TRANSMISSION AND ESC DAMAGE.
STOP!
A. B.
A. Pull the trigger back to accelerate, release it to decelerate.
B. To stop running your car, release the trigger to neutral.
C. Pushing the trigger forward activates reverse.
PULL TRIGGER BACK
CENTRE
PUSH
TRIGGER
FORWARD
C.
FTX Outback Hi-Rock Manual.indd 7FTX Outback Hi-Rock Manual.indd 7 18/12/2019 14:5418/12/2019 14:54

8
RUNNING YOUR CAR
5. TUNING THE STEERING TRIM
STEERING TRIM DIAL
Gently pull the trigger to allow your car to run slowly.
Meantime, tune the steering trim to allow the front
wheels to be aligned by rotating the dial.
STEERING
6. TUNING THE THROTTLE TRIM
7. TO TUNE THE STEERING AND THROTTLE DUAL RATE CONTROL
THROTTLE TRIM DIAL
Throttle Trim is used to set the idle speed of the car,
by rotating the dial.
THROTTLE TRIM
STEERING D/R
STEERING D/R DIAL
The D/R controls the amount of servo travel. You should
adjust this to give maximum steering without any extra
strain on the servo.
Set it to minimum rst and then slowly adjust until full
steering is achieved.
THROTTLE D/R
With this dial you can adjust the the maximum power output from your speed control.
8. STEERING/THROTTLE REVERSE
STEERING REVERSE:
To reverse the direction of servo travel for steering (CH1).
THROTTLE REVERSE:
Allows you to electronically switch the direction that the motor operates in
relation to the throttle trigger. For example, if you pull the throttle trigger to
accelerate forward but the model goes in reverse, ip the Throttle Reverse
switch to make the model accelerate forward.
FTX Outback Hi-Rock Manual.indd 8FTX Outback Hi-Rock Manual.indd 8 18/12/2019 14:5418/12/2019 14:54

9
MAINTAINING YOUR CAR
After running your car, the following procedures should be performed regularly and will help to maintain your car’s performance.
• Inspect your car for any obvious damage.
• Check the gears for wear, debris or broken/slipping teeth.
• Check the wheels and tighten the wheel screws properly.
• Check for loose screws in the chassis.
• Check the wiring for frayed or damaged wires or connectors.
• Check the steering servo which will wear out over time and require replacement.
• Check all batteries.
• Keep the chassis clean and free of sand, dust and moisture.
• Remove and clean the motor if necessary. (Never attempt to re-assemble the motor, you will damage it and void the warranty).
• Clean the car body with a soft lint-free cloth.
• Remove all batteries when not in use.
TROUBLESHOOTING
SYMPTOM
A. The vehicle does not work at all.
B. The vehicle runs slow.
C. The throttle works, but not the steering.
D. It steers, but throttle is uncontrollable.
E. The vehicle runs noisily.
POSSIBLE CAUSE
1. Check to see if transmitter and car are on.
2. Replace batteries.
3. Check if there are damaged parts.
1. Replace or charge the battery pack and/or the radio batteries.
2. Make sure the vehicle is geared properly and the pinion and spur
gear are over tightened.
3. Clean all bushings or ball bearings.
4. Check for stripped or dirty gears.
1. Check if the servo feels jammed – try centering it by hand.
2. Check the whole steering system.
1. Check if there are damaged parts.
2. Replace or charge the battery pack and/or the radio batteries
1. Check gear mesh between spur gear and pinion.
2. Check for stripped and/or dirty gears.
3. Clean and oil bushings or ball bearings.
FTX Outback Hi-Rock Manual.indd 9FTX Outback Hi-Rock Manual.indd 9 18/12/2019 14:5418/12/2019 14:54

10
FTX OUTBACK HI-ROCK
EXPLODED PARTS DIAGRAM
FTX Outback Hi-Rock Manual.indd 10FTX Outback Hi-Rock Manual.indd 10 18/12/2019 14:5418/12/2019 14:54

11
FTX Outback Hi-Rock Manual.indd 11FTX Outback Hi-Rock Manual.indd 11 18/12/2019 14:5418/12/2019 14:54

12
FTX Outback Hi-Rock Manual.indd 12FTX Outback Hi-Rock Manual.indd 12 18/12/2019 14:5418/12/2019 14:54

13
FTX Outback Hi-Rock Manual.indd 13FTX Outback Hi-Rock Manual.indd 13 18/12/2019 14:5418/12/2019 14:54

14
FTX Outback Hi-Rock Manual.indd 14FTX Outback Hi-Rock Manual.indd 14 18/12/2019 14:5418/12/2019 14:54

15
FTX OUTBACK HI-ROCK PARTS LISTING
FTX Outback Hi-Rock Manual.indd 15FTX Outback Hi-Rock Manual.indd 15 18/12/2019 14:5418/12/2019 14:54

16
FTX Outback Hi-Rock Manual.indd 16FTX Outback Hi-Rock Manual.indd 16 18/12/2019 14:5418/12/2019 14:54

17
FTX Outback Hi-Rock Manual.indd 17FTX Outback Hi-Rock Manual.indd 17 18/12/2019 14:5418/12/2019 14:54

18
NOTES:
........................................................................................................................................................................................................................
........................................................................................................................................................................................................................
........................................................................................................................................................................................................................
........................................................................................................................................................................................................................
........................................................................................................................................................................................................................
........................................................................................................................................................................................................................
........................................................................................................................................................................................................................
........................................................................................................................................................................................................................
........................................................................................................................................................................................................................
........................................................................................................................................................................................................................
........................................................................................................................................................................................................................
........................................................................................................................................................................................................................
........................................................................................................................................................................................................................
........................................................................................................................................................................................................................
........................................................................................................................................................................................................................
........................................................................................................................................................................................................................
........................................................................................................................................................................................................................
........................................................................................................................................................................................................................
........................................................................................................................................................................................................................
........................................................................................................................................................................................................................
........................................................................................................................................................................................................................
........................................................................................................................................................................................................................
........................................................................................................................................................................................................................
........................................................................................................................................................................................................................
........................................................................................................................................................................................................................
........................................................................................................................................................................................................................
........................................................................................................................................................................................................................
FTX Outback Hi-Rock Manual.indd 18FTX Outback Hi-Rock Manual.indd 18 18/12/2019 14:5418/12/2019 14:54

19
Le FTX Outback Hi-Rock 4x4,
une voiture de trail
à l’échelle 1/10
prête à rouler
Merci d’avoir choisi le FTX Outback
Hi-Rock 4x4 électrique.
Ce modèle est monté d’usine,
l’électronique est pré installée
et réglée pour permettre un démarrage
et du plaisir
le plus rapidement possible.
This 1/10th scale model has been factory assembled
and all electrics installed and set up to make it the easiest
possible introduction to the sport of driving RC cars.
Attention: lisez l’intégralité du manuel pour exploiter au mieux
la voiture et éviter des dommages mécaniques ou corporels.
Ce modèle n’est pas un jouet, il doit être manipulé avec précaution.
Utilisé dans de mauvaises conditions, ce modèle peut causer des dommages.
Ce modèle n’est pas fait pour être utilisé par un enfant sans la surveillance directe d’un adulte.
Il est essentiel de lire et de suivre les instructions et les recommandations de ce manuel pour entretenir et faire évoluer votre modèle dans de bonnes conditions.
Mesures de sécurité:
• Vous êtes responsable lors de l’évolution de ce modèle, veillez à ne pas vous mettre en danger, à mettre en danger le modèle ou la propriété d’autrui.
• Ce modèle radiocommandé peut être perturbé par d’autres sources d’onde radio, ce qui peut entrainer la perte momentanée du contrôle de la voiture.
• Age recommandé : 14 ans, ceci n’est pas un jouet, ce produit n’est pas fait pour être utilisé par un enfant sans surveillance.
Suivez consciencieusement les instructions suivantes :
• Ne jamais évoluer avec des batteries d’émission faibles
• Toujours évoluer dans une zone dégagée, loin de la circulation et de la foule
• Ne jamais évoluer dans une rue ou un endroit fréquenté
• Toujours garder le modèle dans son champ de vision
• Gardez hors de portée des enfants tous les composants de petite taille, électriques ou chimiques
• Tenez le modèle hors de portée de l’eau (la rouille peut causer des dommages irréversibles au modèle)
• Faites attention aux pièces en rotations, axes, pignons etc.
• Les débutants doivent prendre conseil auprès de personnes plus expérimentées
• Faites attention lors de l’utilisation des outils
• Attention à ne pas mettre les doigts ou d’autres parties du corps en contact avec les pièces en rotation
• Faites attention lors du transport, de la maintenance ou de la réparation, certaines pièces peuvent être coupantes.
• NE JAMAIS toucher les composants tels que le moteur, le variateur ou les batteries après utilisation, ces pièces peuvent être chaudes
• Lorsque vous changez de fréquence d’émission assurez-vous que les quartz de fréquence sont bien positionnés (RX pour récepteur et TX pour l’émetteur)
• Toujours éteindre en premier la voiture avant l’émetteur
• Vériez le bon fonctionnement de la voiture les roues dans le vide (en prenant les précautions nécessaires)
• Prolongez la durée de vie du moteur en le préservant de la surchauffe (la durée de vie du moteur dépend
aussi de la fréquence de roulage, des changements rapide de direction avant/arrière,
des conditions de roulage difciles poussière/boue des utilisations abusives
tirer/pousser des objets)
Contents:
1 FTX Outback Hi-Rock 1/10ème prêt à rouler électrique
1 Emetteur à volant fréquence 2.4GHz
1 Chargeur: entré 240V sortie 500mA
1 Batterie: 7.2V 2000mAh NiMH
FRANÇAIS
FTX Outback Hi-Rock Manual.indd 19FTX Outback Hi-Rock Manual.indd 19 18/12/2019 14:5418/12/2019 14:54

20
EQUIPMENTS REQUIS POUR LA MAINTENANCE:
FRANÇAIS
FTX Outback Hi-Rock Manual.indd 20FTX Outback Hi-Rock Manual.indd 20 18/12/2019 14:5418/12/2019 14:54
Table of contents
Languages:
Other FTX Motorized Toy Car manuals

FTX
FTX OUTBACK FURX 2.0 User manual

FTX
FTX FTX5591 User manual

FTX
FTX GLADIUS User manual

FTX
FTX Surge MT User manual

FTX
FTX Buggy Vantage 2.0 Brushed RTR User manual

FTX
FTX OUTLAW User manual

FTX
FTX Kanyon User manual

FTX
FTX OUTBACK MINI 2.0X User manual

FTX
FTX HOOLIGAN JNR User manual

FTX
FTX OUTBACK XP MINI ROCKVAN UNITRAK User manual