FTX OUTLAW User manual

O tlaw Man al.qxp_Br shed O law 23/09/2016 16:14 Page 1

2
FTX Outlaw 1/10th Scale RTR 4 D Brushed Electric Powered Off Road
Trail Vehicle
Congratulations on your purchase of the FTX Outlaw 4x4
Trail vehicle.
This 1/10th scale model has been factory assembled and
all electrics installed and set up to make it the easiest
possible introduction to the sport of driving RC cars.
Safety Precautions and
arnings
• You are responsible for operating this
model such that it does not endanger
yourself and others, or result in
damage to the product or the property
of others.
• This model is controlled by a radio which
is possibly subject to interference which can
cause momentary loss of control so it is advisable to
always keep a safe distance to avoid collisions or injury.
• Age Recommendation: 14 years or over. This is not a toy. This product is not
intended for use by children without direct adult supervision.
Carefully follow these directions and warnings, plus those of any additional equipment associated with the
use of this model, chargers, ESC and motors, radio etc.
• Never operate your model with low transmitter batteries.
• Always operate your model in an open area away from cars, traffic or people.
• Never operate the model in the street or in populated areas.
• Always keep the vehicle in direct line of sight, you cannot control what you
cannot see!
• Keep all chemicals, small parts and anything electrical out of the reach of
children.
• Avoid water exposure, moisture causes damage to electronics and may
result in the loss of control or permanent damage.
• Avoid injury from high speed rotating parts, gears and axles etc.
• Novices should seek advice from more experienced people to operate the
model correctly and meet its performance potential.
• Exercise caution when using tools and sharp instruments.
• Do not put fingers or any objects inside rotating and moving parts.
• Take care when carrying out repairs or maintenance as some parts may
be sharp.
• Do NOT touch equipment such as the motor, electronic speed control and
battery, immediately after using your model because they can generate high
temperatures.
• Always turn on your transmitter before you turn on the receiver in the car.
Always turn off the receiver before turning your transmitter off.
• Keep the wheels of the model off the ground, and keep your hands
away from the wheels when checking the operation of the radio
equipment.
• Prolong motor life by preventing overheat conditions. Undue
motor wear can result from frequent turns, rapid change of
direction forwards/backwards, continuous stop/starts,
pushing/pulling objects, driving in deep sand and tall grass, or
driving continuously up hill.
ARNING: Read the ENTIRE instruction manual to become familiar with the
features of the product before operating. Failure to operate the product correctly
can result in damage to the product, personal property and cause serious injury.
This is NOT a toy and must be operated with caution and common sense.
Failure to operate this product in a safe and responsible manner could result in
damage, injury or damage to other property.
This product is not intended for use by children without direct adult supervision.
It is essential to read and follow all the instructions and warnings in the manual,
prior to assembly, set-up or use, in order to operate correctly and avoid damage
or serious injury.
Contents:
FTX Outlaw 1/10th 4WD RTR Electric Trail Vehicle.
Transmitter: 2.4GHz Steerwheel.
Charger: Input ains 240V AC. Output 300mA DC
Battery: 7.2V 1800mAh Ni H
Aerial Tube
O tlaw Man al.qxp_Br shed O law 23/09/2016 16:14 Page 2

3
O tlaw Man al.qxp_Br shed O law 23/09/2016 16:14 Page 3

4
Aerial Assembly.
Uncoil the aerial wire carefully so as not to kink or knot it in anyway, and first be sure to insert the wire up through the top chassis aerial mount hole
from below. Pull the rubber tube cap off the aerial tube and push the wire all the way through the aerial tube until the first 5mm of wire shows out of
the other end. Fold the wire down over the end of the tube and be sure to insert the rubber tube cap so that it traps the protruding wire to hold it firmly
in the tube. Push Aerial tube into mounting hole in upper chassis until firmly seated. Bundle any
excess aerial wire neatly away from rotating components on the chassis.
Charging/Installing the Battery.
Always store your model with the battery pack unplugged and removed. Always charge your
battery away from the vehicle. The included 300mAh mains charger will take approx 6 hours to
charge a fully discharged battery, but always remove it from the charger if it becomes warm to the
touch. Always disconnect the charger from the mains supply and the battery pack when not in use.
Keep children away from charger and battery during the charging process.
To install a charged battery, remove the body clips and remove the bodyshell. Remove the battery
retainer clips, insert battery and reinstall retainer with the flat side facing the battery and re-insert
clips. When connecting battery and turning car on, ensure it is off the ground, with wheels away
from objects.
Notes on Battery use:
Always allow the battery cool after use, before recharging.
Always inspect the battery before charging.
Any bare wires, split heat shrink or leakage is a sure sign of abuse.
Never attempt to charge dead or damaged batteries.
Do not disassemble the battery or cut the connector wires.
If the battery connector gets hot enough to melt there is most likely a serious problem with your model, driveline, battery wires or speed controller.
Find and correct the problem before installing another charged battery pack.
NEVER charge the battery unattended incase of overcharging, you need to be able to monitor the battery during charging
Charge away from flammable objects and on a non-flammable surface incase the battery becomes too hot.
O tlaw Man al.qxp_Br shed O law 23/09/2016 16:14 Page 4

FTX6557 ESC Instructions
Features
This ESC is setup in a simple way for ease of operation. When switch on it, it
automatically searches for the neutral point. When the automatic setup is finished the
motor sends out “Do” “Re” “Me” indicating the neutral point is set and it is ready to
be operated.
The ESC has 2 programmable running modes and a Low voltage protection mode
that can be enabled for LiPo batteries.
Specification
Voltage Input: 7.2V-7.4V 2S LiPo/5-6cells NiMh/NiCd
Output Current 45A continuous
Peak Burst Current: 340A (10 sec)
BEC Output: 5.6V 2A
Size: 30 x 28 x 22mm (including heatsink)
Weight: 38g
Low voltage protection: LiPo Cut-off when less than 6V
Thermal Protection: When more than 90°C
iring Diagram
Setup
Connect all wires according to the diagram, then switch on the radio (make sure to
centre trims and ensure default settings for a programmable radio)
Switch on the power to the ESC, and you will hear “Do” “ Re” “Me”, this indicates
that the neutral point is set and the transmission is on. If the motor does not stop
running a short while after the neutral point is set, please switch off the ESC and
switch it back on again to set the neutral point.
Running Mode
To check the current mode
Turn on the ESC and wait for the “Do” “Re” “Me” to indicate the neutral is set and
then look at the status LED
A Flashing LED indicates the ESC is running in Normal mode (Forward, Brake,
Reverse)
A Solid LED indicates the ESC is running in Crawler mode (Forward with Drag Brake,
Reverse)
Changing Running Mode
Changing from Normal mode to Crawler mode
1. Turn on the ESC and wait for the neutral set “Do” “Re” “Me”, the LED will be
FLASHING
2. Hold the Program button down and listen for two “beeps”
3. Let go of the button after you hear the second “beep”
The LED will change to SOLID, the ESC is now running in Crawler mode
Changing from Crawler mode to Normal mode
1. Turn on the ESC and wait for the neutral set “Do” “Re” “Me”, the LED will be
SOLID
2. Hold the Program button down and listen for one “beep”
3. Let go of the button after you hear the “beep”
The LED will change to FLASHING, the ESC is now running in Normal mode
Programmable Protection Option
To check the current status of the protection systems
Switch on the ESC and listen to the motor’s “beep”
Motor “Beep--” + “Do” “ Re” “Me”
Low Voltage and Thermal Protections are turned OFF and Neutral Point is set
Motor “Beep--Beep--” + “Do” “ Re” “Me”
Low Voltage and Thermal Protections are turned ON and Neutral Point is set.
Please note: If you are using a LiPo battery you must turn the Low Voltage
protection on. The Low voltage protection will active if the LiPo battery voltage
drops below 6V, this will cut the power to the motor to protect the LiPo battery
and stop the battery voltage going too low. If you are running NiMh or NiCd cells
you should run with the protection turned off as the voltage protection is not
needed, running NiMh or NiCd cells in the Low voltage mode will not cause harm
the cells but it could cause the ESC to cut out unexpectedly.
If the ESC temperature gets above 90 °C the ESC will shut down to protect the
unit from damage. Once the temperature drops below 90 °C the ESC will begin
operating again.
Changing Protection Function
1. Hold Program button and switch the esc on
2. The ESC will then “beep” to indicate what mode is being set
To turn the protection OFF wait for one “beep” and then let go of the button
To turn the protection ON keep the button held and listen for the second “beep”
and then let go of the button.
3. Once you let go at the selected “beep” the motor will then sound “Do” “Re” “Me”
4. Turn the ESC off and back on and wait for neutral setting “Do” “Re” “Me”
Your ESC is now ready to use in the selected mode
Function
• Forward: Pull the trigger and the car will move forward.
If the car moves a little on its own the adjust the trim (N on the transmitter
picture)
• Brake: Allow the trigger to return to the neutral position and push the trigger
forward.
• Reverse: Push the trigger forward and the car will go into reverse. The car
must be stationary before reverse is engaged. This protects the ESC from
excessive forward/backwards action.
• LED Indicator
Crawler mode. The LED indicator will be solid when the car is not moving, it
will start to flash slowly as the car is moving and when as full speed will be at
a high flash rate. (This works the same forward and backward.)
Normal mode. The LED indicator will be FLASHING when the car is not
moving, it will start to flash slowly as the car is moving and when as full
speed will be at a high flash rate, while braking the LED will be SOLID. (This
works the same forward and backward.)
arning
Although the ESC is waterproof the rest of the vehicle is not. Do not run the model in
excessive wet conditions or submerge as long term damage and wear can occur.
It is dangerous to touch the motor after running as it emits heat during running and
the cooling plate remains hot after use.
The ESC is compatible with LiPo batteries but you must ensure that the Low voltage
protection mode is turned ON as detailed in the “Changing Protection Function”.
O tlaw Man al.qxp_Br shed O law 23/09/2016 16:14 Page 5

6
2.4GHZ RADIO SET-UP
1) I TRODUCTIO .
Thank you for choosing this Etronix
2.4GHz radio system, it has been
designed for land use but could also
suit any 2 channel boat. If you are using
this type of product for the very first
time, please make sure you read all the
information provided before installing in
your vehicle. Please take special care
of any warning notices to ensure safe
operation.
2) SERVICE.
If you experience any difficulties please
refer back to the manual, and if
problems persist contact your retailer
or distributor for further assistance.
3) SAFETY.
If you do not read, fully understand,
then follow the advice and instructions
in this manual properly, you risk
damaging your radio or your model
irreparably, even injury, or causing harm
to another person or their property.
4) USER GUIDES.
Do ot drive at night, in bad weather,
thunder and lightning, during rain, or on wet roads.
Do ot drive in the street between parked cars, near people or children,
or dog walkers.
Always check the proper operation of your model. If it does not respond
properly or reacts unpredictably please check the installation and
condition of your equipment.
Ensure the throttle trigger is at the neutral position before powering up,
to avoid your model running away before you get proper control.
ever turn off the transmitter before the receiver, although fitted with a
failsafe device, it is good practice to keep the model under control at all
times.
Remember :- Transmitter on first. Receiver off first!
5) BATTERY CARE.
If your transmitter or receiver is being power by rechargeable Nickel
Cadmium or Nickel Hydride batteries, be sure to always check they are
fully charged and in good condition before use. Loss of control could
soon result if part charged, discharged or damaged batteries are
installed. When charging NiCd or Ni H batteries always use a dedicated
charger, never try to recharge dry cells. If at any time during use or
charging your transmitter or receiver batteries show signs of severely
over heating, swelling or leaking, disconnect immediately, dispose of
properly and replace!
6) TRA SMITTER CHARGI G.
Connect a dedicated transmitter charger to the power
supply.
Connect the charger to the charging socket on the
rear of the handset.
When charging is complete, disconnect.
If using dry (alkaline) cells do not attempt to connect a
charger to the transmitter!
Install eight 1.5V (AA size) rechargeable
batteries in the transmitter base and re-fit the
bottom cover.
Etronix Pulse EX2 Sport
2 Channel 2.4GHz Steer Wheel Transmitter
7) TRA SMITTER SPECIFICATIO .
Channels : 2
Frequency: 2.4GHz
RF Power : <20 dbm
Modulation: GFSK
Code Type: Digital
Sensitivity: 1024
Power: 12V DC (8 x 1.5V AA)
Low Voltage Warning: <9V DC
Charger Port: 5mm Centre Positive
(Charger ot Included)
DSC Port: 3.5mm
(for Optional USB Game Interface –
OT USED/SUPPORTED)
Antenna Length: 120mm
Weight: 328g
Size: 159 x 99 x 315mm
Colour: Black
Certification: CE, FCC.
O tlaw Man al.qxp_Br shed O law 23/09/2016 16:14 Page 6

7
8) KEY TO TRA SMITTER FEATURES.
A – Folding/Rotating 2.4GHz Aerial
B – Steering Wheel
C – Throttle Trigger
D – Control Panel Cover
E – Battery Box
F – DSC (Simulator) Port ( OT USED/SUPPORTED)
G – Charger Port
H – Steering Reverse Switch
I – Throttle Reverse Switch
J – Power (RED) LED
K – Bind/Battery Condition (Green) LED
L – ‘Bind’ Button
M – Steering Trim Dial
– Throttle Trim Dial
O – Steering Dual Rate Dial (D/R)
P – Power On/Off Switch
9) TRA SMITTER FU CTIO S.
A vertical aerial achieves maximum range, so the short 2.4GHz aerial
(A) can be folded and rotated to achieve the most vertical position once
you are holding the handset comfortably. Then it allows you to fold the
aerial away for safe storage.
The Steering Wheel (B) operates Channel 1 and when turned anti
clockwise the model should steer to the left and vies versa. If not,
simply the flick the Steering Reverse Switch (H) to the “Rev” position.
The Throttle Trigger (C) operates Channel 2 and when pulled towards
the handset the model should move forwards, when pushed away it
The aerial folds down for storage
The aerial base also rotates 180 degrees so once you have
a comfortable grip on the transmitter the aerial can be
moved to the most vertical position to maximise range.
O tlaw Man al.qxp_Br shed O law 23/09/2016 16:14 Page 7

8
should brake (and then reverse if available),
otherwise simply flick the Throttle Reverse
switch (I) to the “Rev” position.
Beneath the folding Control Panel Cover (D)
you will find an array of useful adjustments,
plus the Power Switch (P).
When the Power Switch (P) is moved left to
the ‘On’ position, the RED LED (J) lights up, as
does the Green LED (K), this shows a good
battery condition.
If the transmitter batteries are weak and the voltage drops below 9V DC,
the green LED flashes to alert you to the possibility that range will be
limited and control might be lost, so new batteries (or a recharge) are
advisable.
If the model does not track straight, adjust the Steering Trim Dial ( ).
If the model creeps forwards or doesn’t sit at Neutral, adjust the Throttle
Trim Dial (N).
The Steering Dual Rate Dial (O) controls the total amount of steering
available. If the servo is straining against the steering end stops, turn it
down (clockwise) until it only just achieves maximum steering lock. If the
vehicle exhibits excess steering, or when at high speed you feel it over
reacts to the slightest adjustments, turn the Steering Dual Rate Dial
down yet further until the model becomes more controllable, but not so
far that you struggle to negotiate the tightest
corner on the course. If the servo is connected
to the receiver correctly but the model does
not steer at all, double check the Steering Dual
Rate Dial is not at Zero, before checking for
any more serious faults!
10) RECEIVER SPECIFICATIO .
Channels: 3
Failsafe: Throttle Set Point Adjustable.
Frequency: 2.4GHz
Modulation: GFSK
Sensitivity: 1024
RF receiver sensitivity: -100dbm
Power: 4.5 to 6V DC
Weight: 5g
Antenna Length: 176mm
Size: 37.6 x 22.3 x 13mm
Colour: Black
Certification: CE, FCC.
11) RECEIVER I STALLATIO .
The receiver should be securely mounted flat
and level in your model, within the receiver
box if available to protect it from moisture and
dust. When routing the aerial keep it as far
away from any electronic devices and metal work as reasonably
possible, with at least the last half of the aerial wire in a vertical aerial
tube to maximise control and range.
For Nitro or Petrol powered models connect the receiver battery (noting
correct polarity) into the socket marked “VCC” or via a suitable power
switch.
Electric vehicles equipped with an ESC should power the radio (via the
BEC) when plugged into channel 2, and receiver power is usually
controlled by the ESC switch.
The third channel is not used on this transmitter, so the third (bind)
socket can be used to power a cooling fan or Personal Transponder
(PT).
When at the mid position the model should
remain stationary, if it creeps slightly adjust
the throttle neutral dial accordingly.
When pulled back to the handset the model
should move forwards, if not flick the
Throttle switch to the ‘Rev’ position.
When pushed away the model should brake (and
then move in reverse if applicable) if not simply
flick the throttle switch to the ‘Rev’ position.
O tlaw Man al.qxp_Br shed O law 23/09/2016 16:14 Page 8

9
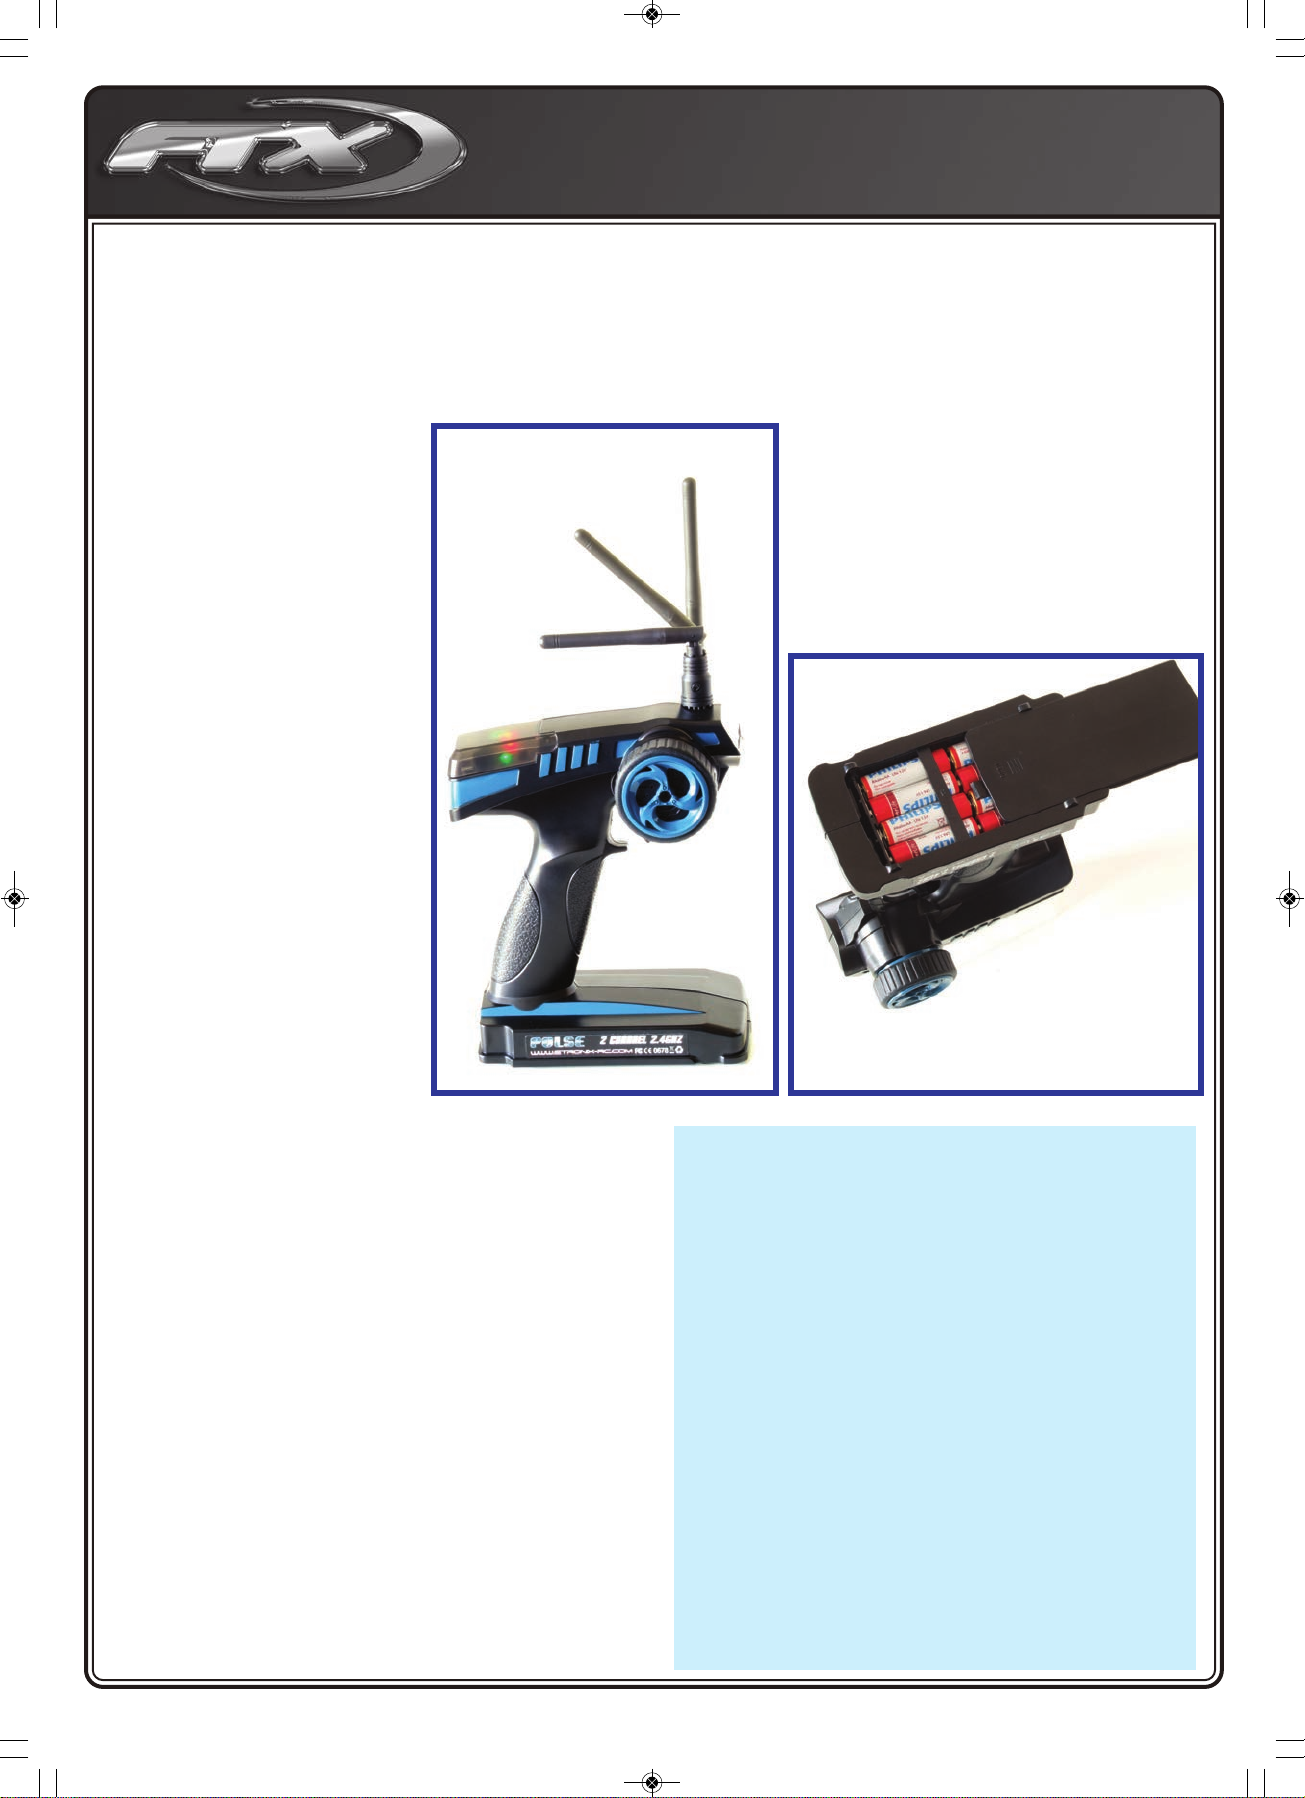
12) MATCHI G THE RECEIVER TO
THE TRA SMITTER. (BI DI G)
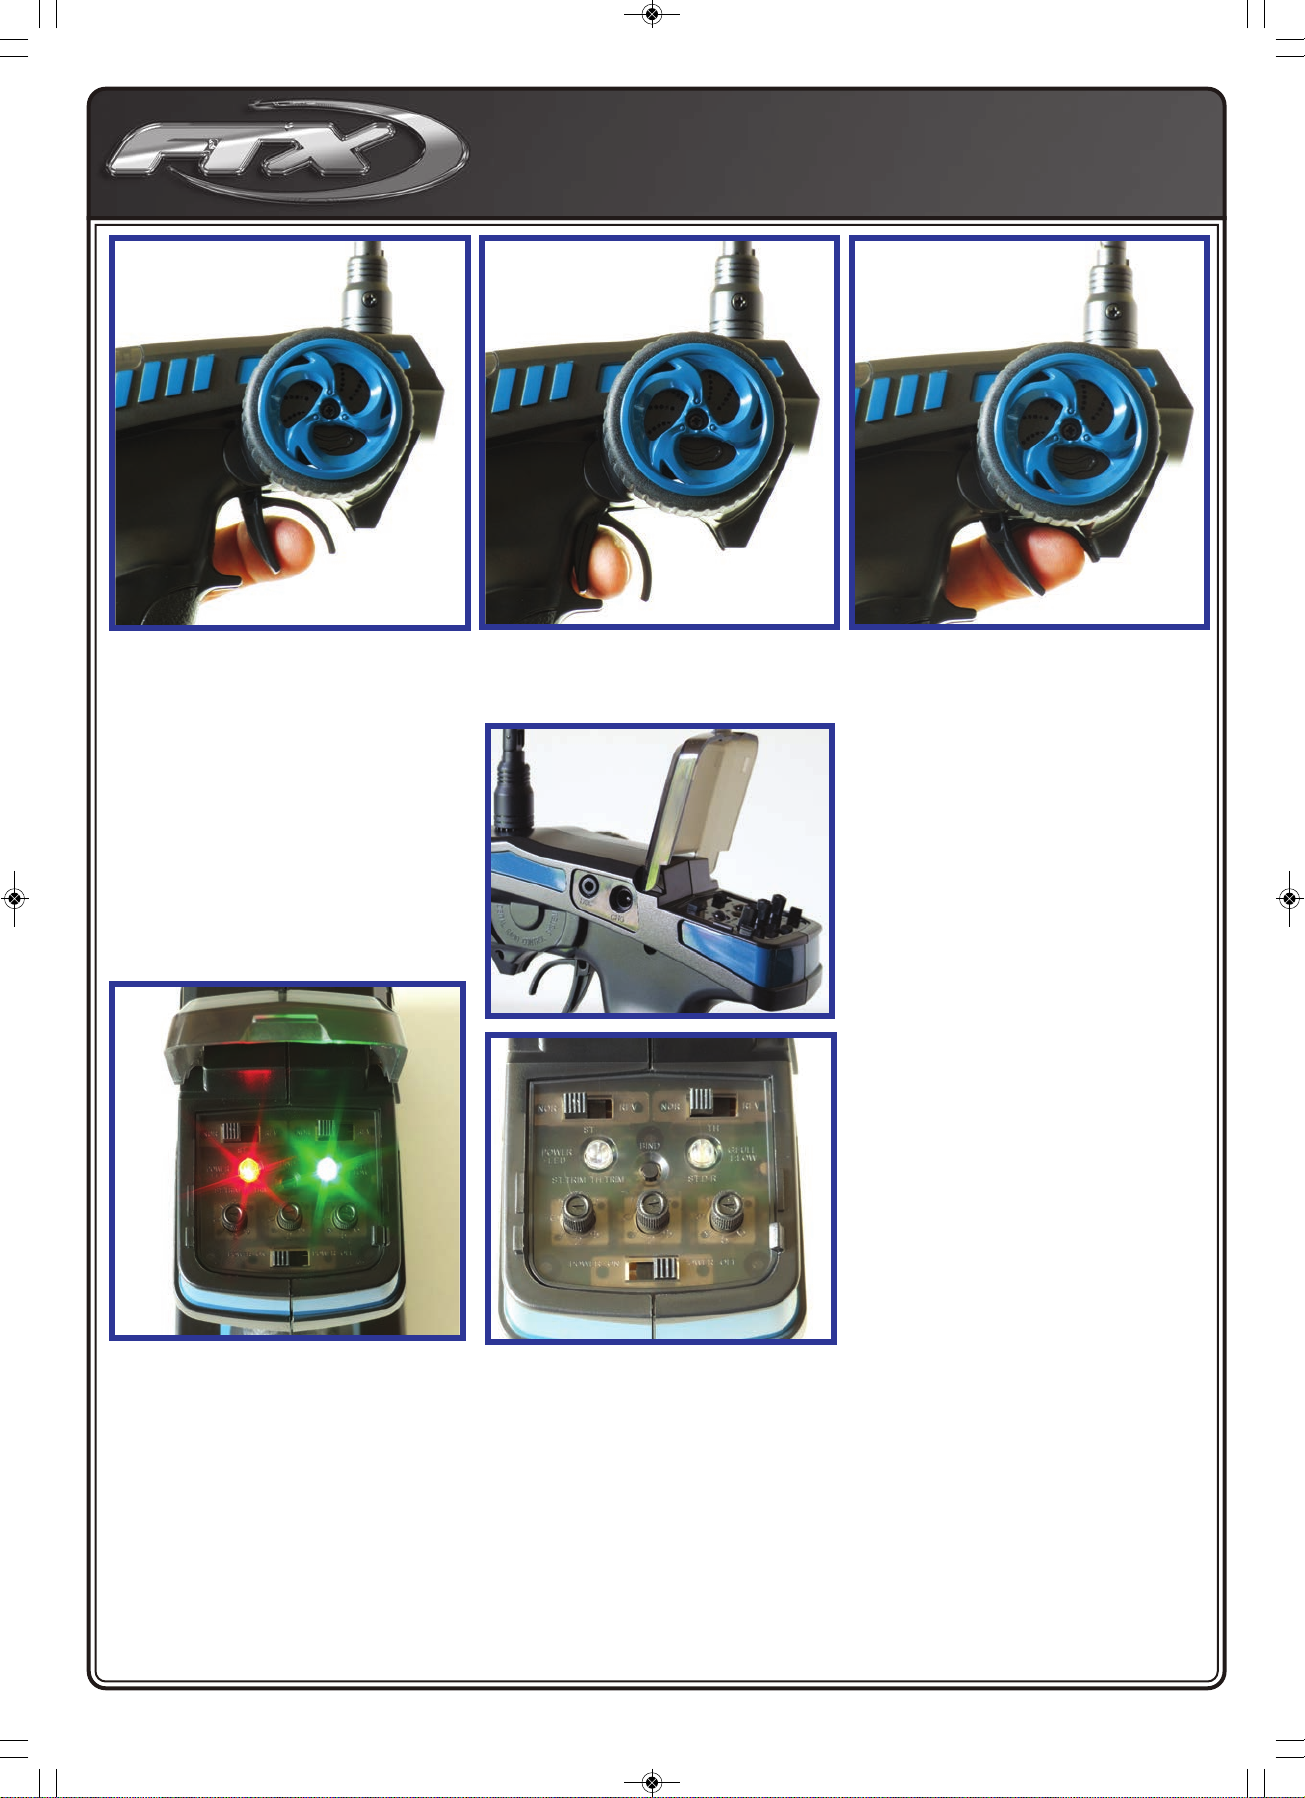
To make sure only one transmitter can control the
receiver they need to be matched, and to do so you
need to “Bind” them together so they only
recognise each others signature code. There is a
‘Bind’ plug included with the receiver, and this is
inserted in the third channel (Bind socket) before
power is supplied to the receiver for the first time.
The red LED on the receiver will begin to blink to
indicate the bind process has begun. Now hold
down the transmitter bind button (L) before it is
switched on. The transmitter’s green LED (K)
begins to blink and the receivers red LED stops
flashing and turns solid red to indicate the bind
process has been achieved. Before you can
operate the model, both the receiver and
transmitter should be switched off and the bind plug
removed from the receiver for safe keeping. Now
switch on the transmitter before the receiver and
the model should respond normally. If the receivers
red LED does not go solid when it is powered up
and the transmitter is on, then ‘Binding’ has failed,
so begin the matching process again.
Remember if this is the first time you have set up
the radio in your model, the steering and throttle
will need correctly adjusted neutral positions before
you will have proper control, and the throttle failsafe
position should also be set before your first run.
13) RECEIVER FAILSAFE OPERATIO .
This Etronix receiver incorporates a digital
protection system known as a failsafe. If the model
goes beyond the usable range, or the signal is
interrupted, the failsafe will automatically set the
throttle (channel 2) to a preset position so
long as power is still supplied to it.
Set up the failsafe before first use, by
turning on the transmitter, then supplying
power to the receiver. A pointer is
supplied (on the bind Plug) which can be
used to hold down the failsafe button on
the receiver for three seconds until the
red LED flashes several times to indicate
successful setting of the failsafe position.
Now, wherever the throttle channel was
positioned, will be the throttle servo
failsafe set point.
To test the failsafe, hold the model clear
of the ground and apply a little throttle
before turning the transmitter off. Within a
second, the throttle servo (or speed
controller) should have repositioned to
the failsafe position, which is typically
throttle neutral position so the vehicle just
rolls safely to a halt if the signal is lost.
Note:- if the receiver is re-matched to the
transmitter for any reason (See ‘Binding’
as above) the failsafe position is lost so it
will need to be reset again.
Thank you for choosing Etronix, used
properly and observing the
information in this manual we believe
the Pulse EX2 Sport will achieve a
strong connection with your model,
utilising all the benefits of crystal free
2.4GHz technology for exceptional
control and interference free
operation.
Hold down the transmitter “Bind” button
before switching the power on.
With the power on you can release the
bind button once the green LED begins to
flash to indicate the “Bind” process has
initiated.
Unless a battery powered model using
an ESC with BEC, a receiver pack
should be plugged into the VCC socket
via a suitable power switch, making sure
to check for correct polarity.
To ‘Bind’ the receiver to the transmitter
the supplied Bind Plug should be
installed channel 3/bind socket before
power is applied. The red LED should
begin to flash to indicate the ‘Bind’
process has begun, and go solid red once
‘Bind’ is complete. ow remove the ‘Bind’
plug and restart the power up procedure.
Once the ‘Bind’ process is complete, the
throttle failsafe position can be set by
pressing the button using the pointer
provided.
O tlaw Man al.qxp_Br shed O law 23/09/2016 16:14 Page 9

10
Getting Started
Switch on transmitter. Hold vehicle clear of the ground, connect battery pack and switch on receiver. Bind the Transmitter and receiver if required.
Test the transmitter to check control of the vehicle with wheels off the ground. Start driving slowly and if the vehicle does not go straight, adjust
steering trim dial on Transmitter. For the very first run use the throttle gently, to gradually bed in the motor brushes and help the driver become
accustomed to the vehicles behaviour and controls.
PLEASE NOTE:
Although the electronics are waterproof the rest of car can be subjected to damage if running in excessively wet or submerged conditions.
After Run.
Switch off the receiver power, switch off the transmitter and lower the aerial. Disconnect the battery and remove it from the vehicle, allow it to cool
before recharging. If you have a second charged battery all ready to use, still allow the vehicle to cool slightly before continuing.
Regular maintenance.
Frequently check the whole vehicle for loose or missing fixings. Use thread lock on any replacement screws into metal threads.
Frequently check rotating parts are free from grass, string etc. that might bind their motion and over stress the motor or speed
controller. Remove the wheels occasionally and check behind the mounting hex for obstructions or anything that might have
been wrapped around the axle and caused extra drag.
Check the gear mesh frequently and remove any stones or grit from gear teeth to prevent premature wear and damage.
If the motor moves, or is removed for maintenance/exchange, the gear mesh will need to be set. Simply slacken the motor
retaining screws and adjust the motor until there is just discernable backlash between pinion and spur teeth. If the gear is too
tight or too loose the gears will be noisy and could be damaged.
Shock absorbers will wear prematurely if used in dirty dusty conditions. Replace oil and seals as required to keep a smooth dampening action.
Trouble shooting guide.
arranty
Due to the nature of this product and potential use FTX warrants it to be free of material and workmanship defects when new. FTX will at its sole
discretion repair or replace defective components free of charge within 30 days from date of purchase. This warranty does not cover wear and tear,
crash or impact damage, modifications, component water damage failure to perform maintenance or damage from improper use. Proof of purchase
date will be required to action any warranty claims. In no case shall FTX's liability exceed the original cost of the purchased kit.
Instructions for disposal.
Environmental Protection Notes & WEEE
The crossed-out wheeled bin symbol shown here, which may be found on the product itself, in the operating instructions or on the packaging, is in accordance with the Waste Electrical and
Electronic Equipment (WEEE) Directive. Individual markings indicate which materials can be recycled and re-used. You can make an important contribution to the protection of our common
environment by re-using the product, recycling the basic materials or recycling redundant equipment in other ways.
When this product comes to the end of its useful life, you must not dispose of it in the ordinary domestic waste. any electrical items that we throw away can be repaired or recycled.
Recycling items helps to save natural resources and also reduces the environmental and health impacts that are linked with sending electrical goods to landfill. The correct method of
disposal is to take it to your local collection point for recycling electrical and electronic equipment. You can go to recycle-more.co.uk for details of locations.
Alternatively FTX can offer our customers free take-back of their WEEE on a like-for-like basis when they buy a new Electrical or Electronic product from us.
For example, if a customer bought a new radio system from us or a dealer, we would accept their old radio and prevent it going into a landfill site by disposing of it safely. Customers must
return their old WEEE item to us within 28 days of purchasing their new item.
Remove batteries from your device and dispose of them at your local collection point for batteries. If you don’t know the location of your nearest disposal centre,
please enquire at your local council office.
Short Runtime:
Battery damaged/not
charged
otor dirty or brushes worn
Drivetrain binding
Sluggish Action:
otor dirty or brushes worn
Bind in drive train
Battery running low on
power
Motor/ESC overheat:
Over-geared
Binding transmission.
Seized axle bearing.
otor binding
Motor spins but vehicle
refuses to move:
Gears damaged.
Gears loose on shaft.
Slipper clutch too loose.
Drive shaft broken or
missing.
Poor Range or fails to
operate:
Transmitter batteries low
Vehicle Battery Low.
Transmitter switched off
Transmitter/receiver aerial
not extended.
ESC switched off or battery
not connected.
Loose connectors/wires.
Water damage. odel
electronics are not
waterproof.
WEE/GB4215VX
CML DISTRIBUTIO , SAXO HOUSE, SAXO BUSI ESS PARK,
HA BURY ROAD, BROMSGROVE, B60 4AD.
O tlaw Man al.qxp_Br shed O law 23/09/2016 16:14 Page 10

11
Notes:
..................................................................................................................................................................
..................................................................................................................................................................
..................................................................................................................................................................
..................................................................................................................................................................
..................................................................................................................................................................
..................................................................................................................................................................
..................................................................................................................................................................
..................................................................................................................................................................
..................................................................................................................................................................
..................................................................................................................................................................
..................................................................................................................................................................
..................................................................................................................................................................
..................................................................................................................................................................
..................................................................................................................................................................
..................................................................................................................................................................
..................................................................................................................................................................
..................................................................................................................................................................
..................................................................................................................................................................
..................................................................................................................................................................
..................................................................................................................................................................
..................................................................................................................................................................
..................................................................................................................................................................
..................................................................................................................................................................
..................................................................................................................................................................
O tlaw Man al.qxp_Br shed O law 23/09/2016 16:14 Page 11

12
O tlaw Man al.qxp_Br shed O law 23/09/2016 16:14 Page 12
Table of contents
Other FTX Motorized Toy Car manuals

FTX
FTX OUTBACK FURX 2.0 User manual

FTX
FTX Mighty Thunder User manual

FTX
FTX Buggy Vantage 2.0 Brushed RTR User manual

FTX
FTX Kanyon User manual

FTX
FTX Crawler Mini Outback 3.0 Ranger 1:24 RTR User manual

FTX
FTX OUTBACK MINI 2.0X User manual

FTX
FTX BANZAI Troubleshooting guide

FTX
FTX TORRO User manual

FTX
FTX FTX5591 User manual

FTX
FTX OUTBACK XP MINI ROCKVAN UNITRAK User manual
Popular Motorized Toy Car manuals by other brands

Jamara
Jamara Ferrari 458 Speciale A 2,4GHz instructions

Reely
Reely Bad Boy 1271058 operating instructions

Team Orion
Team Orion LiPo Glow manual

Carson
Carson Nano Racer instruction manual

Helion
Helion Animus 18TR HLNA0602 owner's manual

Power Wheels
Power Wheels CADILLAC ESCALADE CUSTOM EDITION N8417 owner's manual