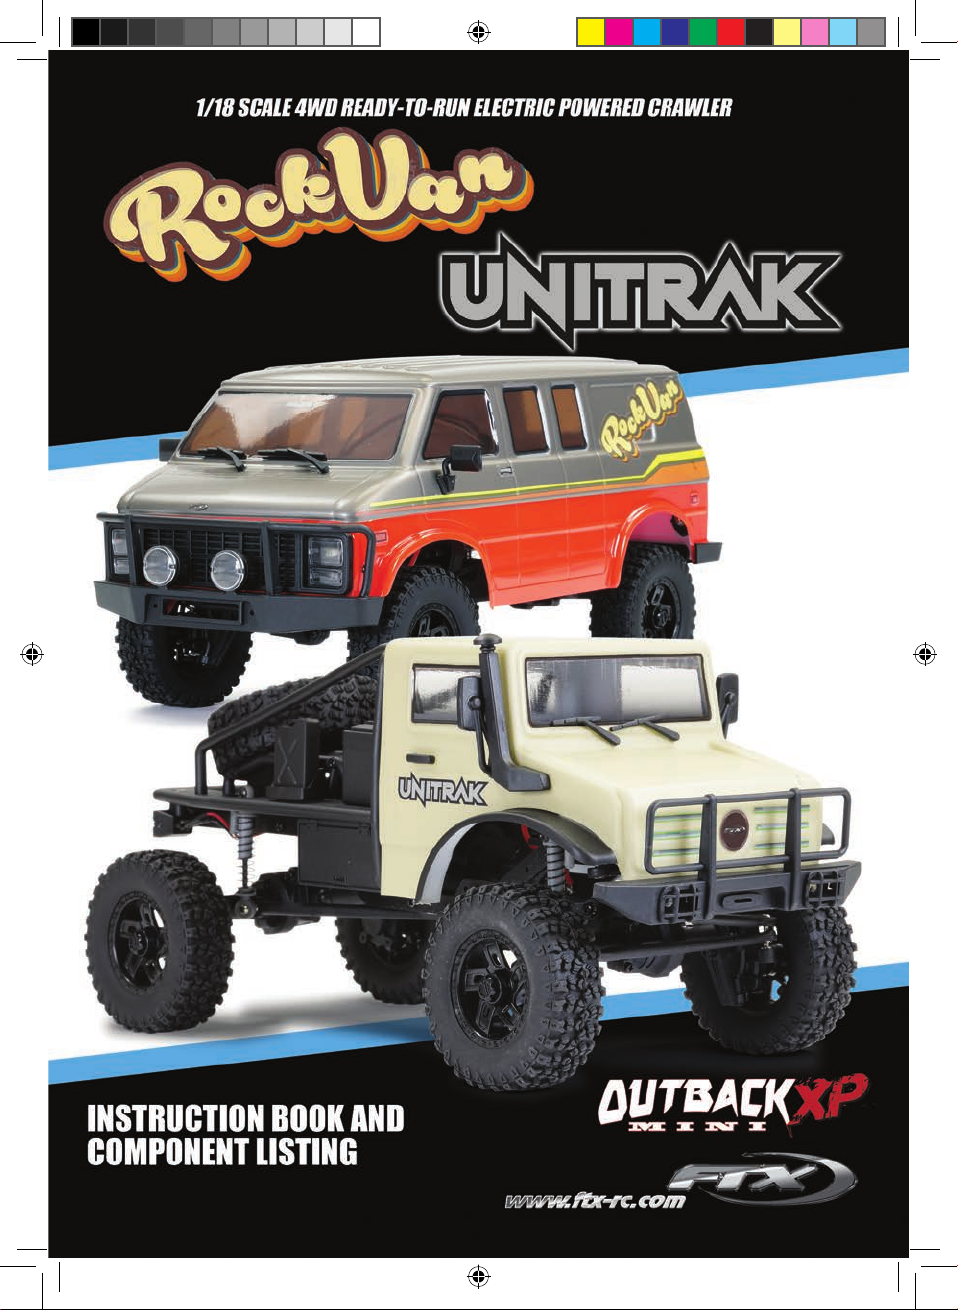
FTX OUTBACK XP MINI ROCKVAN UNITRAK User manual

1
FTXOBminiXUnitrak-RockaVan.Man.indd 1FTXOBminiXUnitrak-RockaVan.Man.indd 1 08/02/2023 14:3208/02/2023 14:32

2
FTXOUTBACKMINIXPROCKVANAND
UNITRAK1/18THSCALE4WD
READY-TO-RUNELECTRIC
POWEREDOFFROADTRAIL
VEHICLE
Congratulations on your purchase of the
FTX Outback Mini XP electric trail vehicle.
This 1/18th scale model has been factory assembled and all
electrics installed and set up to make it the easiest possible
introduction to the sport of driving RC cars.
WARNING: Read the ENTIRE instruction manual to become familiar with
the features of the product before operating.
Failure to operate the product correctly can result in damage to the product,
personal property and cause serious injury.
This is NOT a toy and must be operated with caution and common sense.
Failure to operate this product in a safe and responsible manner could result in
damage, injury or damage to other property.
This product is not intended for use by children without direct adult supervision.
It is essential to read and follow all the instructions and warnings in the manual,
prior to assembly, set-up or use, in order to operate correctly and avoid damage
or serious injury.
Safety Precautions and Warnings
• You are responsible for operating this model such that it does not endanger yourself and others, or result in damage to the product or the property of
others.
• This model is controlled by a radio which is possibly subject to interference which can cause momentary loss of control so it is advisable to
always keep a safe distance to avoid collisions or injury.
• Age Recommendation: 14 years or over. This is not a toy. This product is not intended for use by children without direct adult supervision.
Carefully follow these directions and warnings, plus those of any additional equipment associated with the use
of this model, chargers, ESC and motors, radio etc.
• Never operate your model with low transmitter batteries.
• Always operate your model in an open area away from cars, trafc or people.
• Never operate the model in the street or in populated areas.
• Always keep the vehicle in direct line of sight, you cannot control what you cannot see!
• Keep all chemicals, small parts and anything electrical out of the reach of children.
• Although splash-proof the car and electronics are not designed to be subjected to extended
moisture exposure or submersion.
To do so will result in permanent damage.
• Avoid injury from high speed rotating parts, gears and axles etc.
• Novices should seek advice from more experienced people to operate the model correctly and meet its performance potential.
• Exercise caution when using tools and sharp instruments.
• Do not put ngers or any objects inside rotating and moving parts.
• Take care when carrying out repairs or maintenance as some parts may be sharp.
• Do NOT touch equipment such as the motor, electronic speed control and battery, immediately after using your model because they can generate high
temperatures.
• Always turn on your transmitter before you turn on the receiver in the car. Always turn off the receiver before turning your transmitter off.
• Keep the wheels of the model off the ground, and keep your hands away from the wheels
when checking the operation of the radio equipment.
• Prolong motor life by preventing overheat conditions. Undue motor wear can result from
frequent turns, rapid change of direction
forwards/backwards, continuous stop/starts, pushing/pulling objects, driving in deep
sand and tall grass, or driving continuously up hill.
Contents:
FTX Outback Mini XP RockVan or Unitrak RTR Vehicle
Transmitter: 2.4ghz Steerwheel
Charger: USB 150mA
Battery: 7.4V 600mAh 2S LiPo
FTXOBminiXUnitrak-RockaVan.Man.indd 2FTXOBminiXUnitrak-RockaVan.Man.indd 2 08/02/2023 14:3208/02/2023 14:32

3
FAMILIARIZING YOURSELF WITH YOUR 2.4GHZ RADIO SYSTEM
You car is equipped with a 2.4Ghz radio system that once bound with the ESC will provide you interference free use.
Please read and understand the instructions and functions before operating.
BATTERY INSTALLATION
1. Open the battery cover as shown and install 4 x AAA size batteries, positioning the polarity
as indicated on the battery box and make sure the batteries make good contact to the
contacts therein.
2. Close cover after batteries are installed.
Notes:
• Low battery alarm: When the battery is lower than 4.2V the G.LED on the panel will
ash slowly.
• When installing the battery, please pay attention to the positive and negative poles of the
battery to avoid installation errors. (As shown on the right).
FTXOBminiXUnitrak-RockaVan.Man.indd 3FTXOBminiXUnitrak-RockaVan.Man.indd 3 08/02/2023 14:3208/02/2023 14:32

4
RUNNING YOUR CAR
2. TURN ON THE RECEIVER ON YOUR CAR
1. TURN ON THE RADIO CONTROLLER
Switch on the power on the radio controller. Your car is bound
with your radio controller automatically. When active the R.LED
will be lit.
The ESC/receiver switch is located under the bodyshell of the
model. Switch on the ESC/receiver switch shown here.
3. CHECK THE STEERING PERFORMANCE
Ensure good steering movement.
CENTRE TURN LEFT TURN RIGHT
1. To keep the car running in a straight line,
keep the wheel in the centre position.
2. Turn the wheel to the left to turn your
car left.
3. Turn the wheel to the right to turn you
car to the right.
4. CHECK THROTTLE TRIGGER RESPONSE
PLEASE NOTE: THE MODEL SWITCHES BETWEEN FORWARD AND REVERSE INSTANTLY. FOR SLOW SPEED MANOEUVRABILITY
EXCESSIVE USE OF THIS FEATURE CAN CAUSE TRANSMISSION AND ESC DAMAGE.
A. Pull the trigger back to accelerate, release it to decelerate.
B. To stop running you car, release the trigger to neutral.
C. Pushing the trigger forward activates reverse.
A. PULL
TRIGGER BACK
C. PUSH
TRIGGER
FORWARD
B. STOP
A. B. C.
STOP!
FTXOBminiXUnitrak-RockaVan.Man.indd 4FTXOBminiXUnitrak-RockaVan.Man.indd 4 08/02/2023 14:3208/02/2023 14:32

5
RUNNING YOUR CAR
5. TO TUNE THE STEERING TRIM
THROTTLE TRIM DIAL
Throttle Trim is used to set the idle speed
of the car, by rotating the dial.
6. TO TUNE THE THROTTLE TRIM
7. TO TUNE THE STEERING DUAL RATE CONTROL DIAL
STEERING D/R DIAL
The D/R controls the amount of servo travel.
You should adjust this to give maximum
steering without any extra strain on the servo.
Set it to minimum rst and then slowly adjust
until full steering is achieved.
THROTTLE D/R
With this dial you can adjust the the
maximum power output from your speed
control.
8. STEERING/THROTTLE REVERSE
STEERING REVERSE:
To reverse the direction of servo travel for steering (CH1).
THROTTLE REVERSE:
Allows you to electronically switch the direction that the motor operates in relation to the
throttle trigger. For example, if you pull the throttle trigger to accelerate forward but the model
goes in reverse, ip the Throttle Reverse
switch to make the model accelerate forward.
STEERING TRIM DIAL
Gently pull the trigger to allow your car to
run slowly. Meantime, tune the steering
trim to allow the front wheels to be
aligned by rotating the dial.
FTXOBminiXUnitrak-RockaVan.Man.indd 5FTXOBminiXUnitrak-RockaVan.Man.indd 5 08/02/2023 14:3208/02/2023 14:32

6
BINDING THE TRANSMITTER AND RECEIVER
Your FTX transmitter will come ready bound to the vehicle directly from the factory. However should you need to
rebind the radio to the vehicle please follow these simple instructions:
1. While pressing and holding the BIND button, power on the transmitter. The transmitter will now
enter binding mode, G.LED will ash rapidly and the BIND button can then be released.
2. Power on the receiver. After 1 second the receiver will automatically enter binding mode. Once in
binding mode, the receiver’s LED will ash rapidly.
3. Binding will then automatically occur within 1-2 seconds. If successful, the LED on the receiver
will remain solid, G.LED on the transmitter will turn off and the model can then be operated as
normal.
Note: Always enter the transmitter into binding mode rst, followed by the receiver. If the binding
procedure is not nished within 10 seconds, or if the binding process is unsuccessful, the receiver
will exit binding mode and its LED will then ash slowly. If required, the binding process can then be
completed again as above.
Stick Calibration – Change to Transmitter Calibration:
This function is used to set the neutral position for both the steering wheel and throttle trigger.
The model’s transmitter is calibrated before delivery, however if recalibration is required, please follow
these steps:
1. Enter Calibration Mode: Rotate and hold the steering wheel to its maximum clockwise position,
push and hold the throttle trigger to its forwardmost position, power on the transmitter. R.LED
and G.LED will repeatedly ash twice to conrm that the transmitter is now in calibration mode, return the steering wheel and throttle trigger to their
neutral positions.
2. Calibrate Wheel: Rotate the steering wheel clockwise to its maximum position, then, rotate the steering wheel anti-clockwise to its maximum position.
Return the steering wheel to its neutral position. R.LED will turn off, conrming that steering wheel calibration has been completed.
3. Calibrate Trigger: Pull the throttle trigger backwards to its maximum position, then, push the throttle trigger forwards to its maximum position.
Return the throttle trigger to its neutral position. G.LED will turn off, conrming that throttle trigger calibration has been completed.
4. Once the steering wheel and throttle trigger calibration procedures have been completed, press the transmitter’s BIND button to save these settings
and exit calibration mode.
Car Light Control:
The model’s receiver is pre-set with 5 different lighting proles. The ‘CH4’ button of the transmitter can be used to cycle through these lighting proles as
detailed below:
Default Mode: In this mode, the turn signal lights remain in an off state regardless of whether the model is turning left or right. When braking, the rear stop
lights are in a high-light state but otherwise remain in an off state. The front headlights remain in an off state.
Mode A: In this mode, the turn signal lights ash slowly when the model is making a corresponding turn. The rear stop lights are in a low-light state,
changing to a high-light state when braking. The front headlights are in a low-light state.
Mode B: In this mode, the left or right turn signal lights ash slowly when the model is making a corresponding turn. The stop lights are in a low-light state,
changing to a high-light state when braking. The front headlights are in a high-light state.
Mode C: In this mode, all turn signal lights ash slowly in unison, regardless of whether the model is making a turn or not. The rear stop lights are in a low-
light state, changing to a high-light state when braking.The front headlights are in a high-light state.
Mode D: In this mode, the left or right turn signal lights ash slowly when the model is making a corresponding turn. When braking, the rear stop lights are
in a high-light state but otherwise remain in an off state. The front headlights are in an off state.
Notes:
1. Each time the model is powered on, the lighting prole automatically reverts to ‘Default Mode’.
2. The model’s receiver automatically identies the neutral positions of CH1 (Steering) and CH2 (Throttle) each time the model is powered on. It is
recommended that both the model and transmitter are powered off, before powering them back on each time the transmitter’s trims are adjusted.
Failure to do so could result in abnormal light control.
FTXOBminiXUnitrak-RockaVan.Man.indd 6FTXOBminiXUnitrak-RockaVan.Man.indd 6 08/02/2023 14:3208/02/2023 14:32

7
Notes on Battery use:
• Always allow the battery cool after use, before recharging.
• Always inspect the battery before charging.
• Any bare wires, split heat shrink or leakage is a sure sign of abuse.
• Never attempt to charge dead or damaged batteries.
• Do not disassemble the battery or cut the connector wires.
• If the battery connector gets hot enough to melt there is most likely a serious problem with your model, driveline, battery wires or speed controller.
Find and correct the problem before installing another charged battery pack.
• NEVER charge the battery unattended in case of overcharging, you need to be able to monitor the battery during charging
• Charge away from ammable objects and on a non-ammable surface in case the battery becomes too hot.
Charging the battery:
1. Connect charger to a USB port and the LED will
blink red slowly. Connect to battery.
2. When charging the LED status will be solid red.
Once charged the LED light will turn off.
3. NEVER leave the battery unattended whilst
charging.
4. If the battery or charger become hot during the
charging process, disconnect both the battery
and charger immediately as this may have been
caused due to an internal short-circuit.
The LED sequence for the USB charger is:
Red light on = charging Light off = charged
Power Off:
After use, to power off the
model and transmitter please
follow the steps below:
1. Toggle the model’s
power switch to its ‘OFF’
position. Disconnect the
model’s battery from the
model’s receiver.
2. Toggle the transmitter’s
power switch to the
‘OFF’ position.
Note: Always power off the
model and disconnect its
battery BEFORE turning off
the transmitter. Failure to do
so may lead to damage or
serious injury.
Speed Control/Receiver Unit
FTXOBminiXUnitrak-RockaVan.Man.indd 7FTXOBminiXUnitrak-RockaVan.Man.indd 7 08/02/2023 14:3208/02/2023 14:32

8
MAINTAINING YOUR CAR
After running your car, the following procedures should be performed regularly and will help to maintain your car’s performance.
• Inspect your car for any obvious damage.
• Check the gears for wear, debris or broken/slipping teeth.
• Check the wheels and tighten the wheel screws properly.
• Check for loose screws in the chassis.
• Check the wiring for frayed or damaged wires or connectors.
• Check the steering servo which will wear out over time and require replacement.
• Check all batteries.
• Keep the chassis clean and free of sand, dust and moisture.
• Remove and clean the motor if necessary. (Never attempt to re-assemble the motor, you will damage it and void the
warranty).
• Clean the car body with a soft lint-free cloth.
• Remove all batteries when not in use.
TROUBLESHOOTING
SYMPTOM
A. The vehicle does not work at all.
B. The vehicle runs slow.
C. The throttle works, but not the steering.
D. It steers, but throttle is uncontrollable.
E. The vehicle runs noisily.
POSSIBLE CAUSE
1. Check to see if transmitter and car are on.
2. Replace batteries.
3. Check if there are damaged parts.
1. Replace or charge the battery pack and/or the radio batteries.
2. Make sure the vehicle is geared properly and the pinion and spur
gear are over tightened.
3. Clean all bushings or ball bearings.
4. Check for stripped or dirty gears.
1. Check if the servo feels jammed – try centering it by hand.
2. Check the whole steering system.
1. Check if there are damaged parts.
2. Replace or charge the battery pack and/or the radio batteries
1. Check gear mesh between spur gear and pinion.
2. Check for stripped and/or dirty gears.
3. Clean and oil bushings or ball bearings.
FTXOBminiXUnitrak-RockaVan.Man.indd 8FTXOBminiXUnitrak-RockaVan.Man.indd 8 08/02/2023 14:3208/02/2023 14:32

9
LEFTXOUTBACKMINIXPROCKVANET
UNITRAK,UNEVOITUREDETRAIL
4X4ÉLECTRIQUEÀL’ÉCHELLE
1/18ÈMEPRÊTEÀROULER
Félicitation pour l’achat de l’FTX
Outback Mini XP RockVan et Unitrak.
Ce modèle à l’échelle 1/18ème a été monté en usine, toute son
électronique est déjà installée et réglée an de faciliter votre
introduction au monde de la RC.
Avertissement : Lisez entièrement la notice an de vous familiariser
avec les fonctionnalités de ce produit avant de vous en servir.
Une mauvaise manipulation de ce produit pourrait l’endommager,
endommager d’autres produits et même vous blesser. Ce n’est PAS un jouet et il
doit être utiliser avec précaution et bon sens.
Si vous n’utilisez pas ce produit en toute sécurité et de manière responsable, peut
entrainer des dégâts, des blessures et impacter d’autre personnes. Ce produit
n’est donc pas destiné à être utilisé par des enfants sans la surveillance directe
d’un adulte. Il est important que vous lisiez et suiviez les instructions avant de
monter, régler ou utiliser le produit an de vous en servir correctement et éviter
tout problème.
Mesures de sécurités et Avertissements
• Lorsque vous piloter la voiture, vous en êtes responsable, vous devez donc
vous assurez de ne pas vous mettre en danger ou de mettre en danger les
autres. De même que d’abimer tout produit que ce soit le votre ou ceux
d’autres personnes.
• Cette voiture est contrôlée par une télécommande qui peut possiblement être sujet à des interférences qui peuvent entrainer des pertes de contrôle
momentanée. C’est pourquoi vous devez garder des distances de sécurités pour éviter toute collision ou blessure.
• Age recommandé : 14 ans et plus. Ce n’est pas un jouet. Ce produit n’est pas destiné à être utilisé par un enfant sans la surveillance direct d’un adulte.
Suivez avec précautions ces instructions et ces avertissements, mais aussi les instructions des autres produits
utilisés avec cette voiture (le chargeur, le contrôleur de vitesse, le moteur, la radio, etc…)
• Ne faites jamais rouler votre voiture lorsque les piles de la télécommande sont faibles.
• Faites rouler votre voiture dans un large espace loin des voitures, du trac et de la population
• Ne roulez jamais dans la rue ou dans des endroits peuplés.
• Gardez toujours la voiture à vue, vous ne pouvez pas contrôler ce que vous ne voyez pas !
• Gardez tous produits chimiques, petites pièces et systèmes électrique hors de la portée des enfants
• Bien que la voiture et l’électronique soient résistants aux éclaboussures, ils ne sont pas prévus pour être sujet à des expositions prolongées à l’humidité
ou être immergés. En effet, des dégâts permanent pourraient subvenir.
• Evitez toute blessure avec les pièces qui tournent à haute vitesse, les pignons et les outils coupant.
• Les débutants devraient demander de l’aide à des personnes expérimentés an de manipuler et piloter correctement la voiture et ainsi exploiter toute
ses capacités.
• Soyez précautionneux lorsque vous utilisez des outils notamment ceux qui peuvent couper.
• Ne mettez pas vos doigts ou tout autre objet dans les pièces en rotation ou en mouvement.
• Soyez prudent lorsque vous effectuez des maintenances ou des réparations, en effet certaines pièces pourraient être coupante.
• Ne touchez PAS les composants comme le moteur, le contrôleur de vitesse ou la batterie immédiatement après avoir roulé car ils pourraient être à des
températures élevés.
• Allumez toujours la télécommande avant d’allumer votre voiture. Et inversement, éteignez toujours votre voiture avant d’éteindre votre télécommande.
• Lorsque vous testez votre système radio, surélevez votre voiture an que ses roues soient en l’air et gardez vos mains éloignées des roues.
• Prolongez la durée de vie de votre moteur en évitant toute surchauffe. Une usure moteur anormale peut intervenir si vous tournez fréquemment, changez
rapidement de sens de direction (marche avant / arrière), effectuez des départs / arrêts continuellement, en poussant / tirant des objets, en pilotant
dans du sable profond, de l’herbe haute ou en pilotant constamment en côte.
Contents:
FTX Outback Mini XP RockVan et Minitrak RTR Vehicle
Transmitter: 2.4ghz Steerwheel
Charger: USB 150mA
Battery: 7.4V 600mAH 2S LiPo
FRANÇAIS
FTXOBminiXUnitrak-RockaVan.Man.indd 9FTXOBminiXUnitrak-RockaVan.Man.indd 9 08/02/2023 14:3208/02/2023 14:32

10
FAMILIARISEZ-VOUS AVEC LA TÉLÉCOMMANDE 2.4GHZ
INSTALLATION DES PILES
1. Ouvrir le couvercle de la batterie comme montré et insérez-y 4 piles AAA, respecter les
polarités indiquée sur le couvercle et assurer vous que les contacts soient correctes.
2. Refermer le couvercle une fois les piles insérées
Notes:
• Alarme de faible batterie : Lorsque la batterie est en dessous de 4.2V, la LED verte
d’indication du statut va clignoter lentement
• Lors vous installez les piles, faites bien attention aux polarités positives et négative an
d’éviter les erreurs
FRANÇAIS
Votre voiture est équipée d’un système radio 2.4Ghz, qui une fois connecté au contrôleur de vitesse va vous assurer un
fonctionnement sans aucune interférence. Lisez attentivement le manuel d’instruction pour comprendre son fonctionnement
avant de l’utiliser
FTXOBminiXUnitrak-RockaVan.Man.indd 10FTXOBminiXUnitrak-RockaVan.Man.indd 10 08/02/2023 14:3208/02/2023 14:32

11
FAITES ROULER VOTRE VOITURE
2. ALLUMEZ LE RÉCEPTEUR DE VOTRE VOITURE
1. ALLUMEZ VOTRE TÉLÉCOMMANDE
Allumez votre télécommande grâce à l’interrupteur. Votre car est
de base reliée au récepteur.
Allumez votre récepteur grâce à l’interrupteur du récepteur/
contrôleur de vitesse situé sous la carrosserie. Comme montré
sur la photo.
3. VÉRIFICATION DE LA DIRECTION
Ensure good steering movement.
CENTRÉ
TOURNÉ À GAUCHE TOURNÉ À DROITE
1. An de faire rouler droit votre voiture,
laisser le volant de direction centré
2. Tournez le volant à gauche an de
faire tourner à gauche votre voiture
3. Tournez le volant à droite an de faire
tourner à droite votre voiture
4. VÉRIFICATION DES GAZ
A. Tirez la gâchette vers l’arrière an d’accélérer, relâcher la pour ralentir
B. Pour arrêter votre voiture, laissez la gâchette en position neutre
C. Poussez la gâchette vers l’avant an d’activer la marche arrière
STOP!
A. TIREZ LA
GÂCHETTE VERS
L’ARRIÈRE
C. POUSSEZ
LA
GÂCHETTE
VERS
L’AVANT
B. ARRÊT
A. B. C.
FRANÇAIS
VEUILLEZ NOTER : QUE LA VOITURE PASSE DIRECTEMENT DE MARCHE AVANT À MARCHE ARRIÈRE. AFIN DE MANŒUVRER À
FAIBLE VITESSE, UNE UTILISATION EXCESSIVE DE CETTE FONCTIONNALITÉ PEUT ABIMER LA TRANSMISSION
ET LE CONTRÔLEUR DE VITESSE.
FTXOBminiXUnitrak-RockaVan.Man.indd 11FTXOBminiXUnitrak-RockaVan.Man.indd 11 08/02/2023 14:3208/02/2023 14:32

12
FAITES ROULER VOTRE VOITURE
5. RÉGLAGE DES TRIMS DE DIRECTION
TRIMS DE LA DIRECTION
Placer la voiture sur le stand avec les roues
qui ne touchent pas le sol, puis regler le
Trim de direction pour aligner les roues
avant.
TRIMS DES GAZ
Trim des gaz est utilisé pour régler la
vitesse de ralenti.
6. RÉGLAGE DES TRIMS DES GAZ
7. RÉGLAGE DU DUAL RATE DE LA DIRECTION
D/R DE LA DIRECTION
Ce reglage ajuste la course du servo de
direction.
Pousser le bouton en avant pour un maximum
de directivite. Tirer en arriere pour reduire la
course du servo.
Note: Toujours minimiser et augmenter
ensuite pendant que votre voiture.
8. STEERING/THROTTLE REVERSE
DIRECTION REVERSE:
Cela permet electroniquement d’inverser le sens derotation du servo.
Par exemple si vous si vous tournez le volant a droite.
GAZ REVERSE:
Cela vous permet de changer electroniquement la direction dans laquelle le moteur opere en
relation avec la giichette des Gaz. Par exemple, si vous poussez la giichette pour accelerer en
avant, rnais le rnodel va en arriere, inverser le Gaz Reverse permettra au model d’accelerer
en avant.
FRANÇAIS
FTXOBminiXUnitrak-RockaVan.Man.indd 12FTXOBminiXUnitrak-RockaVan.Man.indd 12 08/02/2023 14:3208/02/2023 14:32

13
CONNECTER LA TÉLÉCOMMANDE ET LE RÉCEPTEUR
Votre télécommande FTX arrive déjà connectée au récepteur de la voiture. Cependant, dans le cas où vous auriez
besoin de réassocier la télécommande et le récepteur de la voiture, suivez les étapes suivantes
Calibration de la télécommande :
Cette fonction est utilisée an de régler le neutre du volant de direction
et de la gâchette des gaz. La télécommande est réglée en usine, mais si
besoin de la calibrer de nouveau, veuillez suivre les étapes suivantes :
1. Entrer dans le mode de calibration : Tournez le volant de direction
dans le sens des aiguilles d’une montre à fond et gardez le dans
cette position. Poussez la gâchette des gaz vers l’avant au maximum
et gardez la dans cette position. Puis allumer la télécommande.
La R.LED et la G.LED vont clignoter par intermittence 2 fois pour
conrmer que la télécommande est maintenant en mode de
calibration. Vous pouvez alors relâcher le volant et la gâchette.
2. Calibration du volant : Tournez le volant de direction dans le sens
des aiguilles d’une montre à fond puis tournez le à fond dans le sens
inverse des aiguilles d’une montre. Laissez de nouveau le volant au
neutre. La R.LED va s’éteindre, et conrmer que la calibration du
volant est terminée
3. Calibration de la gâchette : Tirez la gâchette des gaz à fond puis
poussez la gâchette à fond. Laissez de nouveau la gâchette au
neutre. La G.LED va s’éteindre, et conrmer que la calibration de la
gâchette est terminée
4. Une fois le volant de direction et la gâchette des gaz calibrés,
appuyez sur le bouton BIND de la télécommande pour sauvegarder
les réglages et sortir du mode de calibration
Votre télécommande FTX arrive déjà connectée au récepteur de la
voiture. Cependant, dans le cas où vous auriez besoin de réassocier la
télécommande et le récepteur de la voiture, suivez les étapes suivantes
1. En restant appuyé sur le bouton BIND, allumer la
télécommande. La télécommande est maintenant en mode
d’association, la G.LED clignote alors rapidement et le bouton BIND
peut être relâché
2. Allumer le récepteur de la voiture. Après 1 sec le récepteur va rentrer
automatiquement en mode d’association. Une fois dans le mode, la
LED clignote rapidement
3. L’association va automatiquement se faire en 1 à 2 secondes. Si
l’étape se déroule correctement, la LED sur le récepteur va rester
allumer, et la G.LED de la télécommande va s’éteindre. Vous pouvez
alors utiliser normalement la voiture.
Note : Assurez-vous de toujours mettre la télécommande en premier dans
le mode d’association, puis la télécommande. Si la procédure n’est pas
terminée au bout de 10 secondes, ou si l’association ne se réalise pas, le
récepteur va quitter le mode d’association et sa LED va clignoter lentement.
Si besoin, répéter les étapes ci-dessus.
FRANÇAIS
Contrôle des lumières de la voiture :
Le récepteur de la voiture est préréglé avec 5 modes d’éclairages
différents. Le bouton CH4 de la télécommande peut être utilisé pour passer
d’un mode à l’autre. Plus d’informations ci-dessous :
Mode par défaut : Dans ce mode, le clignotant reste éteint quel que soit la
position du volant. Lorsque vous freinez, les feux stops s’allument. Les feux
avant sont en veilleuse
Mode A : Dans ce mode, le clignotant clignote lentement en accord avec
la position du volant. Les feux arrière sont en veilleuse, et lorsque vous
freinez, les feux stops s’allument. Les feux avant sont en veilleuse
Mode B : Dans ce mode, le clignotant clignote lentement en accord avec
la position du volant. Les feux arrière sont en veilleuse, et lorsque vous
freinez, les feux stops s’allument. Les feux avant sont en plein phare
Mode C : Dans ce mode, les clignotants clignotent lentement en
permanence, quel que soit la position du volant. Les feux arrière sont en
veilleuse, et lorsque vous freinez, les feux stops s’allument. Les feux avant
sont en plein phare
Mode D : Dans ce mode, le clignotant clignote lentement en accord avec la
position du volant. Lorsque vous freinez, les feux stops s’allument. Les feux
avant sont éteints.
Notes :
1. Chaque fois que vous allumez la voiture, le mode revient à celui par
défaut
2. La fonctionnalité de contrôle des lumières de la voiture identie
automatiquement les positions du neutre de la direction et des gaz
chaque vous que vous l’allumez. Dès que vous modiez les trims sur
la télécommande, il est alors recommandé d’éteindre la voiture et
la télécommande puis de les rallumer. Si vous ne le faites pas, il est
possible que les modes ne soient pas correctement ajustés
FTXOBminiXUnitrak-RockaVan.Man.indd 13FTXOBminiXUnitrak-RockaVan.Man.indd 13 08/02/2023 14:3208/02/2023 14:32

14
1. Branchez le chargeur à un port
USB. La LED clignotera lentement
en rouge. Connectez la batterie au
chargeur Lors de la charge, la LED
d’indication sera rouge. Puis verte
lorsque la charge est terminée
2. Pendant la charge, l’état de la LED
sera rouge xe. Une fois chargé, le
voyant LED s’éteint.
3. NE LAISSEZ JAMAIS CHARGER LA
BATTERIE SANS SURVEILLANCE
4. Si le chargeur ou la batterie deviennent chaud lors de la charge, déconnectez
immédiatement la batterie et le chargeur pour éviter tout court-circuit
• Laissez toujours la batterie refroidir après son usage avant de la charger
• Vériez toujours la batterie avant de la charger
• Tout câble dénudé ou fuite de la batterie est un signe de mauvaise utilisation
• N’essayez jamais de charger une batterie qui est morte ou abimée
• Ne démontez jamais la batterie et ne coupez jamais de câble
• Si la prise devient assez chaud pour fondre, ce qu’il y a un gros soucis sur votre voiture, la transmission, les câbles de la
batterie ou le contrôleur de vitesse. Trouvez et résolvez le problème avant d’utiliser de nouveau la voiture
• Ne chargez jamais une batterie sans surveillance, notamment pour éviter toute surcharge, vous devez pouvoir identier
lorsque la charge est terminée
• Chargez la batterie loin de tout matériaux inammable, sur une surface non inammable dans le cas où la batterie venait à
chauer
RÉCEPTEUR / CONTRÔLEUR DE VITESSE
CARACTÉRISTIQUES
• Nom du produit : FS-R4A3-BS
• Fonctionne avec la télécommande :
FS-MG42-BS
• Voitures adaptées : 1/18 voiture,
crawler
• Nombre de voies : 4
• Nombre de LED : 7
• Fréquence radio : 2.4Ghz
• Protocole 2.4Ghz : 2A - BS
• Antenne : Une antenne
• Puissance d’alimentation : NiMH (5
à 7 éléments) / Lithium 2S
• Courant continu / pic : 10A / 50A
• Format de donnée : PWM
• Température de fonctionnement :
-10°C à +60°C
• Limit d’humidité : 20% à 95%
• Waterproof : PPX4
• Portée : > 150 (distance au sol sans
interférence)
• Mise à jour : non
• Dimensions : 33mm * 30mm * 12mm
(sans le condensateur)
• Poids : 11g
• Alimentation de sortie (BEC) : 6V / 1A
• Certication : CE, FCC ID : N4ZR4A31
APERÇU DES ÉLÉMENTS :
1. Voie 1 (CH1)
2. Voie 3
3. Voie 4
4. Interface du système d’éclairage
5. Connexion du clignotant droit
6. Connexion du feu antibrouillard
7. Connexion du feu antibrouillard
8. Connexion du clignotant gauche
9. LED
10. Interface du système d’éclairage
11. Antenne
12. Interrupteur d’alimentation
13. Pin de l’anode de la batterie
14. Pin de la cathode de la batterie
15. Connexion positive du moteur M+
16. Connexion négative du moteur M-
17. Connexion du clignotant gauche
18. Connexion du clignotant droit
19. Connexion du feu arrière
20. Connexion du feu stop
21. Connexion de backup
22. Sortie du signal
23. Connexion positive
24. Connexion négative
ETEINDRE LE
RÉCEPTEUR:
Après son utilisation, an
d’éteindre la voiture et la
télécommande, veuillez suivre
la procédure ci-dessous
1. Eteignez le récepteur
avec l’interrupteur
positionné dessus.
Puis débran a batterie
2. Eteignez la télécommande
avec l’interrupteur
positionné dessus.
Note : Eteignez toujours la
voiture et débranchez sa
batterie avant d’éteindre la
télécommande. Ne pas suivre
cette procédure peut causer
des dégâts ou causer des
blessures
CHARGER LA BATTERIE :
NOTE SUR L’USAGE DE LA BATTERIE :
FTXOBminiXUnitrak-RockaVan.Man.indd 14FTXOBminiXUnitrak-RockaVan.Man.indd 14 08/02/2023 14:3208/02/2023 14:32

15
MAINTENANCE DE VOTRE VOITURE
Après avoir roulé avec votre voiture, vous devriez régulièrement effectuer les procédures ci-dessous an de maintenir les
performances de votre voiture.
• Inspectez votre voiture an de vériez que rien de visible ne soit endommagé
• Vériez l’usure des pignons, leur propreté et regardez si aucune dent n’est cassée
• Vériez les roues, notamment leur serrage
• Vériez que aucune vis ne soit dévissée sur le châssis
• Vériez qu’aucun câble ne soit dénudé, abimé. De même pour les prises.
• Vériez le servo de direction, qui avec le temps va s’abimer et va devoir être remplacé
• Vériez toutes vos batteries
• Gardez votre voiture propre, sans sable, terre ou humidité
• Enlevez et nettoyez votre moteur si nécessaire. (N’essayez pas de le démonter : vous allez l’abimer et supprimer la garantie)
• Nettoyez la carrosserie avec un chiffon microbre
• Enlevez toutes les batteries lorsque vous ne vous en servez pas
PROBLÈMES ET RÉSOLUTIONS
SYMPTÔME
A. La voiture ne marche pas.
B. La voiture avance lentement.
C. Les gaz fonctionnent mais pas la
direction.
D. La voiture tourne mais les gaz sont
incontrôlables.
E. La voiture fait du bruit en roulant.
PROBLÈME POSSIBLE
1. Vériez que la télécommande et la voiture soient allumés.
2. Changez les piles / batterie.
3. Vériez qu’aucune pièce ne soit abimé.
1. Changer ou charger la batterie et ou les piles de la télécommande.
2. Vériez que le rapport de transmission soit correct
(pignon moteur et la couronne).
3. Nettoyez toutes les bagues et les roulements à billes.
4. Vériez qu’aucun pignon ne soit abimé ou sale.
1. Vériez si le servo tourne librement, essayez de le centré.
2. Vériez tout le système de direction.
1. Vériez que rien ne soit abimé.
2. Changer ou charger la batterie et ou les piles de la télécommande.
1. Vériez l’entre-dent entre le pignon et la couronne.
2. Vériez qu’aucun pignon ne soit abimé ou sale.
3. Nettoyez et huilez les bagues et les roulements à billes.
FRANÇAIS
FTXOBminiXUnitrak-RockaVan.Man.indd 15FTXOBminiXUnitrak-RockaVan.Man.indd 15 08/02/2023 14:3208/02/2023 14:32

16
SPAREPARTSLIST
FTXOBminiXUnitrak-RockaVan.Man.indd 16FTXOBminiXUnitrak-RockaVan.Man.indd 16 08/02/2023 14:3208/02/2023 14:32

17
SPAREPARTSLIST
FTXOBminiXUnitrak-RockaVan.Man.indd 17FTXOBminiXUnitrak-RockaVan.Man.indd 17 08/02/2023 14:3208/02/2023 14:32

18
FTXOBminiXUnitrak-RockaVan.Man.indd 18FTXOBminiXUnitrak-RockaVan.Man.indd 18 08/02/2023 14:3208/02/2023 14:32

19
FTXOBminiXUnitrak-RockaVan.Man.indd 19FTXOBminiXUnitrak-RockaVan.Man.indd 19 08/02/2023 14:3208/02/2023 14:32

20
FTXOBminiXUnitrak-RockaVan.Man.indd 20FTXOBminiXUnitrak-RockaVan.Man.indd 20 08/02/2023 14:3208/02/2023 14:32
Table of contents
Languages:
Other FTX Motorized Toy Car manuals

FTX
FTX Outback Hi-Rock User manual

FTX
FTX Surge MT User manual

FTX
FTX FTX5591 User manual

FTX
FTX OUTBACK GEO User manual

FTX
FTX HOOLIGAN JNR User manual

FTX
FTX 5576B User manual

FTX
FTX Buggy Vantage 2.0 Brushed RTR User manual

FTX
FTX OUTLAW User manual

FTX
FTX OUTBACK MINI X 6IXER User manual

FTX
FTX Mighty Thunder User manual
Popular Motorized Toy Car manuals by other brands

REVELL
REVELL Henschel Typ33 D1 Assembly manual

DF-models
DF-models df Crawler 3046 manual

Hunter Products
Hunter Products Rollplay W458 Owner's manual and assembly instructions

Serpent
Serpent S411 Eryx 3.0 instruction manual

Shopify
Shopify BDM0913 Installation and operating instructions

BELKITS
BELKITS Ford Escort Rs1600 Mk1 quick start guide