Gallagher Birth Alarm Advanced User manual


EN
Thank you for purchasing the Birth Alarm Advanced. This is an extremely reliable reporting system
for foal births. We recommend that you read this manual carefully before using it. Proper assembly
and operation are essential for proper working.

EN
Contents
1. Introduction...................................................................................................................................... 4
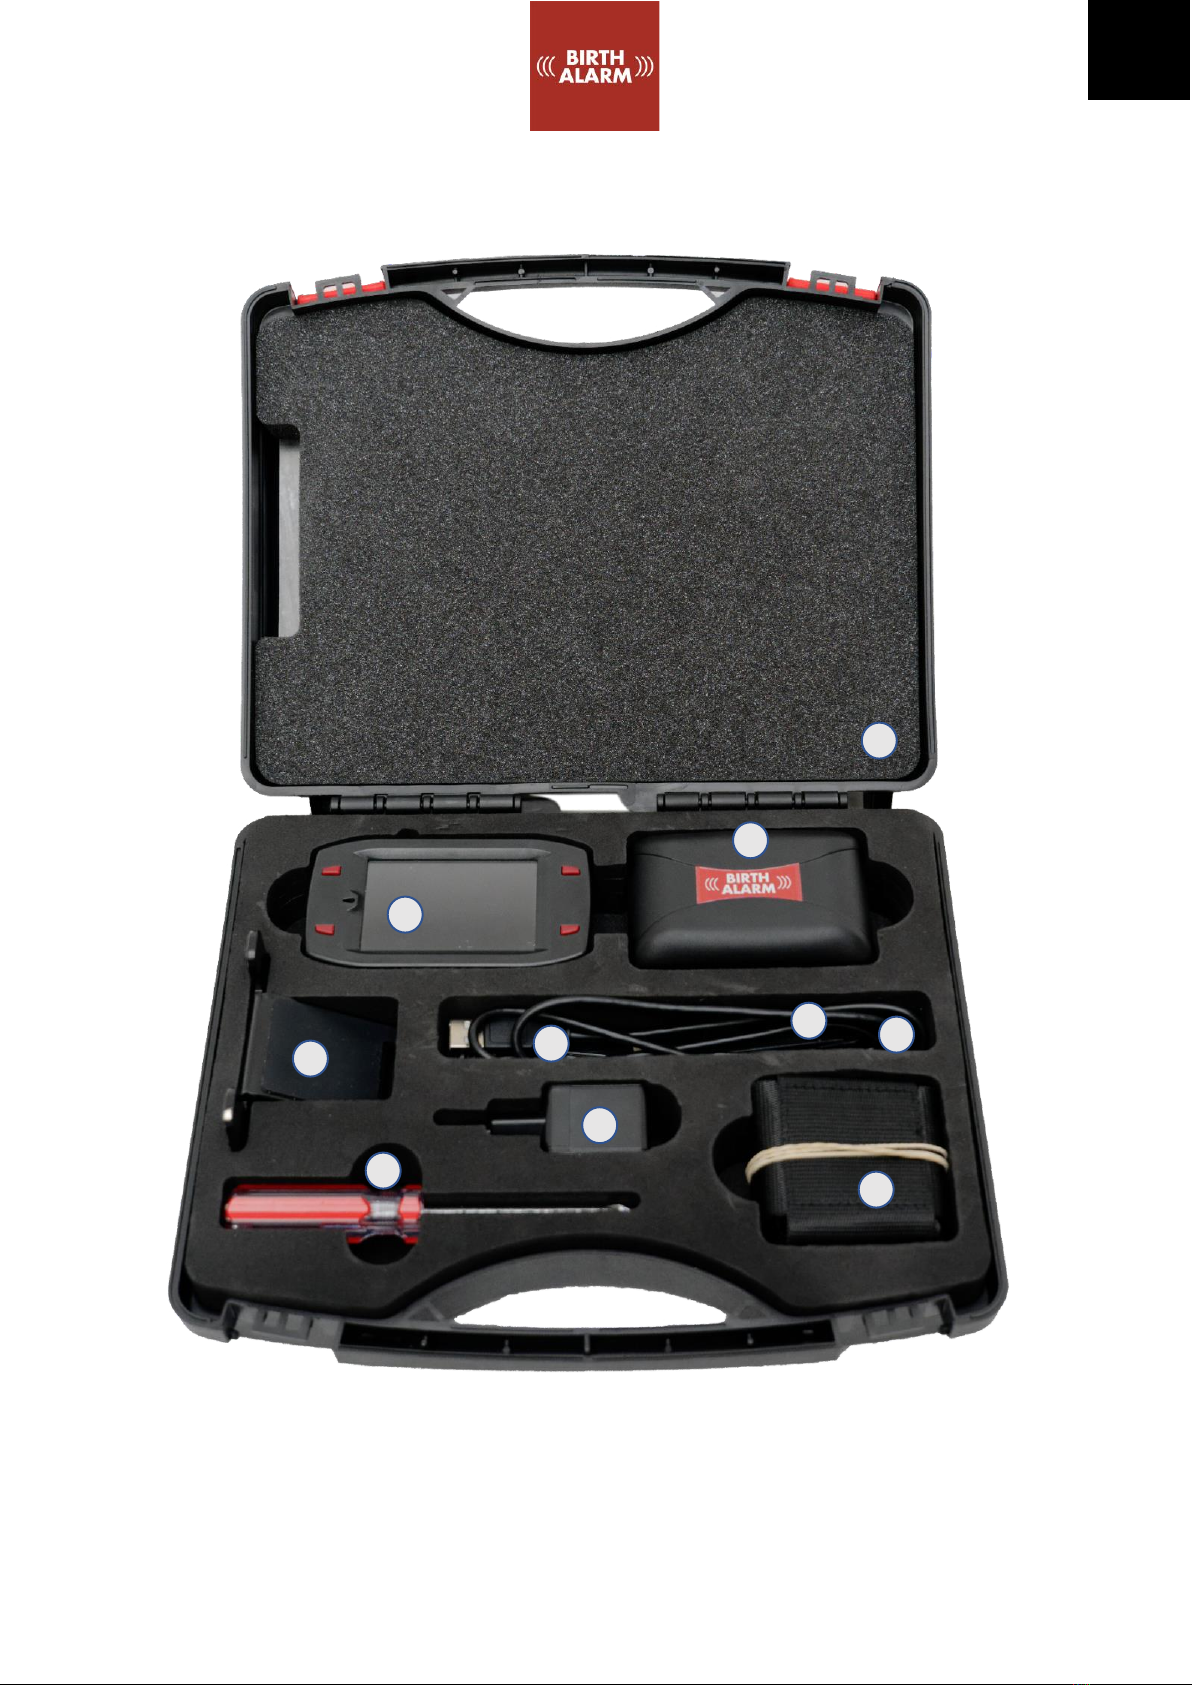
2. Contents of the package .................................................................................................................. 5
3. Preparing for use.............................................................................................................................. 7
3.1 First use ...................................................................................................................................7
3.2 Switching on/off ....................................................................................................................... 8
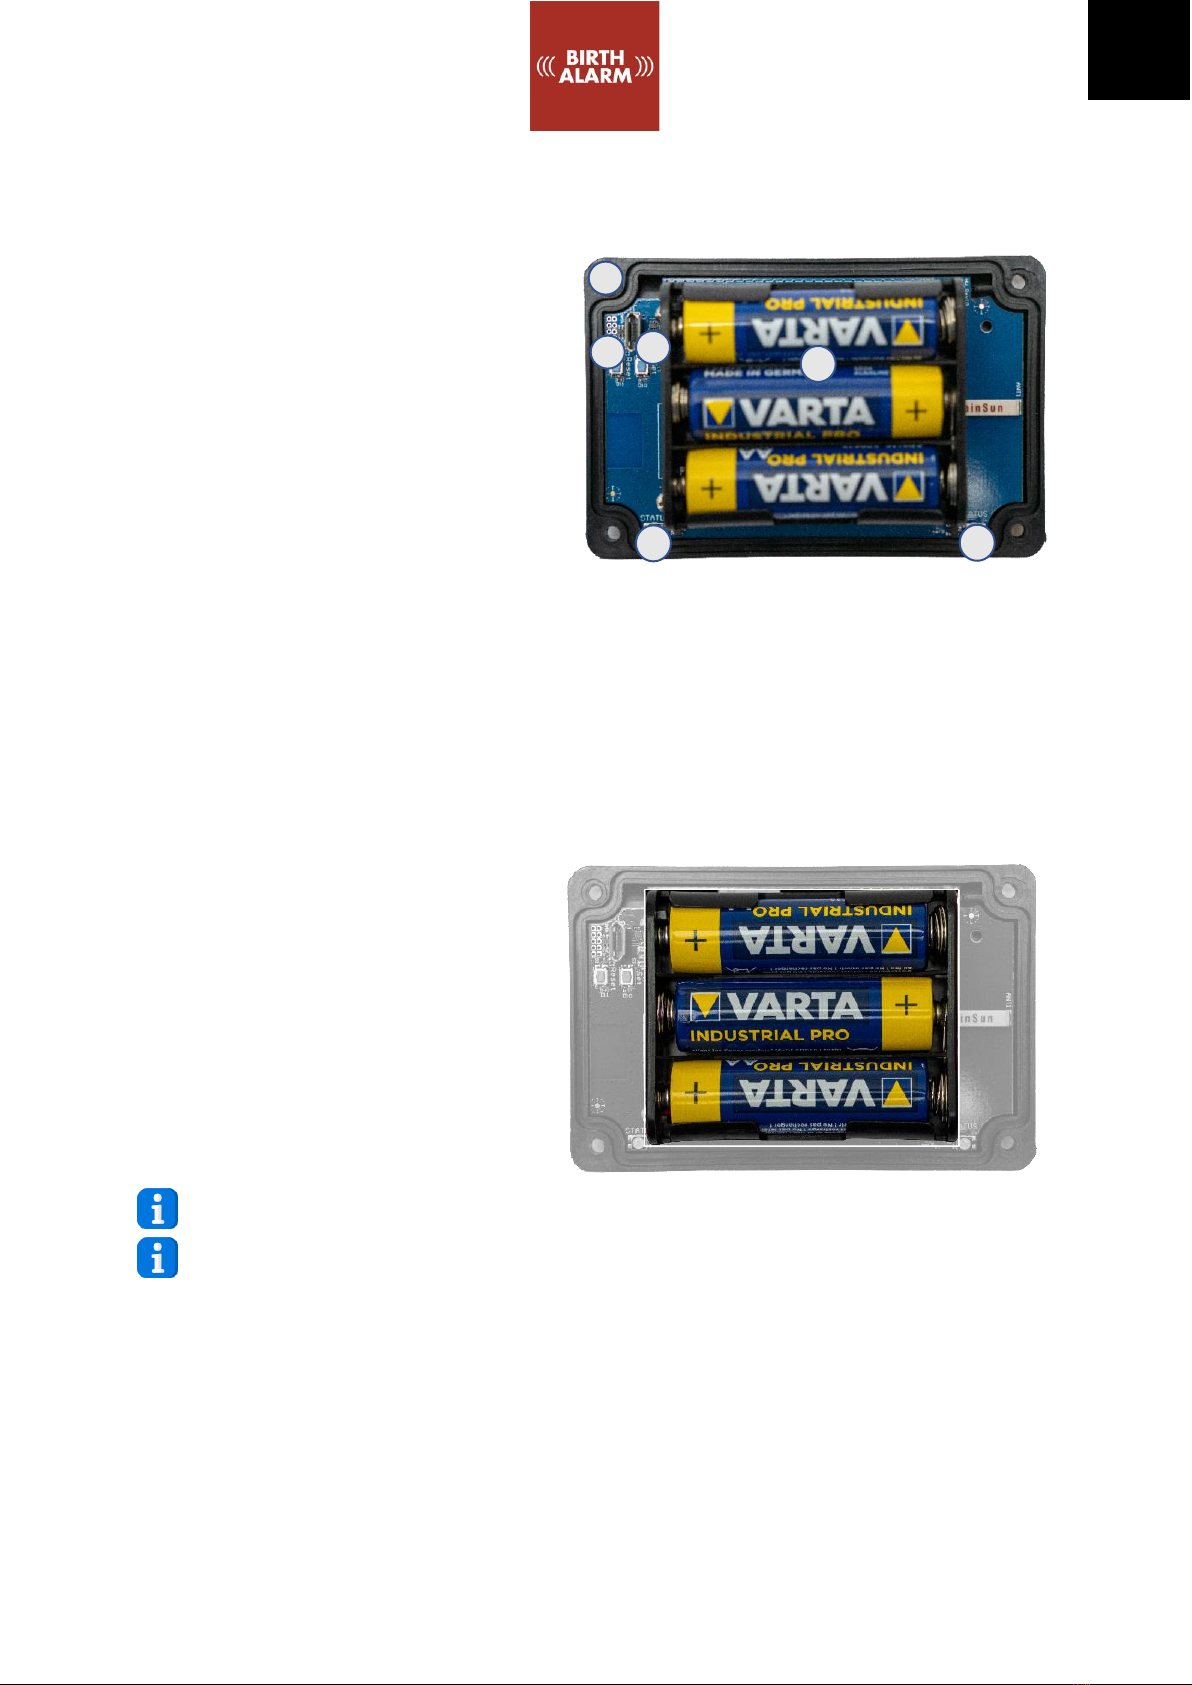
4 The inside of the Birth Alarm Advanced Transmitter ......................................................................9
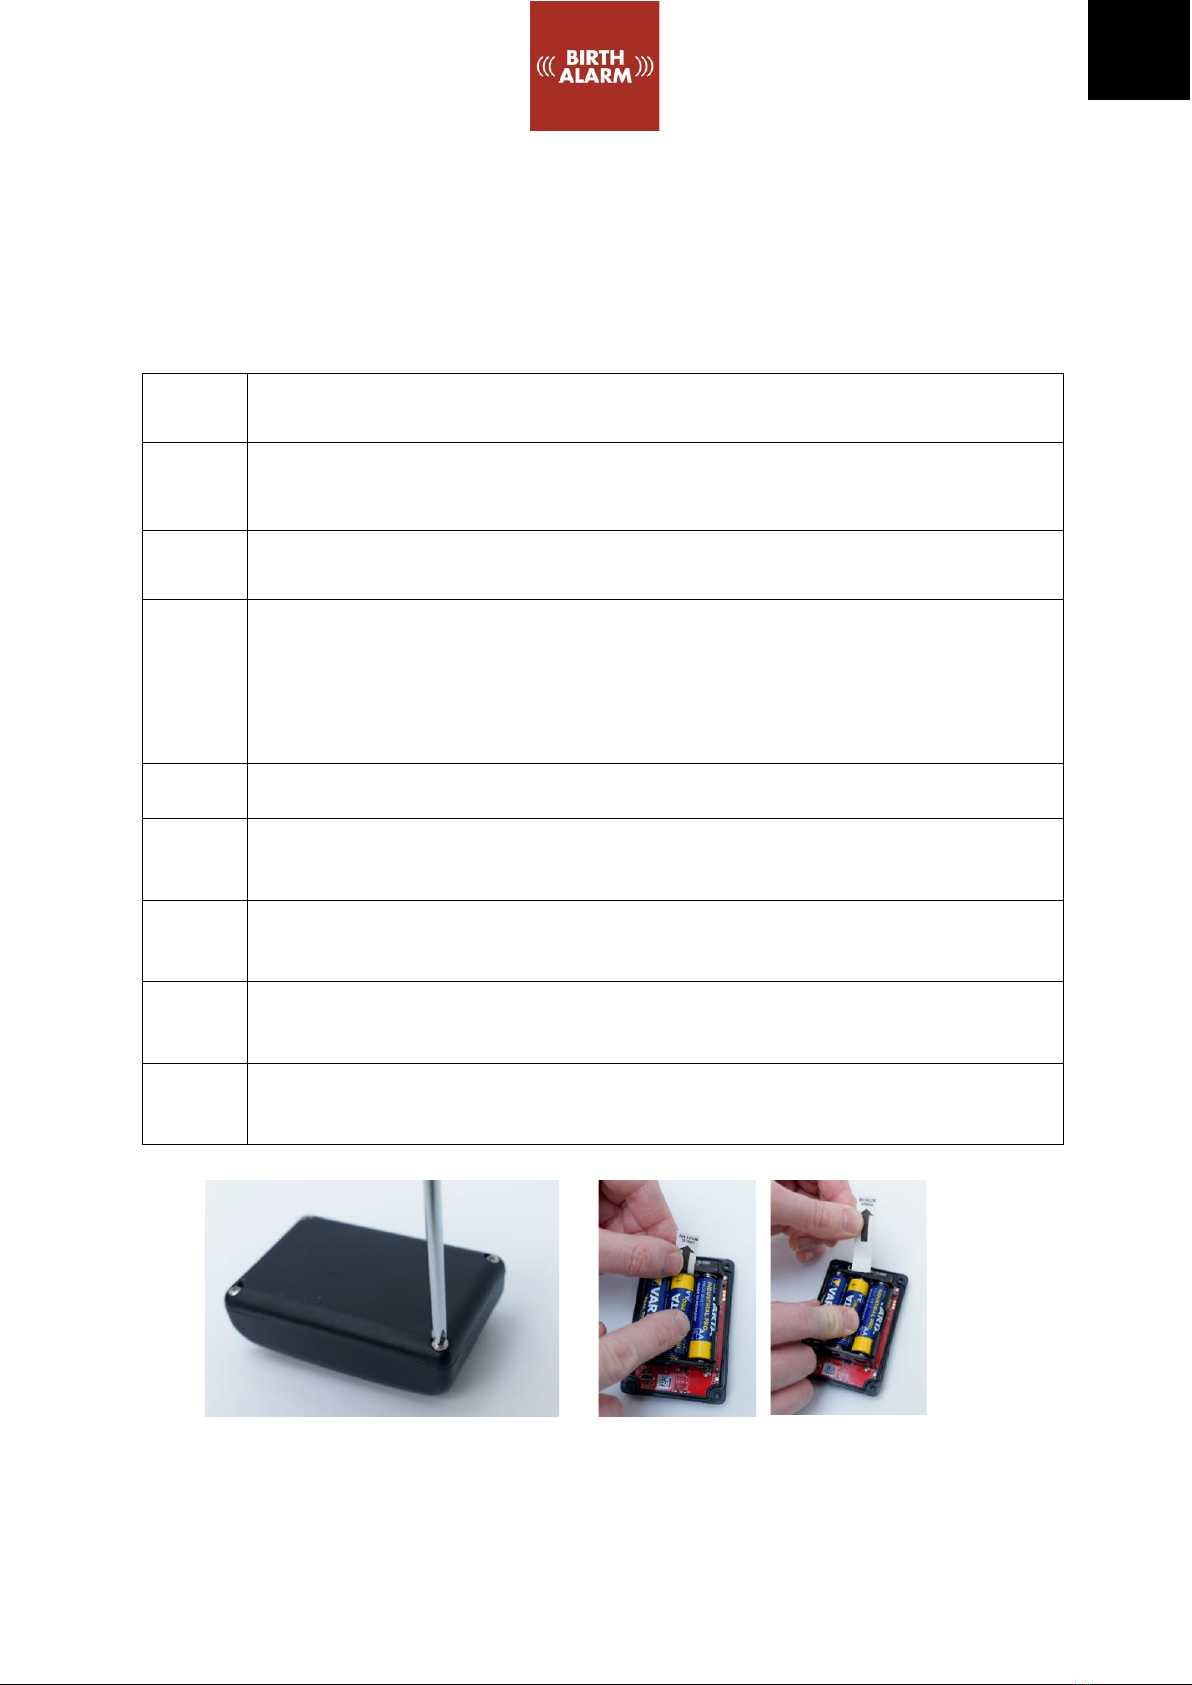
4.1 Installing/replacing batteries .................................................................................................. 9
4.2 The casing of the Birth Alarm Advanced transmitter............................................................10
5 The lights (LEDs) of the Birth Alarm Advanced transmitter...........................................................11
5.1 The status lights .....................................................................................................................11
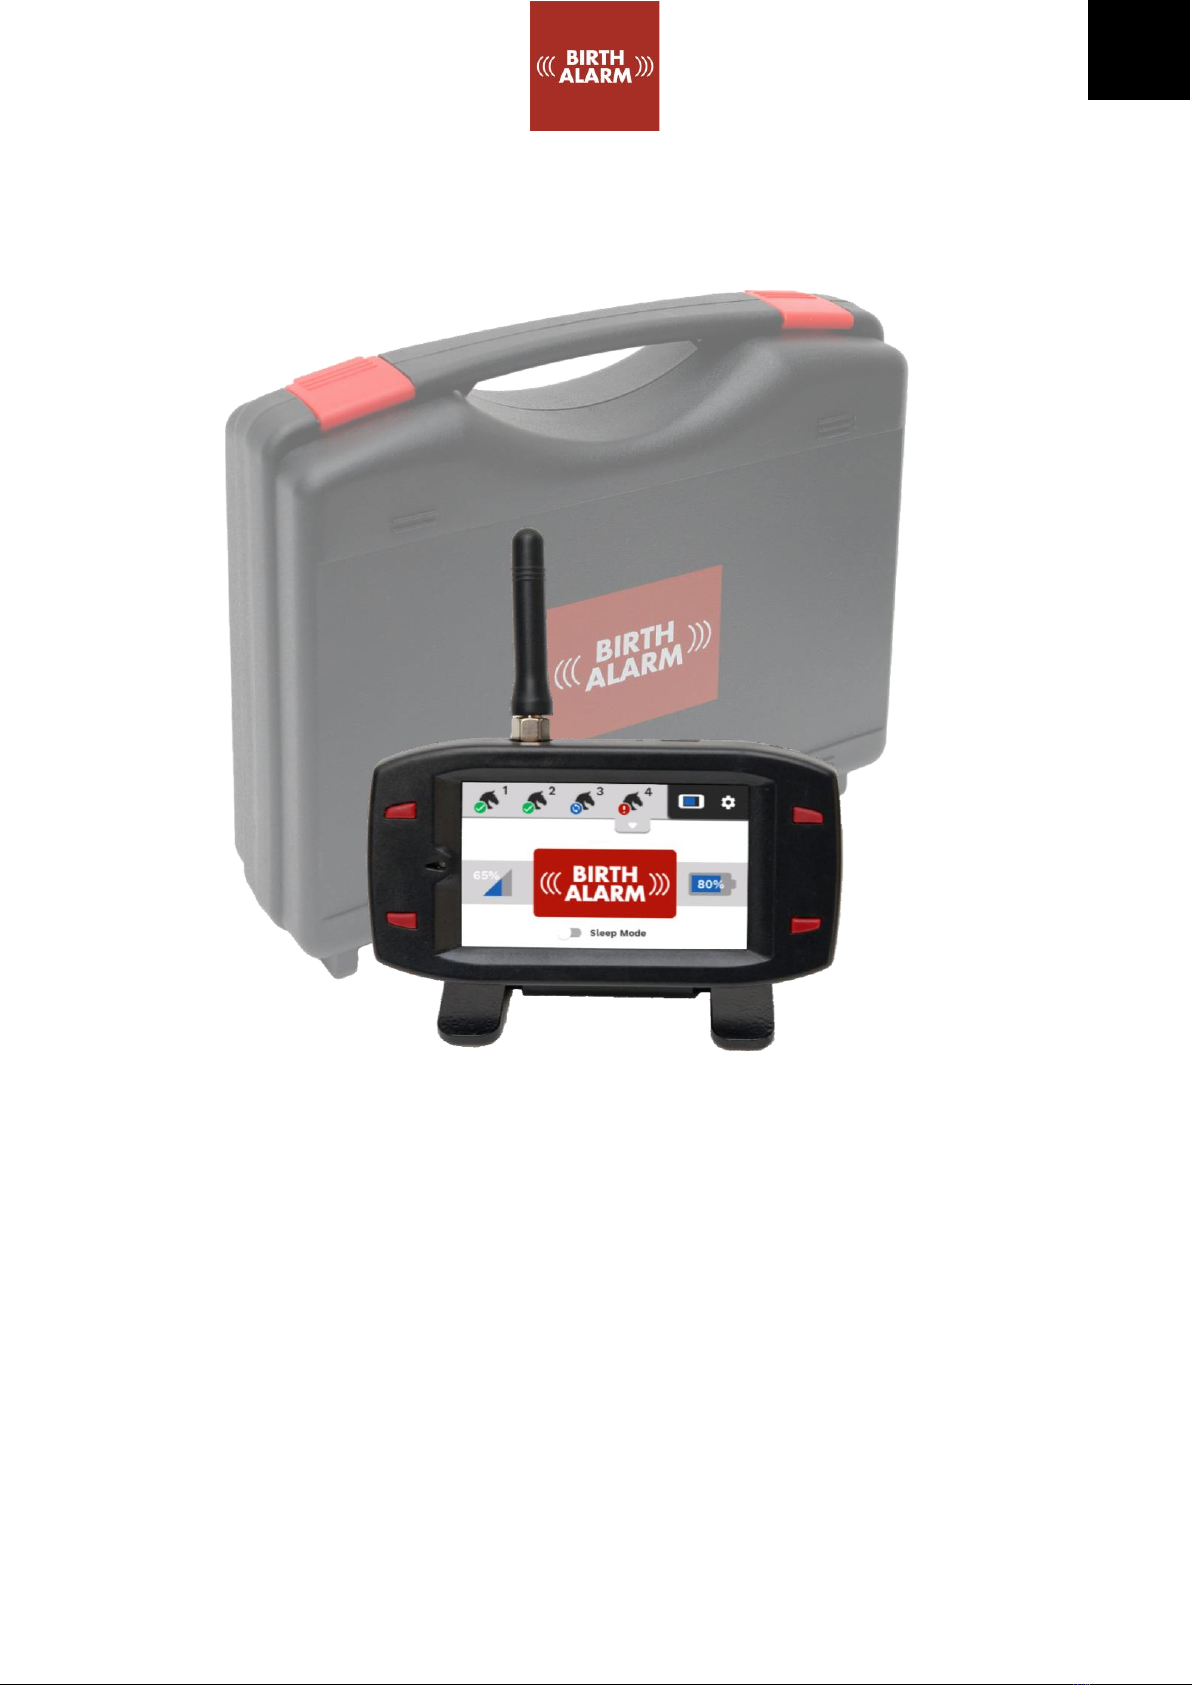
6 Birth Alarm Advanced receiver ......................................................................................................12
6.1 The components of the Birth Alarm Advanced receiver........................................................12
6.2 Control of the Birth Alarm Advanced receiver.......................................................................13
6.2.1 Switching on ...................................................................................................................13
6.2.2 The eco button ...............................................................................................................13
6.2.3 The volume buttons .......................................................................................................13
6.2.4 The display hold button .................................................................................................13
6.2.5 Navigation on the main screen………………………………………………………………………………….13
6.2.5.1 The navigation bar……………………………………………………………………………………………….13
6.2.5.2 The information field…………………………………………………………………………………………...14
6.3 Meaning of the symbols in the navigation beam ..................................................................14
6.3.1 The disconnect symbol .........................................................................................................14
6.3.2 The horse’s head symbol ......................................................................................................14
6.3.3 The door symbol ...................................................................................................................14
6.3.4 The heartbeat symbol...........................................................................................................14
6.3.5 The mini-status symbol.........................................................................................................14
6.3.6 The battery display of the receiver itself ..............................................................................14
6.3.7 The settings button ...............................................................................................................15
6.4 The meaning of the symbols in the information field..................................................................15
6.4.1 The status display...........................................................................................................15
6.4.2 The reception display .....................................................................................................15
6.4.3 The battery display.........................................................................................................15
6.5 Registrating a Birth Alarm Advanced transmitter ...................................................................15
6.6 Logging off the Birth Alarm Advanced transmitter……………………………………………………………..15
7 Connecting the new Birth Alarm Advanced transmitter ...............................................................16
8 Programming other settings ..........................................................................................................16

EN
8.1 Sleep mode.............................................................................................................................16
8.2 Angle setting...........................................................................................................................16
8.3 Colic position..........................................................................................................................17
8.4 Anti burglary alarm ................................................................................................................17
9 The settings menu..........................................................................................................................18
9.1 Display brightness ..................................................................................................................18
9.1.1 Automatic brightness adjustment..................................................................................18
9.2 Eco mode................................................................................................................................19
9.3 Alarm Volume.........................................................................................................................19
9.3.1 Vibration function ..........................................................................................................19
9.4 Setting the language ..............................................................................................................19
9.5 Disabling the Birth Alarm Advanced receiver ........................................................................20
10. Testing ............................................................................................................................................20
10.1 The range................................................................................................................................20
11 Fitting the Birth Alarm onto the mare ...........................................................................................21
11.1 Fitting the Birth Alarm beneath the halter ............................................................................22
11.2 Fitting the Birth Alarm into an anti-roll girth .........................................................................22
12 Summary and modes of use...........................................................................................................23
13 Technical data ................................................................................................................................24

EN
1. Introduction
When your mare gives birth you would like to be present so that you can intervene in case of any
complications or warn a veterinarian. Horses and ponies have the tendency of lying stretched out on
their left or right side during delivery. This gives them more space during contractions. The Birth
Alarm Advanced makes good use of this tendency.
When you fix the Birth Alarm Advanced beneath the mare’s halter (or in an anti-roll girth) you will
receive a notification on your receiver. In this way, you will always be warned in time when the birth
occurs.

EN
2. Contents
1. The Birth Alarm Advanced transmitter
This sends a signal to the receiver as soon as
the mare lies down on her side.
2. The special holder
This is where the Birth Alarm Advanced
transmitter is pushed in. This holder can be
fixed beneath the mare’s halter or in the ring of
the anti-roll girth.
3. The cable ties
To get started, we have already supplied a
number of cable ties (also called "Tie-wraps") in
addition.
These cable ties are for single use, but they are
available at any DIY store.
4. The special screwdriver.
You can use this to open your Birth Alarm
Advanced transmitter (for example when the
batteries need to be replaced or when you need
to insert or remove the SIM card).
On the back of this screwdriver there is also a
strong magnet, with which you can operate the
Birth Alarm Advanced transmitter.
5. The Birth Alarm Advanced receiver
The signal comes in on this receiver as soon as
the mare lies down on her side.
6. The antenna
You fix the antenna on the receiver.
7. The Birth Alarm Advanced receiver
standard
You click the receiver on this in case of regular
use. You can also disconnect the receiver and
wear it on, for example, your belt.
8. The USB cable
You need this cable to supply the Birth Alarm
Advanced receiver with power, or to charge the
battery of the Birth Alarm Advanced receiver.
You can also use this cable to update the
software of the transmitter or receiver. (More
information can be found on
www.birthalarm.com
9. The charger
This provides your receiver with power for
regular use or when you want to charge the
battery.
10. QuickStart Guide
Concise manual

EN
1
2
3
4
6
7
8
9
5
10

EN
3. Preparing for use
3.1 First use
Before using the Birth Alarm Advanced for the first time, the transmitter has to log on to the
receiver. For this, you have to follow the following step-by-step plan once:
Step 1
Open the Birth Alarm Advanced transmitter.
Step 2
Remove the label with the arrow which is located against the pole of one of the
batteries. The batteries now make contact with the Birth Alarm Advanced transmitter.
Step 3
Close the Birth Alarm Advanced transmitter again.
Step 4
Take the Birth Alarm Advanced receiver out of the case and fix the antenna on the gold
coloured antenna connection.
(You can use the small open-ended spanner for this, but make sure you don't apply too
much force!)
Step 5
Position the Birth Alarm Advanced receiver on the standard
Step 6
Click the USB cable into the USB connector at the top of the Birth Alarm Advanced
receiver (next to the antenna).
Step 7
Connect the other side of the USB cable to the charger and plug the charger into the
wall socket.
Step 8
Switch on the Birth Alarm Advanced receiver by pressing and holding the button in the
top left-hand corner of the screen for two seconds.
Step 9
Hold the back of the special screwdriver against one of the lights on the Birth Alarm
Advanced transmitter and wait for the status lights to light up green.
Opening up
Removing the Label

EN
3.2 Switching on/off
You can switch the Birth Alarm Advanced transmitter on/off and operate it with the back of the
special screwdriver supplied. On one of the long sides of the casing you will find two status lights.
To switch ON the Birth Alarm Advanced transmitter, proceed as follows:
•Place the back of the special screwdriver against one of the status
lights.
•The Birth Alarm Advanced transmitter will now switch on. Switching
on can be recognized by the green illumination of both status lights.
•Your Birth Alarm Advanced transmitter is now switched on. The
status lights will briefly light up green every five seconds. It
indicates that the Birth Alarm Advanced transmitter is switched on
and that the status is correct.
To switch the Birth Alarm Advanced transmitter OFF, proceed as follows:
•Place the back of the special screwdriver against one of the status
lights.
•The Birth Alarm Advanced transmitter will now switch off.
Switching off can be recognized by the red illumination of both
status lights.
•Your Birth Alarm Advanced transmitter is now switched off.

EN
4 The inside of the Birth Alarm Advanced Transmitter
Below is an overview of the system components you will need to operate and use the system.
1. Batteries.
2. The two status lights
3. The connection button (pair button)
4. The reset button
5. USB connector (for software updates)
4.1 Installing/replacing batteries
When replacing the batteries for your Birth Alarm Advanced transmitter, you should always use
alkaline batteries (preferably "Duracell", "Panasonic", or "Varta"). The use of rechargeable batteries
is not recommended. Always replace all 3 batteries at the same time. If you cannot remove the
batteries with your fingers, you can also use a small screwdriver, as long as it is done with care. The
batteries must always be placed with their negative pole on the spring.
Always use new batteries at the beginning of the foaling season!
If you will not be using Birth Alarm Advanced transmitter for a longer period of time, such
as after the foaling season, you should remove the batteries to prevent them from
leaking and causing damage to your Birth Alarm Advanced Transmitter.
1
2
2
3
4
5

EN
4.2 The casing of the Birth Alarm Advanced Transmitter
The casing of the Birth Alarm Advanced can only be closed in one way. The light guides on the long
side of the cover must be on top of the status lights when the cover is screwed down.

EN
5 The lights (LEDs) of the Birth Alarm Advanced transmitter
To view the status of your Birth Alarm Advanced transmitter, two status lights are placed on it.
5.1 The status lights
The status lights are on the long side of the casing. These lights both behave exactly the same. The
double version is only meant to be able to read the status of your mare both left and right at all
times.
In the table below you will find the possible colour patterns that the Birth Alarm Advanced can
display.
Colour / pattern
Meaning
Standby, battery okay
Standby, battery okay, sleep mode enabled
Standby, battery weak
Transmitter sends signal to receiver

EN
6 Birth Alarm Advanced Receiver
The Birth Alarm Advanced receiver has been designed as a compact module that gives you complete
information about your mare and the connected transmitter(s).
6.1 The components of the Birth Alarm Advanced Receiver
The Birth Alarm Advanced receiver consists of the following components:
1. Display (with touch function)
2. Mounting clip. This is used to mount the Birth Alarm Advanced receiver on the standard or,
for example, on the trouser belt.
3. A 3-colour LED that allows extra emphasis to be placed on the current state and displays
short events.
4. A loud mini speaker to generate the alarm or other sound messages.
5. The USB connection for charging and updating the Birth Alarm Advanced receiver.
6. Reset button. It should be operated with a paper clip or thin pen if necessary.
7. Antenna
8. The POWER button / eco button
9. The screen hold button
10. The volume up button
11. The volume down button
1
8
3
4
5
6
7
2
9
10
11

EN
6.2 Control of Birth Alarm Advanced Receiver
6.2.1 Switching on
To switch on the Birth Alarm Advanced receiver, press and hold the POWER
button / ECO button at the top left of the screen for two seconds.
6.2.2 The eco mode
You can use this to put your Birth Alarm Advanced receiver into economy mode with the POWER
button / eco button. This will turn the screen off and your receiver will use less energy. When an
alarm or warning is received from one of the transmitters, the display will immediately turn on again.
The eco mode button can be useful when, for example, you want to turn off the screen
completely at night.
6.2.3 The volume buttons
With the volume buttons you can turn the volume up and down. You can also adjust the
volume in the settings menu.
With the volume down button you can also turn off an alarm when an alert is
received.
6.2.4 The display hold button
This button allows you to block the receiver's touch screen
and buttons. Press and hold this button until the key symbol
appears. To unlock the receiver, press and hold this button again.
You can use the display hold button when wearing the receiver on your belt
trousers, so the receiver will not react if buttons are accidentally pressed by your
movement.
6.2.5 Navigation on the main screen
After switching on, you will see the main screen. This
consists, roughly, of two parts:
1. The navigation bar
2. The information field
6.2.5.1 The navigation bar
In the navigation bar you will see four tabs with a battery indicator (from the receiver itself) and a
settings button.
When a Birth Alarm Advanced transmitter is logged on to your Birth Alarm Advanced receiver, an
icon of a horse's head will become visible on the relevant tab. On the bottom left there is a small
symbol which will show the status.

EN
6.2.5.2 The information field
Under the navigation bar you will find the information field. Here you will see a status display of the
mare and the Birth Alarm Advanced transmitter. This concerns the battery percentage, the reception
strength, the status, the current reclining angle and sleep mode settings.
When you have selected a mare using one of the four buttons in the navigation bar, a small
arrow will appear below this button. Clicking this arrow will scroll down a small selection
menu. This allows you to select additional functions that you only use in special cases. You
will find more information about this later in this manual.
6.3 Meaning of symbols in the navigation bar
In the tabs of the navigation bar you'll see some miniature symbols that give information about the
status of your mare or mares.
6.3.1 It disconnect symbol
This symbol is visible by default when no Birth Alarm Advanced transmitter is logged
on to the relevant tab.
6.3.2 The horse's head symbol
This symbol indicates that a Birth Alarm Advanced transmitter has been logged on to
your Birth Alarm Advanced receiver and that the alarm indicator has been set up as a
birth detection system.
6.3.3 The door symbol
This symbol indicates that the relevant Birth Alarm Advanced transmitter is set as an
anti-burglary alarm.
6.3.4 The heartbeat symbol
This symbol should normally be coloured red. Birth Alarm Advanced transmitter
transmits a periodic signal as a sign that the mare is still within range.
When no periodical signal has been received for a longer period of time, the red colour
will slowly fade away. If no signal has been received for too long, you will also receive a warning. The
yellow warning symbol will appear and you will hear a warning tone. If a periodical signal is not
received within the expected time, this symbol will turn red.
Once in a while a periodical signal can't come across, that's not a bad thing. However, if this
signal is not received for a longer period of time, you will receive an alarm warning.
6.3.5 The mini-status symbol
The mini-status symbol is a small representation of the status in the information field.
The colour and meaning corresponds to that of the large status symbol in the
information field.
6.3.6 The battery display of the receiver itself
The battery display shows in blue the remaining capacity of the receiver's own battery.
When the battery is charging, a small lightning symbol will appear.

EN
6.3.7 The Settings button
On the top-right you will find the settings button. When you click on this, the settings
menu appears (see chapter 9).
6.4 Meaning of symbols in the information field
In the information field you will see a clear display of the status of the mare, which you have selected
with the tab-button.
6.4.1 The status display
This large symbol in the centre of the information window intuitively indicates the status of the
selected Birth Alarm Advanced transmitter.
•When there is an alarm, the text "Birth Alarm" appears here in the red field.
•When there is a warning concerning the operation of the system, a question
mark appears in the yellow field.
•When the system is OK and there are no messages, a field with a white "tick"
appears here in the green field.
•When no transmitter(s) are connected, you will see a black signal symbol.
6.4.2 The reception display
The reception display (left in the middle) works just like you are used to on your
smartphone. The blue part of the indicator turns blue for a shorter period of time as
reception decreases. A percentage representation of the reception strength is also
displayed.
6.4.3 The battery display
The battery (right of centre) shows the remaining battery capacity of the batteries of
the Birth Alarm Advanced transmitter. When it exceeds 10%, we advise you to replace
the batteries.
6.5 Registering a Birth Alarm Advanced Transmitter
When you switch on a Birth Alarm Advanced transmitter, it will first log on to the Birth Alarm
Advanced receiver. This activates the tab with the number of the transmission. (The 'disconnect'
symbol disappears and changes into a horse's head symbol). From this moment on, the Birth Alarm
Advanced receiver will also check if the transmitter remains within range and active.
6.6 Logging off the Birth Alarm Advanced Transmitter
When you are no longer using a Birth Alarm Advanced transmitter, switch it off. When switched off,
the transmitter will log off at the Birth Alarm Advanced receiver. The disconnected symbol will
reappear on the corresponding tab and the Birth Alarm Advanced receiver will no longer monitor the
transmitter.

EN
7 Connecting the New Birth Alarm Advanced transmitter
If you have purchased an additional Birth Alarm Advanced transmitter, you must first connect it with
your Birth Alarm Advanced receiver before using it. Connecting –which means "pairing" of an
additional transmitter –goes as follows.
•Prepare the new transmitter according to the steps in chapter 3.
•Switch on the new Birth Alarm Advanced transmitter as described in 3.2.
•Now press the button with the caption "pair" on the circuit board of the Birth Alarm
Advanced transmitter.
•On the receiver, click as soon as possible on one of the empty tabs (to which you have not
yet connected another transmitter).
•Your Birth Alarm Advanced receiver will connect the new transmitter with the tab you have
clicked.
Once connected, the new Birth Alarm Advanced transmitter will remember its number and log in
again next time. So, in principle, you only have to do this "pairing" once.
8 Programming other settings
8.1 Sleep mode
You use the sleep mode of the Birth Alarm Advanced if your peri-parturient mare rests fully stretched
or sleeps. The sleep mode is a certain adjustment in the operation of the Birth Alarm Advanced. This
adjustment ensures that an alarm as a result of the mare's only resting fully stretched is prevented.
When you use the sleep mode, the Birth Alarm Advanced will check if your mare is lying stretched
and is restless as well, as is the case with contractions. You can enable the sleep mode as follows:
•Slide the switch labelled "sleep mode" to the right.
•After the next signal from the Birth Alarm Advanced transmitter
the sleep mode will be switched on.
Similarly, you can always switch off the sleep mode again:
•Slide the switch labelled "sleep mode" to the left.
•After the next signal from the Birth Alarm Advanced transmitter the
sleep mode will be switched off.
8.2 Angle setting
The Birth Alarm Advanced responds to the mare lying down with extended legs. In other words, it
"measures" the extent to which your mare lies on its side. On average, an angle greater than 65° may
be considered "abnormal" and the Birth Alarm Advanced will act on it. The Birth Alarm Advanced is
set to 65° by default. However, you can raise this 65° threshold yourself if desired, so that the Birth
Alarm Advanced comes into action later, or becomes less sensitive. To change the angle setting (for
example to 70°) complete the following steps:

EN
•Click on the small thumb wheel in the upper right-hand
corner of the "status OK" symbol.
•Now a slider appears with which you can change the angle.
•Adjust the angle as desired.
You can set the angle between 60° and 75°.
It can occur that you get an alarm message every time you read in status symbol that the
mare is just lying at 65°. When nothing is wrong, you can adjust the detection angle for
this mare slightly upwards to, for example, 70°. When using sleep mode, reset the angle
setting to 65°.
8.3 Colic position
The Birth Alarm Advanced gives you the possibility to use the system as a Colic reporting system. The
system will then immediately warn you when a mare shows colic suspicious behaviour. To activate
the colic position, proceed as follows.
•Click on the drop-down arrow under the tab of the mare in
question.
•You can now see the colic symbol here.
•Click on this symbol, the symbol changes to active view.
•After the next signal from the Birth Alarm Advanced
transmitter the colic position will be switched on.
You can also switch off the colic position in the same way.
•Click on the drop-down arrow under the tab of the mare in question.
•You can now see the colic symbol here.
•Click on this symbol, the symbol changes to inactive view.
•After the next signal from the Birth Alarm Advanced transmitter the colic position will be
switched off.
8.4 Anti-burglary alarm
You can use your system after the foaling season as an anti-burglary or anti-theft system. The system
then triggers an alarm when the transmitter starts to move. You can fix the Birth Alarm Advanced
transmitter, for example, to the door of your barn or under the saddle of your lawnmower. As soon
as a movement is registered you will receive an alarm notification.
To activate the anti-burglary / anti-theft function, proceed as follows:

EN
•Click on the drop-down arrow under the tab of the mare in
question.
•You can now see the door symbol here
•Click on this symbol, the symbol changes to active view.
•After the next signal from the Birth Alarm Advanced
transmitter the anti-burglary mode will be switched on.
•When you move the Birth Alarm Advanced transmitter slightly,
you will receive an alarm notification.
You can also turn off the Anti-Burglary mode in the same way.
•Click on the drop-down arrow under the tab of the mare in question.
•You can now see the door symbol here
•Click on this symbol, the symbol changes to inactive view.
•After the next signal from the Birth Alarm Advanced transmitter the anti-burglary mode will
be switched off.
9 The settings menu
Via the settings menu you can change various settings relating to the Birth Alarm Advanced receiver
itself. To access the settings menu, click on the toothed wheel in the top right-hand corner of the
screen.
9.1 Display brightness
To adjust the brightness of the screen, proceed as follows:
•Click on the "Brightness" button.
•You will now see a pop-up window with a red dot.
•When you slide it from left to right it can make the screen more or less bright.
•If you are satisfied, click on "OK".
A screen with lower brightness saves on battery power, but is especially useful if you have
the Birth Alarm Advanced receiver on your bedside table. You can adjust the brightness
between 10% and 100%.
9.1.1 Automatic brightness adjustment
The Birth Alarm Advanced receiver is equipped with a light sensor, allowing it to automatically adjust
the brightness of the screen according to the ambient light. For example, if you turn off the light in
the evening, the Birth Alarm Advanced receiver will automatically reduce the brightness of the
screen. In the morning when it becomes light again, the screen will become brighter again.
To activate or deactivate the automatic brightness control, proceed as follows:
•Click on the "Brightness" button.
•You will now see a pop-up window with a red dot.
•To the right of the slider you will find a sun symbol with an "A" in it.
•If you click on it, the symbol will turn red and the automatic control is enabled.
•If you are satisfied, click on "OK".

EN
9.2 Eco mode
To save battery power or just to turn off the screen completely, proceed as follows:
•Click on "Saving" in the settings menu.
•The red text under "Saving" will change to "Enabled".
•If you do not operate the Birth Alarm Advanced receiver
for 10 seconds, the screen will now turn off
automatically. Apart from the screen, the Birth Alarm
Advanced receiver is still operational.
•To turn the screen back on, tap the screen. The screen
will then light up again.
9.3 Alarm Volume
You can set the sound intensity of the Birth Alarm Advanced receiver. This can be done via the
volume buttons (6.2.3), but also via the settings screen.
To do this, proceed as follows:
•Click on the "Alarm Volume" button.
•You will now see a pop-up window with a red dot.
•When you slide it from left to right, the alarm volume can
be turned up or down.
•The sound is turned on during the time you move the red
dot so that you can judge the set volume.
•If you are satisfied, click on "OK".
9.3.1 Vibration function
As an additional warning, the Birth Alarm Advanced receiver can emphasize an alarm or warning via
an internal vibration function. You can enable or disable this function as follows.
To do this, proceed as follows:
•Click on the "Alarm Volume" button.
•Under the volume slider you will see the vibration
function symbol.
•Clicking on the vibration function icon switches the
vibration function on or off.
•If you are satisfied, click on "OK".
9.4 Setting the language
You can change the language in the settings menu.
To do this, proceed as follows:
•Click on "Language". You can recognise this button by the
globe symbol.
•You will now see a window with the languages: German,
English, French, Dutch and Swedish.
•You can search for the language of your choice by moving
your finger vertically across the window.
•Select the language of your choice by clicking on the circle
in front of the language.
•Click "OK" to confirm your choice or "CANCEL" to reject it.
Table of contents
Other Gallagher Farm Equipment manuals
Popular Farm Equipment manuals by other brands

IntelligentAg
IntelligentAg Engage Zone Control Maintenance manual

Jumil
Jumil 3070PD Operator's manual

Del Morino
Del Morino Rotex 90 Manual of use and maintenance

Toro
Toro 138-2998 installation instructions

Pottinger
Pottinger LION 5000 Operator's manual

GREAT PLAINS
GREAT PLAINS YP1630F-1630 Operator's manual