Gastrodomus WINE800SB User manual

WINE COOLER
CANTINA VINO
VINOTECA REFRIGERADA
WEINKÜHLSCHRANK
Manuale d’uso
User manual
Betriebsanleitung
Manuel d’utilisation
Manual del usuario

1. INTRODUZIONE
Le presenti istruzioni raccolgono le informazioni relative all’installazione, collegamento, avvio e all’uso
corretto del prodotto. Il documento contiene anche informazioni generali relative al collegamento
all’alimentazione elettrica, tutte le informazioni necessarie per la manutenzione dell’apparecchiatura, nonchè
i dati tecnici dell’apparecchiatura.
L’apparecchio dovrà essere installato e avviato in conformità con le indicazioni fornite dal fabbricante e nel
rispetto delle norme e delle leggi locali. Qualora l’apparecchiatura o uno qualsiasi dei suoi elementi risulti
danneggiato, o nel caso in cui l’apparecchiatura non funzionasse correttamente, accertarsi che non
costituisca un fattore di rischio per persone o cose.
Le istruzioni devono essere conservate in un luogo sicuro e accessibile a tutti gli utenti del prodotto.
2. DATI TECNICI
VOLTAGGIO/FREQUENZA
220-240V/50-60Hz
REFRIGERAZIONE
VENTILATA
TERMOSTATO
DIGITALE
N° ZONE DI TEMPERATURA
1 o 2
UNITA’ DI MISURAZIONE
TEMPERATURA
CELSIUS/FAHRENHEIT
INTERVALLO DI
TEMPERATURA
5°C-22°C/41°F-72°F
ISTERESI
+2
PORTA REVERSIBILE
NO
SBRINAMENTO
AUTOMATICO
ILLUMINAZIONE
LED
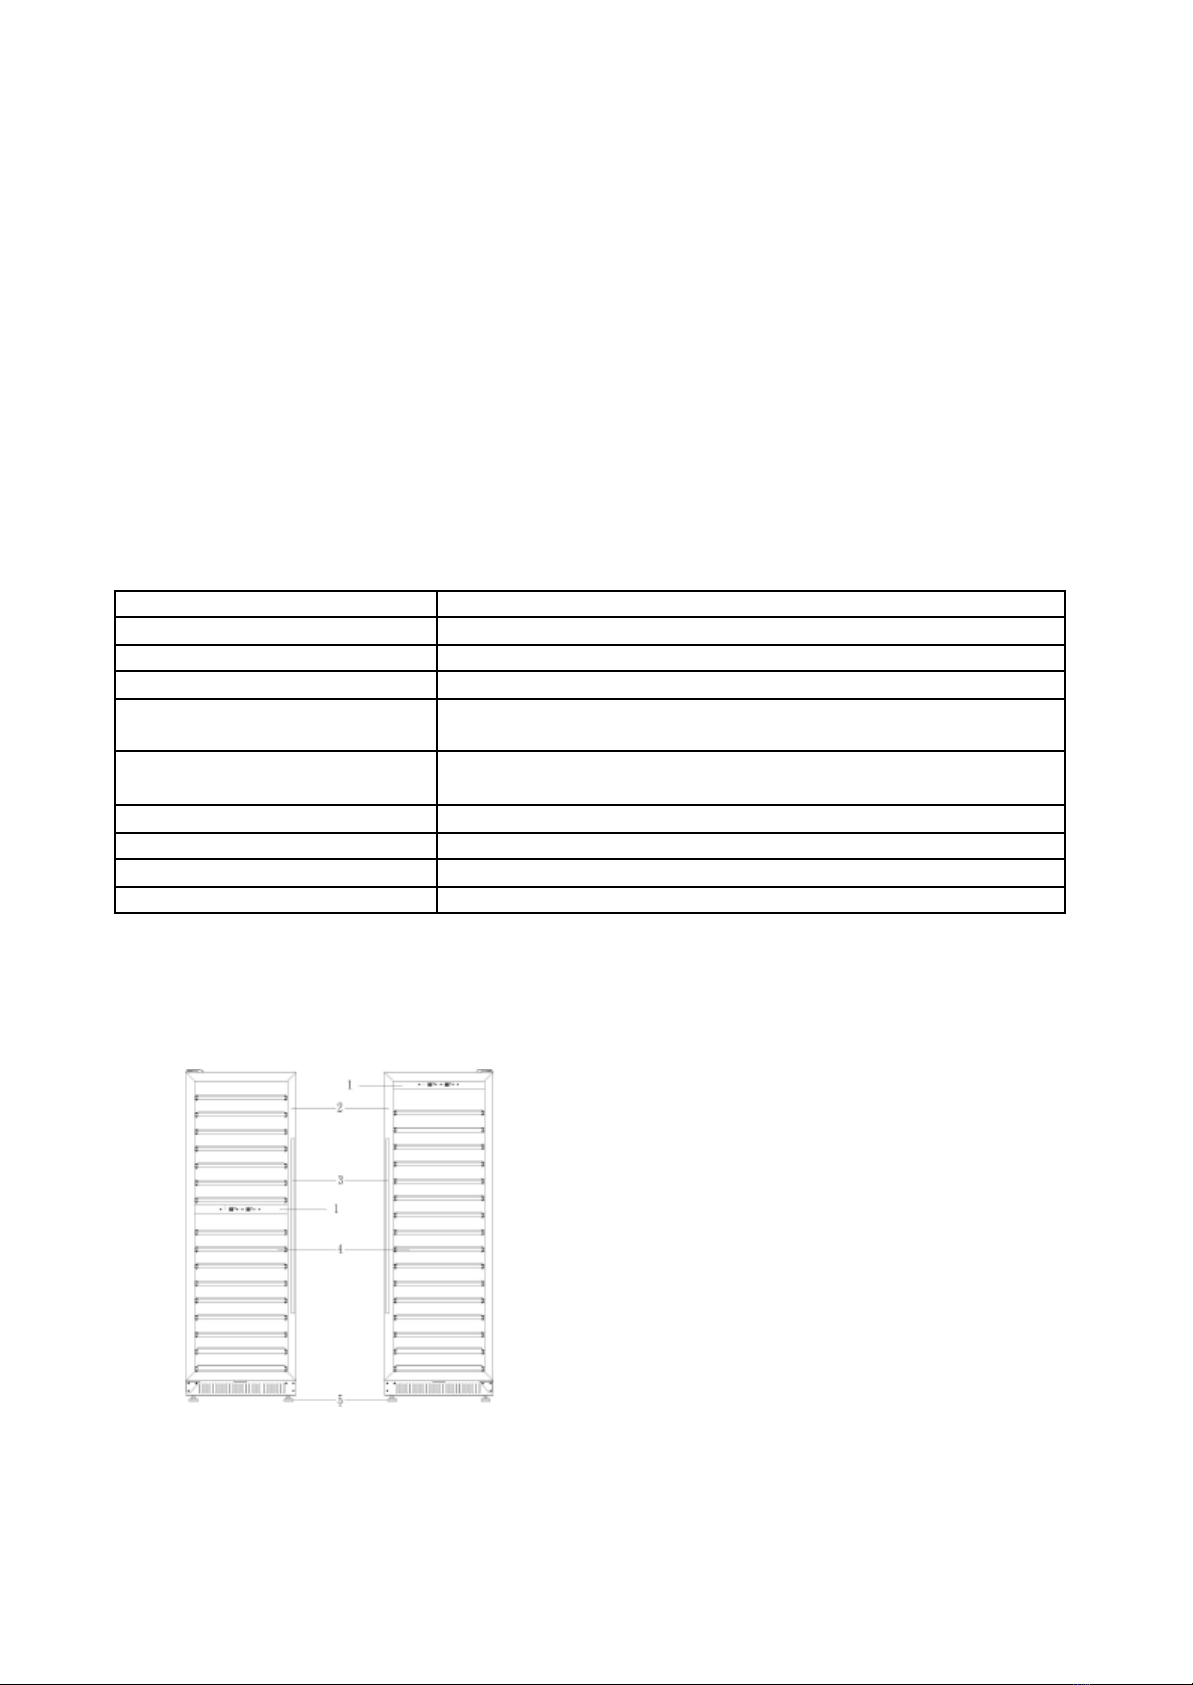
Fig.1.Componenti del dispositivo
1. Pannello di controllo
2. Porta in vetro
3. Maniglia
4. Ripiano
5. Piedini di livellamento

3. COLLEGAMENTO E MESSA IN SERVIZIO
L’apparecchiatura va collocata in un luogo asciutto, ben ventilato, tale da garantire un buon ricambio d’aria
(la distanza tra la parete e l’apparecchiatura dovrà essere pari ad almeno 10 cm), lontano da fonti di calore,
dal sole e da dispositivi che creano correnti d’aria forzata (climatizzatori, ventilatori a soffitto/portatili e
termoventilatori – NON devono indirizzare getti d’aria o aspirare aria dalla cantinetta!). L’apparecchiatura
funziona correttamente in un ambiente caratterizzato da una temperatura corrispondente alla classe
climatica riportata sulla targhetta nominale. Il funzionamento dell’apparecchiatura può peggiorare in caso di
funzionamento prolungato a una temperatura superiore o inferiore a quella indicata.
• Pulire l’apparecchiatura prima di metterla in funzione;
• Posizionare l’apparecchiatura su una superficie piana e sufficientemente resistente. Fatto ció, montare i
piedini livellatori;
• Verificare che la tensione e la frequenza della rete corrispondano a quelle raccomandate dal fabbricante
(vedi targhetta nominale);
• Accertarsi che la sezione dei cavi di alimentazione sia adeguata all’assorbimento di corrente
dell’apparecchiatura installata;
• É vietato collegare l’apparecchiatura con prolunghe o prese multiple;
• L’apparecchiatura deve essere collegata a una presa singola con contatto a terra;
• Verificare lo stato degli elementi elettrici dell’apparecchiatura.
Fig.2 Temperature ottimali per una corretta conservazione del vino
Vino rosso
14.4-18.3°C/58-65°F
Vino bianco/Prosecco Dry
8.9-13.9°C/48-57°F
Vino rosé
9.4-10.6°C/49-51°F
Vino Frizzante
4.4-8.3°C/40-47°F

Fig.3 Installazione del dispositivo a incasso
4. PULIZIA E MANUTENZIONE

L’apparecchiatura deve essere pulita e soggetta a manutenzione periodica.
L’apparecchiatura va pulita con acqua a temperatura non superiore a 40°C e un detergente neutro. Per il
lavaggio e la pulizia dell’apparecchiatura, è vietato utilizzare prodotti contenenti cloro e sodio in varie forme,
poiché danneggiano lo strato protettivo e i componenti dell’apparecchiatura.
5. REGOLAZIONE DELLA TEMPERATURA
Fig.4 Impostazione temperatura ZONA SINGOLA
2. Spia di
funzionamento
3. Display per
visualizzare la
temperatura
impostata
4. Visualizzazione
temperatura interna
5.ON/OFF
1. Interruttore luce 6. Aumento temperatura 7. Diminuzione temperatura 8. Tasto per
convertire°C/°F

1. Interruttore luce: premere una sola volta fino a che non compare sullo schermo la voce
“LED1”. Tenere premuto per spegnere la luce.
2. Spia LED di funzionamento: indica quando l’apparecchiatura è in funzione
3. Display per visualizzare la temperatura impostata: permette di visualizzare la
temperatura che viene impostata. Ogni volta che l’apparecchiatura viene spenta, la temperatura
verrà visualizzata in gradi Celsius.
Verifica della temperatura impostata: premendo il tasto o una volta per visualizzare la
temperatura impostata. Sul display comparirà la temperatura impostata accanto alla quale lampeggerà una
spia LED. L’uscita dalla funzione avverrà automaticamente dopo circa 5 secondi.
Aumento/diminuzione della temperatura: premere il tasto o per visualizzare la temperatura
impostata. Premere il tasto per abbassare la temperatura. L’uscita dalla funzione avverrà
automaticamente dopo circa 5 secondi.
Fig.5 Impostazione temperatura ZONA DOPPIA
2. Spia di funzionamento 3. Visualizzazione temperatura 4. Visualizzazione temperatura 5. ON/OFF
Zona superiore Zona inferiore
1. Interruttore luce 6. Impostazione temperatura 7. Impostazione
temperatura 8. Tasto per convertire °C/°F Zona superiore
Zona inferiore
1. Interruttore luce: premere una sola volta fino a che non compare sullo schermo la voce
“LED1”, premere due volte per accendere la luce del piano inferiore (“LED2”). Tenere premuto per
spegnere le luci.
2. Spia LED di funzionamento: indica quando l’apparecchiatura è in funzione
Per impostare la temperatura:
Zona superiore: Tenere premuto per alcuni secondi il tasto per poter visualizzare ed impostare la
temperatura desiderata utilizzando i tasti o . Successivamente, premere nuovamente il tasto
per almeno 5 secondi.

Zona inferiore: Tenere premuto per alcuni secondi il tasto per poter visualizzare ed impostare la
temperatura desiderata utilizzando i tasti o . Successivamente, premere nuovamente il tasto
per almeno 5 secondi.
6. MALFUNZIONAMENTO
In caso di difficoltà durante l’avvio dell’apparecchiatura o l’utilizzo, consultare le sezioni di questo libretto che
chiariscono le operazioni da svolgere. In questo modo l’utente può verificare che l’apparecchiatura venga
avviata e utilizzata correttamente. Se i problemi persistono, leggere con attenzione le seguenti istruzioni.
PROBLEMA
SOLUZIONE
L’apparecchiatura non funziona
Verificare che:
- Il dispositivo sia collegato correttamente alla
corrente elettrica;
- La tensione e la frequenza della rete siano
conformi a quelle raccomandate dal produttore
(vedi la targhetta nominale);
- L’interruttore centrale sia acceso
L’illuminazione non funziona
Verificare che:
- L’interruttore dell’illuminazione sia posizionato su
LED1 o LED2;
- Il tubo LED o il dispositivo di accensione non siano
danneggiati
L’apparecchio non raggiunge la temperatura impostata
Verificare che:
- L’interruttore principale sia posizionato su ON;
- Il termostato sia impostato correttamente;
- Il termostato funzioni correttamente;
- Il condensatore non sia sporco (pulire, ove
necessario);
- La temperatura ambiente non sia sopra i 37°C;
- Sia trascorso un periodo di tempo sufficiente per il
raffreddamento dei prodotti
Funzionamento rumoroso dell’apparecchiatura
Verificare che:
- Il dispositivo sia correttamente livellato;
- Non ci siano altri mobili nelle vicinanze del
dispositivo
ATTENZIONE: IN CASO DI MANCATO RISPETTO DELLE INDICAZIONI CONTENUTE NELLE PRESENTI
ISTRUZIONI RELATIVE AL COLLEGAMENTO E ALL’USO DELL’APPARECCHIATURA, IL
FABBRICANTE SI RISERVA IL DIRITTO DI RECEDERE DAGLI OBBLIGHI DERIVANTI DALLA
GARANZIA!
ENGLISH
TABLE OF CONTENTS
1. Introduction 10
2. Technical Data 10
3. Electrical connection and Start-Up 10
4. Maintenance 12
5. Temperature controller 13
6. Troubleshooting 14

1. INTRODUCTION
These instructions contain information on how to properly set up, connect, start up, and operate your unit. It
also contains general information on how to turn on the product. It also includes all necessary information
about the maintenance of the unit and its technical data.
The equipment should be set up and operated according to the manufacturer's instructions and in
compliance with local regulations and laws. If the equipment or any of its parts is damaged or fails to operate
properly, be sure it does not present a risk to persons or property.
Instructions must be kept in a safe place accessible to all users of the product.
1. TECHNICAL DATA
VOLTAGE/FREQUENCY
220-240V/50-60Hz
REFRIGERATION
VENTILATED
THERMOSTAT
DIGITAL
N° TEMPERATURE ZONES
1 or 2
TEMPERATURE UNITS
CELSIUS/FAHRENHEIT
TEMPERATURE RANGE
5-22°C/41-72°F
HYSTERESIS
+2
REVERSIBLE DOOR
NO
DEFROSTING
AUTOMATIC
LIGHTINING
LED
Fig.1.Components
1. Control panel
2. Glass door
3. Handle
4. Shelf
5. Adjustable height feet

2. ELECTRICAL CONNECTION AND START-UP
The appliance must be located in a dry and well ventilated place that allows air circulation (the distance
between the wall and the appliance must be at least 10 cm), far from heat sources and devices that create
forced air currents (air conditioners, ceiling/door fans and fan heaters - they must NOT blow or suck air from
the refrigeration appliance!). The appliance operates properly in an environment with a temperature

corresponding to the climate class indicated on the identification plate. The performance of the appliance may
decrease if it is left to operate for long periods at a temperature above or below the stated range.
• Clean the equipment before starting it up;
• Place the appliance on a flat and sufficiently resistant surface, then mount the adjustable height feet;
• Check that the voltage and frequency of the grid correspond to those specified by the manufacturer (see
rating plate);
• Ensure that the supply cable section is adequate for the current consumption of the installed device;
• It is forbidden to use an adapter plug or extension cord;
• The refrigerator should always be plugged into a dedicated electrical circuit, using the equipped
grounding plug;
• Verify the condition of the electrical elements of the appliance
Fig.2 Wine storage temperature
Red wine
14.4-18.3°C/58-65°F
White wine/Prosecco Dry
8.9-13.9°C/48-57°F
Light red wine
9.4-10.6°C/49-51°F
Sparkling wine
4.4-8.3°C/40-47°F

Fig.3 Wine cabinet installation
3. MAINTENANCE
The equipment must be clean and regularly maintained.
The equipment should be cleaned with water at a temperature not exceeding 40°C and a neutral detergent. It
is forbidden to use products containing chlorine and sodium in various forms when washing and cleaning the
equipment, as they damage the protective layer and the components of the equipment.
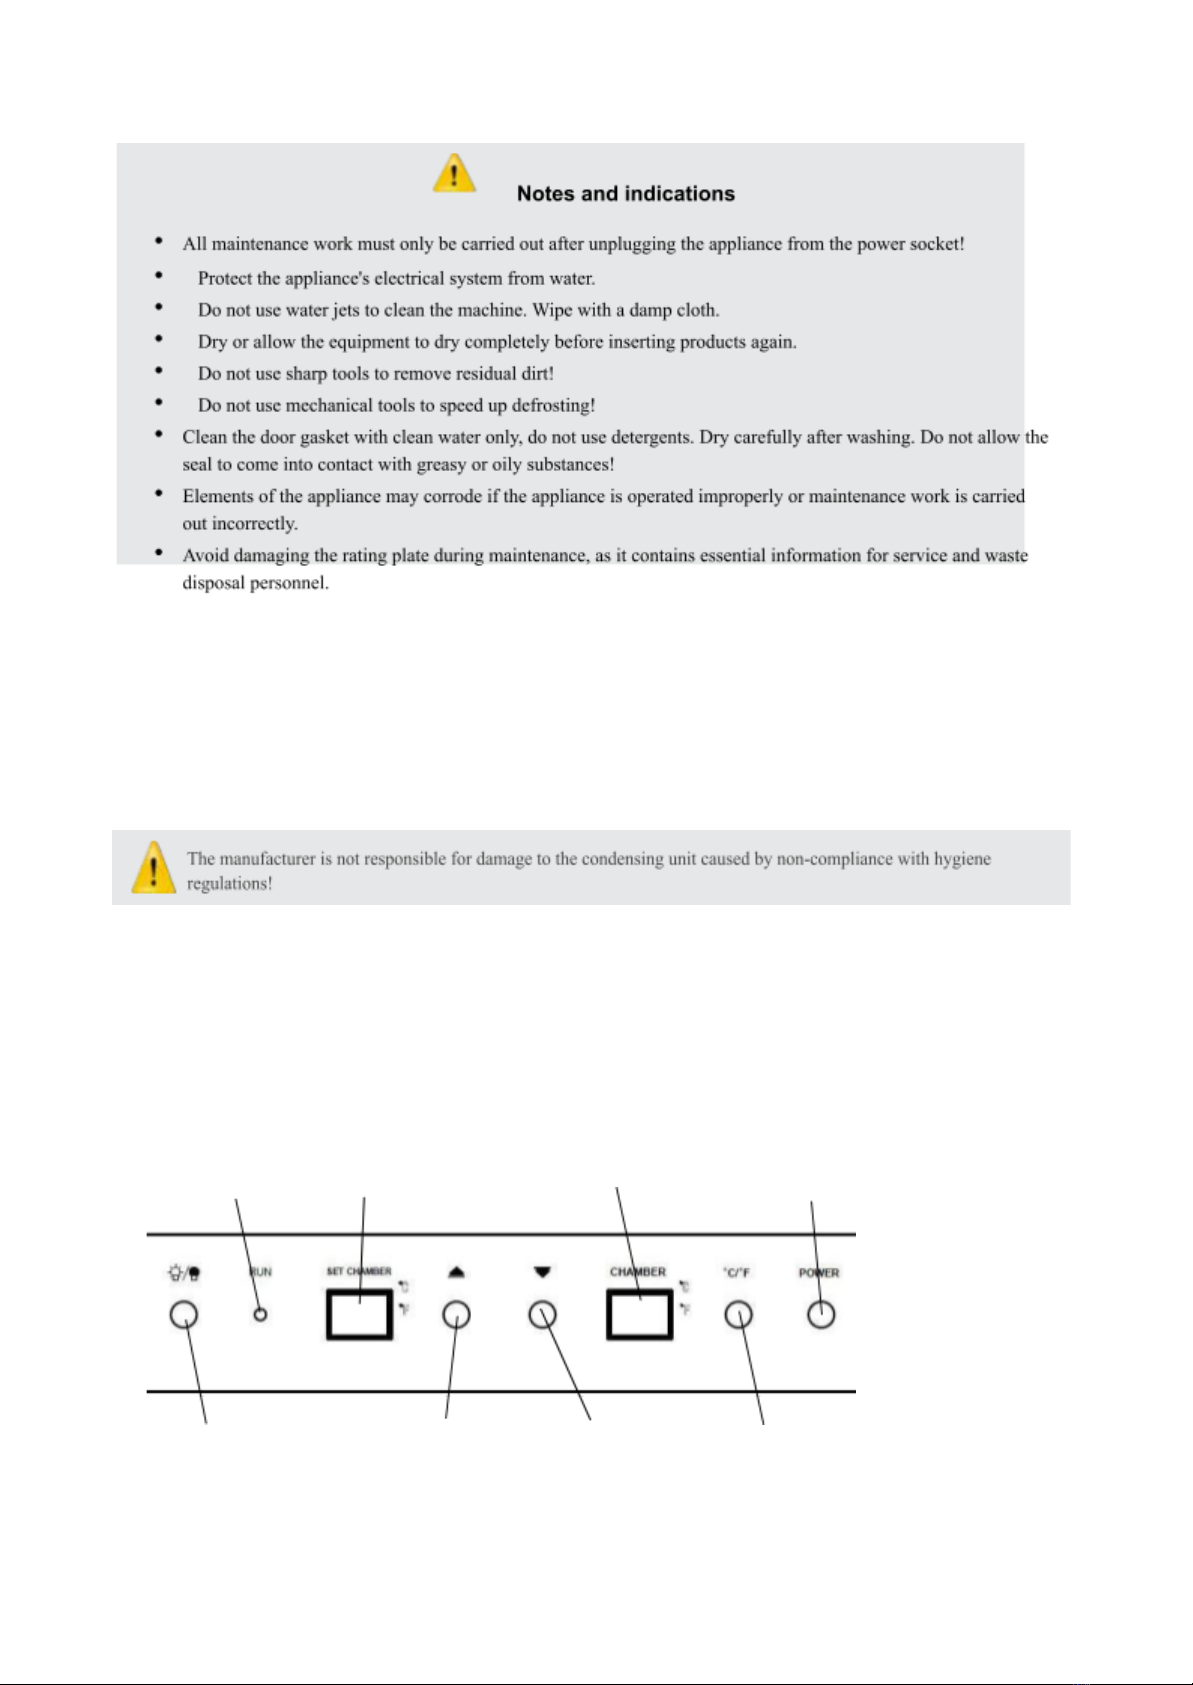
4. TEMPERATURE CONTROLLER
Fig.4 Single Temperature Zone settings
2. Indicator light
3. Temperature
display
4. Internal temperature
display
5.ON/OFF
1. Light button 6. Up button 7. Down button 8. Temperature converter
1. Light button: press until "LED1" appears on the screen

2. Indicator light: indicates when the appliance is in use

3. Temperature display: displays the set temperature. Each time the appliance is switched
off, the temperature will be shown in Celsius.
Display of set temperature value: Press button or to set the temperature. The temperature
shown on the display is the temperature value, next to which a LED indicator flashes. The temperature
display will end automatically after approx. 5 seconds.
Modification of the desired temperature value: Press button or to set the temperature . Press the
button to lower the temperature to the desired value. The temperature display will end automatically
after approx. 5 seconds.
Fig.5 Double Temperature Zone settings
2. Indicator light 3. Upper temperature display 4. Lower temperature display 5. ON/OFF
1. Light button 6. Upper temperature setting 7. Lower temperature setting 8. Temperature
converter
1. Light switch: press until "LED1" appears on the screen, press twice to turn on the lower
floor light ("LED2"). Press and hold to turn off the lights.
2. Indicator light: indicates when the appliance is in use.
Temperature setting:
Upper zone: Press and hold the button for a few seconds and set the desired temperature using
the or buttons or Then press the button again for at least 5 seconds.
Lower zone: Press and hold the button for a few seconds to display and set the desired
temperature using the up and down buttons o . Then press the button again for at least 5
seconds.
6. TROUBLESHOOTING
If you have trouble starting up the device or using it, please refer to the sections in this booklet that explain
how to proceed. This will help you to ensure that the equipment starts up and is operated correctly. If
problems persist, please read the following instructions carefully.

CAUSE
SOLUTION
The cabinet is not working
Ensure that:
- The device is correctly connected to the electricity
supply.
- The voltage and frequency of the power supply
comply with those recommended by the
manufacturer (see the rating plate).
- The central switch is on.
The cabinet lights are not working
Ensure that:
- The lighting switch is set to LED1 or LED2.
- The LED tube or lighting device is not damaged
The cabinet does not reach the set temperature
Ensure that:
- The main switch is set to ON.
- The thermostat is set correctly.
- The thermostat is working properly.
- The condenser is not dirty (clean if necessary).
- The ambient temperature is not above 37°C.
- Sufficient time has elapsed for the products to cool
down.
Noisy operation of the cabinet
Ensure that:
- The device is correctly leveled.
- There is no other furniture in the area around the
cabinet
ATTENTION: THE MANUFACTURER RESERVES THE RIGHT TO WITHDRAW ITS WARRANTY
OBLIGATIONS IF THE INSTRUCTIONS IN THIS USER MANUAL FOR CONNECTING AND USING THE
EQUIPMENT ARE NOT FOLLOWED!

DEUTSCH
INHALTSVERZEICHNIS
1. Einführung 17
2. Technische Daten 17
3. Anschluss und Inbetriebnahme 18
4. Reinigung und Wartung 19
5 Temperaturregelung 20
6. Fehlfunktion 21

1. EINFÜHRUNG
Diese Anweisungen enthalten Informationen über die Installation, den Anschluss, die Inbetriebnahme und
die richtige Verwendung des Produkts. Das Dokument erhält auch allgemeine Informationen über den
Anschluss an die Stromzufuhr, die Wartung des Geräts und die technischen Daten.
Das Gerät muss in Übereinstimmung mit den Anweisungen des Herstellers und unter Beachtung der
örtlichen Vorschriften und Gesetze installiert und in Betrieb genommen werden. Wenn das Gerät oder eines
seiner Bestandteile beschädigt ist oder wenn das Gerät nicht ordnungsgemäß funktioniert, benutzen Sie es
auf keinen Fall und stellen Sie sicher, dass es keine Person sich daran verletzen kann.
Die Anweisungen müssen an einem sicheren Ort aufbewahrt werden, der für alle Benützer des
Produkts zugänglich ist.
2. TECHNISCHE DATEN
SPANNUNG/FREQUENZ
220-240V/50-60Hz
KÜHLUNG
BELÜFTET
THERMOSTAT
DIGITAL
TEMPERATURZONE
1 oder 2
TEMPERATURMESSGERÄT
CELSIUS/FAHRENHEIT
TEMPERATURBEREICH
5°C-22°C/41°F-72°F
HYSTERESE
+2
TÜRANSCHLAG
WECHSELBAR
NEIN
ABTAUEN
AUTOMATISCH
BELEUCHTUNG
LED
Bild 1 Gerätekomponenten
1. Systemsteuerung
2. Glastür
3. Griff
4. Regal
5. Nivellierfüße
3. ANSCHLUSS UND INBETRIEBNAHME
Das Gerät sollte an einem trockenen, gut belüfteten Ort mit gutem Luftzirkulation aufgestellt werden ( der
Abstand zwischen der Wand und dem Gerät muss mindestens 10 cm betragen). Weit von allen
Wärmequellen (Sonne) und Klimaanlagen, Decken- /Wandventilatoren und Heizlüfter. Das Gerät funktioniert
einwandfrei wenn es in einer Umgebung mit einer Temperatur, die der auf dem Typenschild angegebenen
Klimaklasse entspricht, aufgestellt wird. Das Gerät funktioniert nicht richtig wenn es über einen längeren
Zeitraum nicht der richtigen Temperatur ausgesetzt ist.
• Putzen Sie das Gerät, bevor Sie es in Betrieb nehmen;
• Stellen Sie das Gerät auf eine ebene und sehr stabile Fläche. Montieren Sie dann die Nivellierfüße;
• Überprüfen Sie, ob die Spannung und Frequenz des Netzes mit den vom Hersteller empfohlenen Werten
übereinstimmen (siehe Typenschild);
• Stellen Sie sicher, dass der Schnitt der Stromkabel für die Stromaufnahme der installierten Geräte
ausreichend ist;
• Die Verwendung von Verlängerungskabel oder Mehrfachsteckdosen ist verboten.;
• Das Gerät muss an eine einzige Steckdose mit Schutzkontakt angeschlossen werden;
• Überprüfen Sie den Zustand der elektrischen Elemente des Gerätes.
Bild 2 Optimale Temperaturen für die richtige Weinlagerung
Rotwein
14.4-18.3°C/58-65°F
Weißwein/Prosecco trocken
8.9-13.9°C/48-57°F
Roséwein
9.4-10.6°C/49-51°F
Perlwein
4.4-8.3°C/40-47°F
This manual suits for next models
12
Table of contents
Languages:
Other Gastrodomus Kitchen Appliance manuals

Gastrodomus
Gastrodomus HITOUCH2700 User manual

Gastrodomus
Gastrodomus WINE400LUX User manual

Gastrodomus
Gastrodomus HITOUCHPLUS5000 User manual

Gastrodomus
Gastrodomus ASQCH8 User manual

Gastrodomus
Gastrodomus SLA350 User manual

Gastrodomus
Gastrodomus VM320 User manual

Gastrodomus
Gastrodomus CRPN User guide

Gastrodomus
Gastrodomus TRF8 User manual

Gastrodomus
Gastrodomus EPC-8L User manual

Gastrodomus
Gastrodomus DAG4 User manual


