Gator GHDVR360 User manual

!
Resolution
1080P
HD
Full
Screen Size
2.5”
160
Wide Angle Super
Capacitor
G Sensor Adhesive
Window Mount
Manual
GHDVR360
FULL HD 1080P
DaSH cam

!
2
Introduction
Product features
Thank you for purchasing the Gator GHDVR360 FULL HD
1080P Dash Cam. Please ensure that you have read the
product manual and instructions in full, prior to installation
and use. Failure to do so may result in product
failure/damage or incorrect operation and therefore impact
the product performance.
FULL HD 1920x1080 @ 30FPS
2.5" High-resolution LCD screen
160 Degree HD wide angle lens
Super Night Vision with WDR
Super capacitor
G-Sensor function
Seamless cycle loop recording
270 Degree camera lens rotation
Adhesive car mount
8GB Micro SD card included
Supports Micro SD card class10 up to 32GB
CMOS Sensor
DC 12/24V car charger

3
Introduction...........................................................2
Product features...................................................2
Table of contents..................................................3
Package components...........................................4
Product structure..................................................5
Installation of Dash Cam......................................7
Fixing the Dash Cam............................................8
Universal hard wiring kit........................................8
Video and Photo operation..................................9
Dash Cam modes and settings...........................10
Instructions for video and photo operation..........11
Video features....................................................12
Video/Photo settings..........................................13
Photo features....................................................15
Accessing files via your computer......................16
Super capacitor battery......................................17
Formating the SD card.......................................17
Locking video footage ........................................17
Product specifications........................................18
Trouble shooting guide......................................19
Safety information & warnings...........................20
Infringement of copyright warning......................20
Technical assistance..........................................21
Table of Contents
!
4
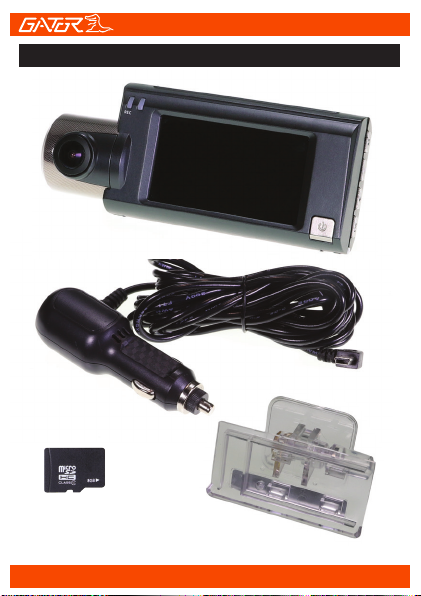
Package components
GHDVR360
Mounting
Bracket
Car Charger
8G Micro SD
Card

!
!
5
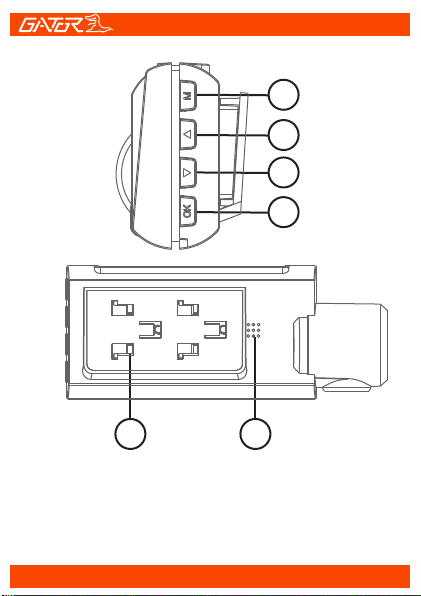
Product structure
1) Recording indicator light
2) Rotating lens
3) Display screen
4) Power ON/OFF
5) Mini USB input
6) Micro SD card input
7) Mounting base
8) LED light
1
6
4
3
5
8
2
7
6
!
8
9
10
11
1312
8) Menu/Mode button
9) Arrow UP button
10) Arrow Down button
11) OK button
12) Mounting base
13) Speaker
14) Mounting base

7
Installation of Dash Cam
1. Check orientation of the Dash Cam camera first before
installation.
2. Ensure windscreen is clean and free of debris. Use an
Alcohol wipe to enhance adhesion.
3. Place mounting bracket on Dash Cam. Remove backing
off 3M tape and press & hold firmly to windscreen for 60
seconds.
4. Fix where the vision is not blocked (Place close to
rear-view mirror is recommended). Do not install the device
on airbag or within its working range.
5. Insert Micro SD card into the Dash Cam
6. Insert Mini USB end of the power cord into the Mini USB
interface/ charging point of the Dash Cam. Connect
charging end of the cable into 12V power socket of vehicle.
7. Adjust the mounting bracket and rotate the camera
direction to get the best view. Ensure of the vehicles
bonnet is visible from the bottom of the screen for alignment.
8. Turn vehicles ignition to accessories and the Dash Cam
will power ON and start recording automatically, you will
hear an audible tone once powered.
9. The recording indicator light will start flashing RED. A red
circle will also flash on the screen and a red timer will
appear when recording has started.
10. For the Dash Cam to work it must receive power from
the charging adapter. Once power is removed or turned off
the Dash Cam will save the current file and turn off.

This can be purchased separately from your retailer to
hard wire your Dash Cam to your vehicle.
Universal hard wiring kit GUNIHWC (Sold separately)
8
Suggested
Fixing the Dash Cam
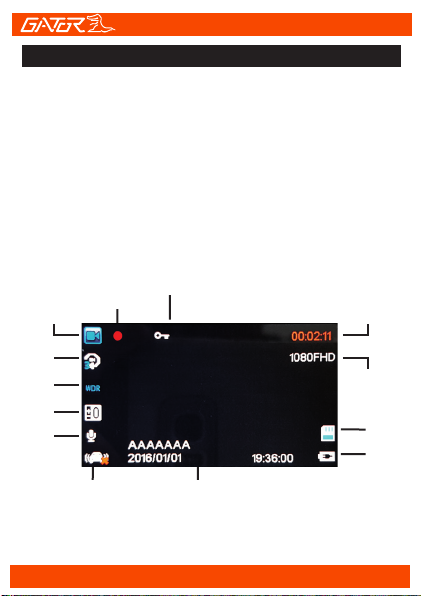
Video
time
SOS locked file
G Sensor
Loop rec
time
Resolution
Battery/
power
icon
Video Mode:
There is a video camera icon at the top left corner of the
LCD to signify you are on video mode. The recording
indicator will start flashing RED. A red circle will flash on
the screen and a red timer will appear when recording has
started.
To stop the recording, simply press the [OK] button.
To resume press recording press [OK] button.
When recording press the [Menu/Mode] button to lock the
recorded video. A key symbol will appear when activated.
Video mode
Recording
icon
Date/Time
SD Card
Exposure
comp
Mic
WDR
9
Video and photo operation

10
ISO
White
balance
Exposure
Photo mode
Remaining
photo space
Resolution
Battery/
power
icon
SD Card
Photo Mode:
There is a photo camera icon at the top left corner of the
LCD to signify you are on photo mode. To take a photo
press the [OK] button and you will hear a shutter click
sound. Briefly the photo will display on the screen.
To switch between video, photo and playback modes,
press and hold the [Menu/Mode] button. Quick press the
[Menu/Mode] button again to show Function and Settings
menu for each mode. Press the [arrow] buttons to choose
between Function, Settings or X icon to exit. Press the
[OK] button to activate. Use [arrow] buttons to move
through menus, [OK] button to confirm selections.
DASH CAM modes & settings
Table of contents
Other Gator Dashcam manuals

Gator
Gator GHDVR350 User manual

Gator
Gator DUAL-TECH GRv43MDT Operational manual

Gator
Gator HDVR245H User manual

Gator
Gator HDVR303 User manual

Gator
Gator HDDVR550 User manual

Gator
Gator G180SPCR User manual

Gator
Gator GHDVR80W User manual

Gator
Gator GHDVR291 User manual

Gator
Gator GHDVR82W Operational manual

Gator
Gator HDDVR202 User manual

Gator
Gator GHDVR370 User manual

Gator
Gator GRV43M Operational manual

Gator
Gator GHDVR62R User manual

Gator
Gator C05EV00009 Operational manual

Gator
Gator HDDVR186 User manual

Gator
Gator GHDVR210 Operational manual

Gator
Gator GHD5MR User manual

Gator
Gator DVR50M User manual

Gator
Gator HDDVR427 User manual

Gator
Gator GHDVR410 Operational manual


