GE ZKHCSS2 User manual
Installation
Instructions ZKHCSS2
Tubular Stainless Steel Handles
and Handle Side Trim
Right hand door swing models are illustrated in these
instructions. Follow these same instructions for left hand
models.
This kit provides for the installation of Tubular Stainless
Steel handles or custom handles on 3/4" overlay custom
panels.
Tools and materials required:
• #2 Phillips screwdriver
• Drill and 7/32", 1/8" bits and 7/8" spade bit
• Custom door panels,
• Safety glasses
• Center punch
• Hammer
• Pencil
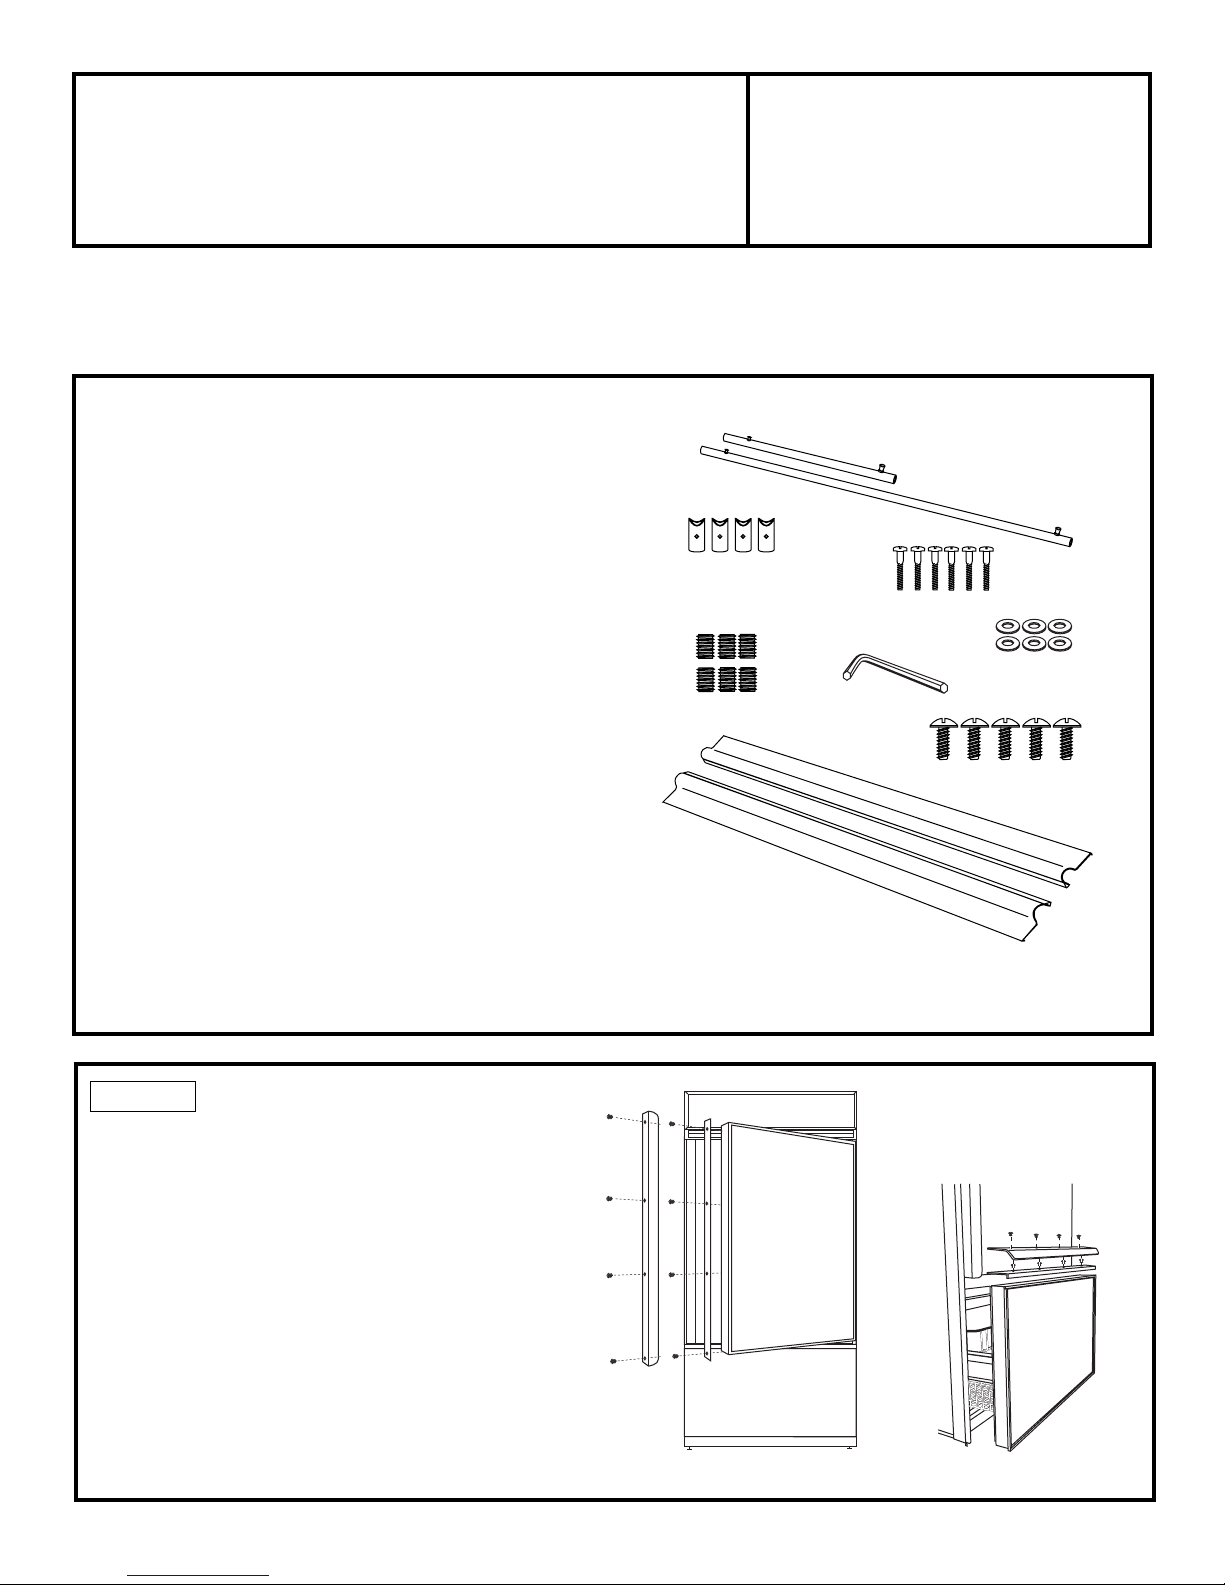
Parts List:
A. Freezer tubular handle (95376) and
fresh food tubular handle (95377)
B. 4 Handle standoffs, 70536
C. 6 Screws for handle standoffs
#10-32x1" pan head machine screws (4 required, 2 extra), 36298
D. 6 Set screws (4 required, 2 extra) 70539
E. 3/32” Allen wrench for set screws, 70548
F. 6 Plastic spacers (4 required, 2 extra) 70540
G. 5 Trim screws (4 required, one extra) 8665
H. Handle side trim for LH models (75468), trim for RH models (75469)
Before you begin – Read these instructions completely and carefully.
Note to Installer: Be sure to leave these instructions with the Consumer.
Note to Consumer: Keep these instructions with your Owner’s Manual for future reference.
STEP 1 REMOVE DOOR AND
DRAWER HANDLES
• Open refrigerator door to 90°. Remove the 4 screws
holding the handle to the door.
• Remove 4 screws holding handle side trim. Discard all
screws and trim. Discard handle.
• Open freezer drawer to access handle and trim.
Remove and discard handle, retain screws and trim.
If you are installing custom handles, go to STEP 3.
B
C
E
H
F
G
D
A

STEP 2 INSTALL TUBULAR STAINLESS STEEL HANDLES ONTO PANELS
-2-
CAUTION: Hole locations must be exact to accept handle standoff
and handle assembly.
Assemble Handles
• Place a handle standoff on each attachment post on
the handle. Position the screw hole on the standoff to
point to the floor.
• Install set screws into the bottom of each standoff,
using the Allen wrench provided. The standoff should
be tight against the handle.
Screw
Allen Wrench
Attachment Post
Secure Handles to Panels
• Use a 7/8" spade bit to drill 1/2" to 9/16" max.
depth into the back side of the panel. At this depth
there will be enough screw threads to engage the
handle on the appearance side. See illustration.
• Stand the panel up on the hinge side. Place a plastic
spacer into the 7/8" opening, drop screw through
the spacer.
Countersink screw
into panel as shown.
• Place handle standoffs against the mounting screws on
the appearance side, drive top screw partially into the
standoff.
• Drive next screw partially into the standoff. Continue
installing screws to the bottom location. Alternate
back to the top tightening screws one at a time until
the handle is tight against the panel.
7/8"
1/2" Min.
9/16" Max.
1.100"
3/4"
7/32"
Plastic
Spacer
Fresh Food Panel
Freezer Drawer
Panel
Drill
Pilot
Holes
to
Match
Handle
1-1/8"
1-1/8"
Drill Pilot Holes
• Measure, mark and draw a line, 1-1/8" from the handle
side edge, top to bottom.
• Hold the tubular handle against the appearance side,
centered top to bottom and on the marked line.
• Mark the screw hole locations at the center of the
handle attachment posts. Place handle over the marks
to check again that holes are aligned to handle posts.
• Center punch to mark hole locations. Drill 7/32" pilot
holes from the appearance side and through the entire
panel thickness.
• Follow the same procedure to drill pilot holes on the
freezer door.

-3-
STEP 3 INSTALL ASSEMBLED PANELS
Install
8 Screws
Install 4
Handle Side
Trim Screws
• Install custom handles according to the manufacturer’s
instructions.
• Slide assembled door panel into
the trim.
• Determine the correct trim for
your model (for left or right
door swing). Place trim against
the side of the refrigerator door,
aligned top to bottom. The holes
in the trim should align to the
holes in the door. Discard the
other trim piece.
• Remove trim. Use a 1/8" bit to drill the semi-punched
holes in the refrigerator door.
• Secure the new custom handle side trim using the
supplied screws.
• Slide assembled panel into the drawer trim.
• Secure the original drawer trim using original round
head trim screws.
Refrigerator
Door
Custom Trim
Trim to Panel Fit

Pub. No. 31-46033-2
Dwg. No. 197D4869P001
(N.D. 532) 9/02
75470
Note: While performing installations described in this book,
safety glasses or goggles should be worn.
For Monogram®local service in your area, call
1-800-444-1845.
Note: Product improvement is a continuing endeavor at
General Electric. Therefore, materials, appearance and
specifications are subject to change without notice.
General Electric Company
Louisville, KY 40225
Monogram.
We bring good things to life.
®
Other GE Accessories manuals

GE
GE Brand Expression Guidelines User manual

GE
GE Giraffe User manual

GE
GE CPLGSTDBLW1 User manual

GE
GE 19298 User manual

GE
GE PDW7800N00CC User manual

GE
GE AP450 User manual

GE
GE 40795 User manual

GE
GE Telaire Vaporstat 9002 User manual

GE
GE 868 GEN2 Quick start guide

GE
GE BAKER HUGHES DPS 5000 Series User manual


