Genano 4500 User manual

Genano®4500
Manual (English)
MEDICAL AIR
PURIFICATION DEVICE

2
Contents
Introduction
Contents of delivery
Before use
Installation
Indications of symbols
Operation of the device
Troubleshooting guide
Warranty conditions
Safety instructions
3
4
5
7
8
9
12
13
15

3
Decontaminated
air out
Genano®4500
Medical Air Purification Device
Genano 4500 is an air purification
device based on Genano
Technology®. The unique
technology removes even the
smallest impurities from indoor
air. These impurities can consist of
viruses, bacteria, mould spores as
well as traffic originated soot.
Genano 4500 doesn’t have
traditional fiber filters, so there
is no risk for a breeding ground
for microbes forming inside the
unit even in humid conditions. In
Genano technology, a gas absorber
is used for the removal of harmful
gases and ozone.
Dirty air in
Using and taking care of
the Genano unit is easy.
Genano 4500 is self-
cleaning and requires
only regular filling of
Genano washing fluid
and emptying the flush
water bowl.

4
Washing liquid (Genonex)
Only use approved Genano washing liquids in Genano units.
Indoor use only
max. 450 m3/h
> 0.003 μm
99,5 %
Included: 800 g active carbon,
60 mm
570 x 440 x 1517
65 kg
Painted steel
200–240 V, 50/60 Hz
75–150 W
+5...+60 °C
32–42 LpA (dBa)
Automatic, once a week
Mobile*
3
0–90 %
Genano®4500
Technical features
Use
Cleaning capacity
Particle size arrestance
Cleaning efficiency
Gas removal
Size (w x d x h mm)
Weight
Construction
Operating voltage
Power consumption
Usage temperature
Sound level
Cleaning
Installation
Fan speed
Humidity level of air
Contents of delivery
1 Genano 4500 unit with mains power cable
Contains 1 gas absorption plate to handle gas emissions. Make
sure absorption plate is changed annually. The absorption plate
change and other service measures are included in the service
agreement.
1 plastic flush water bowl
Empty the bowl on a regular basis every month and clean away
any remaining residue with a moist towel. Notice that there is no
contamination risk from bacteria or viruses from the dirt in the
bowl as the cleaning process eliminates all microbes. The basin
can be sterilized in an autoclave if wanted.
* Can be equipped with a negative and/or positive pressure
adaptor kit to create spaces with negative / positive air pressure.

5
TO TAKE INTO CONSIDERATION WHEN PLACING THE UNIT IN A ROOM
Genano 4500 is to be positioned to stand vertically on an even base.
The unit has wheels on the bottom for portability. Genano 4500 is equipped with
four wheels, of which two can be locked.
Move the unit carefully over doorsteps and over obstacles by tilting.
Genano 4500 takes in the contaminated air from the bottom. The purified air is let
out through the upper part of the unit.
Before use
WARNING! Never use the unit in a place where for example flammable gases
and liquids or large amounts of dust in the air may form an explosive mixture
ignited by a spark.
Do not use the unit in spaces without normal ventilation. Make sure you have
sufficient ventilation!
NOTE! If possible, always transport the unit vertically. If this is not possible, and
you need to transport the unit horizontally, empty the washing fluid container
and make sure the front of the unit is facing upwards during transport. Let the
device dry in a vertical position for at least 8 hours before turning it back on.
The device is always to be used vertically. Only use and store the unit indoors.

6
Place the unit so that the furniture in the room influences the course of the
air flow as little as possible. The unit is to be placed so that it circulates the air
the same way the air normally circulates in the room. The best effect is usually
achieved when the unit is placed near the air income.
The best level of air purification is reached near the unit. Therefore, the best place
for the unit in a big room is near a workstation. The unit can also be placed near
sources of problematic particles to prevent the particles from spreading.
By adjusting the fan settings the production of purified air can be increased.
Genano experts will help you with questions regarding indoor air quality and
placement of the unit and fan settings. Follow the instructions given by your
Genano expert to ensure the best possible outcome.
Exhaust air
Incoming air
Exhaust air
Incoming air
ABOVE VIEW SIDE VIEW
NOTE! It is recommended to leave the unit on at all times, including times
when no one is in the room, nights and weekends.

7
3. Add the washing liquid container before switching the device ON. Connect the
hose to the Genonex container. Close the cap carefully. Place the container on
the left side of the flush water bowl where the are markers marking the place of
the container. Close the door of the basin.
Installation
WARNING! Only plug the unit into a grounded power socket.
4. Make sure that the main switch (see G on page 8) is in the OFF-position. Plug
the main power cable into the Genano 4500 before you plug in the main cable
into a grounded power socket (230V / 50Hz).
5. Push the main switch into ON-position.
NOTE! Genonex washing liquid is ready for use without addition of water.
NOTE! Lock the bottom basin when operated near children or pets.
1. Open the bottom basin.
2. Make sure the flush water bowl is in the basin.

8
SIGNAL LIGHTS
A. OK
Green light
B. AUTOMATIC WASH/DRYING
Green light
C. CLOSE DOOR
Green light
D. ERROR/SERVICE
Red light
E. ADD WASHING LIQUID
Yellow light
Indications of symbols
The bottom basin can be locked. Inside
it, there is a bowl for flush water and a
container for the washing liquid.
OPERATION SWITCHES
F. MAIN SWITCH (ON/OFF)
ON (I) or OFF (0)
G. FAN SETTINGS/CAPACITY
1 - 2 - 3
H. POWER WASH
Keep the switch pressed down
until the fan stops and washing
starts.
ABCDE
F G H

9
NORMAL OPERATION
The unit is functioning and purifying air when the green OK light (A) is illuminated.
The unit efficiently collects atmospheric particles on the collection surfaces inside
the unit. Washing of the collection surfaces takes place automatically once a
week. During the flushing of the collection surface the green WASH light (B) is on.
Operation of the device
NOTE! The green WASH light (B) is on until the drying period has ended.
After the washing cycle the unit is drying. During the drying the unit is silent and
the green WASH light (B) is on. Do not open the basin when the unit is washing or
drying.
The washing cycle lasts less than a minute and the drying period can vary from
minutes up to 8 hours. The unit continues operation automatically when the
drying period is over.
NOTE! It is recommended to let the unit be continuously ON to ensure the
weekly washing and good air quality. If the unit is not ON automatic wash may
be missed.
NOTE! The unit needs to be ON when adding washing liquid. Do not turn it OFF.
RUNNING OUT OF WASHING LIQUID
If the container has run out of washing liquid, the unit is unable to perform the
automatic washing function. When this happens the yellow ADD WASHING
LIQUID light (E) turns on.
The unit will continue its normal operation even if one automatic wash cycle is
missed due to a lack of washing liquid.
If washing liquid is not added within a week, the unit stops and the red SERVICE
light (D) lights up.
Replace the Genonex washing liquid container according to instructions given on
page 7. Do not switch OFF the unit.

10
ERROR/SERVICE
Genano 4500 has an internal monitoring system. This feature protects the unit
and increases the drying period if parts are too wet after the washing. It is comple-
tely normal that the drying period is increased due to the monitoring.
However, if the drying takes an abnormally long time and the unit will not turn on
(the OK light, see A on page 8, does not turn on) there may be a malfunction.
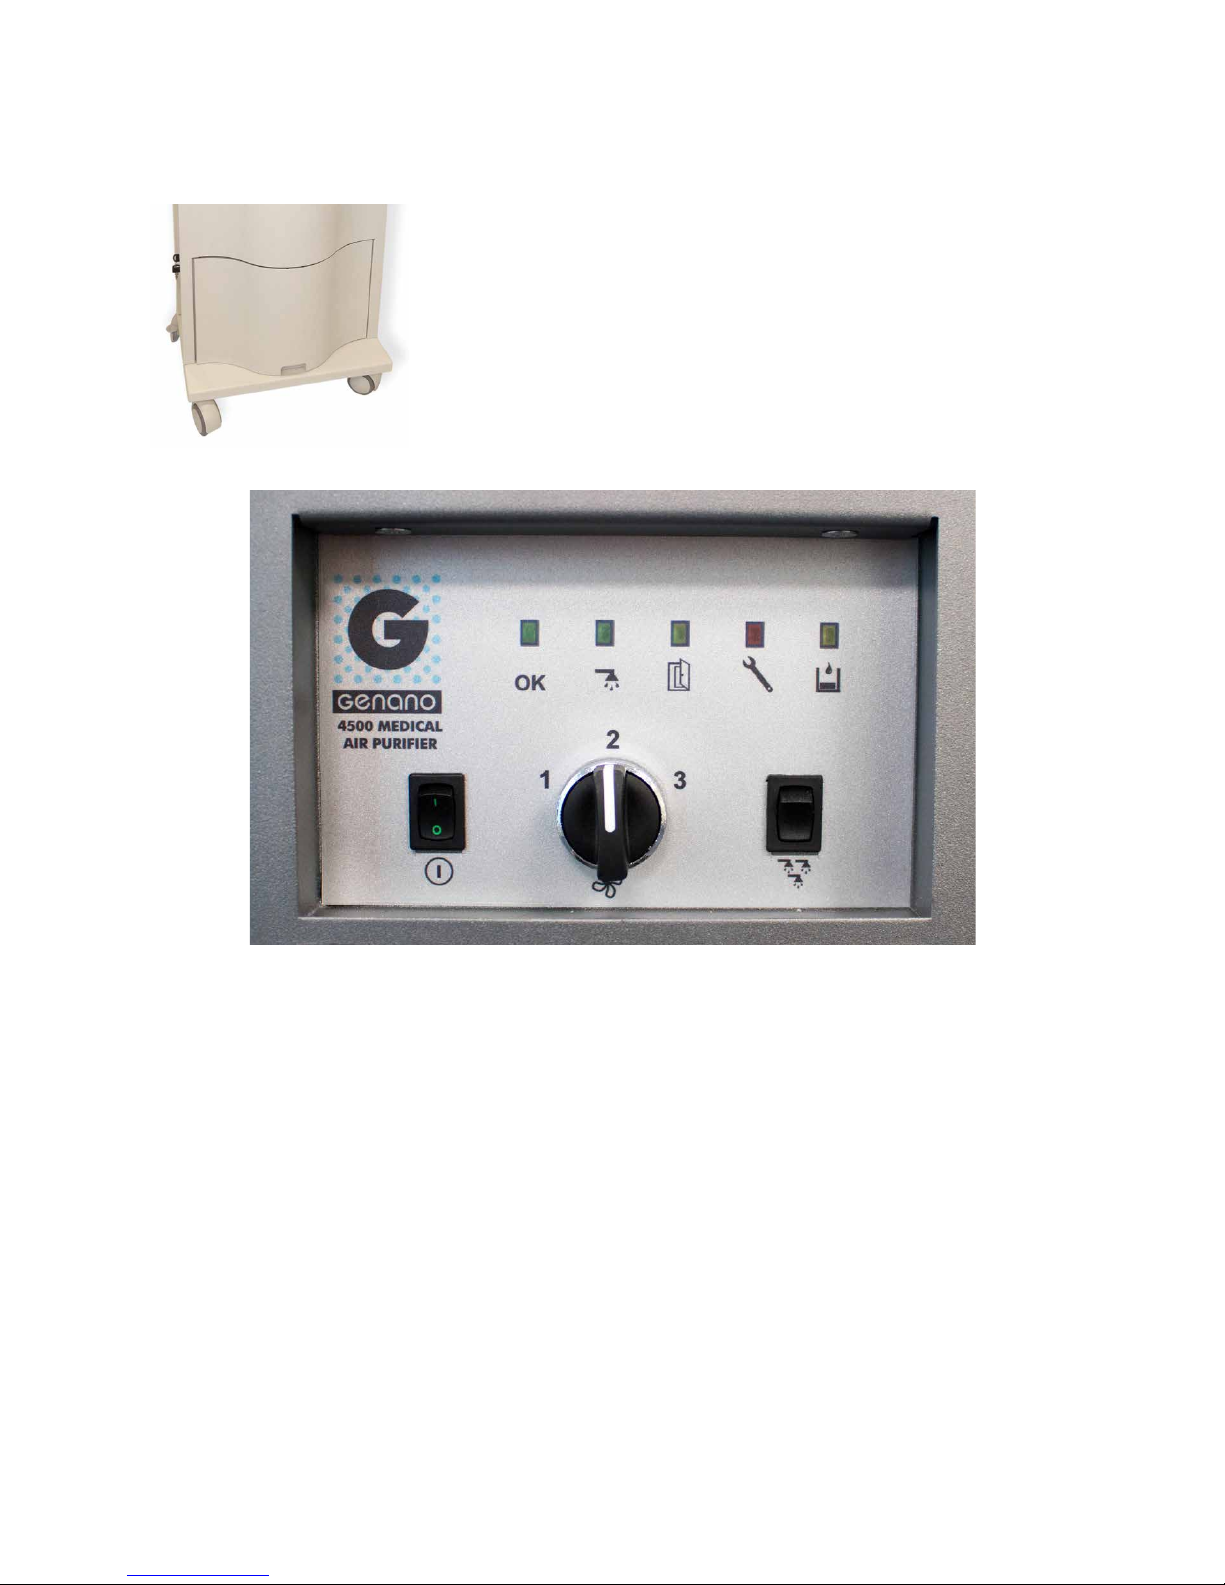
A straightforward indication of a malfunction is the ERROR/SERVICE light (see D
on page 8) turning on and staying lit.
If the ERROR/SERVICE light is on make sure that the bottom basin door is closed.
Then try resetting the unit (see instructions below). If the malfunction does not go
away, contact an authorised Genano service representative.
Resetting the program settings
1. Switch OFF the unit and wait about 20 seconds.
2. Switch ON the unit.
THE BOTTOM BASIN
If the bottom basin is opened during normal operation, the red ERROR/SERVICE
light (see D on page 8) and the yellow CLOSE BASIN light (see C on page 8) turn
on and the unit stops the air purification. The unit continues purifying air only after
the basin is closed.
When the bottom basin is open, non-purified air cannot flow through the unit, as
the gas absorption plate prevents the flow of air when the fan is not on.
Genano washing liquids are environmentally friendly. In normal home and office
use, the dirty flush water can be poured into the sewer. If the unit is used to
remove hazardous material, dispose of the dirt according to environmental regu-
lations.
NOTE! Empty and clean the flush water bowl regularly. The bowl can be
cleaned with a soft material or if need be, sterilized in an autoclave (max. 120
°C). There is no risk of contamination from microbes in the flush water bowl as
the Genano cleaning process eliminates living microbes.
WARNING! Only use approved Genano washing liquids in Genano units.

11
GAS ABSORPTION PLATE
Besides particles, the Genano unit can also remove gases. Using a gas absorp-
tion plate, different kinds of gases can be removed from indoor air. The typical
exchange period of the gas absorption plate is 12 months.
POWER WASH
Power wash can be used if the unit is under heavy duty use in a location where
the air has a particularly large amount of particles.
It is recommended that the power wash be performed every 6 months even when
the unit is not used in an especially demanding environment.
Empty the flush water basin and fill the washing liquid container before performing
the power wash.
After the power wash, check the cleanness of the rinsing water. If necessary, you
can repeat the power wash.
The power wash is performed by pressing the POWER WASH switch (see H on
page 8) and holding it down until the fan stops and the unit starts the wash cycle
(about 5 seconds). The unit continues purifying air automatically after the wash. If
the power wash is done several times the unit needs more time to dry and start
automatically.
The change of the gas absorption plate as well as other service measurements
are included in the service agreement. Units that have a service agreement are
in Genano’s service register and the service personnel will arrive for the yearly
service without a separate call.
WARNING! Do not operate the Genano 4500 unit without the gas absorption
plate!
NOTE! The gas absorption plate is to be changed once a year. Replacement of
the gas absorption plate can only be performed by service personnel autho-
rised by Genano Ltd.

12
Troubleshooting guide
THE DEVICE DOES NOT TURN ON.
• Check connection to the mains.
• Check that the power is switched on.
• Check the service door is not open.
THE GREEN WASH-LIGHT IS ON WHEN DEVICE IS NOT WASHING.
• Wait until the drying period is over.
• If after a few hours the unit does not restart then reset the system
• If the error continues after resetting contact an authorized repair service
RED SERVICE/ERROR-LIGHT IS CONTINUOUSLY ON.
• Wait for at least 1 hour.
• Execute Power-wash.
• Reset default program settings (Switch the unit OFF and wait about 20
seconds then restart).
• If the error continues after resetting contact an authorized repair service.
THE DEVICE IS LEAKING WATER.
• It is possible that the device leaks washing liquid if transported horizontally.
Wait 8 hours before first use.
• Check that the flush water basin is in its place. Empty the basin if necessary.
• If leaking continues contact an authorized repair service.
THE OPERATING LIGHTS ARE NOT FUNCTIONING.
• Check connection to the mains.
• Check that the power is switched on.
• Reset the program settings. “Add washing liquid” light is not working when the
water tank is empty.
• Contact authorized Genano service.
AIRFLOW THROUGH THE DEVICE IS POOR OR IT SMELLS OF METALLIC GASES.
• Turn device off and contact authorized Genano service.
WARNING! Repairs and maintenance work must be carried out by authorised
Genano service personnel only.

13
1. GENERAL
Genano Ltd warranty conditions follow the NL 09 (articles 21-35) contract terms
with the following modifications and amendments.
2. WARRANTY PERIOD
The warranty period is 24 months from the date of delivery, unless otherwise
stated in the product-specific warranty, offer or contract.
3. CONTENTS OF WARRANTY
Repairing a defective part or device or if needed replacing the faulty part or unit
with a new one according to the consideration of the salesperson is included in
the warranty. Possible travel expenses and freight costs that are caused by the
warranty repair are not included in the warranty.
4. ADDITIONAL
Additional warranties, commitments or assurances potentially given by the distri-
butor or reseller bind only them. Genano Ltd is responsible only for the warranty
stated here.
5. LIMITATIONS OF WARRANTY
This warranty is given with the assumption that the product is used in normal
office conditions or comparable conditions and that the operating instructions
are followed carefully. The warranty is valid in Finland under these conditions. The
responsibility of the guarantor is limited to these warranty conditions and does
not cover damages a sold product causes another object or a person. On the
basis of this warranty the client is not entitled to demand anything from anyone
other than the guarantor. Verbal clauses not included in these warranty condi-
tions do not bind the guarantor. For the warranty to be valid, the information and
serial numbers on the product or in the warranty cards are not to be changed or
damaged.
The warranty does not include damage that has been caused:
• during shipment
• by negligence of the user of the product or overload of the product
• by use that is against the operating instructions, lack of care or service,
the product falling or liquid damage
• by circumstances not dependent on the guarantor such as fluctuations
in power supply voltage, (fluctuations in voltage can be at maximum level
+10 %), thunderstorms, fires or accidents
Warranty conditions

14
• by service, repairs or alterations in structure performed by other than
authorized repair service
• or by placement of the unit against operating instructions or otherwise incor-
rectly.
The warranty does not include repairing damage that has no effect on the func-
tionality of the product.
Parts that have a risk of break up from handling or natural wear and tear like fuses,
plastic parts movable by hand or other parts that wear are not included in the
warranty.
6. ACTIONS TO BE TAKEN WHEN A FAULT IS DISCOVERED
When a fault appears during the warranty period the client is to contact the
authorized service provider or distributor without delay. The client is to tell what
product is in question (the designation of type and serial number on the warranty
card or the data plate), what the fault is as specifically as possible and in what kind
of circumstances the fault has appeared. A precondition for the warranty service is
also that the customer reliably shows that the warranty is valid (by presenting the
purchase invoice with the serial number of the product).

15
1. Only use the unit indoors.
2. Do not place or store the unit where it can get wet. Do not keep the unit
in the rain or pour water on it. Do not use a wet unit.
3. Never put the unit in direct, hot sunlight or store at a temperature above
140°F (60°C).
4. Do not place or store the unit in a place where it can fall over.
5. Do not use the unit in spaces without normal ventilation. Make sure you
have sufficient ventilation.
6. Do not use the unit if it is damaged in any way.
7. Do not use the unit if it has a damaged cord or plug. Return the unit to an
authorized Genano service location for examination and repair.
8. To prevent possible damage to the cord, do not wrap the cord around
the unit and keep the cord away from heated surfaces.
9. Only plug the unit to a grounded outlet.
10. Always attach the power cable first to the unit, then to the outlet (wall).
Be certain that the plug is inserted firmly into the unit. To disconnect, turn
off the device, then remove the plug from the outlet.
11. Unplug the unit before moving or transporting it to another location.
12. Do not cover the air intakes of the unit. Do not place anything directly on
top of the unit.
13. Never drop or insert any object into any opening.
14. Lock the bottom basin when the unit is operated near children or pets.
15. The unit is only allowed to be serviced by an authorized repair service.
16. Do not take the gas absorption plate out of the unit.
17. WARNING! Due to its mode of operation the electronic unit may occa-
sionally emit sparks. Never use the unit in a place where flammable gases
or liquids or large amounts of dust may combine with air to form an
explosive mixture.
Always follow the operational instructions when using this Genano unit. Do
not use expansions or supplies not recommended or used by Genano Ltd.
Safety instructions
Manufacturer: Genano Ltd
Manual last revised 1.7.2016.

www.genano.com
Contact us
Genano Ltd
Metsänneidonkuja 6
02130 Espoo
Finland
info@genano.com
Table of contents
Other Genano Air Cleaner manuals
Popular Air Cleaner manuals by other brands

AtmosAir
AtmosAir 500 Series Installation, operation and maintenance guide

MaSSC Clean
MaSSC Clean MC-CA1 operating instructions

Clean Air Plasma
Clean Air Plasma Air Sanitizer 1000 quick start guide

Instant
Instant AP300 Get started

Five Seasons
Five Seasons 490AIV owner's manual

Bionaire
Bionaire BAP706 instruction manual

Toyotomi
Toyotomi ENSO Series user manual

Figure Machine
Figure Machine XLFLOW-STACK installation manual

Helios
Helios AirPal 1750 H Installation and operating instructions

Panasonic
Panasonic FP15JU2 manual

Healthy Climate Solutions
Healthy Climate Solutions HCC-14-23 installation instructions and home owner's guide

Crane
Crane EE-8072 instruction manual