Genie WNVR8645 User manual

Quick Start Guide
Please read these instructions carefully before operating the unit
and keep for further reference.
64 Channel H.265 12MP NVR
with 8x HDD Bays
WNVR8645

ii
Intro Section
Please read this instruction carefully before operating the product and keep it for further
reference. All examples and pictures used here are for reference only.
The contents of this manual are subject to change without notice.
CAUTION:
• Please check the device and the accessories after getting the device. If there are any
damages, shortages or defects, please contact your dealer immediately.

Contents
iii
1.0 Introduction..........................................................................................................4
1.1 Product Features...........................................................................................4
1.2 Product Dimensions.....................................................................................4
1.3 Specification.................................................................................................5
2.0 HDD Installation...................................................................................................6
3.0 Rear Panel Instruction..........................................................................................7
4.0 Start Up and Shut Down......................................................................................8
5.0 Login ....................................................................................................................9
6.0 Configurations and Connections ........................................................................10
6.1 Network Configuration & Adding IP Camera...............................................10
7.0 UPnP .....................................................................................................................12
8.0 NAT.......................................................................................................................13
9.0 Manual Recording and Playback .........................................................................14
9.1 Manual Recording.........................................................................................14
9.2 Playback.......................................................................................................14

4
The Genie WNVR8645 is a 64 channel ultra-high definition 4K network video recorder.
network video recorder with 8 HDD bays. The WNVR8645 features up to 16 channel
simultaneous playback as well as two independently configurable gigabit ethernet Lan
ports. The NVR can support the latest H.265 and H.264 encoding streams.
The WNVR8645 NVR has a dedicated iPhone and Android App (Super Live Plus) and are
supplied with free Windows / MAC CMS software.
1.1 Product Features
• Supports 64 CH 12MP, 8MP, 6MP, 5MP, 4MP, 3MP, 1080p, 720p input
• H.265S, H.265+, H.265, H.254 high profile compression
• • Intuitive and user-friendly Graphic User Interface (GUI), Windows style operation by
mouse
• Multi-mode recording: Manual / Timed / Motion / Sensor / POS / AI recording and
Smart search
• Supports POS information overlay on live view and playback Playback : 16 CH
simultaneous playback
• Search : Time slice, Time, Event, Tag, Smart search
• Authorisation management, log view and device status view
• Pentaplex : Preview, record, playback, backup and remote access
• DHCP, DDNS, PPPoE network protocol
• Multi-user online simultaneously
• Remote control via Web Client or CMS: Preview, playback, backup, PTZ and
configuration
• Supports RAID0, RAID1, RAID5, RAID6, RAID10
• Express and flexible backup via USB, network and so on
• Dual stream technology for local storage with high definition, remote network
transmission and remote surveillance with mobile device
• 4K UHD output at up to 60Hz Supports PTZ preset and auto cruise, up to 255 presets
and 8 cruises
• Supports NAT function and QR Code scanning by mobile phones
• Powerful iOS and Android smartphone and tablet surveillance with push notifications
• Supports multiple VCA (Video Content Analytics) events, such as object abandoned/
missing, region intrusion, tripwire, video exception, etc.
1.2 Product Dimensions
1.0 Introduction
445mm
436mm
90mm

Quick Start Guide 64 Channel H.265 12MP NVR with 8x HDD Bays
5
1.3 Specification
Model WNVR8645
System OS Embedded Linux
Video
Network Input 64 CH IPC input
Incoming Bandwidth 320Mbps
Outgoing Bandwidth 320Mbps
Network Input Resolution 12MP / 8MP / 6MP / 5MP / 4MP / 3MP / 1080p / 1280×1024 / 960p / 720p / 960H / D1 / CIF
Output
HDMI 1 : 3840×2160 @ 60fps / 3840×2160 @ 30fps / 1920×1080 / 1280×1024 / 1024×768
HDMI 2: 1920×1080 / 1280×1024 / 1024×768
VGA x 1: 1920×1080 / 1280×1024 / 1024×768
Compression H.265S / H.265+ / H.265 / H.264
Multi-Screen Display 1 / 4 / 6 / 8 / 9 / 13 / 16 / 25 / 32 / 36 / 64
Audio
Network Input 64 CH IPC audio input
Two-Way Audio RCA x 1
Local Output RCA x 1
Compression G.711(U/A)
Record
Record Stream Dual stream recording
Resolution 12MP @ 20fps, 8MP / 6MP / 5MP / 4MP / 3MP / 1080p / 1280×1024 / 960p / 720p / 960H / D1 / CIF
@ 30fps (NTSC) / 25fps (PAL)
Mode Manual / Timed / Motion / Sensor / POS / AI recording
Playback
Simultaneous Playback Max 16 CH
Search Time slice / Time / Event / Tag / Smart search
Smart Search Highlighted colour to display the camera record in a certain period of time, different colours refer to
different record events.
Function Play, Pause, FF, FB, Digital Zoom, etc.
Decoding Capability 1CH 12MP / 4 CH 5MP / 9 CH 720p / 16CH 720p (Live View / Playback)
Alarm
Mode Manual, Sensor, Motion, Exception, Smart events
Input 8 CH local alarm input, supports IPC alarm input
Output 4 CH
Triggering Record, snapshot, buzzer, preset, e-mail, etc.
Mobile Device OS iOS, Android
Video Structure
Analaysis
Human / Vehicle
Classification Yes
Network
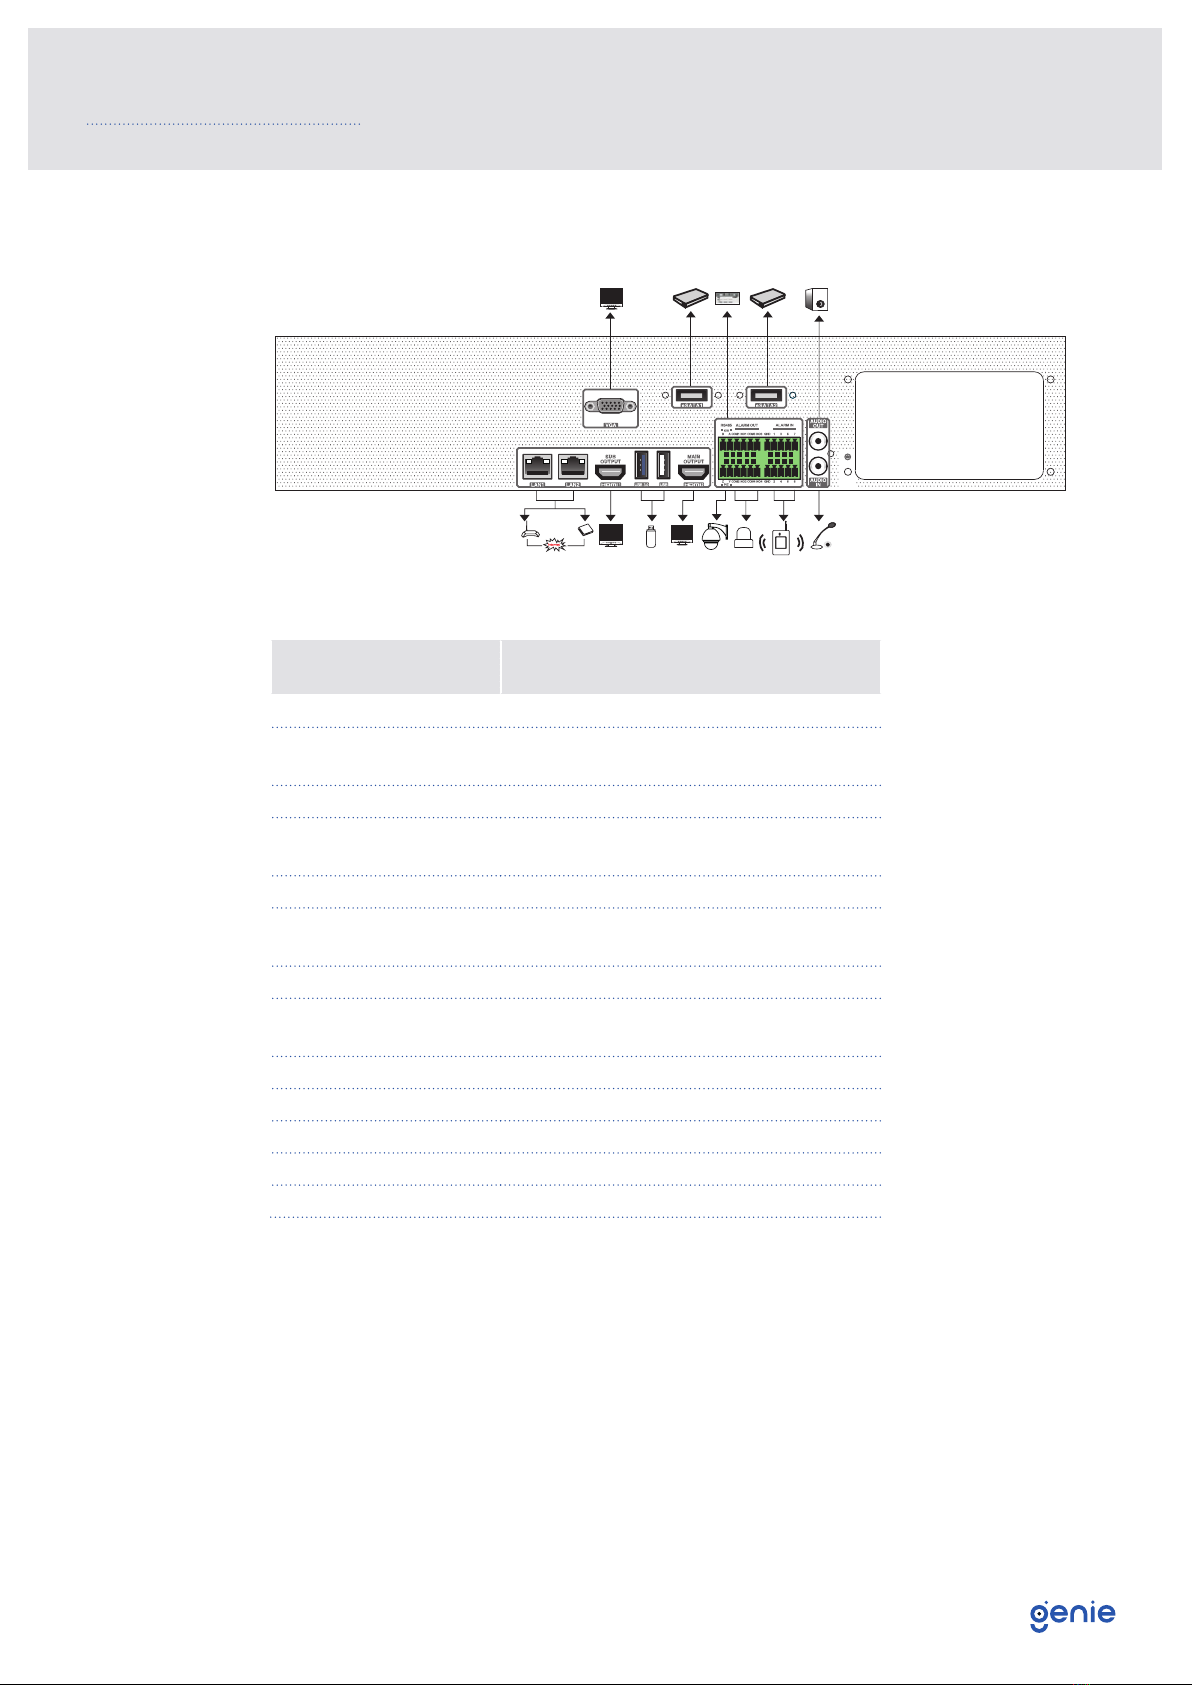
Interface RJ45 10 / 100 / 1000 Mbps x 2
Protocol TCP / IP, PPPoE, DHCP, DNS, DDNS, UPnP, NTP, SMTP, HTTP, HTTPs, 802.1x, Onvif, etc.
Client Connection Maximum 20 users access
Port
RS485 USB2.0 × 2, USB3.0 × 1
USB Yes (full-duplex), connectors for PTZ and keyboard
Remote Controller Yes
Backup Local Backup USB stick, USB mobile HDD
Network Backup Yes
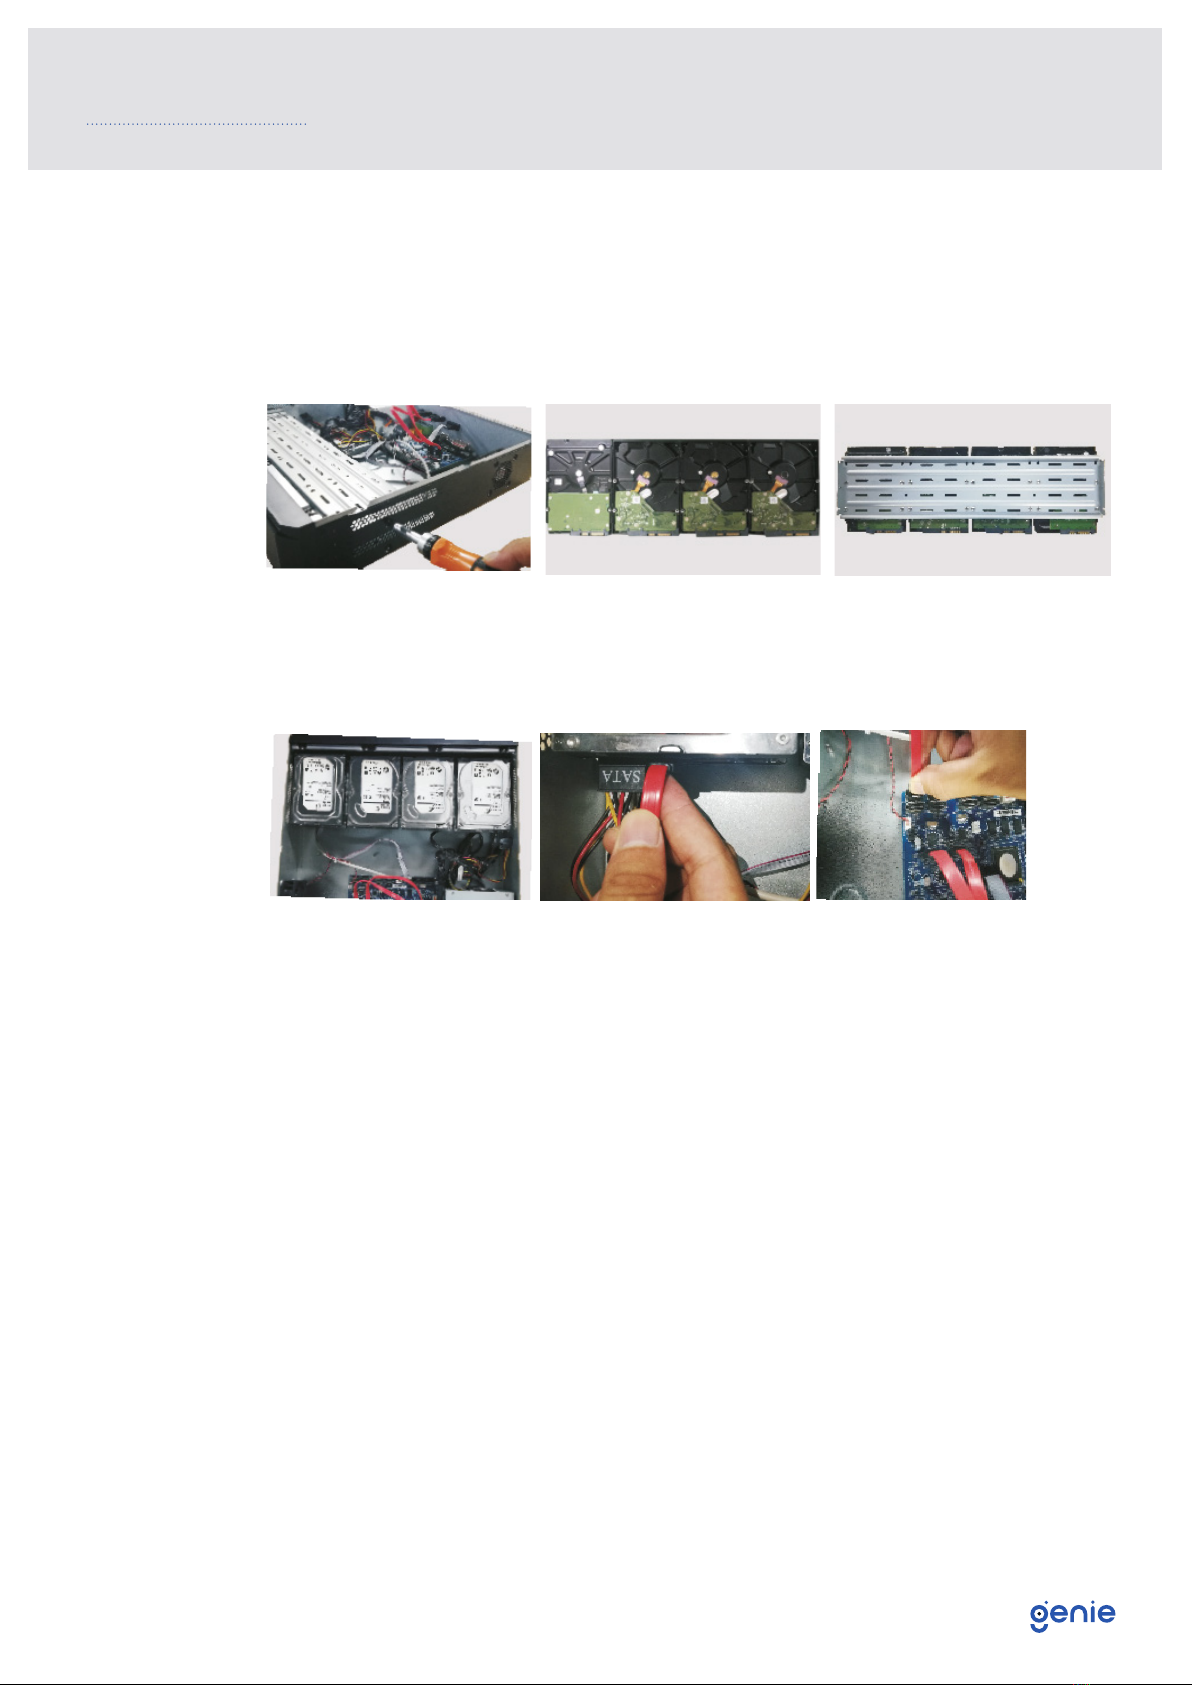
Storage HDD SATA×8, up to 8TB per HDD; E-SATA×2
RAID RAID0, RAID1, RAID5, RAID6, RAID10
Remote
Monitoring
Immix Compatible with Immix via RTSP only (2-way audio not supported)
Sentinel Yes, Firmware 1.1.0 or later
Others
Fisheye Supports fisheye dewarping via Web Client and mobile App
Plate Recognition Yes
Power Supply ATX 250W
Consumption ≤ 30W (without HDD)
Working Conditions -10~50°C, 10%~90% humidity
Certificate CE, FCC
Environmental Protection Complies with Directive EU RoHS, REACH and WEEE
Dimensions 445 × 436 × 90 mm

6
This series of the product supports 8 SATA hard drives. Please make sure that the device is
powered off before the installation. The pictures of the installation are for reference only.
1. Remove the cover and loosen the screws to take out two mounting bars.
2. Fix the HDDs on the mounting bar.
3. Install the mounting bar with HDDs back to the device (It is recommended to install the
copper-pillar provided incase the HDDs are damaged by external force).
4. Connect the power and data cables.
5. Install back the cover and secure it with the screws.
Note: Please check the inside structure of the device and make sure that the cables are
connected well before installing the cover back. Please format the HDD before using.
2.0 HDD Installation

7
The interfaces of the rear panel are for reference only.
3.0 Rear Panel Instruction
Name Description
VGA Connect to monitor
HDMI Connect to high definition display
device
LAN Network port
USB Connect to USB storage device or USB
mouse
ALARM IN Alarm input for connecting sensor
ALARM OUT Relay output, connect to external
alarm
GND Ground
P/Z Connect to speed dome. Y is TX+,Z is
TX-
K/B Connect to keyboard. A is TX+,B is TX-
AUDIO OUT Audio output
AUDIO IN Audio input
e-SATA Connect to HDD with e-SATA interface

8
Startup
1. Connect the monitor and the power.
2. The device will boot and the power indicator will display blue.
3. A wizard window will pop up.
Shutdown
Click “Start” and then select “Shutdown” icon. This will bring up a shutdown window. The
device will shut down by clicking “OK” button. Then disconnect the power.
4.0 Start Up and Shut Down

9
The default username is admin and the default password is 123456. You must configure the
wizard if you start the NVR for the first time and you may change the password when you
configure the wizard for the first time. You can skip the settings wizard next time.
Click “Start” and select “Login”. This will take you to see a login box. Enter the default
username and password you set. Then you will see the live image.
5.0 Login

10
6.1 Network Configuration & Adding IP Camera
After you finish adding IP cameras, you can see the live images through the monitor of the
NVR. The following will mainly introduce how to add the IP cameras via LAN/WAN.
LAN
1. Set the network of the NVR. Go to Start → Settings → Network → TCP/IP. Enter IP
address, subnet mask, gateway, etc. If using DHCP, please enable DHCP in both the
NVR and the router.
2. Go to Start → Settings → Network → Port. Enter HTTP port (the default value is 80),
server port (the default port is 6036).
3. Go to Start → Settings → Camera → Add Camera. The NVR will automatically refresh the
cameras searched. The IPC which supports the Onvif protocol may be added manually.
If the IPC searched is not in the same local network as the NVR, you should select the
device and click to modify the IP address.
6.0 Configurations and Connections

Quick Start Guide 64 Channel H.265 12MP NVR with 8x HDD Bays
11
4. Checkmark the device you want to add and then click “Add” button. The NVR will
automatically refresh the cameras and return to “Edit Camera” interface. “Online” status
means connecting the device successfully and you will see the live image. You may
select the added device and click button to modify channel, IP address, etc.
WAN
1. Set the network of the NVR. Go to Start → Settings → Network → PPPoE. Enter static IP
address or enable PPPoE and then enter the user name and password received from
your ISP.
2. Go to Start → Settings → Camera. Click “Add Camera” or behind the column of the
search camera and select “Manually Add” to add the IP cameras. Enter IP address,
server port, username and password of the IP camera. The IP camera must be
connected over WAN. And here the IP address of the IP camera must be a WAN IP
address.

12
You can use the UPnP function to enable the fast connection of the device to WAN via a
router without port mapping.
1. Go to Start → Settings → Network → UPnP, and enable UPnP and then click “Apply”
button to save.
2. Enable the UPnP function in the router.
3. Click “Refresh” button to refresh the UPnP status. If the UPnP status were still “Invalid
UPnP” after refreshing it for several times, the port would be wrong. Please change the
mapping type to “Manual” and then click to modify the port until the UPnP status
turns to “valid UPnP”.
7.0 UPnP

13
NAT Settings
1. The NVR shall be powered on and connected to the network.
2. Go to Start → Settings → Network → TCP/IP. You can obtain the IP address, subnet mask
and gateway automatically. You can also manually enter them according to the actual
network situation. Please make sure the network segment is the same as that of the
network which is used.
3. Set the preferred or alternative DNS Server. Click “Apply” to save the parameters.
4. Go to Start → Settings → Network → NAT tab. Enable NAT and select the NAT Server
Address (The default NAT Server Address is nat.autonat.com). Click “Apply” to save the
parameters.
NAT Access
After finishing the NAT settings, you can enter www.autonat.com in the address bar of
your browser and then press enter to go to the following interface. If you are the first time
to access the NAT, you shall download and install the plug-in according to the tips. After
installing the plug-in successfully, it will pop up the login box.
Device Serial Number:
Click on the menu bar at the bottom of the live interface to check the serial number or
go to Start → Settings → Network → Network Status to check the serial number of the NVR).
Username:
The username of the NVR. The default username is admin.
Password:
The password of the NVR. The password is set by yourself when you configure the wizard
for the first time.
8.0 NAT

14
9.1 Manual Recording
Before recording, please install and format a HDD. In the live interface you can see the
menu toolbar. Click button to start recording. Click it again to stop recording. You can
also click to check the status of the recording.
9.2 Playback
Instant Playback
Click “Instant Playback” in the right-click menu of the camera’s preview window to select
or drag the playback progress bar to change the playback time to play back the record.
General Playback
Click on the tool bar at the bottom of the live preview interface or click
Start → Playback to go to the playback interface as shown below. You can also
add the playback cameras manually. Click in the playback window to pop up the “Add
Camera” window. Check the cameras in the window and then click “Add” to add playback
camera. The record files of the added playback camera
will be played in the playback interface.
9.0 Manual Recording and Playback
Table of contents
Other Genie DVR manuals

Genie
Genie WAHDN241A User manual

Genie
Genie GDVRH-616 User manual

Genie
Genie WNVRN14P5 User manual

Genie
Genie WNVR432P5OAI User manual

Genie
Genie WAHDN281A User manual

Genie
Genie WAHD324H User manual

Genie
Genie WNVR18P5AI User manual

Genie
Genie BDVR-8 User manual

Genie
Genie WAHDN2161A User manual

Genie
Genie EDVR-4 User manual

Genie
Genie WAHD841 User manual

Genie
Genie WNVR416P5AI User manual

Genie
Genie EDVRH-4 User manual

Genie
Genie WNVR432P5AI User manual

Genie
Genie WNVRN216P5 User manual

Genie
Genie 4CH User manual

Genie
Genie WAHD2161A User manual

Genie
Genie WNVRN18P5 User manual

Genie
Genie WNVR832P5AI User manual

Genie
Genie C41W User manual