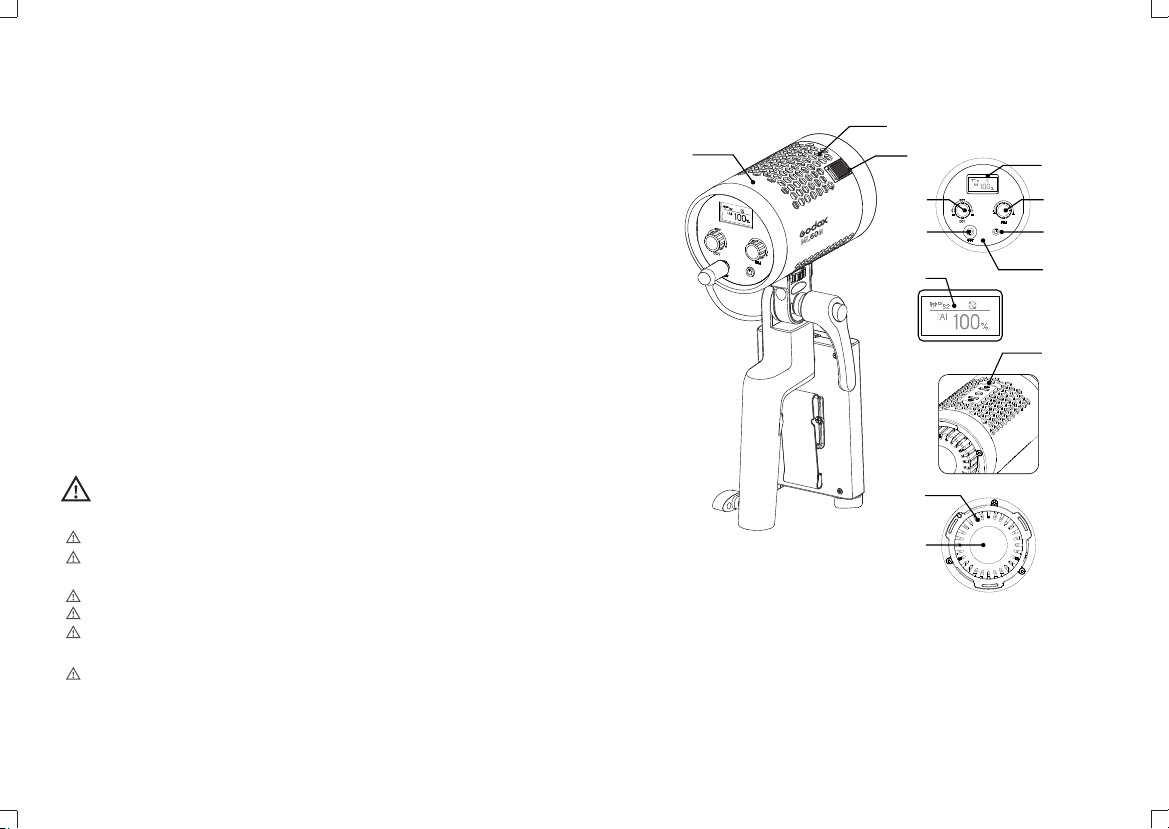
Godox ML60Bi User manual

Instruction Manual
705-ML60BY-00
Made in China
: 2
: 0755-29609320(8062) : 0755-25723423 : godox@godox.com
godox.com
Add: Building 2, Yaochuan Industrial Zone, Tangwei Community, Fuhai Street, Bao’an District,
Shenzhen, China Tel: +86-755-29609320(8062) Fax: +86-755-25723423 E-mail: [email protected]
GODOX Photo Equipment Co., Ltd.
LED
Bi-color LED Video Light
6500K
QCPASS

LEDML60Bi
• LED21
• 0%100%
• 1632
•
•
•
• ,APP/2.4G
•
•
- 01 - - 02 -
01.
02.
03. DC
04.
05. CCT/SET
06. DIM
07.
08.
09.
10.
11. LED
12.
6500K
6500K
6500K

- 03 - - 04 -
•
18.
19.
20.
21. 12
22. /
23.
24.
25.
•
13.
14.
15.
16.
17.
ML60Bi *1 *1 BC60 *1 *1
*1 *1 AC5M *1 DC1.5M *1
DC0.2M *1 *1 *1
100-240V50/60Hz 2A16.8V 4.2A
2NP-F970DC
*1
:
RC-A6
755025

- 05 -
1.
OLED
2. /FX
2.1
2.1.1 CCT/SET
(2800~6500K)100500
2.1.2DIM0%-100%
2.2 721
3. 2.4G
ML60Bi2.4GRC-A6
2.4G163299
IDLED(CH),(GR)ID
LED
2.4GCCT/SETCCT/SET
DIM2.4G
CH: CCT/SETCCT/SETCH,
DIM32(1-32)
GR: CCT/SETCCT/SETGR,
DIM16(A-E,0-9)
ID: CCT/SETCCT/SETID
DIMID, OFF1-99
序号 场景 显示Ⅰ 显示Ⅱ 显示Ⅲ
Fx1
FX2
FX3
FX4
FX5
FX6
FX7
- 06 -
显示
DIMDIM
6500K

- 07 - - 08 -
4.
DIM1
10DIMDIM
5.
CCT/SETDIM
ON OFF
0%~50%
6.
6.1
6.2
6.4 2FP970
6.3
DC
6500K
6500K

10.1CCT/SET,
CCT/SET DIM
(OFF/MAC/Reset)OFF
MAC(:CE8C)
ResetDIM
- 09 - - 10 -
7.
8.
CCT/SET2
2
6500K
10.
10.2 Godox Light
APP(
APP
APP
APP
CE8C
: 2.4G
9.
9.1 LED
9.2 LED
DIM
9.3
Errl

LED
100%(LUX)
CRI
TLCI
2.4G
ML60Bi
16.8V 4.2A
60W
32
16 (A B C D E F0-9)
0%~100%
10100 (1)
96
97
2800 ~ 6500K()
721
APP/2.4G
30
30
-10~40
0.77Kg ()
145*88*88mm ()
*
•
• 1
•
•
•
•
•
:CMIIT ID:2020DP13510
- 11 - - 12 -

6500K
Foreword
Warning
Thank you for purchasing this Godox Product!
This Bi-color LED Video Light ML60Bi is a light that is easy to fill. It has high
brightness, wireless adjustable, and color temperature adjustable functions.
Suitable for almost all shooting occasions e.g. live, camping, make up, portrait
shooting, make up, video, wedding, children photography, etc. It’s portable and easy
to be operated.
Features:
● Freely switch LED bi-color mode and 21 Light effects modes
● 0% to 100% Precisely adjust light brightness
● 16 Groups and 32 channels wireless remote control
● Switch silent mode to light without interference
● Compact and lightweight, easy to be held in hand
● Freely adjust color temperature
● Combined control by smartphone APP/2.4G wireless
Always keep this product dry. Do not use in rain or in damp conditions.
Do not disassemble. Should repairs become necessary, this product must be
sent to an authorized maintenance center.
Keep out of reach of children.
As this product do not have waterproof function, please take measures of
waterproof in rainy or damp environment.
Do not use the flash unit in the presence of flammable gases, chemicals and
other similar materials. In certain circumstance, these materials may be
sensitive to the strong light emitting from this flash unit and fire or
electromagnetic interference may result.
Parts
01. Body
02. Power Switch
03. DC Power Socket
04. Control Panel
05. CCT/SET Select Dial
06. DIM Select Dial
07. Display
08. Thermovent
09. Fixing Socket for Handle
10. Accessory Locking Ring
11. LED Light Beads
12. Radiator
- 13 - - 14 -
6500K
6500K

Light Body ML60Bi
*1
Handle *1 Battery Case
BC60 *1
Adapter *1
Reflector *1 Protect Cover *1 5m AC Power Cable
*1
1.5m DC Power Cable
*1
0.2m DC Power Cable *1 Portable Bag *1 Instruction Manual *1
● Handle
13. Handle Bracket
14. Direction Adjusting Ring
15. Fixing Screw for Light Head
16. Fixing Screw for Light Stand
17. Fixing Buckle for Battery Case
● Battery Case
18. Clip
19. Fixing Hole for Battery Case
20. Locking Ring for Battery Case
21. Battery Compartment 1 and 2
22. Battery Level Display Button/
Battery Locking Ring
23. Battery Level Indicator
24. Battery Case Leg
25. Battery Power Output Port
Power Management
1. Power Supply
Adapter power supply: input: 100-240V~50/60Hz 2A, output: 16.8V 4.2A.
External battery power supply: install two NP-F970 batteries into the battery
compartment. Then, use DC power line to connect the battery case with the light
body to achieve power supply.
The battery case can only offer battery discharging instead of charging. When powered
by battery box, two batteries shall be used simultaneously. Please do not use one
battery individually.
What's in the Box
Adapter Holder *1
RC-A6 remote control
Optional Accessory
- 15 - - 16 -

Operation
1. Power On
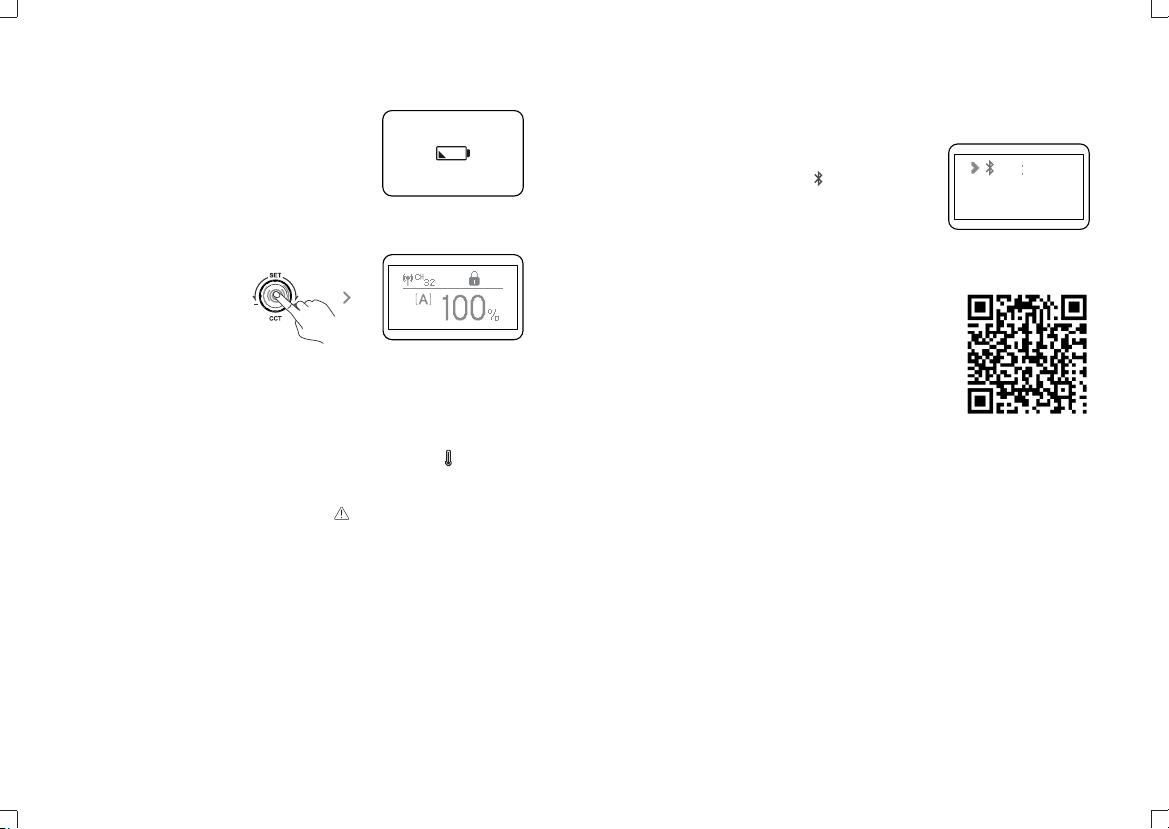
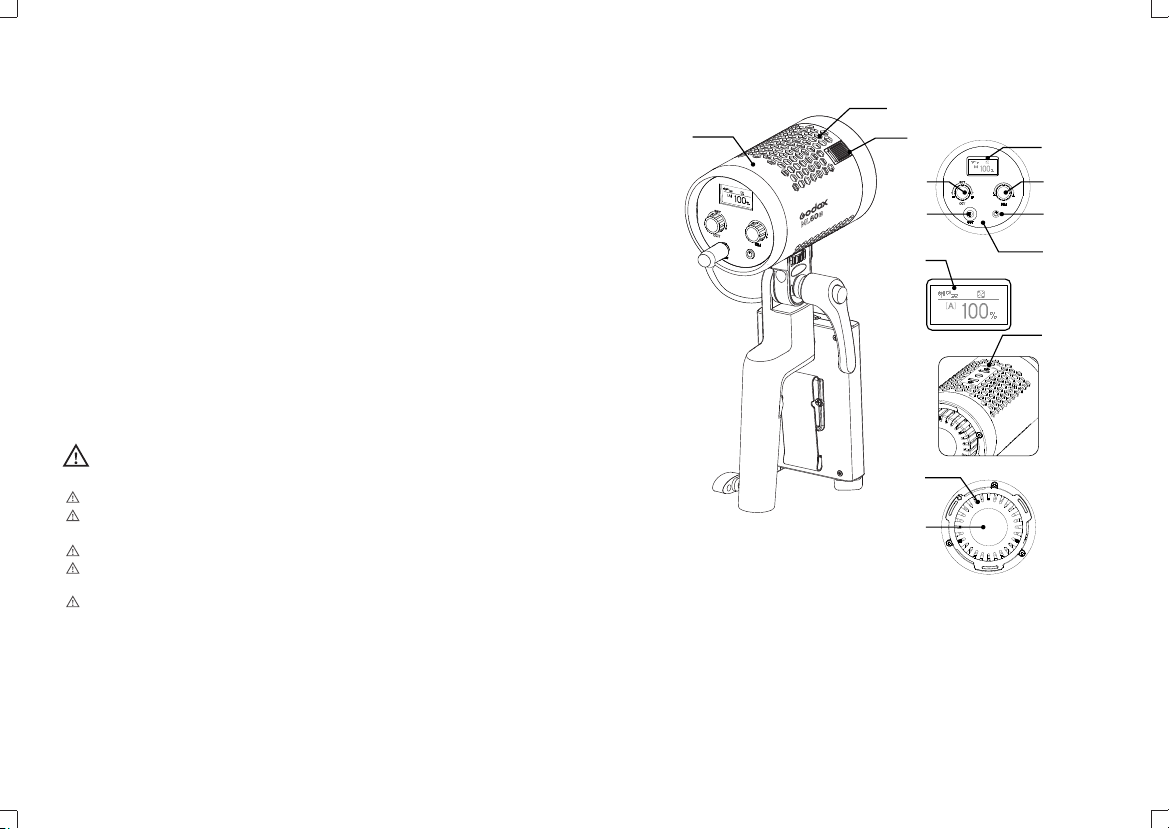
Press the power switch to control the on/off of the light, and the OLED display will
show the current information.
3. 2.4G Wireless setting
ML60Bi has 2.4G wireless receiving function, and the remote control RC-A6 can
be purchased separately for wireless remote control. Using 2.4G wireless
technology function, it can control 16 Groups, 32 channels, and 99 wireless IDs at
the same time, with strong anti-interference.
Note: Before use, please set the channel (CH), group (GR) and ID of the remote control
and the LED light to be the same. The LED light can only receive wireless signals when
it is turned on.
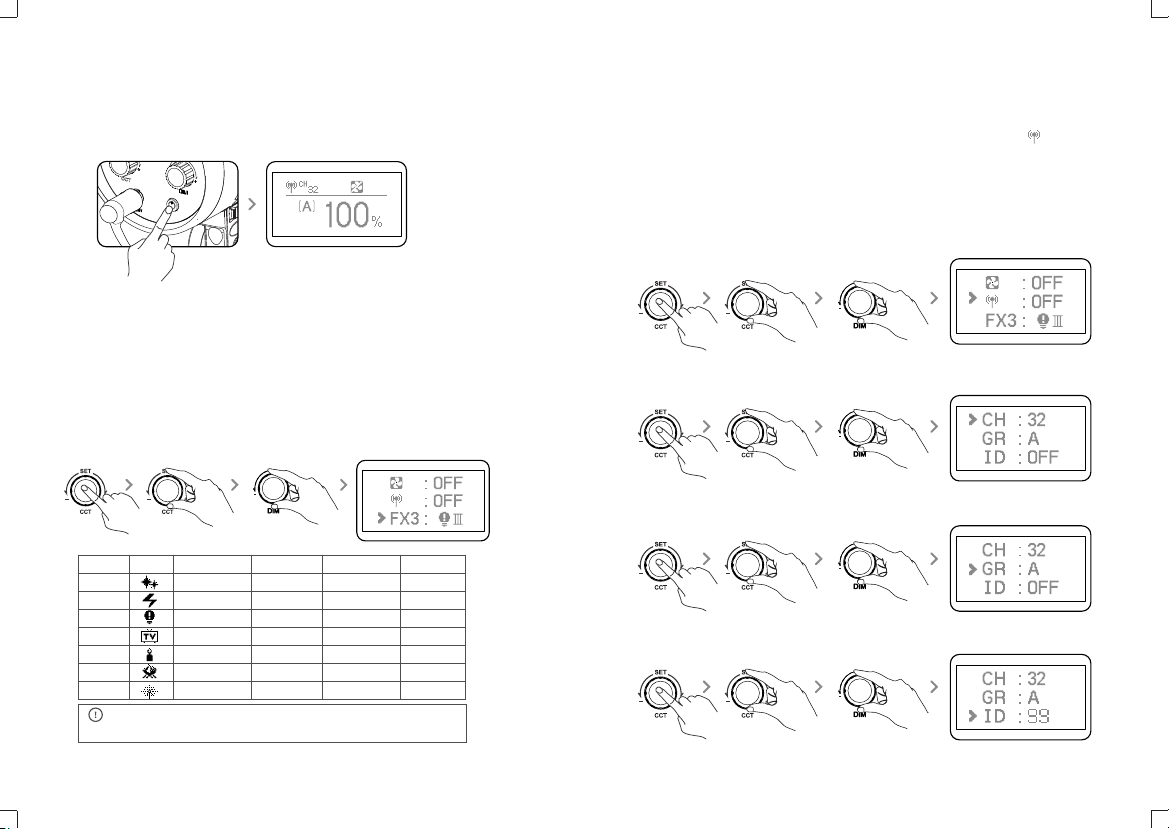
Turn on/off 2.4G wireless: press CCT/SET button to enter the menu. Turn the
CCT/SET select dial until the wireless icon is displayed. Then, turn the DIM select
dial to turn on or off 2.4G wireless.
Channel CH Setting: press CCT/SET button to enter the menu. Turn the
CCT/SET select dial until the CH is displayed. Then, turn the DIM select dial to
choose channel from 1 to 32.
Group GR Setting: press CCT/SET button to enter the menu. Turn the CCT/SET
select dial until the GR is displayed. Then, turn the DIM select dial to choose
group from A to E and 0 to 9.
ID setting: press CCT/SET button to enter the menu. Turn the CCT/SET select
dial until the ID is displayed. Then, turn the DIM select dial to choose 99 IDs from
1 to 99.
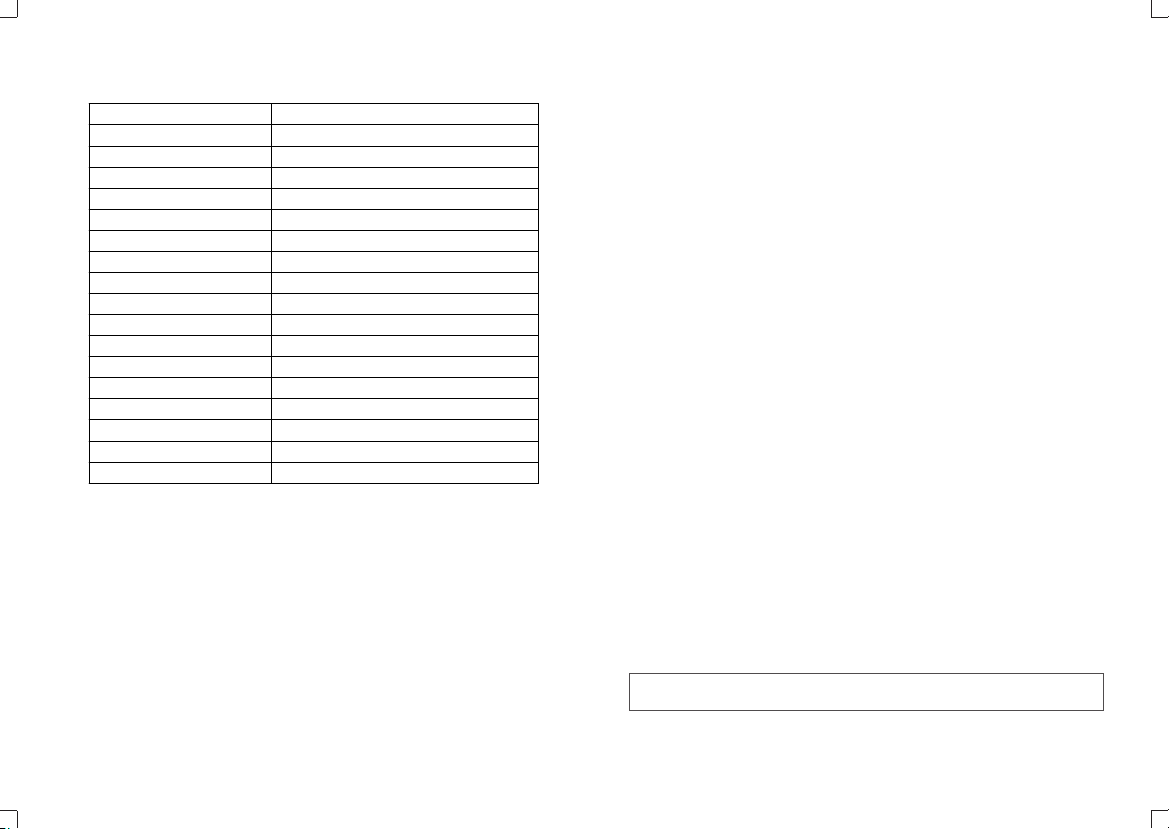
Special Effects Situation Display
Fx1
FX2
FX3
FX4
FX5
FX6
FX7
Flash
Discontinuous
Discontinuous
Slow speed
Intermittently
Wood fire
Short
Press conference
Frequent
Frequent
Medium speed
Frequent
Bonfire
Continuous
Paparazzi
Continuous
Continuous
Quick speed
Continuous
Fire
Performance
Display IIIDisplay II
Flash
lightning
Broken bulb
TV
Candle
Fire
Fireworks
2.2 Light effect mode:There are seven types and 21 kinds of light effect modes.
Color temperature mode: the main interface is the color temperature mode
2.1.1 Color temperature adjustment: Rotate the CCT/SET knob on the main
interface to adjust the color temperature (2800~6500K). Normally rotate 100 unit
values, and quickly rotate 500 unit values.
2.1.2 Brightness Adjustment: Select the DIM dial to adjust brightness from
0% to 100%.
Display
Tip: Rotate DIM dial to select light efficiency type, and then press DIM dial to realize
speed switching.
- 17 - - 18 -
2. Mode Selection: Bi-color mode/FX Special Effects Mode
6500K

4. Brightness adjustment: Rotate DIM to adjust brightness, normally
rotate 1 unit value, and quickly rotate 10 unit value.
5. Silent mode:
When is displayed, the silent mode is turned on.
Turn on the silent mode: press CCT/SET button to enter the menu. Then, screw
the DIM select dial to turn on or off the fan. Set it to on to enter non-silent mode
while set it to off to enter silent mode. In silent mode, the brightness adjustment
range is from 0% to 50%.
6.2 Detach battery case: push the battery case’
locking ring and push the battery case upwards
to take it out.
6. Install and detach battery case
6.1 Install battery case: Aim the handle’s
fixing buckles into the battery case’s fixing
holes, pull the batter case downwards until
being tightened.
6.3 Connect the battery case with light head:
Insert one end of the power cord into the battery
box and the other end into the DC socket of the
lamp cap.
6.4 Insert two FP970 batteries, and the LED light
can be put into usage.
Note: Press the DIM select dial to
turn off brightness, and then press
dim to restore the brightness of the
last time it was turned off.
- 19 - - 20 -
6500K
6500K

7. Low Battery Indication
When the battery is below one grid, the low battery
indicator will pop out.
8. Locking Function
In power on state, long press the CCT/SET button
for 2 seconds and the locking icon will appear on the
display. Long press the button for 2 seconds again to
unlock.
10. Bluetooth Control
10.1 Press the CCT/SET button to enter the menu,
turn the CCT/SET knob to the Bluetooth symbol ,
turn the DIM knob (OFF/Bluetooth MAC code/Reset
cycle selection), select OFF when the Bluetooth is
turned off; When the Bluetooth MAC code (For
example: CE8C) is selected, Bluetooth is turned on
and the Bluetooth symbol appears on the main
interface; select Reset and then press the DIM button
to perform the Bluetooth reset function.
Note: The first mobile device (mobile phone or tablet) can
directly use the APP to control the light body. When
replacing other mobile devices (mobile phones or tablets),
the lamp body can be connected normally after Bluetooth
reset.
10.2 Scan the QR code to download the "Godox Light"
mobile app. (It can be used on both Android
and Apple systems) (QR code diagram) . For specific
operations, please refer to the "Help" manual of the
mobile APP, which contains detailed tutorials.
6500K
CE8C
Note: The locking function only locks the control panel function,
the 2.4G wireless remote control and Bluetooth control are not affected.
9. High Temperature Alarm Function
9.1 When the LED Light bead temperature is too high, the display screen will
display the high temperature alarm symbol .
9.2 When the LED Light temperature returns to normal, the lamp will automatically
release the alarm. At this time, the DIM dial can be rotated to change the
brightness.
9.3 When the temperature sensor failure symbol appears on the display, it
means that the high temperature alarm function of the machine has failed.
- 21 - - 22 -
Errl

Maintenance
This product, except consumables e.g. charger and charger cable, is
supported with a one-year warranty.
Avoid sudden impacts and the product should be dedusted regularly.
Maintenance of the flash must be performed by our authorized maintenance
department which can provide original accessories.
Unauthorized service will void the warranty.
If the product had failures or was wetted, do not use it until it is repaired by
professionals.
Changes made to the specifications or designs may not be reflected in this
manual.
* Product design and specifications are subject to change without notice.
Technical Data
LED Light
Adapter
Power
Channel
Group
Brightness Adjusting Range
100% Illuminance(LUX)(≈)
CRI(≈)
TLCI(≈)
Color Temperature
Mode
Lighting effcts mode
Control method
2.4G wireless transmission distance
Bluetooth transmission distance
Working Temperature
Weight
Dimension
BT Frequency Range
Max. Transmitting Power
ML60Bi
Output: 16.8V 4.2A
Max. 60W
32
16(A B C D E F,0-9)
0%~100%
10100 (testing distance is 1 meter)
96
97
2800~6500K (without reflector)
Bi-color mode/scene mode
A total of 7 categories and 21 types
Mobile APP/2.4G wireless control
30 meters
30 meters
-10~40℃
0.77Kg (not include handle and reflector)
145*88*88mm (not include handle and reflector)
2402.0-2480.0MHz
5dbm
FCC Statement
This device complies with part 15 of the FCC Rules. Operation is subject to the
following two conditions: (1) This device may not cause harmful interference, and (2)
this device must accept any interference received, including interference that may
cause undesired operation.
Any Changes or modifications not expressly approved by the party responsible for
compliance could void the user's authority to operate the equipment.
Note: This equipment has been tested and found to comply with the limits for a Class
B digital device, pursuant to part 15 of the FCC Rules. These limits are designed to
provide reasonable protection against harmful interference in a residential installation.
This equipment generates uses and can radiate radio frequency energy and, if not
installed and used in accordance with the instructions, may cause harmful interference
to radio communications. However, there is no guarantee that interference will not
occur in a particular installation. If this equipment does cause harmful interference to
radio or television reception, which can be determined by turning the equipment off
and on, the user is encouraged to try to correct the interference by one or more of the
following measures:
- Reorient or relocate the receiving antenna.
- Increase the separation between the equipment and receiver.
- Connect the equipment into an outlet on a circuit different from that to which the
receiver is connected.
- Consult the dealer or an experienced radio/TV technician for help.
The device has been evaluated to meet general RF exposure requirement.
The device can be used in portable exposure condition without restriction.
- 23 - - 24 -

()
()
()
12
3
12
0755-29609320-8062

Warranty
Dear customers, as this warranty card is an important certificate to apply for our
maintenance service, please fill in the following form in coordination with the seller
and safe-keep it. Thank you!
Note: This form shall be sealed by the seller.
Applicable Products
The document applies to the products listed on the Product Maintenance lnformation
(see below for further information). Other products or accessories (e.g. promotional
items, giveaways and additional accessories attached, etc.) are not included in this
warranty scope.
Warranty Period
The warranty period of products and accessories is implemented according to the
relevant Product Maintenance lnformation. The warranty period is calculated from the
day(purchase date) when the product is bought for the first time, And the purchase date
is considered as the date registered on the warranty card when buying the product.
Product
Information
Model Product Code Number
Name Contact Number
Address
Customer
Information
Seller
Information
Note:
Name
Contact Number
Address
Date of Sale
If maintenance service is needed, you can directly contact the product distributor or
authorized service institutions. You can also contact the Godox after-sale service call
and we will offer you service. When applying for maintenance service, you should
provide valid warranty card. If you cannot provide valid warranty card, we may offer you
maintenance service once confirmed that the product or accessory is involved in the
maintenance scope, but that shall not be considered as our obligation.
The guarantee and service offered by this document are not applicable in the following
cases: . The product or accessory has expired its warranty period; . Breakage or
damage caused by inappropriate usage, maintenance or preservation, such as improper
packing, improper usage, improper plugging in/out external equipment, falling off or
squeezing by external force, contacting or exposing to the improper temperature,
solvent, acid, base, flooding and damp environments, etc; . Breakage or damage
caused by non-authorized institution or staff in the process of installation, maintenance,
alternation, addition and detachment; . The original identifying information of product
or accessory is modified, alternated, or removed; . No valid warranty card; .
Breakage or damage caused by using illegally authorized, nonstandard or non-public
released software; . Breakage or damage caused by force majeure or accident; .
Breakage or damage that could not be attributed to the product itself. Once met these
situations above, you should seek solutions from the related responsible parties and
Godox assumes no responsibility. The damage caused by parts, accessories and
software that beyond the warranty period or scope is not included in our maintenance
scope. The normal discoloration, abrasion and consumption are not the breakage within
the maintenance scope.
How to Get the Maintenance Service
Inapplicable Cases
Godox After-sale Service Call 0755-29609320-8062
Maintenance and Service Support Information
The warranty period and service types of products are implemented according to the
following Product Maintenance Information:
Product
Type
Parts
Other Items
Name
Circuit Board
Battery
Electrical parts e.g.battery
charger, power cord, sync cable,
etc.
Flash tube, modeling lamp, lamp
body, lamp cover, lockingdevice,
package, etc.
Maintenance
Period(month)
12
3
12
No
Warranty Service
Type
Customer sends
the product to
designated site
Without warranty
Customer sends
the product to
designated site
Customer sends
the product to
designated site
Other manuals for ML60Bi
1
Table of contents
Other Godox Lighting Equipment manuals

Godox
Godox LC500R User manual

Godox
Godox ML30Bi User manual

Godox
Godox SL Series User manual

Godox
Godox ML60 LED Light User manual

Godox
Godox LED 36 User manual

Godox
Godox SL Series User manual

Godox
Godox AD200 Pro User manual

Godox
Godox LED 64 User manual

Godox
Godox WITSTRO+ AR400 User manual

Godox
Godox SL60II Bi User manual

Godox
Godox LDX50 Bi User manual

Godox
Godox SL150II User manual

Godox
Godox LC500 User manual

Godox
Godox KNOWLED M600 Bi User manual

Godox
Godox SL Series User manual

Godox
Godox 2ABYN004 User manual

Godox
Godox LED1000D II User manual

Godox
Godox SL Series User manual

Godox
Godox VL150 User manual

Godox
Godox Quicker600IIM User manual