Godox ML60 User manual

Instruction Manual
705-ML6000-00
Made in China
: 2
: 0755-29609320(8062) : 0755-25723423 : godox@godox.com
godox.com
Add: Building 2, Yaochuan Industrial Zone, Tangwei Community, Fuhai Street, Bao’an District,
Shenzhen, China Tel: +86-755-29609320(8062) Fax: +86-755-25723423 E-mail: [email protected]
GODOX Photo Equipment Co., Ltd.
LED
LED LIGHT

LEDML60
• LED8
• 0%100%
• 1632
•
•
•
- 01 - - 02 -
01.
02.
03. DC
04.
05. SET
06. DIM
07.
08.
09.
10.
11. LED
12.

- 03 - - 04 -
•
18.
19.
20.
21. NP-F97012
22. /
23.
24.
25.
•
13.
14.
15.
16.
17.
ML60 *1 *1 BC60 *1 *1
*1 *1 AC5M *1 DC1.5M *1
DC0.2M *1 *1 *1 *1
100-240V50/60Hz 2A16.8V 4.2A
2NP-F970
*1
*1
:

- 05 - - 06 -
1.
OLED
2. /FX
SETSETFX,DIM
FXOFF
8F*1FX8
F*1
I
Fx2
II
Fx3
III
Fx4
I
Fx5
II
Fx6
III
Fx7
Fx8
3. 2.4G
2.4GSETSET
DIM2.4G
CH: SETSETCH, DIM
32(1-32)
GR: SETSETGR, DIM
16(A-E,0-9)
ID: SETSETIDDIMID,
99(1-99)ID

- 07 - - 08 -
4.
DIM
5.
SETDIM
ON OFF
6.
6.1
6.2
6.4 2FP970
6.3
DC

LED
100%(LUX)
CRI
TLCI
ML60
16.8V 4.2A
60W
32
16 (A B C D E F0-9)
0%~100%
69000 (0.5)
96
97
-10~40
0.77Kg ()
145*88*88mm ()
*
- 09 - - 10 -
•
• 1
•
•
•
•
•

Foreword
Warning
Thank you for purchasing this Godox Product!
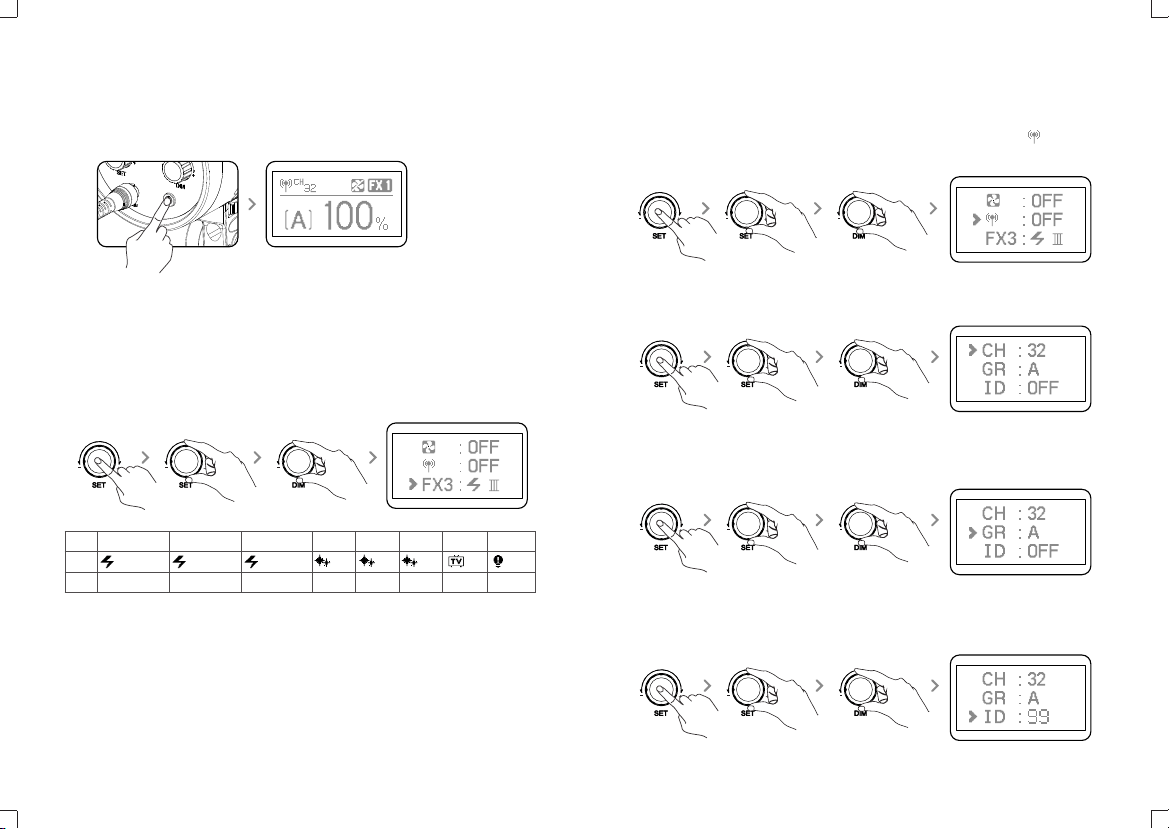
This LED Light ML60 is a continuous light with wireless adjustment and 8 FX
situational special effects. Suitable for almost all shooting occasions e.g. live,
camping, make up, portrait shooting, make up, video, wedding, children photography,
etc. It’s portable and easy to be operated.
Features:
● Freely switch LED continuous light mode and 8 FX situational special effects modes
● 0% to 100% Precisely adjust light brightness
● 16 Groups and 32 channels wireless remote control
● Switch silent mode to light without interference
● Compact and lightweight, easy to be held in hand
Always keep this product dry. Do not use in rain or in damp conditions.
Do not disassemble. Should repairs become necessary, this product must be
sent to an authorized maintenance center.
Keep out of reach of children.
As this product do not have waterproof function, please take measures of
waterproof in rainy or damp environment.
Do not use the flash unit in the presence of flammable gases, chemicals and
other similar materials. In certain circumstance, these materials may be
sensitive to the strong light emitting from this flash unit and fire or
electromagnetic interference may result.
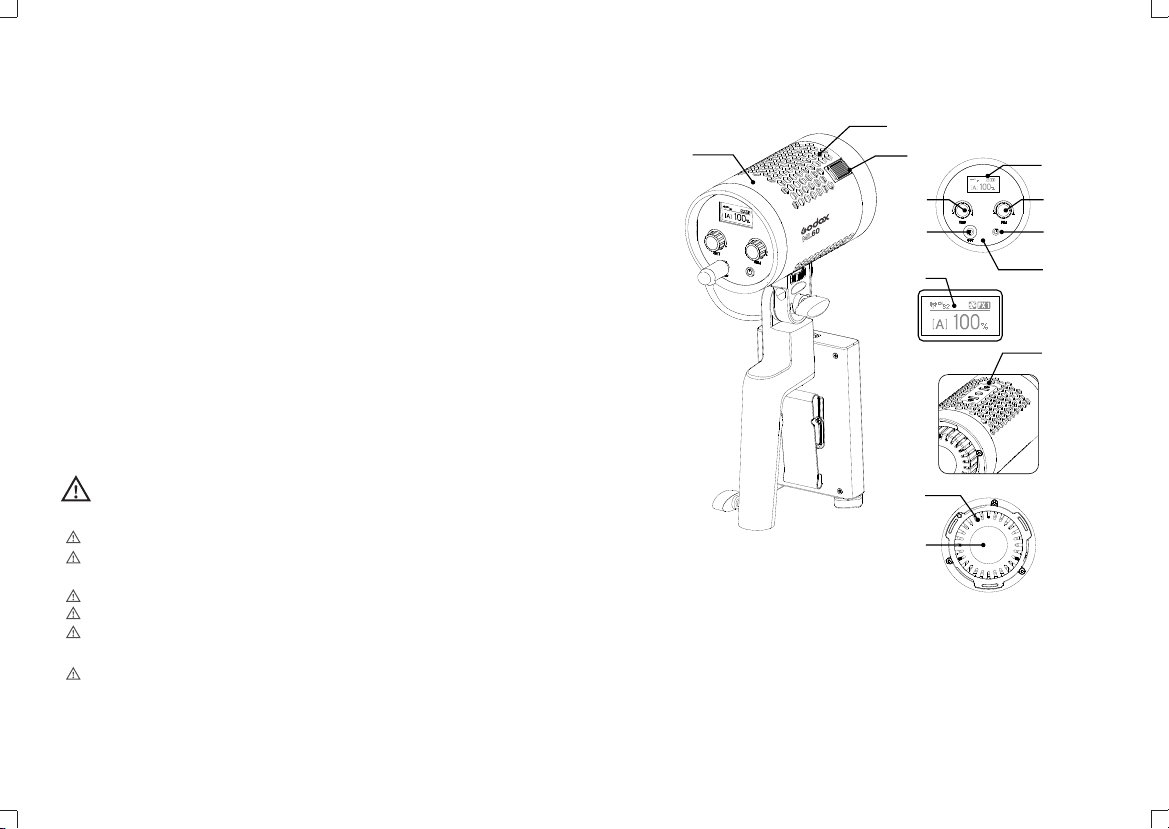
Parts
01. Body
02. Power Switch
03. DC Power Socket
04. Control Panel
05. SET Select Dial
06. DIM Select Dial
07. Display
08. Thermovent
09. Fixing Socket for Handle
10. Accessory Locking Ring
11. LED Light
12. Radiator
- 11 - - 12 -

- 13 - - 14 -
Light Body ML60
*1
Handle *1 Battery Case
BC60 *1
Adapter *1
Reflector *1 Protect Cover *1 5m AC Power Cable
*1
1.5m DC Power Cable
*1
0.2m DC Power Cable *1 Fastener *1 Portable Bag *1 Instruction Manual *1
● Handle
13. Handle Bracket
14. Direction Adjusting Ring
15. Fixing Screw for Light Head
16. Fixing Screw for Light Stand
17. Fixing Buckle for Battery Case
● Battery Case
18. Clip
19. Fixing Hole for Battery Case
20. Locking Ring for Battery Case
21. NP-F970 Battery Compartment 1 and 2
22. Battery Level Display Button/
Battery Locking Ring
23. Battery Level Indicator
24. Battery Case Leg
25. Battery Power Output Port
Power Management
1. Power Supply
Adapter power supply: input: 100-240V~50/60Hz 2A, output: 16.8V 4.2A.
External battery power supply: install two NP-F970 batteries into the battery
compartment. Then, use the power cable to connect the battery case with the light
body to achieve power supply.
The battery case can only offer battery discharging instead of charging.
What's in the Box
Adapter Holder *1
Clip *1

Operation
- 15 - - 16 -
Special Effects
Icon
Situation
F*1
I
Lightning
intervals
Fx2
II
Lightning
frequent
Fx3
III
Lightning
sustainable
Fx4
I
Flash
Fx5
II
Conference
Fx6
III
Paparazzi
Fx7
TV
Fx8
Broken
bulb
1. Power On
Press the power switch to control the on/off of the light, and the OLED display will
show the current information.
2. Mode Selection: Continuous Lighting Mode/FX Special
Effects Mode
Press SET button to enter the menu. The, turn the SET select dial to FX and
screw the DIM select dial to switch the two modes:
Continuous lighting mode: set FX mode to OFF to enter continuous lighting mode.
Special effects mode: there are 8 situational special effects from F*1 to Fx8.
3. 2.4G Wireless Setting
Turn on/off 2.4G wireless: press SET button to enter the menu. Turn the SET
select dial until the wireless icon is displayed. Then, turn the DIM select dial to
turn on or off 2.4G wireless.
Channel CH setting: press SET button to enter the menu. Turn the SET select
dial until the CH is displayed. Then, turn the DIM select dial to choose channel
from 1 to 32.
Group GR setting: press SET button to enter the menu. Turn the SET select dial
until the GR is displayed. Then, turn the DIM select dial to choose group from A to
E and 0 to 9.
ID setting: press SET button to enter the menu. Turn the SET select dial until the
ID is displayed. Then, turn the DIM select dial to choose 99 IDs from 1 to 99.

- 17 - - 18 -
4. Brightness adjustment: turn the DIM select dial to adjust brightness.
5. Silent mode:
when is displayed, the silent mode is turned on.
Turn on the silent mode: press SET button to enter the menu. Then, screw the
DIM select dial to turn on or off the silent mode. Set it to on to enter non-silent
mode while set it to off to enter silent mode.
6.2 Detach battery case: push the battery case’
locking ring and push the battery case upwards
to take it out.
6. Install and detach battery case
6.1 Install battery case: Aim the handle’s
fixing buckles into the battery case’s fixing
holes, pull the batter case downwards until
being tightened.
6.3 Connect the battery case with light head:
insert the one end with clamping buckle of the
power cable into the battery case while another
end into the DC power socket of the light head.
6.4 Insert two FP970 batteries, and the LED light
can be put into usage.

* Product design and specifications are subject to change without notice.
Technical Data
LED Light
Adapter
Power
Channel
Group
Brightness Adjusting Range
100% Illuminance(LUX)(≈)
CRI(≈)
TLCI(≈)
Working Temperature
Weight
Dimension
ML60
Output: 16.8V 4.2A
Max. 60W
32
16(A B C D E F,0-9)
0%~100%
69000 (testing distance is 0.5m)
96
97
-10~40℃
0.77Kg (not include handle and reflector)
145*88*88mm (not include handle and reflector)
- 19 - - 20 -
Maintenance
This product, except consumables e.g. charger and charger cable, is supported
with a one-year warranty.
Avoid sudden impacts and the product should be dedusted regularly.
Maintenance of the flash must be performed by our authorized maintenance
department which can provide original accessories.
Unauthorized service will void the warranty.
If the product had failures or was wetted, do not use it until it is repaired by
professionals.
Changes made to the specifications or designs may not be reflected in this
manual.
FCC Statement
This device complies with part 15 of the FCC Rules. Operation is subject to the
following two conditions: (1) This device may not cause harmful interference, and (2)
this device must accept any interference received, including interference that may
cause undesired operation.
Any Changes or modifications not expressly approved by the party responsible for
compliance could void the user's authority to operate the equipment.
Note: This equipment has been tested and found to comply with the limits for a Class
B digital device, pursuant to part 15 of the FCC Rules. These limits are designed to
provide reasonable protection against harmful interference in a residential installation.
This equipment generates uses and can radiate radio frequency energy and, if not
installed and used in accordance with the instructions, may cause harmful interference
to radio communications. However, there is no guarantee that interference will not
occur in a particular installation. If this equipment does cause harmful interference to
radio or television reception, which can be determined by turning the equipment off
and on, the user is encouraged to try to correct the interference by one or more of the
following measures:
- Reorient or relocate the receiving antenna.
- Increase the separation between the equipment and receiver.
- Connect the equipment into an outlet on a circuit different from that to which the
receiver is connected.
- Consult the dealer or an experienced radio/TV technician for help.
Table of contents
Other Godox Lighting Equipment manuals

Godox
Godox SL Series User manual

Godox
Godox ML60Bi User manual

Godox
Godox SL150II User manual

Godox
Godox KNOWLED M600 Bi User manual

Godox
Godox UL150II User manual

Godox
Godox ML60Bi User manual

Godox
Godox KNOWLED AT200Bi User manual

Godox
Godox Quicker600IIM User manual

Godox
Godox SL Series User manual

Godox
Godox Knowled M300Bi User manual