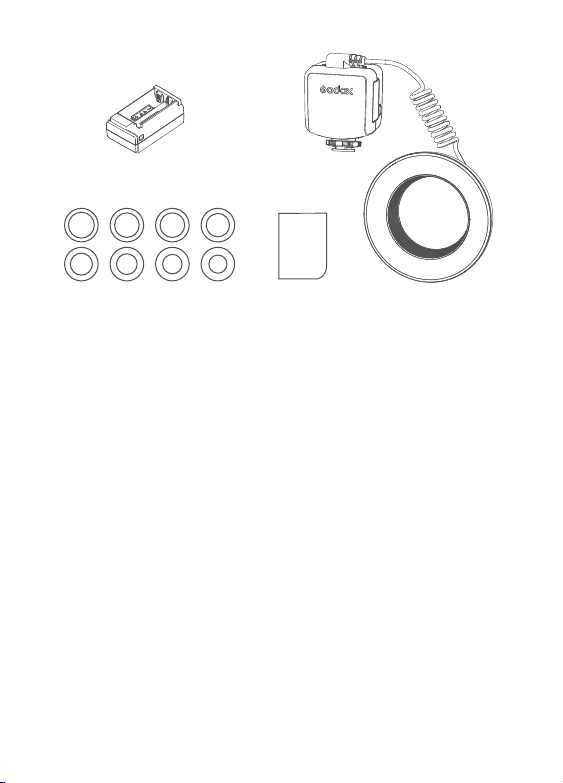
Ring Light *1
Controller *1AA Battery Case *1
Adapter Rings (eight different lens diameters:
49mm, 52mm, 55mm, 58mm, 62mm,
67mm, 72mm, 77mm)
Instruction
Manual *1
Types of power supply
2 types power supply following for this macro LED ring light:
• 4 pieces size-AA large capacity alkaline batteries or 4 rechargeable Ni-MH batteries.
• 7.2V/2600mAh lithium battery supports 450 times of repeated charging and
discharging, and has a long using life span.
* Note:Batteries are sold separately and you can purchase it from us Godox. 2 types
Godox lithium battery(7.2V/2600mAh or 7.2V/3200mAh) following can be applied to this
Ring 72.
• Godox lithium battery VB26(shared with Godox TTL Li-ion Round Head Camera Flash V1).
• Godox lithium battery WB100(shared with Godox Pocket Flash AD100Pro).
What's in the Box
Precautions for using AA alkaline batteries
1. Keep the batteries connection clean and dry to maintain good contacts.
2. Use a new set of four batteries of the same brand. When replacing the batteries,
replacing all four at one time.
3. Do not disassemble or short-circuit the batteries. And do not put aside or into fire or
water.
4. Take the batteries out from the battery slot, if the light is not used for a long time.
- 11 - - 12 -
Precautions for using lithium battery
1. Avoid short-circuiting the positive and negative poles.
2. As the batteries do not have waterproof function, please take measures of
waterproof in rainy or damp environment.
3. Keep the product out of reach of children.
4. No over 24 hours' continuous charging.
5. Store in dry, cool, ventilated places.
6. Do not put the battery aside or into the fire.
7. Dead batteries should be disposed according to local regulations.
8. Please charge the battery to approx. 60% before being placed for long time.
9. If the battery had ceased using for over 3 months, please make a full recharge.
10. It's normal that the battery will be degraded after a period's usage for the
battery life limitation.
Installation tutorial
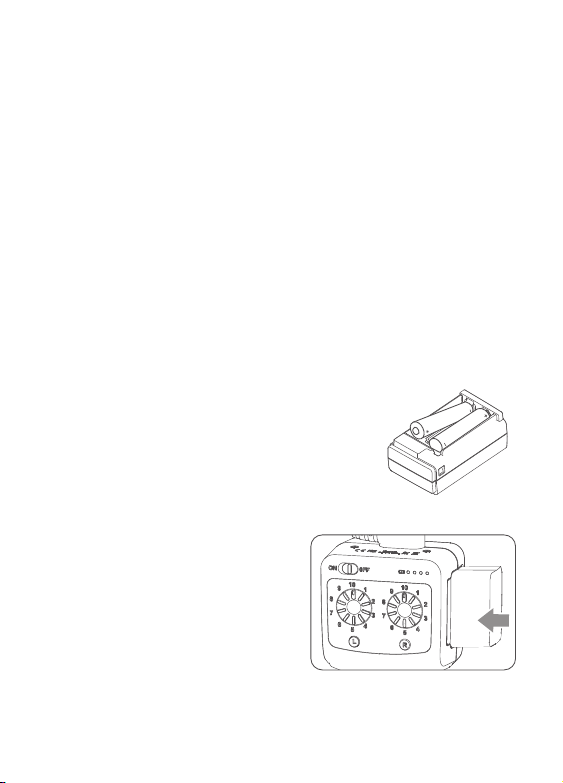
Install the battery
1.1 Use AA alkaline batteries or rechargeable Ni-MH
batteries
1.1.1 Put 4 pieces batteries into the battery case.
1.1.2 Align the battery case with the battery
compartment, and insert the battery case into the
battery compartment until the it be locked with a click
sound.
1.2. Use lithium battery(Lithium battery is
not included and you can purchase it
separately)
1.2.1 Align the battery with the battery
compartment, and insert the battery into
the battery compartment until the it be
locked with a click sound.