Goodmans CDMP3527K User manual

WARNING
4. The unit employs a laser. The use of
controls or adjustments or performance of
procedures other than those specified
herein may result in exposure to
hazardous radiation.
1. To prevent fire or shock hazard, do not
expose the unit to rain or moisture.
2. To avoid electrical shock, do not open the
cabinet. Refer servicing to qualified
personnel only.
3. Do not put anything in the safety slot. If you
do, the laser diode will be ON when the lid
is still opened.
IMPORTANT NOTES
1. In order to maximize battery life and provide optimum playing time this product
incorporates an Auto Power Off function.
The power to the player will automatically switch off approximately 30 seconds after a disc
has finished playing .
2. The ESP function is automatically engaged when playback starts. For more information,
see section 8 of these instructions.
Instruction Manual
MP3 Compact Disc Player
Programme Play .................................Up to 20 memories for CD
Line output ..........................................0.6V RMS
Earphone output ................................. 20mW
Power requirement ............................. DC 4.5V external and battery 3V
("AA" Cell x 2) (IEC R6, JIS SUM-3
or Ni-Cd rechargeable battery)
Dimension
Weight ................................................228g not including battery (Main Unit)
and 64 memories for MP3
154.5(W) x 25(H) x 141(D)mm...........................................Appro.
For improvement purposes, specification and design are subject to change without notice.
Goodmans Product Information Helpline 0870 873 0080
Helpline No.: 0870 873 0080
CDMP3527K
Anti-Shock

Power Sources Normal Batteries/AC Adaptor..... 1
Charging and Use of Rechargeable Batteries..... 2
Earphone and Hi-Fi Connection......................... 3
Player Maintenance........................................... 4
Disc Cleaning and Troubleshooting Guide.......... 5
Location of Controls............................................. 6
Anti-shock Function.............................................8
CD/MP3-CD Playback Section.............................9
Bass Boost.........................................................10
............................................................... 7
Product Specifications....................................... 11
Important Notes..................................................12
Icons & Their Description in the LCD Display
Window
TABLE OF CONTENTS SAFETY PRECAUTIONS
1. As the laser beam used in this compact
disc player is harmful to the eyes, do not
attempt to disassemble the casing.
2. Stop operation immediately if any liquid or
solid object should fall into the cabinet.
Unplug the unit and have it checked by
qualified personnel.
3. Do not touch the lens or poke at it. If you do,
you may damage the lens and the player
may not operate properly.
4. Do not put anything in the safety slot. If you
do, the laser diode will be ON when the lid
is still opened.
5. The unit employs a laser. The use of
controls or adjustments or performance of
procedures other than those specified
herein may result in exposure to
hazardous radiation.
1. POWER SOURCES NORMAL BATTERIES/AC ADAPTOR
1. Open the battery compartment cover and
insert two "AA" alkaline batteries inside the
battery compartment.
2. Close the battery compartment cover.
Be sure to observe
the proper polarity (the "+" and "-" signs) as
indicated inside the battery compartment.
1. Insert the DC plug at the end of the AC
adaptor (not included) cord into the DC
input socket at the rear of the unit.
2. Plug the AC adaptor (not included) into a
230V AC power outlet socket.
If the AC plug of this unit does not fit in
your AC outlet, a plug adaptor (not included)
should be used.
Consult your local dealer on the type of plug
adaptor required.
Note
Battery Power Operation AC Operation
WARNING
ENSURE THAT THE BATTERY
RECHARGE SWITCH IS OFF WHEN
USING THE AC ADAPTOR WITH NON
RECHARGEABLE BATTERIES
INSTALLED.
Average Playing
Time (Continuous
Play)
Battery Type
Alkaline MN
1500, LR 6 or
Equivalent
Ni-CAD
rechargeable
(min.
specification
recommended
1.2V - 650mA)
Note: Zinc/Carbon, or Zinc/Chloride type
batteries are not recommended for this unit
as their use will result in extremely short
playing times.
Normal
Play Mode
Anti-Shock
Mode
10 Hours
8 Hours Approx.9
Hours
Approx.12
Hours

<Listening with the earphone
Caution
Connect the plug of the stereo earphones
(included) or headphones (not included)
into the PHONES (GREEN) socket.
Avoid excessive volume levels and
listening to sound for a long period of time
when using headphone.
<Connecting to component audio
systems
Note
Connect a stereo connection cable (not
included) into the LINE OUT (BLACK)
socket of the unit and the CD/AUX input of
an audio system.
Always switch the power off before
making any connections between the player
and another unit.
3. EARPHONE AND HI-FI CONNECTION
TO CD / LINE
INPUT
This unit can fully recharge the specified rechargeable batteries, in approximately 15 hours. The
rechargeable batteries (NOT supplied) should be recharged before they are used for the first time
because they are low in power or they have not been used for a long period (over 60 days)
1. Open the battery compartment cover and insert
two of the recommended rechargeable batteries,
matching polarity. (1.2V 650mA)
2. Plug in the AC adaptor (not included) and set the Charge switch to ON position to start charging.
The CHARGE indicator will illuminate.
3. After 15 hours, please unplug the AC adaptor and switch the Charge switch to the OFF position.
you may play DISC while charging the batteries.
DO NOT CHARGE CONTINUOUSLY FOR 24 HOURS OR MORE. DOING SO CAN CAUSE
THE PERFORMANCE OF THE RECHARGEABLE BATTERIES TO DETERIORATE.
Note
4. If the operating time decreases drastically even when the rechargeable nickel-cadmium batteries
are properly recharged, purchase a new set of rechargeable nickel-cadmium batteries.
5. When charging for the first time or after a long time, playing time may be reduced. In this
case, charge and discharge the batteries several times.
ALL BATTERIES MUST BE OF
RECHARGEABLE NICKEL-CADMIUM / NI-MH
TYPE, OTHERWISE THE BATTERIES MAY
EXPLODE OR LEAK.
Charging Rechargeable batteries
The charging current for this player is 120mA and has been optimised for over night
charging of NI-MH batteries. NI CAD batteries can still be charged in this player but please
note due to their lower capacity the charging time will need to be reduced.
2. CHARGING AND USE OF RECHARGEABLE BATTERIES
Rechargeable Battery Operation
TO LINE OUT
<Adjust Volume to the desired level.
TO PHONES
CHARGE SWITCH

5. DISC CLEANING AND TROUBLESHOOTING GUIDE
Cleaning the Disc
Note
When a disc becomes dirty, clean it with a cleaning cloth. Wipe the disc from the centre out.
Do not use solvents such as benzine petrol, thinner, commercially available cleaners or anti-static
spray intended for analogue discs.
Should you experience difficulties in the use of this player please refer to the following chart before
contacting your dealer or the place of purchase.
Troubleshooting Guide
Disc may be inserted upside down
Disc not mounted correctly on chuck
Dirty or defective disc
Dirty pick up lens
Player lid not closed
Moisture/condensation. allow player to warm up to
room temperature for 60 minutes.
AC Power to adaptor switched off
Weak batteries
Auto Power off has occurred.
Earphone plug is not firmly inserted into the Green
Phones socket
Earphones have been inserted into the Black line
output socket
Connection is incorrect
Power to external amplifier not switched on
No sound when played
through an external amplifier
No sound from Earphones
Player fails to function
Problem Points to Check
Intermittent Sound Dirty or defective disc
Dirty pick up lens
Player is subject to excessive vibration or shock
Low battery power
Poor Earphone connection
ESP not selected
4. PLAYER MAINTENANCE
Wipe with a soft cloth. If the cabinet is very dirty, dampen the cloth with a weak solution of neutral
detergent and water, and then wipe clean.
A dirty lens will cause sound skipping and, if the lens is very dirty, the CD may not work. Open the
disc cover and clean the lens as follows:
Using a camera lens brush/blower, blow on the lens couple times, then wipe it lightly with the
brush to remove dust. Then, blow on the lens once more.
If the lens cannot be cleaned by using a brush/blower, use a dry cotton swab.
Dust or Dry Particles
Finger prints
Cleaning the Cabinet
Cleaning the lens

6. LOCATION OF CONTROLS
1. LCD
2. CD DOOR OPEN BUTTON
3. CD MODE BUTTON
4. PROGRAM BUTTON
5. ALBUM/ESP BUTTON
6. LINE OUT SOCKET
7. VOLUME CONTROL
8. CD PLAY/PAUSE BUTTON
9. CHARGE INDICATOR
10. CD DOOR
11. CD STOP BUTTON
12. CD SKIP/SEARCH BACKWARD
BUTTON
13. CD SKIP/SEARCH FORWARD
BUTTON
14. EARPHONES SOCKET
15. DC INPUT SOCKET
16. BATTERY LID
17. BASS BOOST SWITCH
18. CHARGE SWITCH
1. "CD-RW" shows when the disc played is a Rewritable disc
2. "PROG" shows during the programming process and programmed playback.
3. "REPT" shows during the various repeat playback modes.
4. "DIR" shows together with "REPT" when the unit is repeating the current album of an
Mp3 disc .
5. "ALL" shows together with "REPT" when the unit is repeating all tracks on the disc.
6. The icon " " shows when the batteries are flat.
7. "MP3" shows when the disc played is an Mp3 disc.
8. "RND" shows when the unit is in Random playback mode.
9. "INTRO" shows when the unit is in Intro-Scan mode.
10. "ESP" is shown when the Electronic Shock Protection is activated.
11. This unit can only read upto 126 Folders (albums). If a disc is inserted with more that
126 folders (albums) only the first 126 folders (albums) will be heard and the remain
folders will not be played.
12. The current Album number.
13. Current Track number.
14. Elapsed minutes of the current track.
15. Elapsed seconds of the current track.
1114
18
17
16
12
1315
10
12
3
4
5
6
79
8
7. ICONS & THEIR DESCRIPTION IN THE LCD DISPLAY WINDOW

This unit is equipped with an electronic device
that prevents sound interruptions when the unit
suffers sudden shocks or vibrations during
playback. This function is activated automatically
when playback begins and the ESP icon will
flash in the display during CD play until the buffer
is full and is always steady on (not flashing)
during MP3 playback
1. When the ESP is used, power consumption
doubles.
2. Press ESP button to cancel ESP mode during
CD playback or in CD stop mode .
3. ESP function is automatically on in MP3-CD
playback and cannot be cancelled.
Note:
8. ANTI-SHOCK FUNCTION
9. CD/MP3-CD PLAYBACK SECTION
PLAYBACK
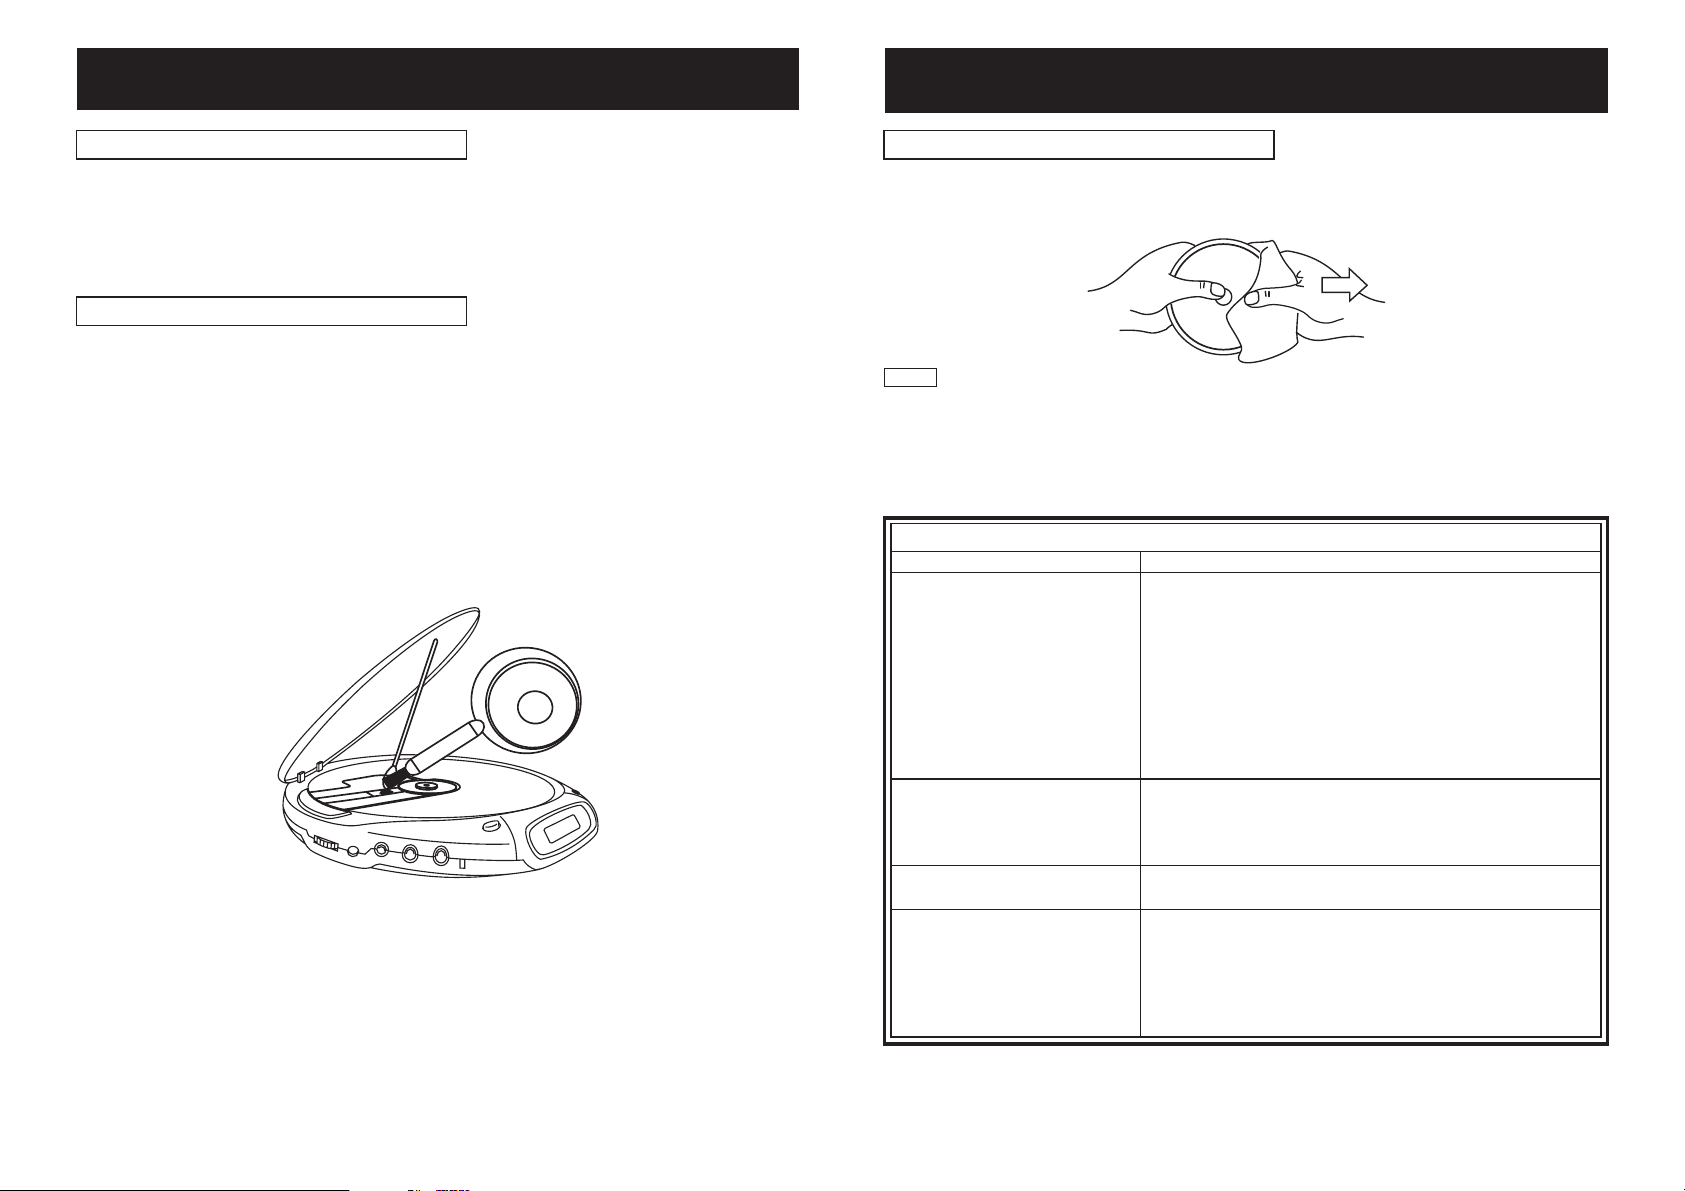
1. Open the CD compartment by pressing the
CD DOOR OPEN BUTTON, insert the disc
with the printed side up and close the door
pressing lightly.
2. Press the CD PLAY/PAUSE BUTTON to start
play.
3. Playback will begin and the display will show
the number of the track playing (for MP3
playback the album number will be shown
instead of Cd on the display).
4. Adjust the volume using the VOLUME
CONTROL.
5. Press the CD PLAY/PAUSE BUTTON again
to pause playback and the part of elapsing
time in the display will flash.
6. Press the CD PLAY/PAUSE BUTTON again
to resume playback.
7. Press the CD STOP BUTTON to stop the
playback.
CD PLAYBACK
MP3 PLAYBACK
ESP/ALBUM
TRACK SKIP
Press the CD SKIP/ SEARCH FORWARD
BUTTON while listening to skip to the next track.
Press the CD SKIP/ SEARCH BACKWARD
BUTTON once to return to the beginning of the
current track. To skip to the previous track press
the CD SKIP/SEARCH BUTTON again quickly.
SKIP
SEARCH
1. Press and hold the CD SKIP/ SEARCH
FORWARD BUTTON OR CD SKIP/ SEARCH
BACKWARD BUTTON while listening to
search quickly for a particular musical
passage.
2. Release the button for normal playback.
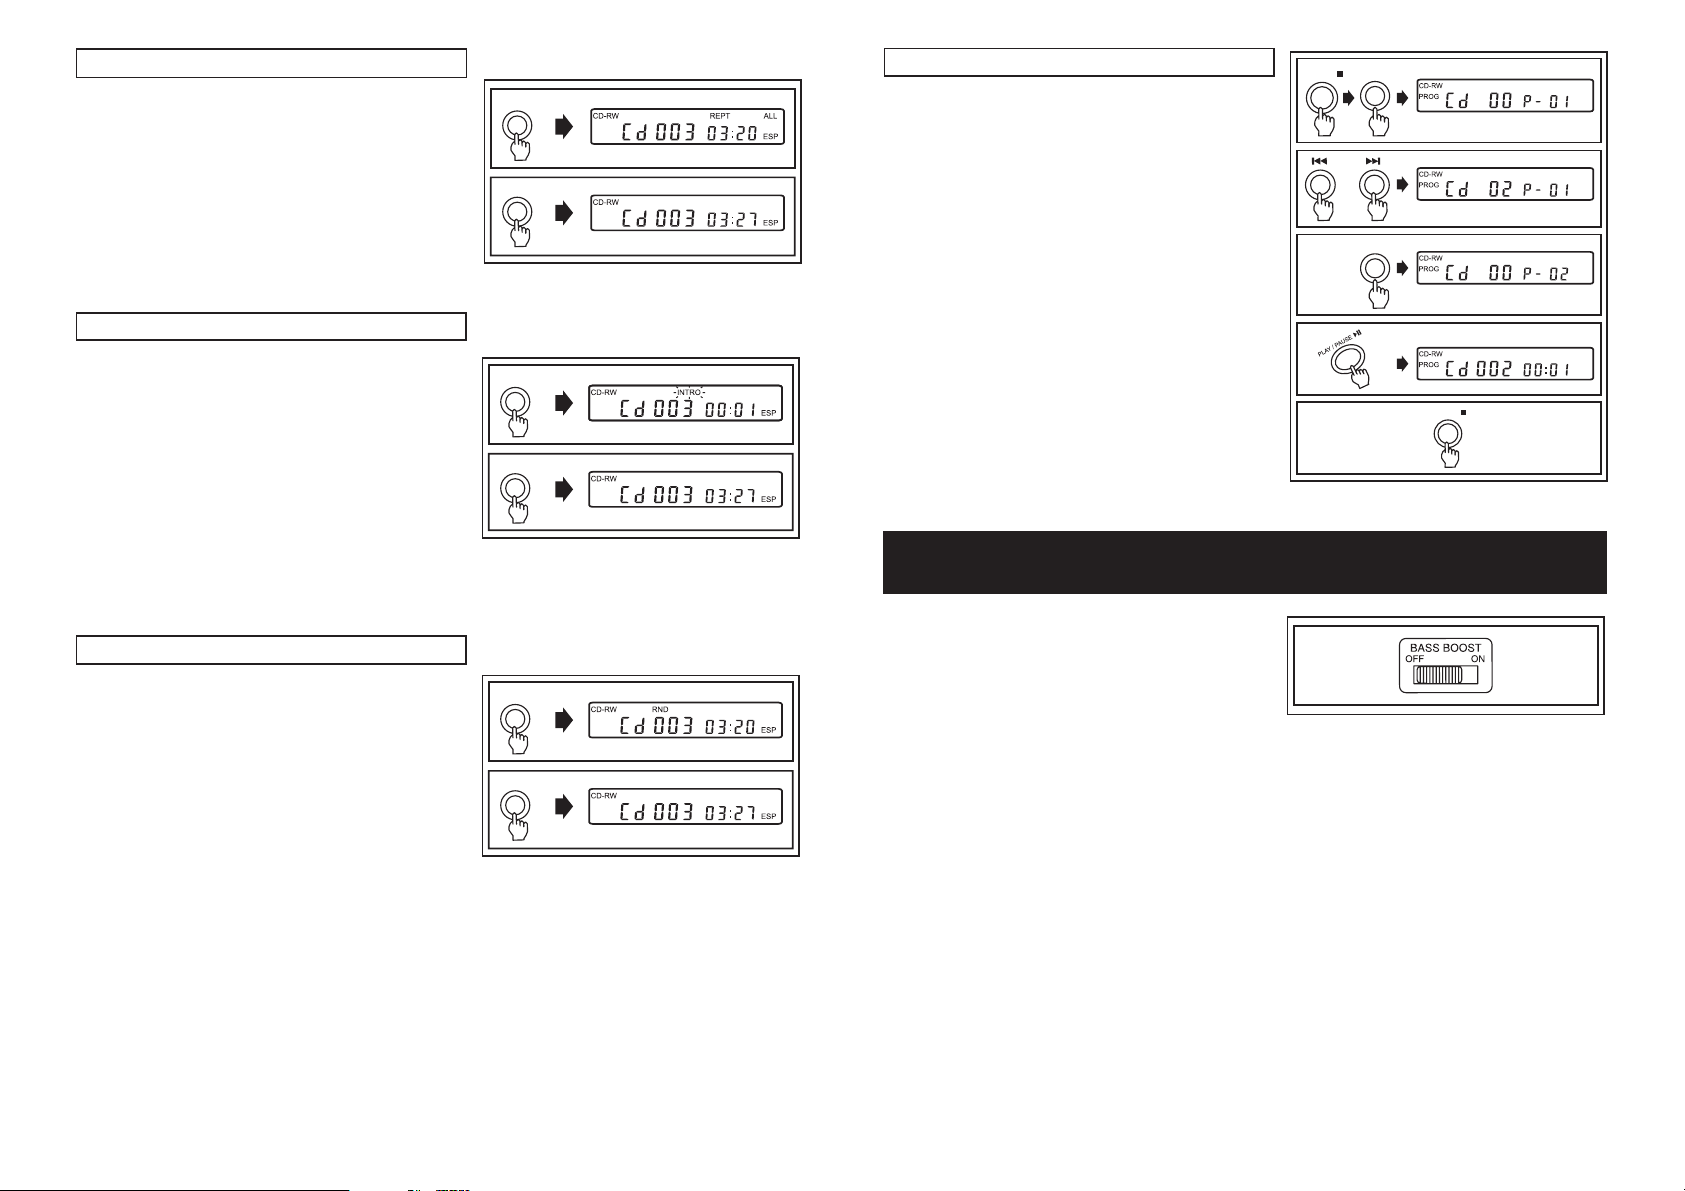
CONTINUOUS PLAY OF A SINGLE TRACK
1. Press the P-MODE BUTTON during playback
of a track until the "REPT" icon is shown
above the current track number.
2. The CD player will play the track displayed
repeatedly.
3. To cancel repeat play of the single track, press
the P-MODE BUTTON repeatedly until the
"REPT" indicator is no longer shown in the
display.
STOP
P-MODE
P-MODE
SKIP
CONTINUOUS PLAYBACK OF A DIRECTORY
(MP3-CD ONLY).
1. During playback in the desired directory, press
the P-MODE BUTTON until the "REPT DIR"
indicator is shown in the display.
2. The CD player will play all of the tracks in the
current directory repeatedly.
3. To cancel continuous playback of a directory
press the P-MODE BUTTON repeatedly until
the "REPT DIR" is no longer shown in the
display.
ALBUM SELECT (MP3-CD only)
Press the ALBUM button repeatedly to cycle
through the albums (folders) on the MP3-CD.
ESP/ALBUM
P-MODE
P-MODE

INTRO SCAN
1. To listen to the first 10 seconds of each track
of the disk, press the P-MODE BUTTON until
the "INTRO" indicator is shown flashing in the
display.
2. The CD player will play the first 10 seconds of
each track.
3. To cancel the intro scan mode, press the
P-MODE BUTTON repeatedly until the
"INTRO" indicator no longer shows in the
display.
PLAYING IN RANDOM ORDER
1. To listen to all tracks on the CD in a random
order press the P-MODE BUTTON until the
"RND" indicator is shown flashing in the
display.
2. To cancel random play, press the P-MODE
BUTTON repeatedly until the "RND" indicator
no longer is shown in the display
P-MODE
P-MODE
PROGRAMME PLAYBACK
1. Press CD STOP BUTTON to stop playback.
2. Press the PROGRAM BUTTON; the indicator
PROG will appear on the display with
"00 P- 01".
3. Select the first track to be programmed using
the CD SKIP/SEARCH BACKWARD or
FORWARD BUTTONS .
4. Press the PROGRAM BUTTON to confirm the
selected track; "00 P- 02" will appear on the
display.
5. Repeat steps 3 and 4 above to program
further tracks, up to a maximum of 20 tracks.
6. Press the CD PLAY/PAUSE BUTTON to start
playback of the programmed tracks.
7. Press CD STOP BUTTON twice during
Programmed play to exit programmed
playback.
P-MODE
P-MODE
PROG.
STOP
SKIP
PROG.
STOP
CONTINUOUS PLAY OF THE WHOLE DISK
1. Press the P-MODE BUTTON until the "REPT
ALL" indicator is shown in the display.
2. The CD player will play the whole disk
repeatedly.
3. To cancel press the P-MODE BUTTON
repeatedly until the "REPT ALL" indicator is
no longer shown in the display.
P-MODE
P-MODE
To increase the bass level, switch the BASS
BOOST SWITCH ON.
10. BASS BOOST

12. IMPORTANT NOTES
Your hearing is very important to you and to us so please take care when operating this
equipment. It is strongly recommended that you follow the listed guidelines in order to prevent
possible damage or loss of hearing.
Over time your hearing will adapt to continuous loud sounds and will give the impression
that the volume has in fact been reduced. What seems normal to you may in fact be harmful.
To guard against this set the volume at a low level.
Slowly increase the level until you can hear comfortably and clearly and without distortion.
Damage to your hearing is accumulative and is irreversible.
Any ringing or discomfort in the ears indicates the volume is too loud.
once you have established a comfortable listening level,
The following list of typical sound levels may assist you in recognizing just how loud you have
set the volume level.
30dB Quiet library, soft whisper
40 Living room, fridge freezer bedroom away from traffic.
50 Normal conversation, quiet office, light traffic.
60 Electric sewing machine.
70 Vacuum cleaner, hair dryer, noisy restaurant.
80dB Average city traffic, alarm clock buzzer at 2 feet, food mixer.
90dB Motorcycle, heavy goods vehicle, petrol lawn mower.
100 Pneumatic drill, chain saw, garbage truck,
120 Rock band concert, thunderclap.
140 THRESHOLD OF PAIN Gunshot 2 feet away.
180 Rocket Launching pad.
ESTABLISH A SAFE SOUND LEVEL
i
i
i
i
BEFORE YOUR HEARING ADAPTS
DO NOT INCREASE THE SOUND
LEVEL FURTHER.
DECIBEL
Level dB Example
THE FOLLOWING NOISE CAN BE HARMFUL UNDER CONSTANT EXPOSURE
PERMANENT LOSS OF HEARING
discotec / night-club.
11. PRODUCT SPECIFICATIONS
Bass boost effect
(100HZ)
Weight
Dimension
Power consumption
Power requirements
Output level
No. of channels
Wow and flutter
Frequency response
D/A conversion
+7dB.
Approx. 228g excluded(Main Unit, batteries )
Approx. 154.5(W) x 25(H) x 141(D)mm
0.8W (DC 4.5V) UNDER NORMAL CONDITION
- DC in socket accepts various AC power adaptors .(not supplied)
- 2 x "AA" alkaline battery
)
(3220mWEarphone:
)
(47KrmsV0.6output:Line
2 channels (stereo)
Below measurable limits
20-20,000Hz (+1/-3 dB)
1-bit DAC 8 times oversampling
AUDIO
GENERAL
System
Cross-interleave Reed-solomon code
material: GaAIAs
Compact disc digital audio system
Error correction
Properties
Laser diode
PICK-UP
Laser output: <44.6 W
Emission Duration: continuous
=780nmWavelength:
Table of contents
Other Goodmans MP3 Player manuals

Goodmans
Goodmans GMP32000B User manual

Goodmans
Goodmans GMP316 User manual

Goodmans
Goodmans GMP33005 User manual

Goodmans
Goodmans GMP31G7DAB User manual

Goodmans
Goodmans GMP34G5 User manual

Goodmans
Goodmans GMP34G9 User manual

Goodmans
Goodmans GMP31G3S User manual

Goodmans
Goodmans GMP32005 User manual

Goodmans
Goodmans GMP31000 User manual