Goodmans GMP32005 User manual

GMP32005
INSTRUCTION MANUAL
Before operating this unit
Please read this Instruction Manual carefully
GOODMANS Product Information Helpline : 08708730080

- 1-
Product Information Hel
p
line 0870 873 0080
Thank you for purchasing this Goodmans product.
The GMP32005 2GB MP3/WMA Player is a portable device with multiple
features and functions, details of which are described in the following pages.
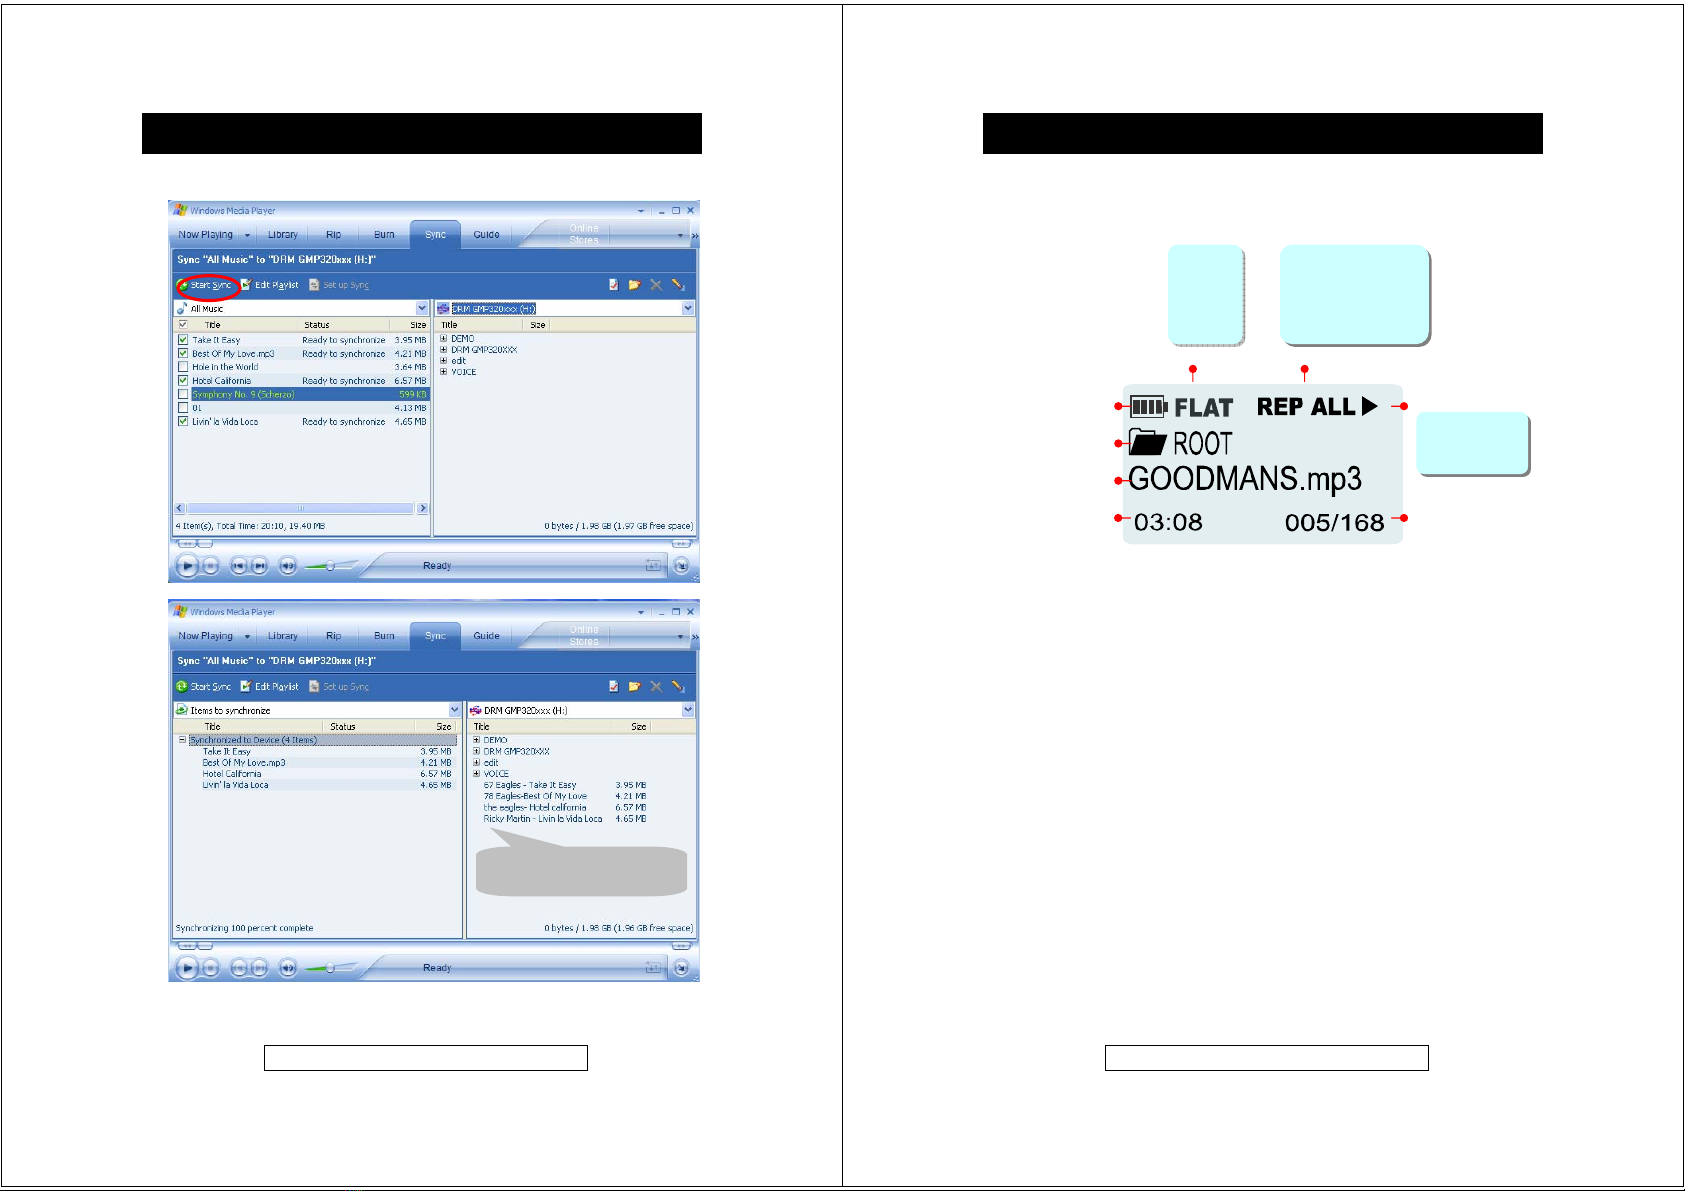
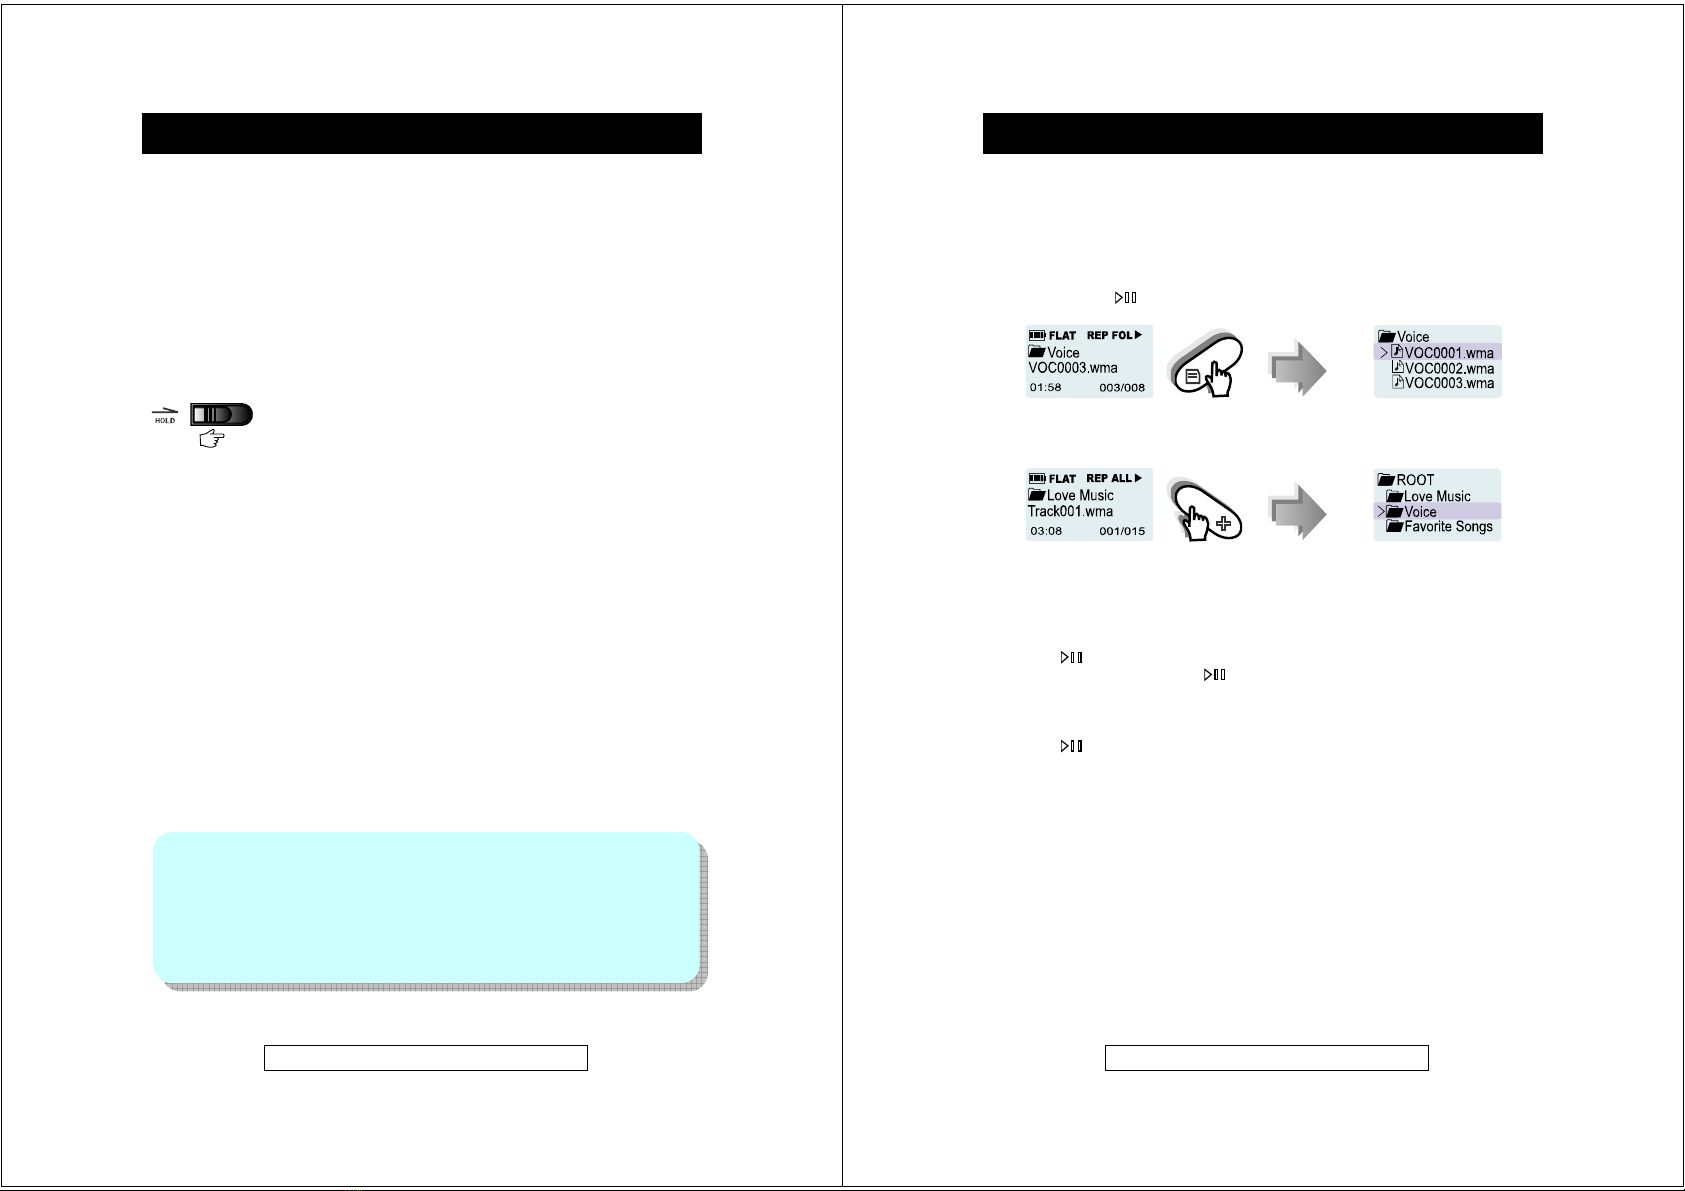
zMP3/WMA/WMA-DRM9 Format File playback
zVoice recording - The unit can record voice through the internal
microphone encoding directly into WMA format.
zUniversal storage - the unit can operate as a mass storage device and
can be used for file storage i.e. between work and home etc.
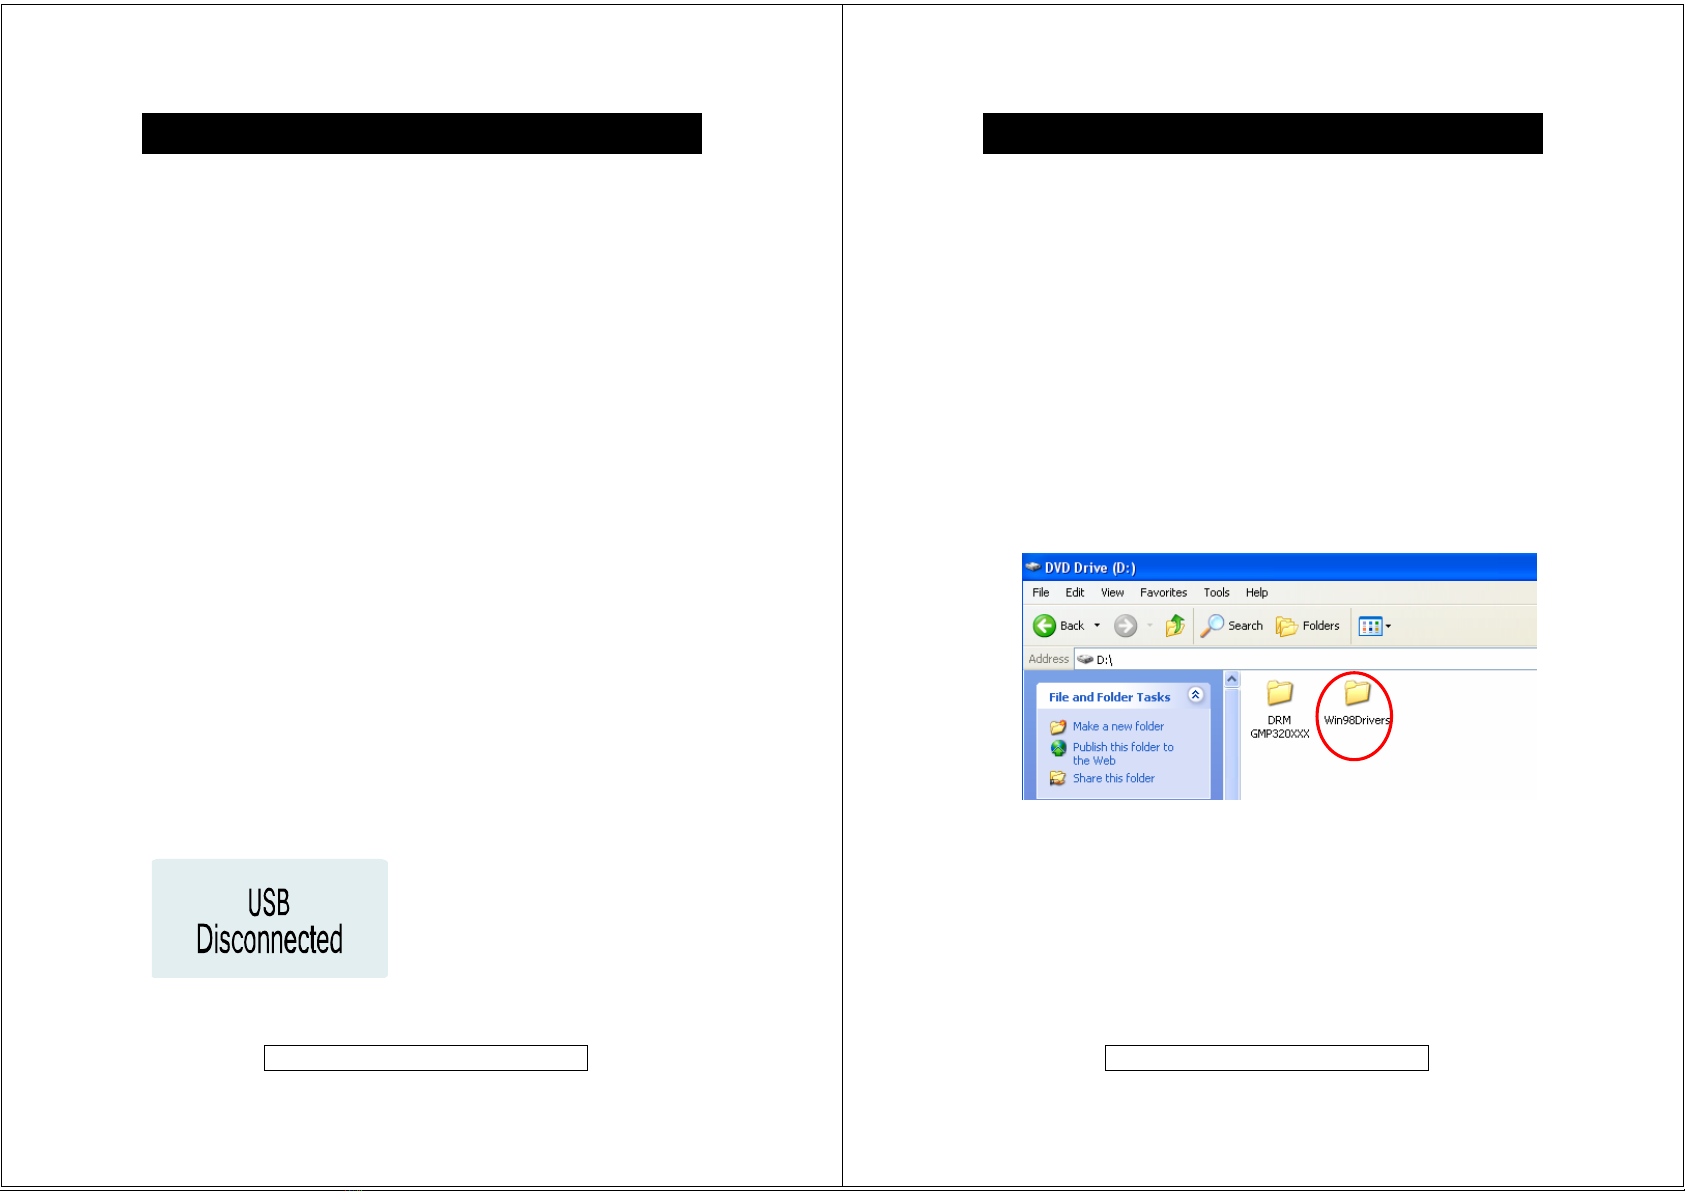
zDirect PC compatibility - operates without the need to install driver
software on Windows ME/2000/XP and comes complete with a driver for
use Windows 98SE
zSound Enhancement EQ - inbuilt equaliser for Flat, Classic, Jazz, Rock
and Pop effects.
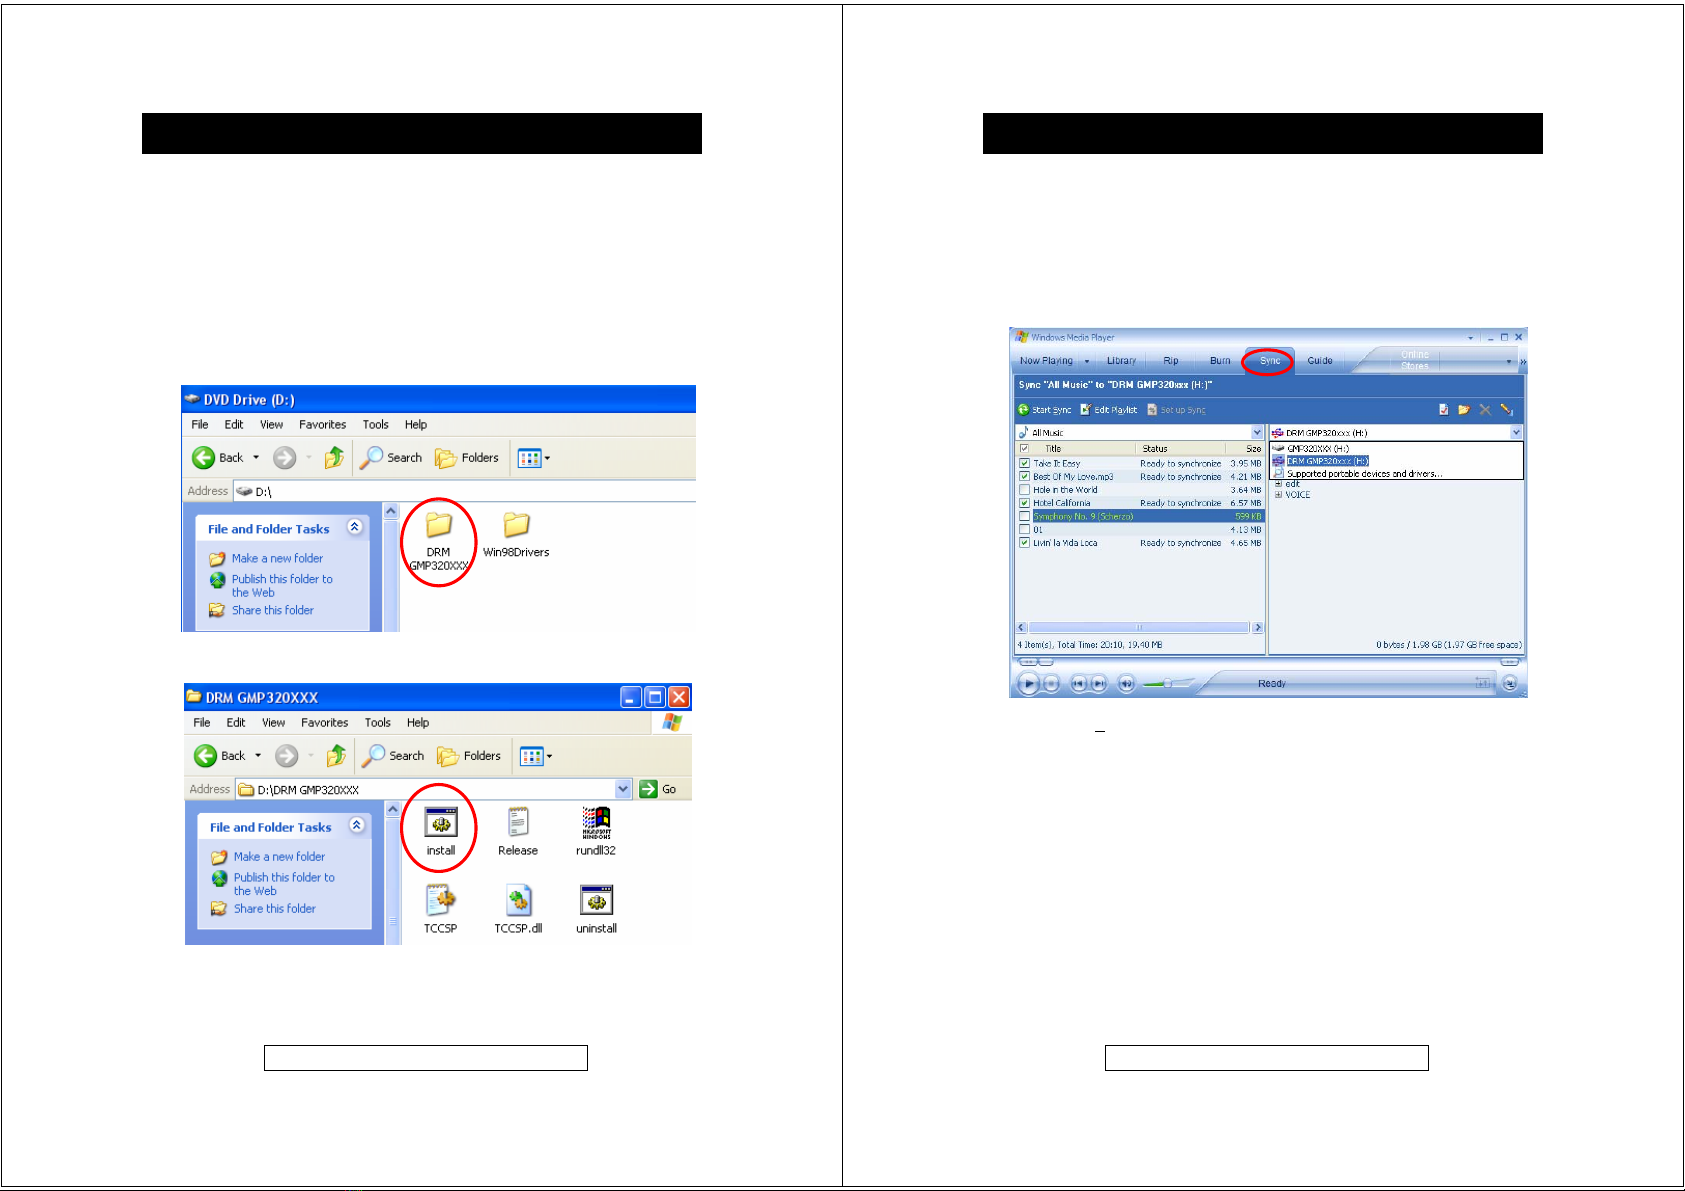
To transfer purchased tracks (WMA DRM encoded) to the GMP32005
Windows Media Player 10 must be used. Note: this is exclusively available
with Windows XP alternatively use the application recommended by the online
music download service
This instruction manual is important. Please read it, in a short time it will show
how to connect, operate and adjust the unit for best performance.
It can also save money, it shows simple things to do and check before calling
us for assistance.
Introduction
Note: Services and applications must be Windows Media audio-compliant and
support Digital Rights Management. Windows XP required. Apple iTunes music
content is NOT supported.
- 2-
Product Information Hel
p
line 0870 873 0080
Table of Contents
Introduction…………………………………........……. 1
Table of Contents…….………………………….……. 2
System Requirements………….…..………………… 3
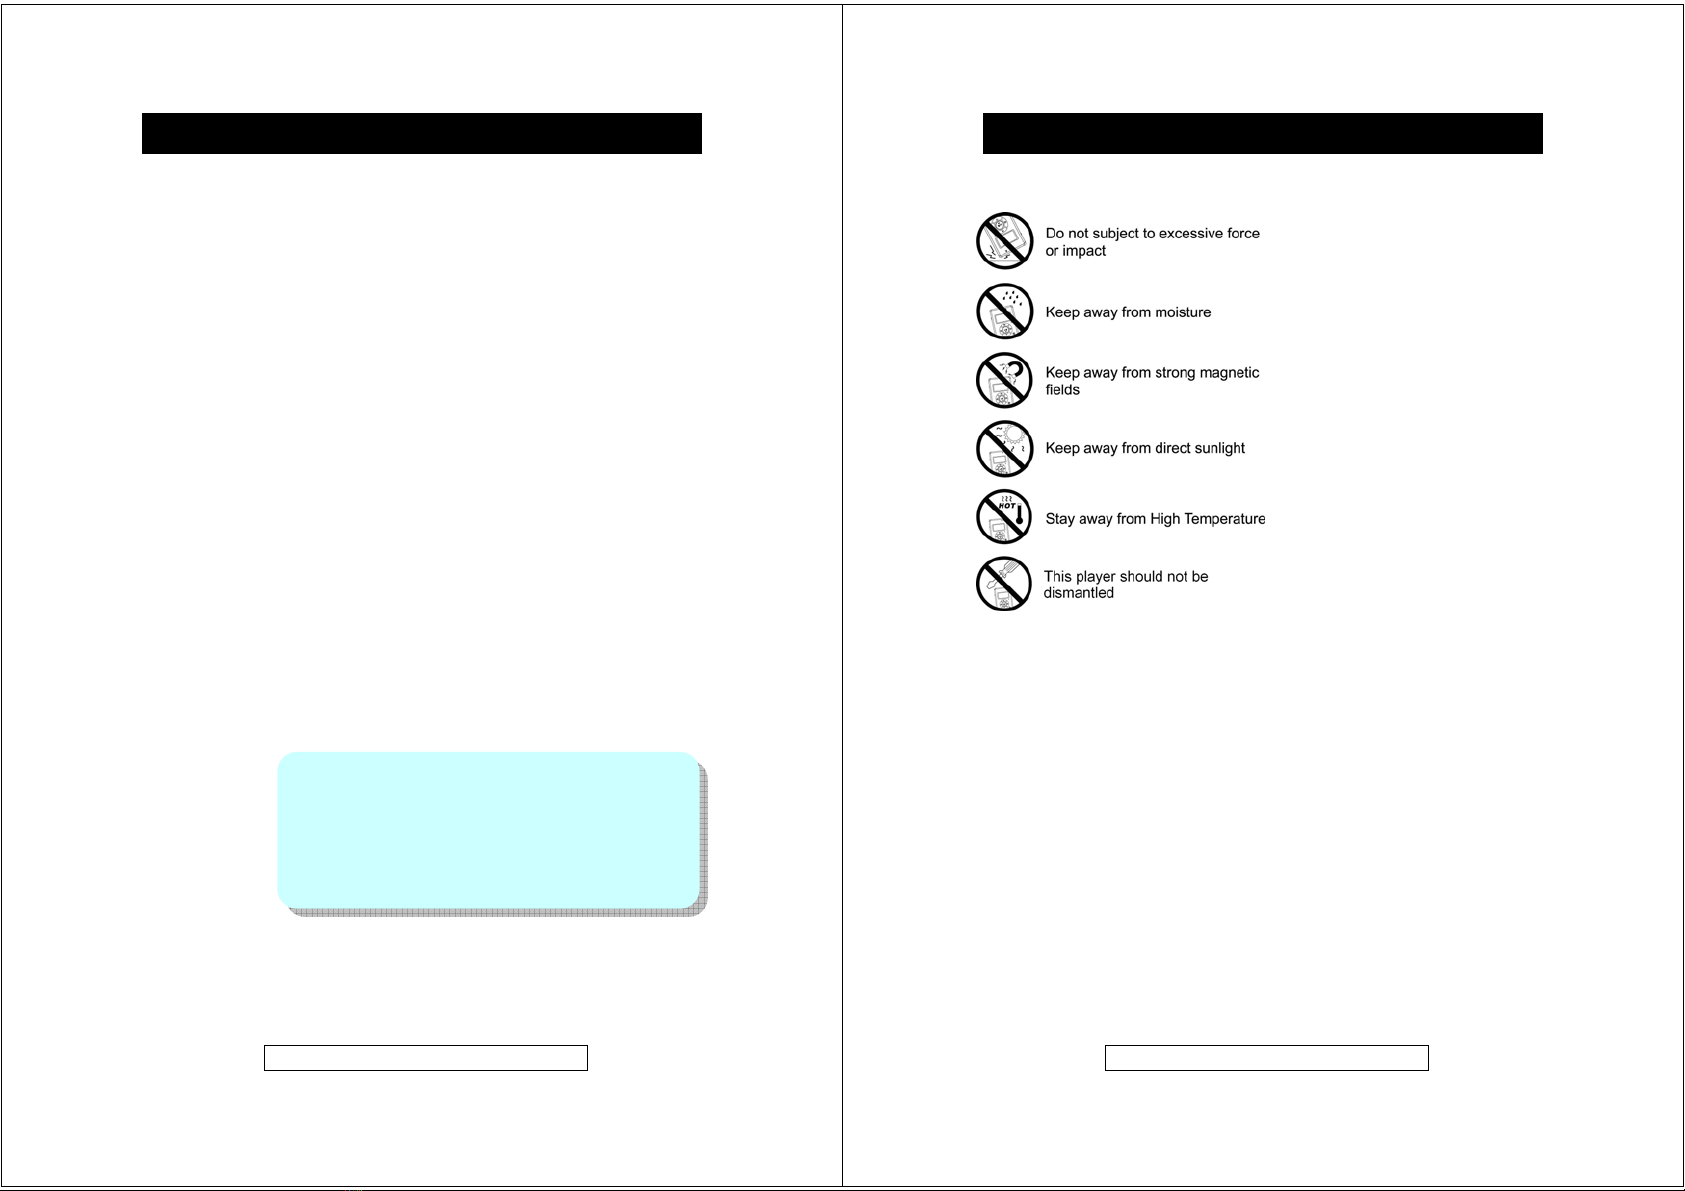
Precautions & Safety Notes……………………....…. 4
General Information…………………………………... 5
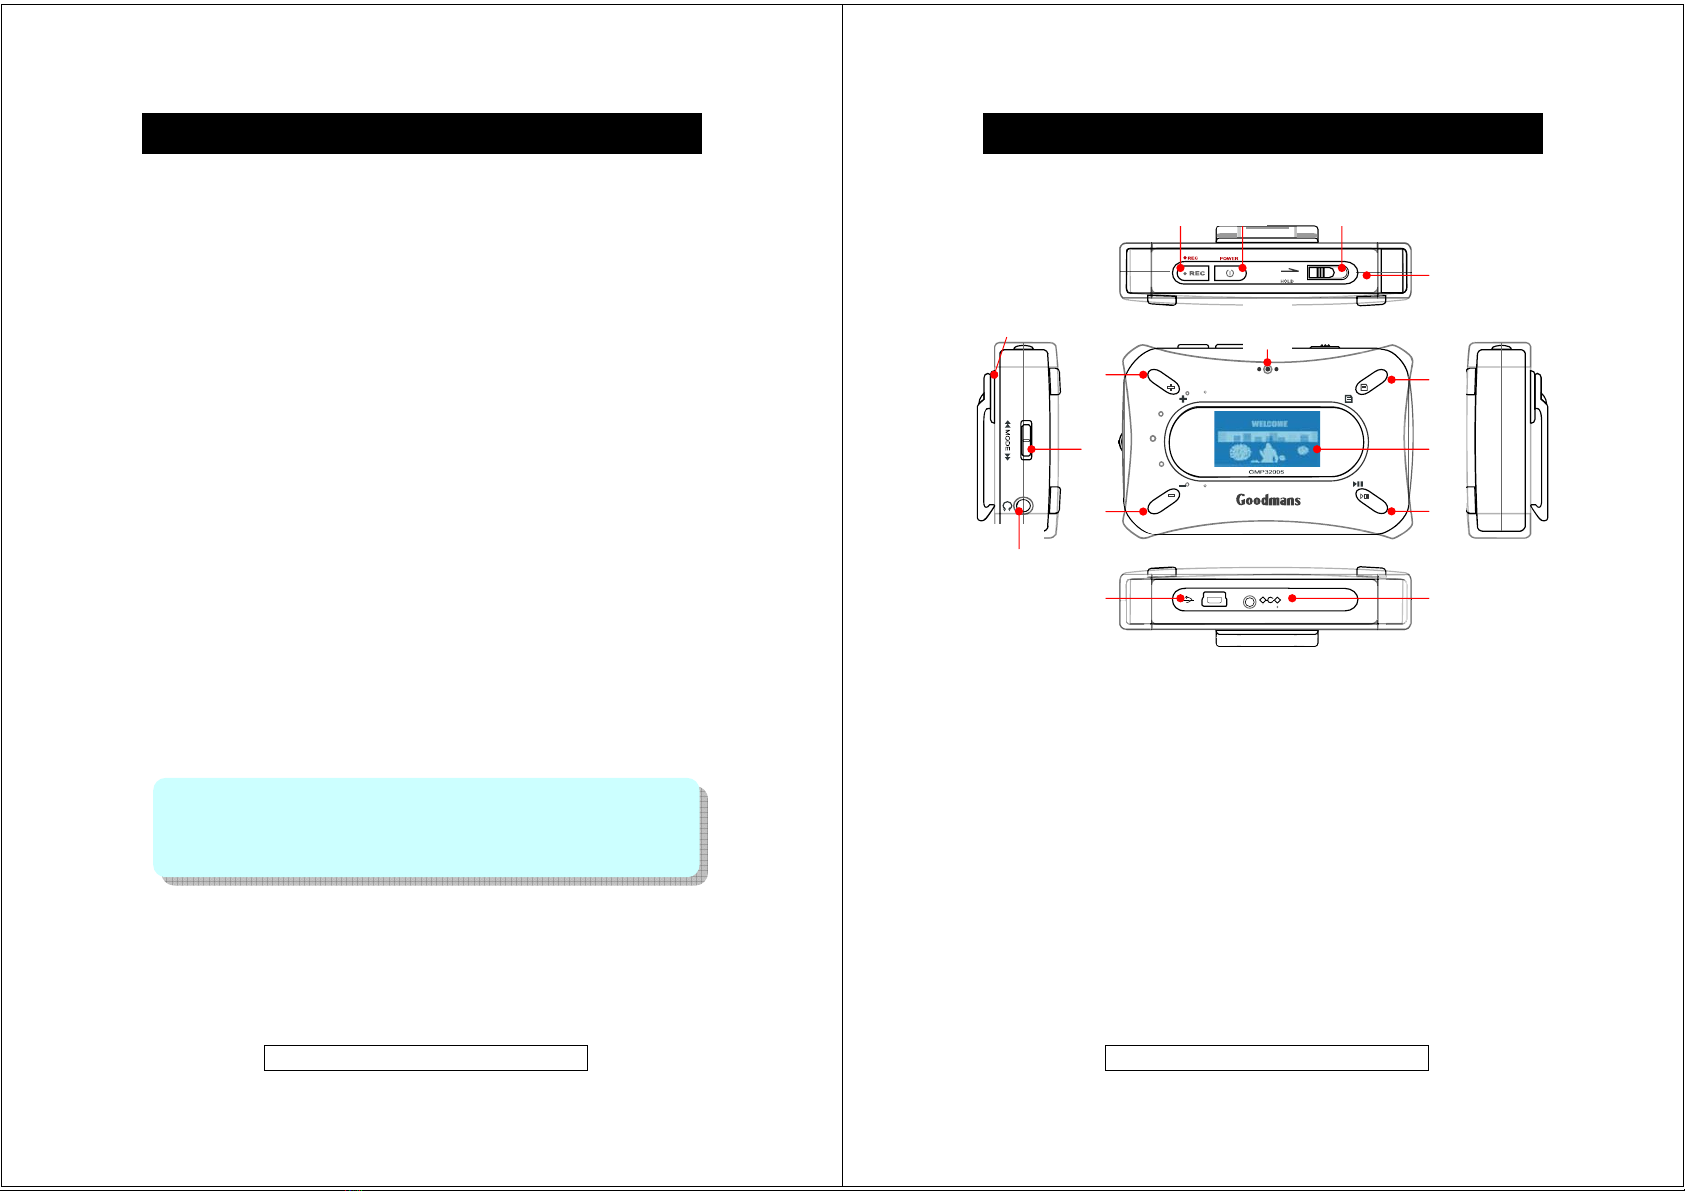
Controls and Indicators………………….....………… 6
Power Source…………………..………….………….. 7
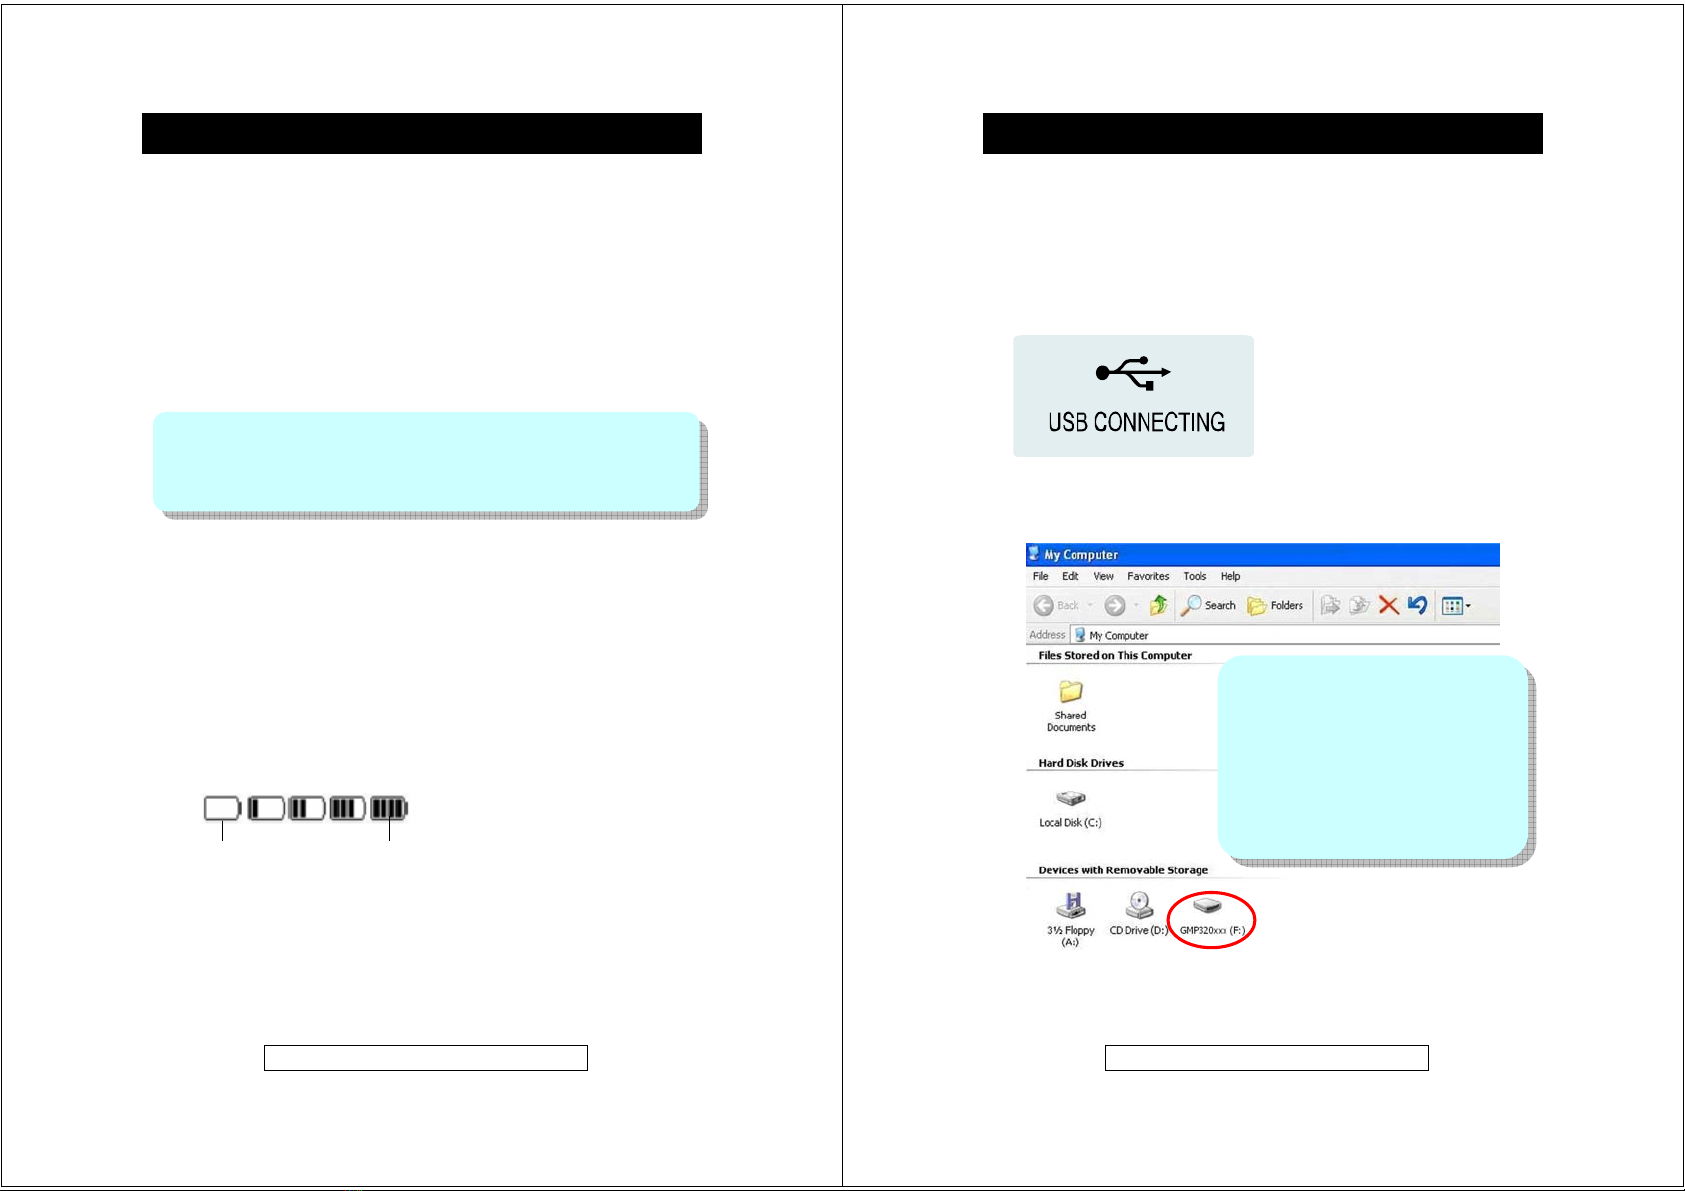
PC Connection…….………………………………….. 8
Software Installation………………………………….. 10
Getting Started ……………………………………….. 14
Customized Settings…..……………………………… 19
Troubleshooting Guide & Maintenance………..….. 23
Product Specifications………………………………... 25
Your package includes the following components:
1 x Main Unit (GMP32005, 2GB Digital MP3/WMA Player)
1 x Pair of Earphones
1 x USB Cable
1 x Carrying Pouch
1 x AC Adapter (230 Volts to DC 5 Volts)
1 x Instruction Manual
1 x Driver Installation CD (with operating software for Windows 98SE)
Table of Contents
Note: Please retain all packaging materials for future transportation or in the unlikely
event the product should need to be returned for repair.
Warning:
zThe AC Adapter supplied with the unit must not be used with other equipment.
zUse only the supplied AC Adapter for charging this model.

- 3-
Product Information Hel
p
line 0870 873 0080
Hardware and software requirements
Computer IBM PC/AT-Compatible (not operable with Macintosh)
Operating System Microsoft® Windows® 98SE/ME/2000 Professional/
XP Home Edition standard install
CPU Windows® XP Professional/XP Home Edition
Pentium® II 300 MHz or higher
Windows ® Millennium Edition, 2000 Professional,
Windows® 98SE
MMX® Pentium® 233 MHz or higher
Memory 64MB minimum
(128MB or more recommended for Windows XP)
Hard disk space 10MB minimum required
Drive CD-ROM drive
Interface Available USB Port (USB 2.0)
Display 1024 x 768 pixels or better, higher colour (16-bit) or better
Secured music download requirement
O/S: Windows XP SP1* or higher (Note: SP = Service Pack)
Software: Windows Media Player 10.0 or higher
(Windows Media Player 10.0 is only available for Windows XP users)
System Requirements
Notes:
zOperation is not guaranteed on all the compatible
computers.
zOperation is not guaranteed on computers running upgraded
OS or multiple OS with dual-boot. NTFS format can be used
for standard installation only.
zDepending on the Windows version, more free space maybe
necessary. Music data also requires more space.
- 4-
Product Information Hel
p
line 0870 873 0080
CAUTIONS !
Precaution & Safety Notes
Safety Notes
Power Sources
Be sure that the local voltage is corresponding with the supplied AC Power Adapter before using this
product. If the AC Power Supply exceeds the limit it may cause malfunction or permanent damage to
this unit.
Battery
The unit has a non-removable battery. If the unit is not used for a while the battery may need to be
recharged.
Listening with Earphone
Your hearing is very important to you and to us so please take care when operating this equipment. It
is strongly recommended for not playing the unit with too high volume. If you experience ringing in your
ears, reduce the volume or discontinue usage.
Road Safety
Do NOT use while driving any kind of motor vehicles or motorcycles. It may create a traffic hazard and
it is illegal in many areas. It is dangerous to listen at high volume while crossing roads.
Never detach the cover
Removing any of the covers will invalidate the warranty and could result in a hazardous
situation.
NEVER use the su
pp
lied AC/DC Power Su
pp
l
y
to
p
ower other
p
roducts.

- 5-
Product Information Hel
p
line 0870 873 0080
Software and operation manual
zReproduction in part or in whole without prior permission is prohibited.
zBefore using third-party connecting devices or software, consult the dealer or
manufacturer. Manufacturer shall not be responsible for any damages caused
by malfunction resulting from the unspecified products.
zScreen shots in the manual are for reference only. Manufacturer shall not be
liable for any errors in this manual.
zSpecifications, contents are subject to change without notice for improvement.
Copyright and Trademarks
© All rights reserved. All other brand and product names listed are trademarks or
registered trademarks of their respective holders and are hereby recognized as
such.
If a power failure occurs
zAny voice recordings being made will be damaged if power failure occurs.
zAny tracks being played back may be damaged.
For important recording
zIf the HDD malfunctions, the contents recorded on the HDD maybe lost. To
save contents permanently it is recommended to copy the content to a PC,
etc…as backup.
Audio data
zBackup data stored on this product periodically in case of loss or malfunction.
zGoodmans cannot be held liable for any damages or loss of data resulting
from defects in this product or your computer.
General Information
Note: In the unlikely event that there is some problem like loss of recorded audio
contents due to HDD malfunction, please be aware beforehand that, Manufacturer
will bear no responsibility to compensate for the content which could not be recorded
or edited, for the loss of recorded or edited audio contents, or for other related direct
or indirect damages.
- 6-
Product Information Hel
p
line 0870 873 0080
1 Power ON/OFF Button
2 REC Button
3 HOLD Switch
4 MENU Button
5 PLAY/PAUSE/STOP Button
6 VOLUME +/Up & FOLDER Up button
7 VOLUME -/Down button
8 Jog Switch (Down(FF)/Enter/Up (FW))
9 Earphone Socket
10 USB Socket
11 DC Socket
12 Display
13 Inbuilt Microphone
14 Belt Clip
15 Reset Hole
⑫
⑤
⑭
⑩⑪
⑨
⑧
⑦
④
⑥
Controls and Indicators
⑮
②①
⑫
③

- 7-
Product Information Hel
p
line 0870 873 0080
The GMP32005 has a non-removable battery. It can be charged with the
supplied AC Adapter.
Charging the main unit
1. Connect the AC adapter to the DC-In 5V socket on the unit
2. Plug the AC adapter into the wall socket, the unit starts charging.
About Charging Time
The battery fully charges in about 3.5 hours, and “Charging Completed” will
display on the screen.
Built-In Battery
zThe built-in battery may discharge completely after long period without use.
Recharge the battery before use.
zCharging time depends on the battery condition and ambient temperature.
zAt low temperatures, continuous playing time is shortened.
zManufacturer shall not be liable for any damages resulting from loss or
alteration of data caused by malfunction, repairs, or complete discharge of the
battery.
Checking the remaining amount of battery power
The remaining amount of battery power will be shown by the battery indicator in
the display.
How to read the battery indicator
Power Source
when battery is Low
the battery indicator
starts flashing
when battery is Full
Notes:
zThe unit may get warm during or after charge. This is normal.
zWhen charging battery for the first time or after a long period of disuse, battery life
may be shorter. Repeat charge/discharge cycle 4 to 5 times to restore the full
capacity.
- 8-
Product Information Hel
p
line 0870 873 0080
Connecting the unit to a PC
1. Connect the unit to a PC with the supplied USB connection cable, by inserting
the smaller plug to the unit and the larger plug to the USB port of the computer.
Plug-and-Play feature of the PC OS will automatically detect the device. Whilst the
unit is connected to the PC, the USB symbol shown below appears.
2. Double Click the “My Computer” icon, a window will open and “GMP320xxx”
will be shown typically designated E: and F: if the computer has one hard drive
or partition and one CD-ROM drive.
PC Connection
Caution ! Do not disconnect a USB
connection cable or remove the unit from the
unit whilst transferring data from a PC. Data
on the unit maybe corrupted and hard-disk
maybe damaged.
Note: The operation buttons on the main
unit do not work if it is connected to a PC.
It will take few seconds for PC detection
whilst the player is creating music library.

- 9-
Product Information Hel
p
line 0870 873 0080
Disconnecting the unit
The GMP32005 can be used in the same way as a normal hard drive and MP3
and WMA files can be dragged into the drive to add them to the player memory.
Once the required files have been copied to the removable drive:
Windows XP Home Edition/Professional
1. Click on the Safely Remove Hardware icon on the taskbar.
2. Click “Safely Remove USB Mass Storage Device - Drive (*:)”.
3. “Safe To Remove Hardware” appears. Click the message and disconnect the
USB connection cable from the PC.
Windows 2000 Professional
1. Click Unplug or Eject Hardware icon on the taskbar.
2. Click “USB Mass Storage Device - Stop Drive”.
3. “USB Mass Storage Device can now be safely removed” appears. Click
“OK” button and disconnect the USB connection cable form the PC.
Windows Millennium Edition
1. Click Remove Hardware icon on the taskbar.
2. Click “USB Disk - Stop Drive”.
3. “USB Mass Storage Device can now be safely removed” appears. Click
“OK” button and disconnect the USB connection cable form the PC.
Windows 98 Second Edition (Win98SE)
1. Click Safely Remove Hardware icon on the taskbar.
2. Select “Stop USB Card Reader”
3. Then Device is removed successfully” appears. Click “OK” button and
disconnect the USB connection cable form the PC.
When the player is disconnected from the PC the following message appears in
the display and the player shuts down.
PC Connection (contd.)
- 10 -
Product Information Hel
p
line 0870 873 0080
The installation CD that comes with the GMP32005 contains the necessary
drivers required to enable the player to connect to a computer running
Windows 98SE.
Windows 98SE Driver
Plug-In driver for secure music file transfers from PC to player
(for Windows XP, Windows Media Player 10 only)
Windows 98SE Driver (for Windows 98SE users only)
To use the GMP32005 on a PC running Windows 98SE please install a driver for the
product.
1. Insert the supplied installation CD into the computer CD-ROM drive.
2. Double click on “My Computer” icon and double click on the CD-ROM drive
icon and point Windows to the “Windows98 Driver” folder when it asks for a
driver after connecting the unit to the PC via the USB cable. (Note: this player
does not work with Windows 95 O/S as USB is not supported)
Software Installation

- 11 -
Product Information Hel
p
line 0870 873 0080
Plug-In driver for transferring secure music files
(for Windows XP, Windows Media Player 10 only)
To transfer the secure music download files to your player, Windows Media Player
10.0 must be used or the application recommended by the online music download
service.
1. Insert the supplied installation CD into the computer CD-ROM drive.
2. Double click on “My Computer” icon and double click on the CD-ROM drive
icon, and select “DRM GMP320XXX” folder.
3. Double click “Install” to run the installer.
4. Follow the onscreen instructions to install the plug-in driver.
Software Installation (contd.)
- 12 -
Product Information Hel
p
line 0870 873 0080
The Sync feature in Windows Media Player 10 enables synchronization of
secured music files in categories to the library of the player.
1. Connect the player to the PC and start Windows Media Player 10
2. Select the music files to transfer to the player from the menu bar.
3. Drag and drop the selected items to the right column.
4. Select Sync from the menu bar and select to the player as “DRM GMP320xxx”
5. Select Start Sync, the selected item will be synchronized to the player
automatically.
Software Installation (contd.)

- 13 -
Product Information Hel
p
line 0870 873 0080
Software Installation (contd.)
Music files are transferred
to the player
- 14 -
Product Information Hel
p
line 0870 873 0080
Display Icons
Pla
y
Status
Getting Started
Batter
y
Indicato
r
Folder Name
Playback Information
(Track Name/Title/Artist)
Pla
y
time Track Number
(Current Track/Total Tracks)
Pla
y
mode
NORMAL
REPEAT ONE
REPEAT FOLDER
REPEAT ALL
RANDOM FOLDER
RANDOM ALL
EQ Mode
FLAT
CLASSIC
JAZZ
ROCK
POP
▶PLAYBACK
▶ll PAUSE
■STOP

- 15 -
Product Information Hel
p
line 0870 873 0080
Switching the power ON
To switch the player ON first ensure the HOLD switch is in the Off (pushed fully
towards the left) position then press and hold the POWER button for more than
2 seconds.
The start-up screen logo appears and the hard disk starts to load information.
The first music track will appear together with track and file information ready for
playback, if no files have been loaded onto the player “No Music File“ will show in
the display.
Switching the power OFF
To switch the player OFF firstly ensure the Hold switch is in the Off (pushed fully
towards the left) position then press and hold the POWER button for more than
2 seconds, the hard disk will take few seconds to save last status data and the
player will then power down.
Please also note that the player has an auto power off function whereby if no
music is playing or no menu actions are taken the player will power down in 1
minute to preserve battery life.
Getting Started (contd.)
- 16 -
Product Information Hel
p
line 0870 873 0080
Playing transferred music
Power on the unit.
To locate the desired portion:
Press and hold the button for Fast Forward (FF) during playback.
Press and hold the button for Fast Rewind (FR) during playback.
To select tracks for playback:
To select music or recorded voice tracks using the FOLDER BROWSER function.
1. Press the MENU button ONCE to enter the FOLDER BROWSER during
playback.
2. Use the or buttons to browse the available tracks. Select the desired
FOLDER or track and press Jog_ENTER button.
3. Using the same method as in point 2any subfolders can be accessed.
4. Use VOL+ button to return to the Upper Level/Folder or ROOT Directory.
5. Use the or buttons to browse the available tracks. To select a track to
playback press the Jog_ENTER button or PLAY/PAUSE.
To interrupt playback:
Press the PLAY/PAUSE or Jog_ENTER button.
To resume playback, press the PLAY/PAUSE or Jog_ENTER button again.
To stop playback:
Press & hold the PLAY/PAUSE or Jog_ENTER button for more than 2
seconds.
Getting Started (contd.)

- 17 -
Product Information Hel
p
line 0870 873 0080
Volume Control
During playback use the VOL + or VOL - buttons to increase or decrease the
volume level through the earpieces.
Hold function
This feature enables the locking of the buttons on the unit to prevent accidental
operation during use and transportation. To activate move the HOLD switch on the
top of the unit to the ON (RIGHT) position the HOLD will show in the display.
To unlock the buttons move the HOLD switch to the OFF (LEFT) position. If the
hold function is active “Hold” will appear in the display if any button is pressed.
Voice Recording
Voice or music data can be recorded through the in-built microphone.
1. Power on the unit.
2. Hold down the yREC button for 2 seconds.
3. Recording starts.
To interrupt recording:
Press the yREC button for 1 second.
To resume recording, press the yREC button again.
To stop recording:
Press the yREC button for 2 seconds to stop recording. To listen to the recorded
data after recording, press the PLAY/PAUSE button to listen to the recorded data
immediately or press any other button to listen to it later.
Getting Started (contd.)
Notes:
zWhilst recording the backlight will be turned off automatically.
zIt is possible to change the recording quality as required.
(Please refer to the section of Customized Settings).
zWhilst recording with the in-built microphone, data is written to the hard disk at
regular intervals (High quality at 128 kbps, Medium quality at 64 kbps, and
Low quality at 32 kbps). Some mechanical noise may be heard during this
process, this is normal and to be expected.
- 18 -
Product Information Hel
p
line 0870 873 0080
Playing a recorded voice file
1. Power on the unit.
2. Press the MENU button ONCE to enter the FOLDER BROWSER select the
voice menu, then scroll through the available recorded voice tracks and select
the required track for playback by using either the jog button centre push
switch or the PLAY/PAUSE button.
OR use VOL+ button to return to the ROOT Directory during MUSIC
playback.
3. Using the same method as in point 2any subfolders can be accessed.
4. Use the or buttons to browse the available tracks. Select the desired
FOLDER or track and press Jog_ENTER button.
To interrupt playback:
Press the PLAY/PAUSE or Jog_ENTER (MODE) button.
To resume playback, press the PLAY/PAUSE or Jog_ENTER (MODE) button
again.
To stop playback:
Press the PLAY/PAUSE or Jog_ENTER (MODE) button for more than 2
seconds to stop playback.
Getting Started (contd.)

- 19 -
Product Information Hel
p
line 0870 873 0080
To change the default settings of Equalizer, Play mode.
1. During playback press the MENU button TWICE to access the MAIN MENU.
2. Use the Jog Up/Down control (or ) to select the required option, and press
the Jog_ENTER (MODE) button.
3. Select a menu in the same way as step 2. (ex: “EQ Mode” is selected)
4. Change the setting item in the same way as step 2.
5. Press the MENU button again to exit the selection.
In the MAIN MENU the following functions can be accessed the bottom 5
functions are contained within the settings submenu.
Advanced Settings and Functions
Equalizer Adjust sound effect settings
(Flat, Classic, Jazz, Rock and Pop)
Play Mode Play music tracks Repeatedly or Randomly
Backlight Set the backlight timer
Contrast Adjust display contrast level
Record Quality Adjust the voice record quality
Factory Default Restore player firmware settings back to the default
values set at time of manufacture
Information Display Disk Usage / No. of Files and Firmware
Version of the player
Customized SettingsCustomized Settings
- 20 -
Product Information Hel
p
line 0870 873 0080
Equalizer (EQ Mode)
The unit has FIVE preset equalizer effects: FLAT*, CLASSIC, JAZZ, ROCK
and POP. Select an effect according to a music genre or personal preference.
Note: (*) indicates the default setting.
1. Press the MENU button TWICE during playback.
2. Use the Jog Up/Down control (or ) to browse the MAIN MENU
options and select EQ MODE press Jog_ENTER button.
3. Select the Equalizer effect and then confirm the selection in the same way
as Step 2
4. Press MENU button to return to the main menu. Playback starts in the
selected EQ mode.
Play Mode (Repeat Play or Random Play)
1. Press the MENU button TWICE during playback.
2. Use the Jog Up/Down control (or ) to browse the MAIN MENU,
select PLAY MODE press Jog_ENTER button.
3. Select REPEAT (One, All, Folder), RANDOM (Folder, All) or Normal* in
the same way as Step 2.
4. Press MENU button to return to the main menu. Playback starts in the
selected play mode.
Customized Settings (contd.)
Submenu under “PLAYMODE”
Normal*: Normal playback.
Repeat One: Playback only the selected audio data (single).
Repeat Folder: Playback all audio data in a folder.
Repeat ALL: Playback ALL audio data on the main unit.
Random Folder: Random play all audio data in a folder
Random ALL: Random play ALL audio data on the main unit.
Note: (*) indicates default setting.

- 21 -
Product Information Hel
p
line 0870 873 0080
Record Quality (for Voice or Music Recording)
1. Press the MENU button TWICE during playback.
2. Use the Jog Up/Down control (or ) to browse the MAIN MENU,
select SETTING and press Jog_ENTER button.
3. Use the Jog_Up/Down to scroll the SETTING options.
4. Select RECORD QUALITY (Hi-Mid*-Lo),press Jog_ENTER to confirm
the desired selection.
5. Press MENU button to return to the main menu.
Backlight
1. Press the MENU button TWICE during playback.
2. Use the Jog Up/Down control (or ) to browse the MAIN MENU and
select SETTING and press Jog_ENTER button.
3. Select Backlight option and then use the Jog_Up/Down control (or )
to scroll the backlight options: OFF, 5, 10*, 15, 20 seconds or Always On
and press Jog_ENTER to confirm the selection.
4. Press MENU button to return to the main menu.
Customized Settings (contd.)
Record Quality
Quality Hi: Recording bit rate at MP3 128 kbps (High)
Quality Mid*: Recording bit rate at MP3 64 kbps (Medium)
Quality Lo: Recording bit rate at MP3 32 kbps (Low)
Note: (*) indicates default setting
Backlight options
Always On: Backlight remains ON.
5~20 sec.: Backlight is illuminated for the set time (5-20sec.)
OFF: Backlight remains OFF.
Notes: 10 seconds is default setting.
The higher the value selected the more the
battery life will be reduced as the backlight
consumes a higher level of power when it is ON.
- 22 -
Product Information Hel
p
line 0870 873 0080
Customized Settings (contd.)
Contrast
1. Press the MENU button TWICE during playback.
2. Use the Jog Up/Down control (or ) to browse the MAIN MENU,
select SETTING and press Jog_ENTER button.
3. Select CONTRAST option and then use the Jog_Up/Down control (or
) to adjust the contrast value (from 1~10, 5 is the default setting), press
Jog_ENTER to confirm the selection.
4. Press MENU button to return to the main menu.
Information (Disk Usage / Number of Files / Firmware Version)
1. Press the MENU button TWICE during playback.
2. Use the Jog Up/Down control (or ) to browse the MAIN MENU,
select SETTING option and press Jog_ENTER button.
3. Select INFORMATION option to view the Disk Usage / Number of Files /
Firmware Version in the unit.
4. Press MENU button to return to the main menu.
Factory Default
1. Press the MENU button TWICE during playback.
2. Use the Jog Up/Down control (or ) to browse the MAIN MENU,
select SETTING and press Jog_ENTER button.
3. Select the FACTORY DEFAULT options, confirm RESTORE or CANCEL*
to restore all settings to the default, press Jog_ENTER button. Note: (*)
indicates default setting
4. Press MENU button to return to the main menu.

- 23 -
Product Information Hel
p
line 0870 873 0080
Troubleshooting Guide
Many potential problems can be resolved without calling a service technician.
If something seems to be wrong with this product, check the following before
calling us.
Troubleshooting Guide & Maintenance
The player cannot be switched on
zCheck if the AC adapter is disconnected.
zCheck if the built-in battery is exhausted.
zCheck if the HOLD key is switched OFF.
No sound or the sound quality is poor
zCheck if the volume is set too low.
zCheck if the earphone is plugged in properly.
Sound skips during playback
zCheck if the built-in battery is exhausted.
zCheck if the music file is bad encoded.
zIf there are any bad sectors on the hard disk the sound will skip during playback.
The battery runs out fast
zThe built-in battery is probably dead. It will need replacement.
Replacement should be carried out by qualified personnel only.
NEVER disassemble the product for this purpose.
The unit does not play for 10 hours
z10 hours of playback is based on MP3 files encoded at a bit rate of 128 kbps.
Power consumption is minimised under this condition since the unit accesses the
hard disk only once every 28 minutes. Higher bit rate increase the access and
power consumption leading to less playback time.
Recorded voice files cannot be seen from display (after renaming them)
zThe file names of recorded music/voice files are automatically generated by the
player and are managed separately from downloaded music. Whilst renaming
them you have to move them to the VOICE folder, under the ROOT FOLDER.
- 24 -
Product Information Hel
p
line 0870 873 0080
Maintenance
Moisture condensation
If condensation forms inside the unit the unit may not function properly.
In the following cases, condensation may form inside the unit.
zShortly after turning on a heater.
zWhen the unit is placed in a room where there is excessive steam or moisture.
zWhen the unit is moved from a cool place to a warm place.
To remove condensation:
Leave the unit for approximately 1 hour. The condensation should evaporate and
unit will work properly.
Cleaning
When the unit becomes dirty
Clean it with a soft cloth. When the unit is excessively dirty, use a soft cloth
dampened in water (external surfaces only).
Clean the plugs and the connecting sockets
If the plugs or sockets are dirty, noise may be heard. Cleaning will prevent noise.
Troubleshooting Guide & Maintenance (contd.)
Voice Recording is not possible
zCheck if the HOLD key is switched OFF.
System crash when the unit is in operation
zThis may occur within a strong magnetic field. Take the unit away from the
magnetic field. Perform a hard reset, gently poke a paper clip or a pin (not a
pencil) into the RESET Hole on the top (near by the HOLD switch) of the unit to
reboot the system.
Caution! Do not use chemicals for cleaning (petrol, paint thinner and etc.). It may
damage the cabinet finish. Do not apply oil to the inside of the unit. It may cause the
unit to malfunction.

- 25 -
Product Information Hel
p
line 0870 873 0080
As a part of our policy of continuous improvement. Goodmans reserves the
right to make design and specification changes for product improvement
without prior notice. The performance specification figures indicated are
nominal values. There may be some deviations from these values in individual
units.
Model: GMP32005
Internal Memory: 1-inch, 2.2GB Hard Disk
Supported Digital Audio MPEG1, 2, 2.5 Layer 3 with Bit Rate 8-320 kbps and VBR
Playback Formats: WMA, supports PDDRM (WMA-9)
Sampling Frequency: 8-48 KHz
File System: FAT32 for Hard Disk
Display: 128x64 Mono LCD, with Blue Backlight
Voice Recording Bit Rate: 32 kbps (Low), 64 kbps (Mid), 128 kbps (High)
Input/Output Connections: Earphone
USB 2.0 High Speed
Built-in Microphone
DC-In5Volts
Headphone: Frequency response: 20Hz to 20KHz
Maximum Output Power: 5mW per channel on 32Ω@ 3.3V
Power Source: DC 5V/AC Adapter (AC 230V, 50Hz)
Built-in Battery: 1000mAh Lithium Rechargeable Battery
approx. 3.5 hours (fully charged, when using the AC adapter
included with the unit)
* Specifications are subject to change without notice.
Product Specifications
Table of contents
Other Goodmans MP3 Player manuals

Goodmans
Goodmans GMP33005 User manual

Goodmans
Goodmans CDMP3527K User manual

Goodmans
Goodmans GMP316 User manual

Goodmans
Goodmans GMP31G3S User manual

Goodmans
Goodmans GMP31000 User manual

Goodmans
Goodmans GMP34G5 User manual

Goodmans
Goodmans GMP31G7DAB User manual

Goodmans
Goodmans GMP34G9 User manual

Goodmans
Goodmans GMP32000B User manual