Gram DX Series User manual

SERIES
DX
3 / 6 / 15 / 30
USER MANUAL
EN

1

Table of Content
Instruction for Use ................................................................................................................ 1!
Preparing to Use the Scale .................................................................................................. 1!
Chapter 1 Introduction .......................................................................................................... 3!
1-1 Features and Specifications ....................................................................................... 3!
1-2 Power Supply .............................................................................................................. 4!
1-3 Display and Keypad Introduction ................................................................................ 4!
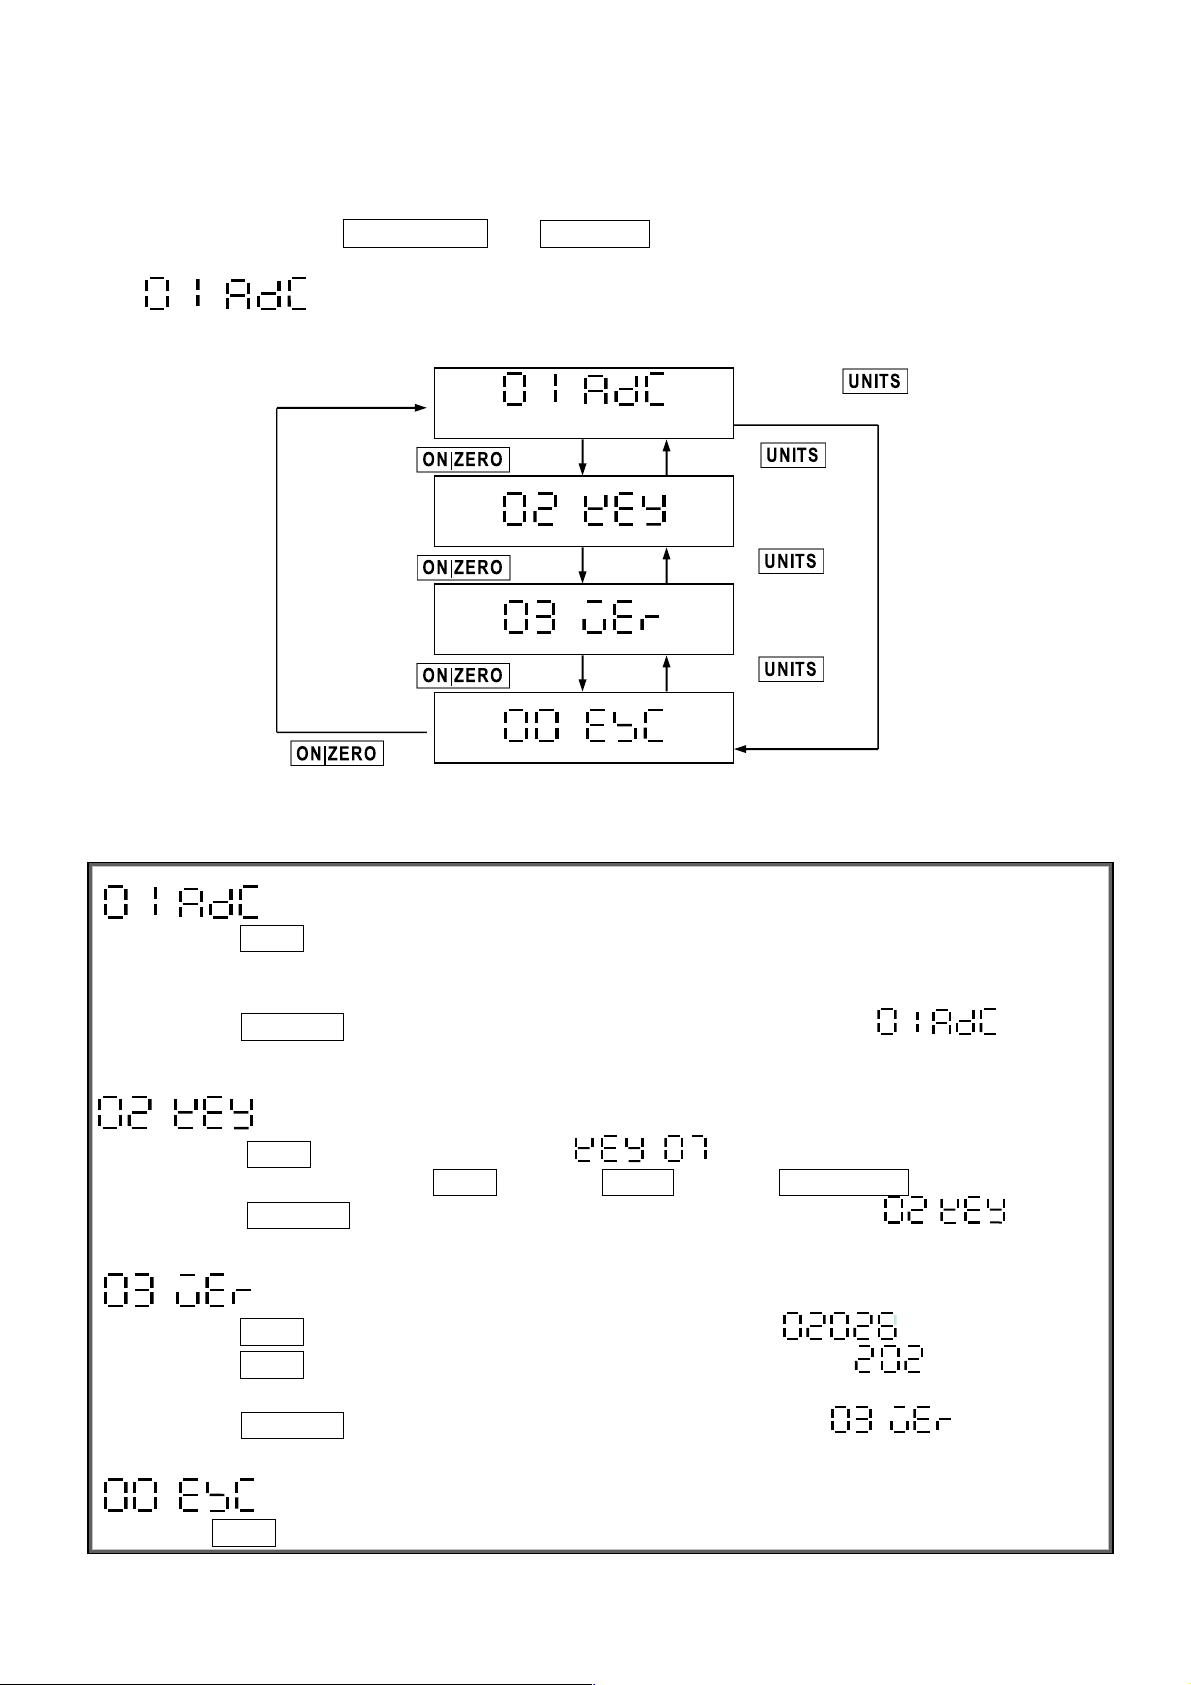
1-4 Self-Test Mode ............................................................................................................ 7!
1-5 Error Messages .......................................................................................................... 8!
1-6 Weight Unit ................................................................................................................. 8!
Chapter 2 External Function Setting .................................................................................... 9!
2-1 General Function Setting ................................................................ 10!
2-1-1 Power Saving Function Setting ......................................... 11!
2-1-2 Automatic Power-off Timer Setting .................................... 12!
2-1-3 Hi/Lo/OK Function Setting .................................................. 13!
2-1-4 Restore to the Default Setting ........................................... 14!
2-1-5 Noise Filter Setting ............................................................ 15!
2-1-6 Two Weighing Units Setting .............................................. 16!
2-1-7 Unstable Tare .................................................................... 17!
2-1-8 LED Brightness Setting .................................................... 18!
2-2 Weight Calibration ............................................................................... 19!
Appendix 1 Command Mode &Output data format ............................................................ 20!
Appendix 2 7-Segment Display Characters ....................................................................... 22!

1
Thank for your purchasing of our GRAM
Weighing Scale. To guide you to use our product
correctly, please read this Manual carefully to
extend the life of machine and to avoid error.
Instruction for Use
1. Please keep the scale in a cool dry place. Do not store it at high temperature.
2. Avoid objects impacting with the scale. Do not drop loads onto the scale or subject the
weigh pan to any strong shock loads.
3. The load placed on the weigh pan must not exceed the maximum weighing capacity of
the scale.
4. If the scale is not going to be used for some time, please clean it and store it in a plastic
bag in dry conditions. A desiccant sachet may be included to prevent any moisture
build up.
5. Please operate or charge the scale in an open area. Do not squeeze the power cord to
avoid wire on fire.
Preparing to Use the Scale
1. Adjust the four levelling feet (if fitted) to set the scale pan level using the spirit level
bubble located at the front of the scale.
2. Avoid operating the scale in direct sunlight or drafts of any kind.
3. If possible avoid connecting the scale to ac power outlet sockets which are adjacent to
other appliances to minimise the possibility of interference affecting the performance of
the scale.
4. Remove any weight that might be on the weigh pan before the scale is switched on and
avoid leaving weight on the pan for long periods of time.
5. All goods weighed should be placed in the centre of the weigh pan for accurate
weighing. The overall dimensions of the goods being weighed should not exceed the
dimension of the weigh pan.
6. We suggest to warm up the scale for 15~20 minutes before operation to ensure best
accuracy.
7. Please note when the symbol keeps flashing on the screen, the batteries need
to be replaced.
8. Introduction of Storage Battery

2
No burning
Caution Corrosion
Due to the storage battery adopt the advanced free-maintaining technique, customers
need not to replenish electrolyte.
The scale should be recharged every 3 months to prevent failure of the internal
rechargeable battery.
1. The battery should be charged for 8~10 hours.
2. The temperature of battery should below 45℃.
Maintaining
1. Please do not discharge with over-current when using the battery. Please charge the
battery after discharging current.
2. Please take down the battery when the scale is not used for a long time or break the
connection of cathode.
3. Do not short the battery terminals to check whether there is current. Please check
whether the connection point is firm to guarantee good connection.
4. The battery should be replaced by specialized person. No reverse-battery or the
product will be damaged.
a) Anode of battery should be connected with Anode of product battery(usually red
cable)
b) Cathode of battery should be connected with Cathode of product battery (usually
brown cable or black cable)
c) See the picture following
Safety warnings
1. The electrolyte of battery is caustic which causes metal, cotton, etc to corrode.
2. The hydrogen will be resolved when using or charging the battery and it will cause
explosion when approaches fire.
Brown cable(or black cable)
connected with Cathode of
battery
Red cable connected with
Anode of battery
Warning explosion
Children faraway

3
Chapter 1 Introduction
1-1 Features and Specifications
Features
u Sealed waterproof silica gel strip blocks water from infiltrating into the scale.
u Surrounded by waterproof grade sheeting to ensure the water free.
u 1/3,000~1/6,000 display resolution available.
u DX adopts stainless steel housing.
u High speed of 24bits AD fast reacts and shortens the weighing operation duration.
u Selectable units: Kilogram (kg), gram (g), and pound (lb) weighing units available.
u Built-in rechargeable battery can be easily replaced.
u Vertical placement design battery prevents from electrolyte leakage, and makes more
safety and durable.
u Low power indication and auto power off.
u Well-designed protection point for transportation.
u Securable platter with screws at users' needs.
Specifications
Model
Capacity
Division
Resolution
DX-3
3kg
0.5g
1g
1/6,000
1/3,000
DX -6
6kg
1g
2g
1/6,000
1/3,000
DX -15
15kg
2g
5g
1/7,500
1/3,000
DX -30
30Kg
5g
10g
1/6,000
1/3,000
Operating Temperature: -10°C ~ 40°C (14°F ~ 104°F)
Dimensions:
240 x 120 x 280 mm (W x H x D)
Weight of the scale:
3.5 kg approximately;
4 Resolutions above 1/3,000 are only available for non-approval models.

4
1-2 Power Supply
Power Supply Selection for Standard Models
1. DC 6V / 4Ah rechargeable battery
2. AC 110V~240V (±10%) adapter
Power Supply Selection for Wireless Charging Models
1. Power Supply adapter 100V~240V(50~60Hz)
Output:>5W (meets WPC1.12_Qi Wireless Power Supply’s)
2. DC 6V / 4Ah rechargeable battery or 3.7V/4000mAh lithium battery is used
Power Consumption for Models with lead acid battery
About 120 mA (high brightness); 60 mA (normal brightness); 41.7 mA (low brightness)
Power Consumption for Models with lithium battery
About 180 mA (high brightness); 90 mA (normal brightness); 62.6 mA (low brightness)
Low Battery Warning
Please note when the ( ) symbol keeps flashing on the display, the battery should be
recharged right away.
4 The scale will turn off automatically after 1~2 hours, when the low battery warning
symbol shows up. Then the scale must be fully charged, before operating again.
1-3 Display and Keypad Introduction
Icon Introduction
à0ß
:
Zero point indication
STABLE
:
stable indication
GROSS
:
gross weight indication
:
Low battery indication. When this symbol is flashing replace the batteries.
L1、L2
:
only for multiple-unit models; units indications
HI
:
The weight on weigh pan is greater than the high limit
LO
:
The weight on weigh pan is lower than the check value
HI
LO
L2
STABLE
GROSS
à
0
ß
L1

5
Keyboard Function
1OFF 1:
power off
1ON
|
ZERO : This key possesses two functions: Power On and Zero function.
% When the scale is off, press the ON
|
ZERO key, the scale will switch on.
& When the scale is on, the ON
|
ZERO key has zero function.
4 When the weigh pan is empty (free of load) and the display is not showing
zero, press the ON
|
ZERO key to zero the scale. At zero, the “à0ß” indication
is on.
1UNITS
:
switching units
Press the UNITS key to switch weight units, the icons or arrows will indicate the
active units as appropriate. The units available are dependent on the exact scale
model.
4 After power off, the scale will memorize the active units. When the scale is
powered on again, it displays the previously active units.
1
NET |GROSS :
switch NET or GROSS key
4 NET
|
GROSS key is only used in Tare mode.
In the Tare mode, the screen displays the “Net” icon,
4 In tare mode, when the GROSS icon is on, the weight value on the display is the
total amount of the tare value. When the GROSS icon is off, the weight value on
the display is the net value. press the NET
|
GROSS key to switch between the “Net
value” and the “Gross value”.

6
4 At the Gross status, only OFF and NET
|
GROSS keys are functional.
1TARE : tare / pre-tare key
The tare function will not operate during the following conditions:
When the scale powers on, the weight is still below zero after a container is placed
on the weigh pan. Or the tare value is over the full scale capacity.
Tare function
(1) Put a container on the weigh pan and after the weight is stable, press the TARE1
key to zero the weight of the container. The screen displays the “à0ß” “STABLE”
icon.
(2) Put the goods in the container, the screen displays the net weight value of the
goods.
(3) Remove the full container; the screen displays the negative weight value of the
container. At this time pressing the TARE key again will cancel the tare and the
scale reverts back to zero. The screen displays the “à0ß” “STABLE” icon.
4 The tare function can be operated continually to the full weighing capacity of the
scale.
4 Continual tare operation is adding or removing tare objects on weigh pan and
pressing the TARE key each time.
Power Saving Mode
To enable the power saving mode, please go to FnC 01 and set as “on”.
When the scale is idle at zero without any key being pressed for 10 seconds, it will enter
power saving mode. Only one “-“ segment will be the display, and “-“ will scrolling from left
to right. To exit power saving mode, place weight over 10d or press any key.

7
Press key
Press key
Press key
Press key
1-4 Self-Test Mode
4 Set the switch SWA1 on the bottom of machine to the LOCK position.When the scale
count down, press NET
|
GROSS and ON
|
ZERO keys together, Wait till display shows
to enter “Self-Test Mode”.
INTERNAL VALUE MODE
(
must hook up Load Cell to test)
' Press
TARE
to enter, and the display shows internal value
( Please check whether the internal value has changed obviously with weight changing.
) Please check the backlight.
* Press
ON
|
ZERO
key to back to the last screen , the display shows
KEYPAD TEST MODE
' Press
TARE
to enter, display shows
Keypad’s internal code:
TARE
key= 07,
UNITS
key= 06,
NET
|
GROSS
key=05
( Press
ON
|
ZERO
key to back to the last screen , the display shows
FIRMWARE VERSION DISPLAY MODE
' Press
TARE
to enter, display shows the firmware version ,
( Press
TARE
key again, the display shows maintenance number for 2 secs for
lead acid battery model or “900” for Wipower models with lithium battery
) Press
ON
|
ZERO
key to back to the last screen, display shows
BACK TO THE LAST SCREEN
Press
TARE
key to exit self-test mode, the scale will restart automatically.
Press key
Press key
Press key
Press key

8
1-5 Error Messages
Þ
Initial zero is higher than the zero range when switching the scale on.
Þ
Initial zero is lower than the zero range when switching the scale on.
Þ
Internal value is unstable. (Continuous unstable occurred over 20 secs when
switching the scale on, or after pressing ON
|
ZERO or TARE key.)
Þ
The weight of the object is over 9 divisions of the maximum capacity.
--------
Þ
For weight < -20d without tare or pretare device in operation.
1-6 Weight Unit
kg
1 g = 0.001 kg
g
1 g = 1 g
lb
1 g = 0.002204623 lb
oz
1 g = 0.03527396 oz

9
Chapter 2 External Function Setting
4 In the weighing mode, press NET
|
GROSS and ON
|
ZERO keys at the same time to
enter the External Function setting mode. The LCD shows .
Press key
Press
ON ZERO
key
Press key
Press key
Press
ON ZERO
key
Press
ON ZERO
key
Þ General Function setting mode
Þ External Weight Calibration
Þ Exit the Advanced Function setting mode
Refer to the following sections for the detailed operation
procedures of each function setting.

10
2-1 General Function Setting
Workflow of the General Function setting:
4
FnC 04, FnC 05, FnC 09 are only available for non-approval models.
Press key
Use the keys to select
the function
Key in “00” and Press
key to return to
the Advanced function
setting menu
key Þ Upward key (from 0 to 9)
key Þ Downward key (from 9 to 0)
key Þ Move the cursor to right
key Þ Move the cursor to left.
ACTIONS
DISPLAY
NOTE
Þ Return to the Advanced Function Setting Mode Menu
Þ Power saving Function Setting
Þ Automatic Power-off Timer Setting
Þ Hi/Lo/OK Setting
Þ Restore the Default Setting
Þ Noise Filter Setting
Þ Two Weighing Units Setting
Þ Unstable Tare
Þ LED Brightness Setting
Refer to the following sections for detailed operation procedures of each
setting.

11
2-1-1 Power Saving Function Setting
Select in the General Function setting mode to change power
saving function setting.
The displays shows the last saved
status
Default setting = off
Power saving function
When the scale is idle at zero without any key being pressed for 10 seconds,
it will enter power saving mode. To exit power saving mode, place weight over
10d or press any key.
Press key
Use
or
key to select function “on”
or “off
Press
key
ACTIONS
DISPLAY
NOTE
Key in the parameter “00”
Press key to
complete the
general setting
procedures
Power Saving Function Setting
Use or key to select
On = power saving on
Off = power saving off
key Þ Upward key (from 0 to 9)
key Þ Downward key (from 9 to 0)
key Þ Move the cursor to right
key Þ Move the cursor to left.

12
Automatic power-off timer setting
Use or
key to key in
parameter
0 Þ No auto power-off
1 Þ When the scale is idle for 1
minute, the scale
automatically switches off
2 Þ When the scale is idle for 2
minutes, the scale
automatically switches off
9 Þ When the scale is idle for 9
minutes, the scale
automatically switches off
2-1-2 Automatic Power-off Timer Setting
Select in the General Function setting mode to change the
automatic power-off timer setting.
LED displays the last saved status
Automatic power-off function
When the weight on weigh pan is less than 10d or keeps idle for the set time, the
scale will automatically switch off.
Press key
Use
or
key to key in parameter
Press
key
ACTIONS
DISPLAY
NOTE
key Þ Upward key (from 0 to 9)
key Þ Downward key (from 9 to 0)
key Þ Move the cursor to right
key Þ Move the cursor to left.
Key in the parameter “00”
Press key
to complete the
general setting
procedures

13
2-1-3 Hi/Lo/OK Function Setting
Select in the General Function setting mode to set the
Hi/Lo/OK function. This function is available in all unit modes. In one specific unit mode,
enter to set the Hi/Lo/OK values.
4 When the high limit and low limit are both set as “0”, the Hi/Lo/OK function is disabled.
ACTIONS
DISPLAY
NOTE
LED displays the last saved status
Press key
Key in the desired high
limit value
Press
key
Key in the desired low limit
value
Press
key
Key in the parameter
setting for alarm
Press
key
LED displays the last saved status
.
.
.
.
Alarm setting
(a) (b) (c)
The definition of a, b, c positions:
(a)
Þ 1 = beep sound on
0 = beep sound off
(b)
Þ 1 = beep sound on when stable
0 = beep sound on when unstable
(c)
Þ 1 = beep sound on when the weight is
between high and low limits
0 = beep sound on when the weight is not
between high and low limits and
higher than 10d
key Þ Upward key (from 0 to 9)
key Þ Downward key (from 9 to 0)
key Þ Move the cursor to right
key Þ Move the cursor to left.
Key in the parameter and then press key to go back to the
Advanced function setting menu

14
2-1-4 Restore to the Default Setting
Select in the General Function setting mode to restore to
the default setting.
4 The default setting includes the following:
1) External weight calibration
2) HI/LO/OK setting value
3) Noise filter setting (External)
4 In approved models, setting is not available.
4 If is set to , and the scale has not been restarted
automatically. Please ensure to restart the scale manually.
ACTIONS
DISPLAY
NOTE
Þ Return (Cancel the
restoration)
Þ Restore to the default
setting
Press key
Use
or
key to select “return” or
“format”
Press
key
key Þ Upward key (from 0 to 9)
key Þ Downward key (from 9 to 0)
key Þ Move the cursor to right
key Þ Move the cursor to left.
Key in the parameter “00”
Press key
to complete the
general setting
procedures

15
2-1-5 Noise Filter Setting
Select in the General Function setting mode to set the
noise filter setting.
4 When modifying , the parameters of remain un-altered.
Key in the parameter and then press
TARE
key to go back to the Advanced
function setting menu
4 In approved models, setting is not available.
Returning to the zero point setting
Use
or key to key in the
parameters or zero point
Default setting = 0
0
Þ No skip 5 Þ skip 5d
1
Þ skip 1d 6 Þ skip 6d
2
Þ skip 2d 7 Þ skip 7d
3
Þ skip 3d 8 Þ skip 8d
4
Þ skip 4d 9 Þ skip 9d
4
When the weight on the scale is over
1/3 full capacity, the function is on.
Digital switch & Stabilization range setting
LED displays the last saved parameter setting
Filter parameter setting
LED displays the last saved parameter setting
Filter parameter setting
Use
or key to key
in the parameters. Default setting = 5
Parameter 0 ~ 9, the larger the number,
the faster the filter response. Fast
response can lead to weight instability.
Digital switch & Stabilization range setting
Use
or key to key in the
parameters.
Default setting = 0
Parameter 0 ~ 9, the larger the number
the more stable the weight.
ACTIONS
DISPLAY
NOTE
Press key
Use
or
key to key in the
parameters
Press
key
Use
or
key to key in the
parameters
Press
key
Use
or
key to key in the
parameters
Press
key
Returning to zero point setting
LED displays the last saved status

16
2-1-6 Two Weighing Units Setting
Select in the General Function setting mode to set the two
weighing units Setting.
Two weighing units setting
Use
or key to key in the
parameters for two weighing units
Default setting = 1
0
Þ two weighing units function is not
activated
To activate two weighing units, please set
the 2nd weighing unit to be:
1
Þ 2nd weighing unit in CSP 01
2
Þ 3rd weighing unit in CSP 01
3
Þ 4th weighing unit in CSP 01
If it set to 1~3, it only displays the 1st
weighing unit and the selected 2nd
weighing unit
Two weighing units setting
LCD displays the last saved parameter
setting
key Þ Upward key (from 0 to 9)
key Þ Downward key (from 9 to 0)
key Þ Move the cursor to right
key Þ Move the cursor to left.
Press key
Use or key
to key in the parameters
Press key

17
2-1-7 Unstable Tare
4 Only available for non-approval models. (CFN 02=0)
Unstable Tare setting
Use
or key to key in the
parameters for second weighing unit
Default setting = 0
0
Þ
Disable tare operation while unstable
1
Þ
Enable tare operation while unstable
Unstable Tare setting
LCD displays the last saved parameter
setting
key Þ Upward key (from 0 to 9)
key Þ Downward key (from 9 to 0)
key Þ Move the cursor to right
key Þ Move the cursor to left.
Press key
Press key
Use or key to
key in the parameters
This manual suits for next models
4
Table of contents
Other Gram Scale manuals

Gram
Gram ZFOC Series User manual

Gram
Gram XFOC+ User manual

Gram
Gram WHITE MEL SERIES User manual

Gram
Gram AHV Series User manual

Gram
Gram S3 SERIES User manual

Gram
Gram K3iX Series User manual

Gram
Gram SILK Q User manual

Gram
Gram FC Series User manual

Gram
Gram S5i SERIES User manual

Gram
Gram C7 Series User manual