manuals.online logo
Brands
  1. Home
  2. •
  3. Brands
  4. •
  5. Grange
  6. •
  7. Outdoor Furnishing
  8. •
  9. Grange TOSCANA CORNER ARBOUR User manual

Grange TOSCANA CORNER ARBOUR User manual

ACORNER POSTS 3
BINTERMEDIATE
POSTS
2
CTRELLIS
LARGE
2
DTRELLIS
SMALL
2
EROOF RAFTER
UPPER
4
FROOF RAFTER
LOWER
4
TOSCANA CORNER
ARBOUR
ASSEMBLY
INSTRUCTIONS
CARE OF YOUR ARBOUR
The Toscana Corner Arbour is made of planed pressure treated and FSC certified
timber and as such is guaranteed against rot for a minimum of 15 years. However, it
must be remembered that as a natural product, timber is subject to movement and
weathering as it seasons. It is not uncommon for small spits to occur when drying
and warping when timber is allowed to dry too rapidly. These will normally go back
when humidity rises, it is nature at work and not considered a fault.
Its colour will also change with time, a re-treatment, as required with a proprietary
wood treatment is recommended.
GSEAT BACK
SUPPORTS
860 x 63 x 38mm 4
HSEAT BACK
SLATS
1200 x 63 x 38mm 6
JSEAT SLATS
(LONG)
1260 x 63 x 38mm 6
KSEAT SLATS
(SHORT)
860 x 63 x 38mm 6
LLEG SUPPORTS 400 x 63 x 38mm 12
MLEG BRACE 324 x 63 x 38mm 4
XScrew 3.5 x 70mm 48
YScrew 4 x 60mm 72
ZScrew 3.5 x 50mm 32
1200mm
860mm
70mm
Seat back assembly
400mm
400mm
Seat leg assembly
Fig 5
Fig 6
Completed seat
Tools required (NOT SUPPLIED)
Power screwdriver with Pozidrive No.2 bit. Tape measure.
3mm pilot drill Hammer.
Before you start.
Check the packs and make sure that you have all of the parts listed above. If not
contact your retailer who will be able to help you.
When you are ready to start make sure you have the right tools to hand, plenty of
space and a clean dry area for assembly.
It is advisable for two people to carry out the work.
ASSEMBLY
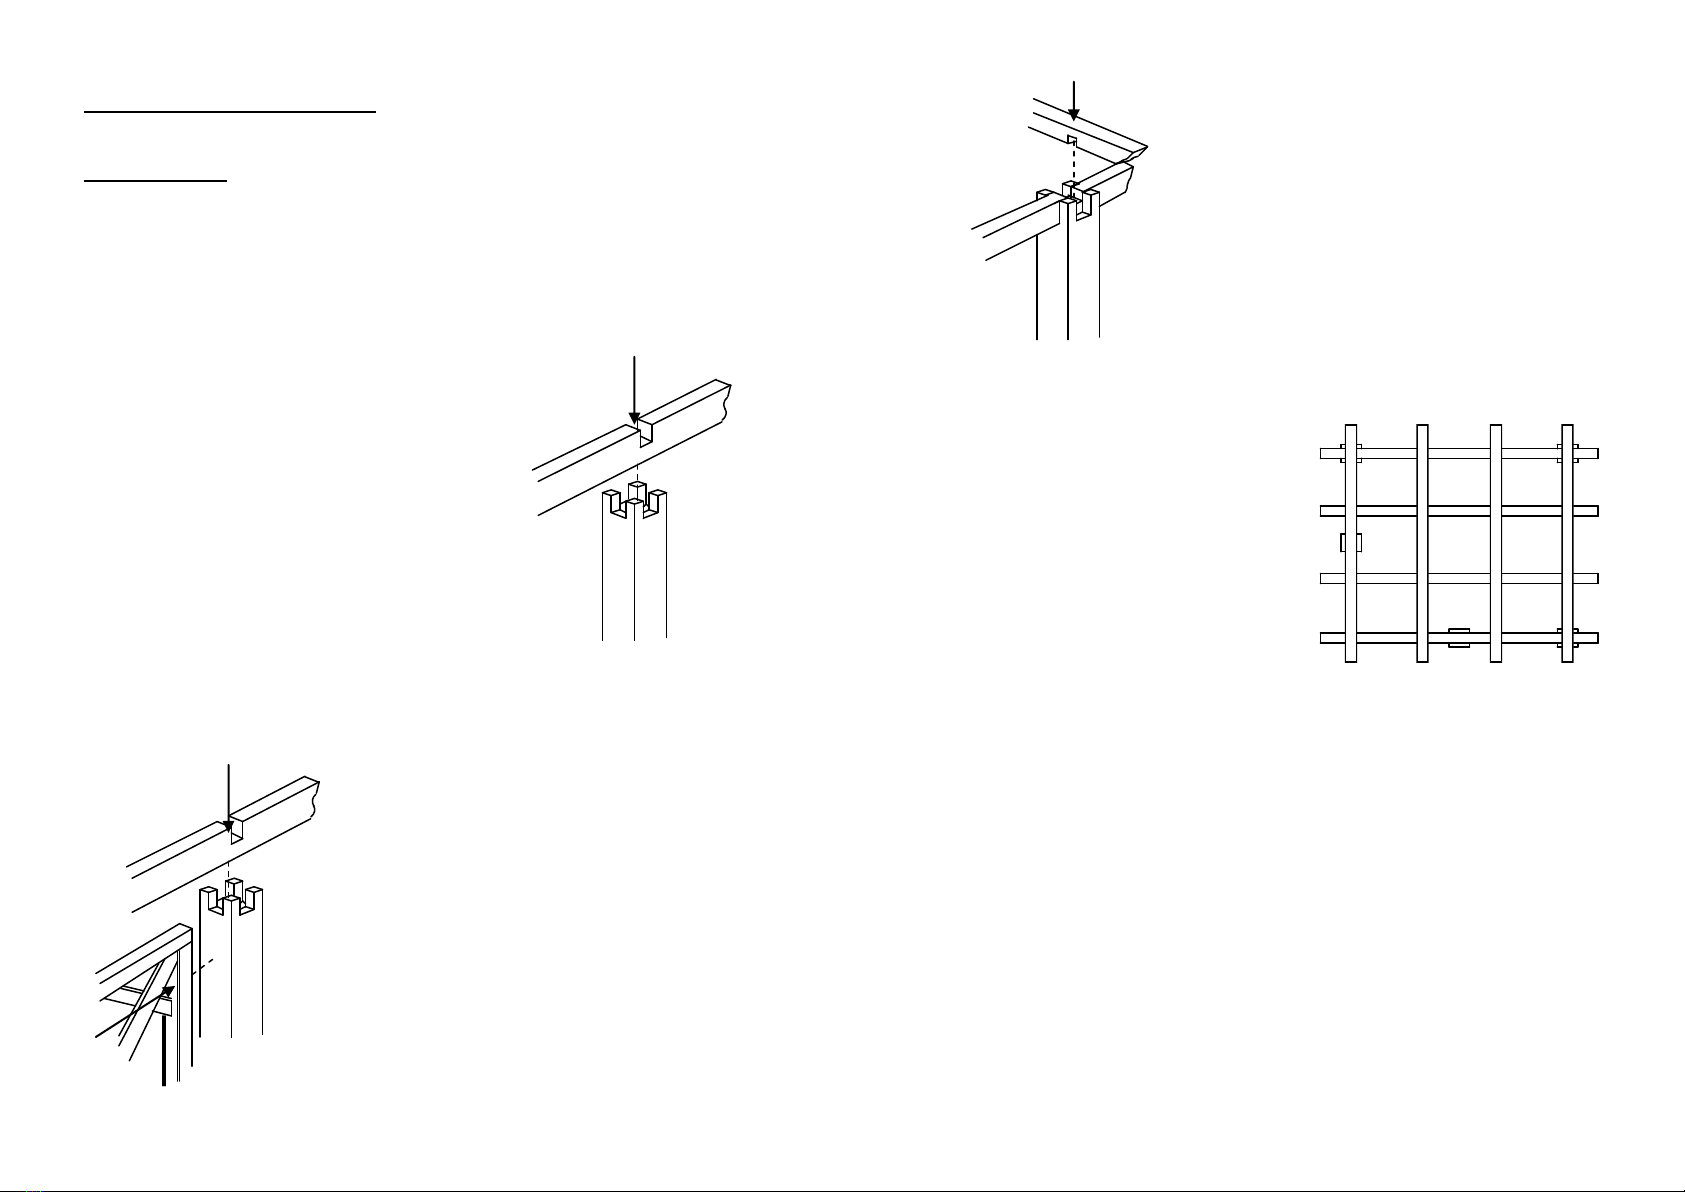
1. Take one of the corner posts A and a raft-
er F. Fix the rafter to the post using one
screw X aligning the slot in the rafter with
the one in the post as Fig 1.
2. Take another post A and put the free end
of the rafter in the slot the same as before
but do not fix yet.
3. Take one of the larger pieces of Trellis C
and fasten to the post with the fixed rafter
attached. The top of the trellis should be
up against the rafter and should be flush
with the outside edge of the post. Fix with
four screws Z equally spaced down the
side.
4. Ensure the free post is pushed against the trel-
lis on the other side . Fix it to the post using
four screws as above ensuring the rafter is
down in the bottom of the slot.
5. Now fix the rafter to the top of the post using
one screw X as before.
6. Take another post A and a rafter E. Insert the
rafter into one of the slots in the assembly and
again rest the free end into the slot on the new
post.
7. Fix the second larger trellis to the post assem-
bly below the rafter E in the same way as be-
fore fixing at four positions down the side.
8. Fix the rafter E in place using screw X.
9. Now, the loose end of rafter E may be
raised to allow another rafter F to be
slotted into the rafter and then lowered
back into the top of the post.
10. Support the end of this rafter with a
post B.
11. Take one of the small trellis D and fix
to the assemble post using four screws
again down the side.
12. Fix the rafter into the top of the post
using one screw X.
13. Fix the rafter to the last post using
screw X.
Fig. 1
Fig. 2
X
14. Go back to the other end of the assembly
and slot a rafter E into the top of the
post and rafter. Support the free end
with post B and slot into the rafter F .
15. Fix the remaining smaller trellis to the
corner post, butted up to the rafter using
four screws
16. Fix the other side of the trellis to the
final post.
17. Feed the two remaining rafters into
place, the two F rafters the same direc-
tion as the previous ones and the E raft-
ers will locate in place. It may be neces-
sary to loosen the corner fixing screws
of the rafters to do this.
18. Screw each rafter joint into place using
screws X as Fig 4
X
Fig 3
xx
xxx
x
x
x
x
x
x
x
xx
xx
Fig 4
19. Assemble the legs for the seats as shown in Fig. 5 using two screws Y at each
joint Ensure the assembly is square.
20. Next assemble the seat backs as figure 6 again using screws Y two in each end.
21. The seats are two sizes one 1260mm wide and the other 860mm wide. Five slats
are used for the seat equally spaced across the top of the leg assemblies and one
is used to provide support bridging the braces of each leg assembly.
22. These are fixed in place using two screws Y at each end

Other Grange Outdoor Furnishing manuals

Grange TRADITIONAL PERGOLA User manual

Grange

Grange TRADITIONAL PERGOLA User manual

Grange Romana Arbour User manual

Grange

Grange Romana Arbour User manual

Grange VALENCIA ARBOUR User manual

Grange

Grange VALENCIA ARBOUR User manual

Grange AREZZO ARBOUR User manual

Grange

Grange AREZZO ARBOUR User manual

Grange PORTICO PERGOLA User manual

Grange

Grange PORTICO PERGOLA User manual

Grange ELITE GRANVILLE ARCH User manual

Grange

Grange ELITE GRANVILLE ARCH User manual

Grange RGTBR User manual

Grange

Grange RGTBR User manual

Grange TRADITIONAL PATIO PERGOLA User manual

Grange

Grange TRADITIONAL PATIO PERGOLA User manual

Grange MONTEBELLO User manual

Grange

Grange MONTEBELLO User manual

Grange BOWED WALKWAY 221800A001OWBZ01C1 User manual

Grange

Grange BOWED WALKWAY 221800A001OWBZ01C1 User manual

Grange CONTEMPORARY PKCPERGA User manual

Grange

Grange CONTEMPORARY PKCPERGA User manual

Grange MONTEBELLO ARBOUR User manual

Grange

Grange MONTEBELLO ARBOUR User manual

Grange OBLONG User manual

Grange

Grange OBLONG User manual

Grange Elite Arch User manual

Grange

Grange Elite Arch User manual

Grange Romana Arbour User manual

Grange

Grange Romana Arbour User manual

Grange Dragon Pergola User manual

Grange

Grange Dragon Pergola User manual

Grange BOWED WALKWAY User manual

Grange

Grange BOWED WALKWAY User manual

Popular Outdoor Furnishing manuals by other brands

felton industries FELEPG5T6 Assembly instruction

felton industries

felton industries FELEPG5T6 Assembly instruction

Dreamo OTF-503S quick start guide

Dreamo

Dreamo OTF-503S quick start guide

Garden Furniture Direct Borrowdale Assembly instructions

Garden Furniture Direct

Garden Furniture Direct Borrowdale Assembly instructions

Rowlinson Clarendon Assembly instructions

Rowlinson

Rowlinson Clarendon Assembly instructions

Garden Treasures 8201268 Assembly instructions

Garden Treasures

Garden Treasures 8201268 Assembly instructions

Safavieh Outdoor Marson PAT7062 quick start guide

Safavieh Outdoor

Safavieh Outdoor Marson PAT7062 quick start guide

SSC-LUXon 990070716 Assembly & operating instructions

SSC-LUXon

SSC-LUXon 990070716 Assembly & operating instructions

supremo LEISURE 2-Seat Stool 110*40cm Assembly instruction

supremo LEISURE

supremo LEISURE 2-Seat Stool 110*40cm Assembly instruction

Hatteras Hammocks DCA1-K-HH instructions

Hatteras Hammocks

Hatteras Hammocks DCA1-K-HH instructions

Lemeks Palmako PA120-5959 Assembly, installation and maintenance manual

Lemeks

Lemeks Palmako PA120-5959 Assembly, installation and maintenance manual

OLT 24 Assembly manual

OLT

OLT 24 Assembly manual

forest-style HACIENDA 2354 Building instructions

forest-style

forest-style HACIENDA 2354 Building instructions

Courtyard Creations RUS0188-WM Assembly instructions

Courtyard Creations

Courtyard Creations RUS0188-WM Assembly instructions

kingsley-bate MC-55 Assembly instructions

kingsley-bate

kingsley-bate MC-55 Assembly instructions

Weltevree Carrier product manual

Weltevree

Weltevree Carrier product manual

Grange Fencing Elite Arch Assembly instructions

Grange Fencing

Grange Fencing Elite Arch Assembly instructions

Grosfillex AUVENT YR14 Assembly instructions

Grosfillex

Grosfillex AUVENT YR14 Assembly instructions

X-METAL EAGLE 33511 Assembly instructions

X-METAL

X-METAL EAGLE 33511 Assembly instructions

manuals.online logo
manuals.online logoBrands
  • About & Mission
  • Contact us
  • Privacy Policy
  • Terms and Conditions

Copyright 2025 Manuals.Online. All Rights Reserved.