manuals.online logo
Brands
  1. Home
  2. •
  3. Brands
  4. •
  5. Hachette
  6. •
  7. Toy
  8. •
  9. Hachette Agora Bismarck Pack 04 Manual

Hachette Agora Bismarck Pack 04 Manual

Pack 04 |Build Instructions
Your 1:200 scale model of the legendary battleship Bismarck is packed with
intricate details which precisely replicate every aspect of this state-of-the-
art warship. Each piece has been created using premium quality materials to
bring maximum enjoyment during your complete build.
In your fourth model pack, you will assemble:
© 2020 Hachette Partworks Ltd.
North America Edition by Agora Models
STAGE 33: MOTOR FOR THE FORWARD
RADAR EQUIPMENT
STAGE 34: RADAR CONTROL CENTRE
STAGE 35: A KEEL SECTION AND
A DISPLAY STAND
STAGE 36: MOTOR FOR THE FORETOP
RADAR INSTALLATION
STAGE 37: THE FORETOP RADAR
AND A PORT HULL SECTION
STAGE 38: THE FORETOP RADAR
AND A STARBOARD HULL SECTION
STAGE 39: THE NEXT HULL SECTION
STAGE 40: FIRE CONTROL POST DETAILS AND
SEARCHLIGHT DECK
STAGE 41: THE NEXT SECTION OF HULL
STAGE 42: THE SIXTH KEEL SECTION
STAGE 43: ADMIRAL’S BRIDGE
STAGE 44: THE UPPER MAST DECK
Not suitable for children under the age of 14. This product is not a toy and is not designed for use in play. Keep
the parts out of the reach of small children. Some parts may have sharp edges. Please handle them with care.
Advice from the experts
Spare screws are included with each part. Occasionally, you may
be instructed to keep spare or unused screws for a later stage.
Keep these spares in a safe place and label them correctly.
Please make sure you don’t mix up the screws. They look quite
similar, but the threads do vary slightly. Using the wrong screws
may damage the parts.
When securing parts together using multiple screws, fit each
screw loosely to ensure all the parts are correctly aligned before
gently tightening them firmly, but not overtight, in the order in
which you placed them.
Your screwdriver can be magnetised by stroking it with a magnet
(fridge magnet, etc.) enabling it to hold the screws and make
assembly easier.
If a screw is tight going into a metal part, do not force it as you
may shear the head off. Remove it and put a tiny smear of Vaseline,
soap or light oil on the thread. That will lubricate it and make it
easier to drive home.
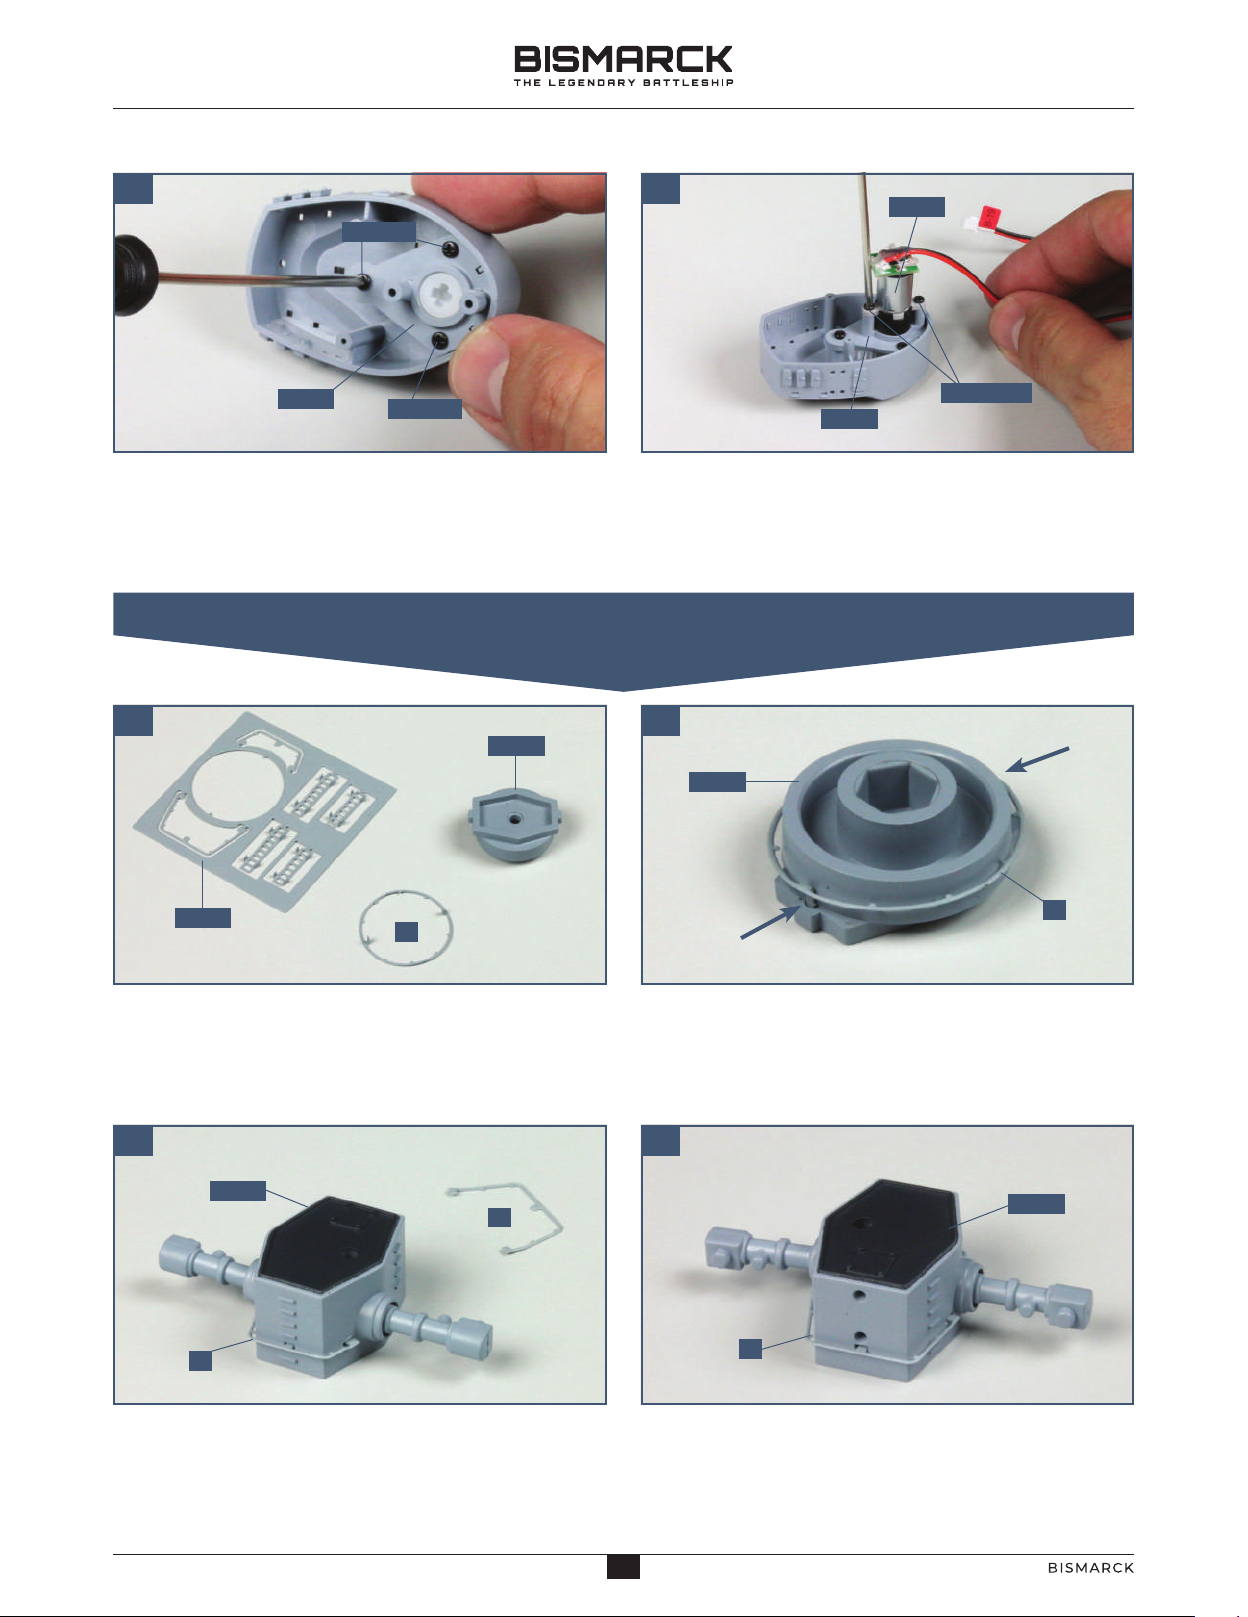
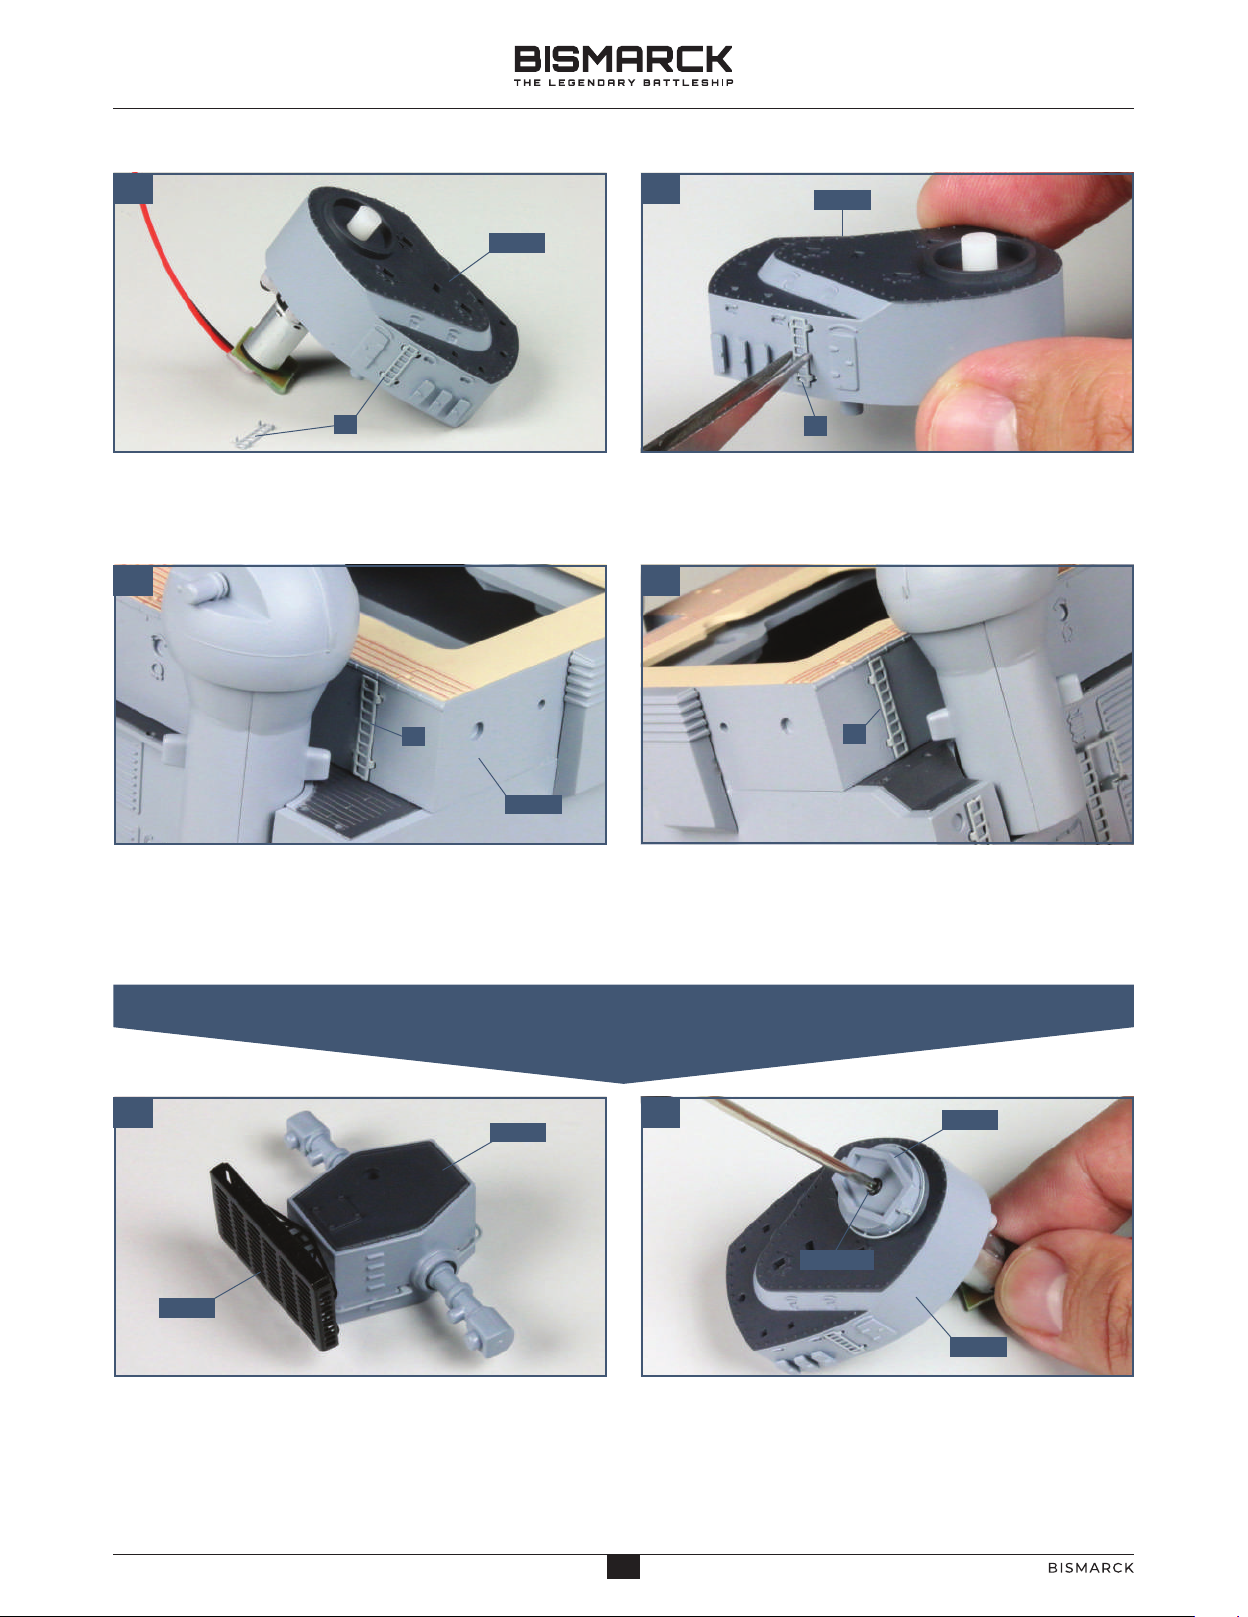
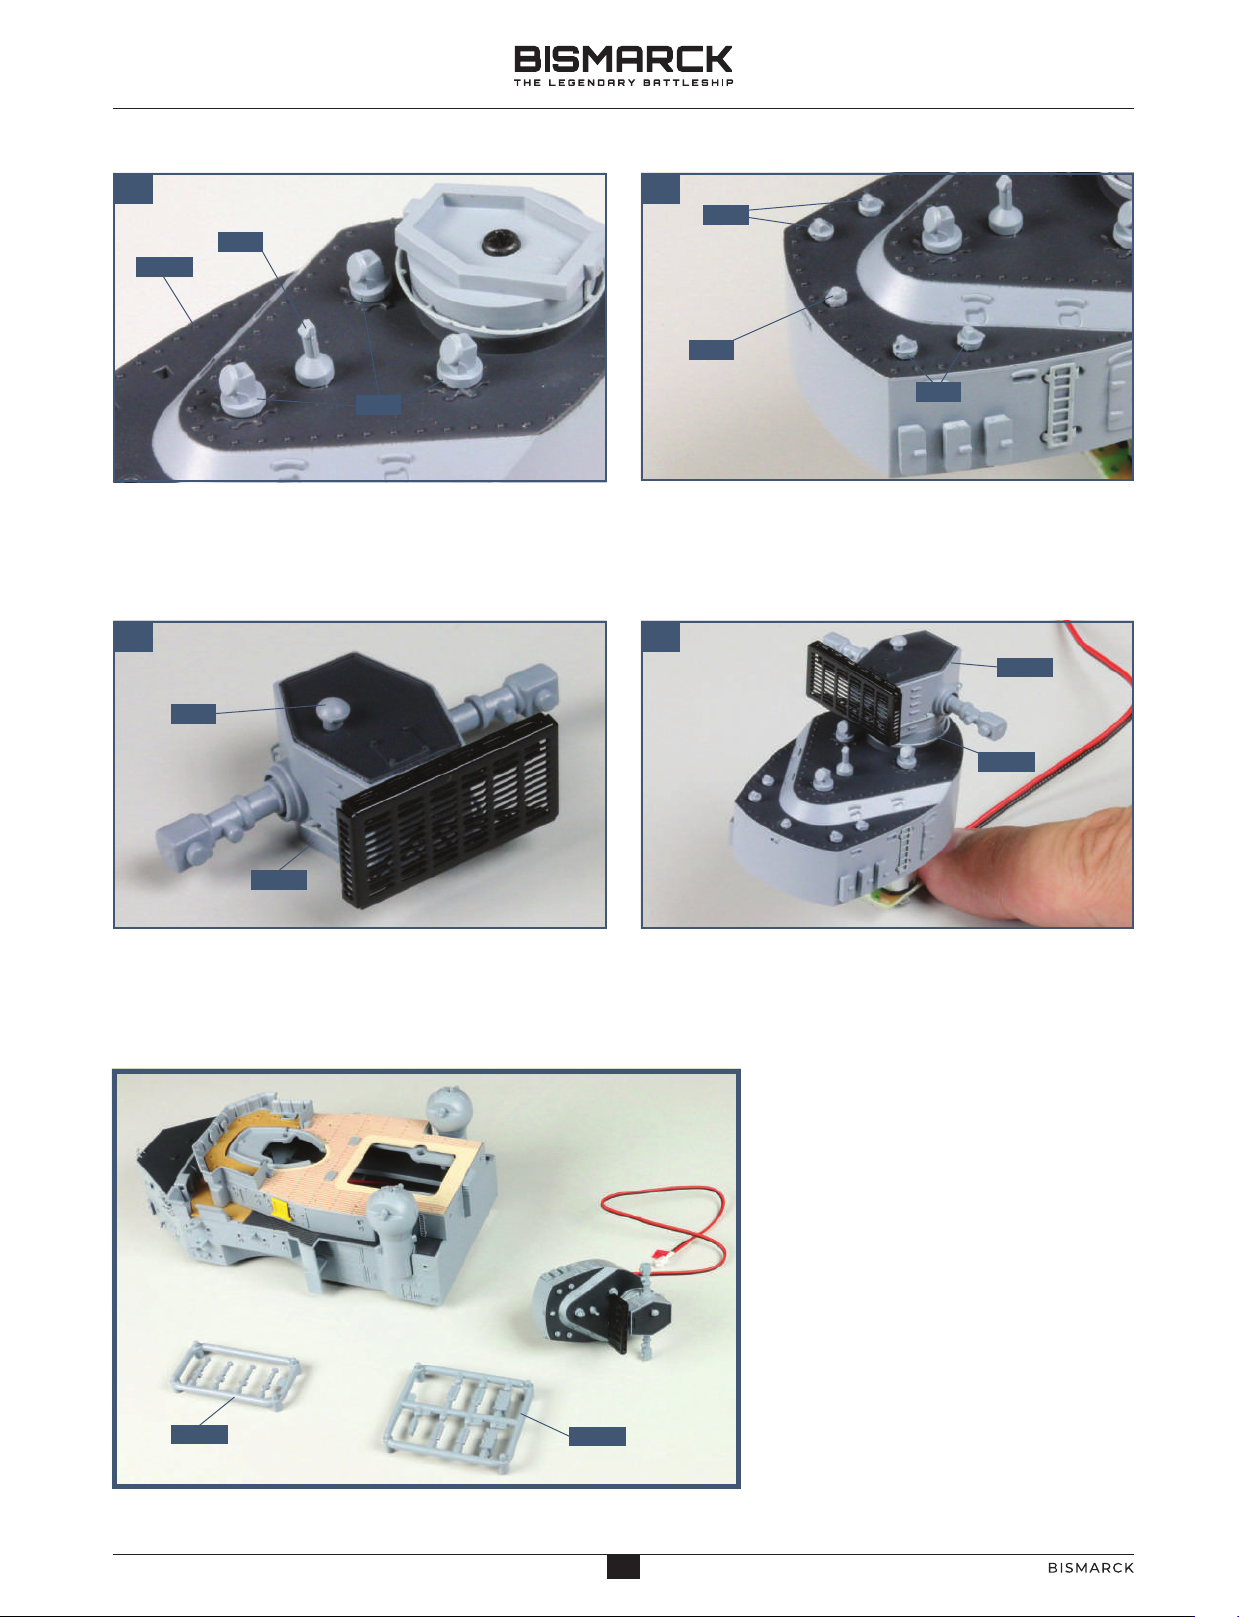
During the course of this build, you will receive many pieces that
you will assemble immediately – following the instructions in the
corresponding stage – and other pieces that you should store
safely to one side, for use in future assembly stages.
22
AGORAMODELS BISMARCK PB
AGORAMODELS BISMARCK
01. PREPARING THE RADAR MOTOR
STAGE 33
MOTOR FOR THE FORWARD
RADAR EQUIPMENT
01
PB
3301 3302
3301
3302
COMPONENTS CHECKLIST
33-01: Motor for the forward radar
33-02: Cable label
PB: Three 1.7 x 6 mm PB screws
Take the motor with attached cable 33-01. Remove
the cable label 33-02 from the backing and wrap it
around the cable, next to the socket, as shown.
Completed work
A label has been fitted to the cable on the radar
motor. Store the three PB screws carefully until they
are needed in stage 34.
33
AGORAMODELS BISMARCK PB
AGORAMODELS BISMARCK
01. SMALL PARTS FOR THE CONTROL CENTRE AND RADAR
STAGE 34
RADAR CONTROL CENTRE
01 02
PB 2x5
3405
3401
3406
3409
3408
3401
2
3
5
4
1
PB 1.7x4
3402 3403
3404
3407
3410 3411 3412 3413
3414
5
4
K2 K2
3401
COMPONENTS CHECKLIST
34-01: Control centre
34-02: Radar unit
34-03: Base of radar unit
34-04: Mounting plate
34-05: Small parts (J1–J5)
34-06: Small parts (K1–K2)
34-07: Small parts (L)
34-08: Small parts (M1–M3)
34-09: Cog
34-10: Cog
34-11: Cog
34-12: Shaft (x2)
34-13: Small metal parts
34-14: Radar antenna
PB: Eight 2 x 5 mm PB screws
PB: Two 1.7 x 4 mm PB screws
Remove the six lockers K2 from frame 34-06. Take the
control centre 34-01 and use a little superglue to fix
three lockers K2 on the port side as shown.
Fix the remaining three lockers K2 on the starboard
side of the control centre 34-01.
44
AGORAMODELS BISMARCK PB
AGORAMODELS BISMARCK
03 04
01 02
03 04
Cut the two radar arms K1 from the frame 34-06. Glue
the first arm K1 to the radar unit 34-02, ensuring that
it is pointing in the right direction (see step 4).
Fit the second radar arm K1 in place on the other side
of the radar unit 34-02, ensuring it is pointing in the
right direction, as indicated by the arrow.
Positon the control centre upside down on your work
surface. Identify the cog 34-09. You will also need a
shaft 34-12.
Fit the shaft of cog 34-09 into the larger hole in the
control centre 34-01. Fit the shaft 34-12 into the centre
of the cog.
Fit the cog 34-10 and the second shaft 34-12 in the
next hole in the control centre. The smaller rim of
teeth on cog 34-10 engages with the teeth of 34-09.
Next, you will need cog 34-11.
Fit the cog 34-11 on the first shaft 34-12: its teeth
engage with the larger rim of teeth on part 34-10.
Next, you will need the mounting plate 34-04 and
three PB 2 x 5 mm screws.
3402
3412
3410
3402
K1
3409
K1
3409
3401
3401
3412
3411
3412
3410
PB
3409
3411
3404
02. GEARBOX FOR THE RADAR
55
AGORAMODELS BISMARCK PB
AGORAMODELS BISMARCK
03. METAL PARTS FOR THE RADAR AND SUPERSTRUCTUREK
03 04
05 06
01 02
Fit the mounting plate 34-04 onto the bottom of the
control centre and fix in place with the three PB 2 x
5 mm screws. The cogs are held in place by the
mounting plate.
Insert the shaft of the motor 33-01 into the centre of
cog 34-11 (not shown) and fix the motor to the
mounting plate 34-04 with two PB 1.7 x 6 mm screws
(supplied with stage 33).
Cut parts 2and 3from the metal frame 34-13. Use a
little glue to fix part 2to the back of the radar unit
34-02, so that the three pins fit into the holes.
The metal part 3is glued to the front of the radar
unit 34-02. Again, the three pins fit into holes in
the radar unit.
3404 PB 2x5
3413 1
2
3
PB 2x5
3404
3301
3403
1
3403
3402
3
3402
Place the base of the radar 34-03 on your worktop.
Remove part 1from the metal plate 34-13 using
tweezers or side cutters.
Turn over the base of the radar unit 34-03. Apply a
little superglue to the two pins on the metal part 1
and insert them into the holes in the side of the radar
unit, indicated by the arrows.
PB 1.7x6
66
AGORAMODELS BISMARCK PB
AGORAMODELS BISMARCK
05 06
07 08
01 02
04. FURTHER DETAILS FOR THE RADAR AND CONTROL CENTRE
Identify the two ladders 4and cut them from part
34-13. Glue the first ladder 4on the starboard side of
the control centre 34-01.
Glue the second ladder 4in place on the port side of
the control centre 34-01.
Cut the two ladders 5from part 34-13. Glue the first
ladder 5to the back port side of the superstructure
(part 29-01, behind the rangefinder).
Glue the second ladder 5to the starboard side of the
superstructure, behind the rangefinder.
Check the fit of the radar antenna 34-14 on the front
of the radar unit 34-02. It should protrude clearly
above the top of 34-02. Fix in place with a little
superglue.
Attach the base of the radar unit 34-03 to the roof of
the control centre using a PB (1.7 x 4 mm) screw.
2901
3402
3401
4
3401
4
55
3414
3403
3401
PB 1.7x4
77
AGORAMODELS BISMARCK PB
AGORAMODELS BISMARCK
03 04
05 06
Taking care that the parts do not fly off, cut part J1
and three parts J2 from the frame 34-05. Glue them
to the top of the control centre 34-01.
Cut four parts J3 and one part J4 from the frame.
Glue them around the edge of the control centre
34-01 as shown.
Cut part J5 from the frame and glue it in place on the
roof of the radar unit as shown.
Check the fit of the radar unit 34-02 to the base of the
radar unit 34-03 and check that the screw fitted
earlier (see page 7 step 2) is fully tightened. Glue the
radar unit in place.
Completed work
The radar control centre and turntable
have been assembled and fitted with
accessories. The engine and gearbox
for the radar were fitted and two
ladders were attached to the front
superstructure. Frames 34-07 and
34-08 and two PB 2 x 5 mm screws will
be used in the next stage.
3401
3402
J1
J3
J2
J4
J3
J5
3402
3403
3407 3408
88
AGORAMODELS BISMARCK PB
AGORAMODELS BISMARCK
01. DETAILS FOR THE FORWARD SUPERSTRUCTURE
STAGE 35
A KEEL SECTION AND A
DISPLAY STAND
01
PB 2x5
PM 2x4
3408
3407
3504
3503
3501
3502
3505
COMPONENTS CHECKLIST
35-01: Fifth keel section
35-02: Connecting piece
35-03: Left display stand support
35-04: Right display stand
support
35-05: Base of display stand PM: Five 2 x 4 mm PM screws
Place the forward superstructure
assembly on your worktop. You will
need the two plastic frames supplied
with the previous stage: frame 34-07
has four identical parts L, and frame
34-08 has two parts M1, four parts
M2 and one part M3.
99
AGORAMODELS BISMARCK PB
AGORAMODELS BISMARCK
02 03
04 05
06 07
Fit first two parts Lfrom the frame 34-07 on each side
of the lower mast deck, as shown. Fix in place with a
little superglue.
Fit the two remaining parts L in the forward corners
of the bridge deck and glue in place.
Cut the first storage box M1 from frame 34-08. Check
the fit on the starboard side of the lower mast deck,
near part L. Make sure that the box does not cover the
hole on the deck (circled). Glue in place.
Cut the second storage box M1 from frame 34-08 and
fit it in place on the other side of the lower mast deck,
near the oval opening. Make sure you have the box
the right way round: in this photo, the pegs on the
base are located on the left, as indicated by the arrow.
The four storage units M2 are fitted in pairs behind
the large opening. Take care not to remove the
locating pegs when cutting from the frame. Make
sure that they are vertically aligned and glue in place.
Glue part M-3 in place next to box M-1 on the lower
mast deck.
M1
L
L
L
L
L
M1
L
M2 M2 M3
M1
10 10
AGORAMODELS BISMARCK PB
AGORAMODELS BISMARCK
02. ASSEMBLING THE SUPERSTRUCTURE ELEMENTS
05 06
01 02
03 04
Take the control centre assembly from the previous
stage and check the fit in the recess on the lower
mast deck as shown.
Remove the railing 6from the metal frame 32-07.
Glue it in place on the port side of the superstructure,
to form a railing for platform C1 (fitted in stage 23).
Similarly, glue railing 7to platform C3 on the other
side of the superstructure deck.
Place the superstructure deck on your worktop. Fit
the bridge deck assembly so that all cables run down
into the large recess of the superstructure deck, as
indicated by the arrow.
Carefully turn the assembly over, taking care not to
damage any parts. Fix the superstructure decks
together using four PB 2 x 5 mm screws (supplied
with the previous stage).
6
7
PB
PB
PB
C1 C3
When fitting the control centre, take care not to
damage the parts that are already in place. Press
down gently on the assembly so that it fits snugly,
with no gaps. This is a very tight push-fit.
11 11
AGORAMODELS BISMARCK PB
AGORAMODELS BISMARCK
01 02
03 04
05 06
03. FITTING THE NEXT KEEL SECTION
Fit the connecting piece 35-02 over the two raised
sockets on the keel section 27-01, as indicated. Have
two PM 2 x 4 mm screws ready.
Fix part 35-02 to the keel assembly using two
PM 2 x 4 mm screws as shown.
Position the keel section 35-01 so that the raised
screw sockets fit into the sockets in the connecting
piece 35-02 as shown.
Fix the keel section in place with two PM 2 x 4 mm
screws.
Place the parts of the display stand, 35-05, 35-03 and
35-04 on your worktop. Fit the pegs on the right
support 35-04 into the corresponding holes in the
base 35-05, as shown.
This photo shows the first part of the display stand in
place.
3504
3503
3504
3502
2701
3502
3501
3501
3502
3505
PM 2x4
PM 2x4
PM 2x4
12 12
AGORAMODELS BISMARCK PB
AGORAMODELS BISMARCK
07
08
Next, fit the pegs on the other bracket
35-03 into the corresponding holes in
the base 35-05, as shown.
Fit the display stand 35-05 under the
hull of your model and push it aft as far
as possible.
Note: When positioning the display
stand, make sure that the ‘front’ sides of
the two brackets are facing the bow.
Completed work
The hull has been extended and now
rests safely on three display stands.
Three elements of the front
superstructure have been fitted
together to make a large assembly.
3503
3505
3505
13 13
AGORAMODELS BISMARCK PB
AGORAMODELS BISMARCK
3602
3601
01. PREPARING THE RADAR MOTOR
STAGE 36
MOTOR FOR THE FORETOP RADAR
INSTALLATION
01
3601
3602
COMPONENTS CHECKLIST
36-01: Motor for the radar
installation
36-02: Cable label
PB: Three 1.7 x 6 mm PB screws
Take the motor with attached cable 36-01. Remove
the cable label 36-02 from the backing and wrap it
around the cable, next to the socket, as shown.
Completed work
A label has been fitted to the cable on the second
radar motor. Store this and the three PB screws until
they are needed in the next stage.
PB
14 14
AGORAMODELS BISMARCK PB
AGORAMODELS BISMARCK
01. FITTING THE NEXT HULL SECTION
3702
3701
3703
3708
3701
3705
3704 3706
PM
3707 3709 3710 3711
PB 1.74 PB 25
PM 24
3501
2801
3701
STAGE 37
THE FORETOP RADAR
AND A PORT HULL SECTION
01 02
COMPONENTS CHECKLIST
37-01: Lower port hull section
37-02: Radar unit
37-03: Base of radar unit
37-04: Foretop command post
37-05: Base plate
37-06: Foretop command
post attachment
37-07: Deck
37-08: Cog
37-09: Cog
37-10: Cog
37-11: Two shafts
PM: Four 2 x 4 mm PM screws
PB: Four 2 x 5 mm PB screws
PB: Two 1.7 x 4 mm PB screws
Fix the hull section 37-01 in place with three
PM 2 x 4 mm screws.
Take the hull assembly from stage 35. Fit the pegs on
the lower port hull section 37-01 into the raised
sockets in the hull sections 28-01 and 35-01.
15 15
AGORAMODELS BISMARCK PB
AGORAMODELS BISMARCK
01 02
03 04
02. THE RADAR UNIT
05 06
Fix the deck 37-07 in place on the top of part 37-04.Put the foretop command post attachment 37-04 on
your work surface. Take the deck 37-07 and check the
fit on the top of part 37-04. Apply superglue to the
underside of the deck 37-07.
Turn part 37-04 over. Take the cog 37-08 and one of
the shafts 37-11. Fit the shaft into the cog 37-08
then pass the cog through the hole in part 37-04.
Identify the fixing point (circled) for the next cog
37-09 and shaft 37-11.
Fit the shaft 37-11 through the cog 37-09 and into the
fixing point in part 37-04. When correctly fitted, the
smaller ring of teeth on the cog 37-09 will engage
with the teeth on the outer edge of cog 37-08.
Fit cog 37-10 on the first shaft 37-11 so that its teeth
engage with the outer ring of teeth on cog 37-09.
3707
3704
3707
3711
3711
3708
3704
3710
3710
3704
3704
3709
3711
3704
3709
3709
3708
16 16
AGORAMODELS BISMARCK PB
AGORAMODELS BISMARCK
11
07 08
09 10
Take the motor from the previous stage. Fit the shaft
of the motor into the recess in cog 37-10, so that the
tabs on the motor fit over the raised screw sockets.
Fix the motor in place with two PB 1.7 x 6 mm screws
(supplied with stage 36).
Take the base plate 37-05 and fit it over the cogs.
Fix in place with three PB 2 x 5 mm screws so that
the cogs are held in place.
Check the fit of the foretop command post attachment
37-06 on the back of the foretop command post part
37-04, as shown. Apply a little superglue to the two
pins on part 37-06 and fix in place.
Completed work
We have started to assemble the radar unit, and the
motor has been fitted.
Check the fit of the radar unit 37-02 on the base
37-03. Apply a little superglue to the contact points
and fix in place.
Turn the assembly over and take the base of the
radar unit 37-03. Fit it onto the protruding shaft of
cog 37-08 and fix in place with a PB 1.7 x 4 mm
screw.
3704
PB
PB
3705 FP
3601
3703 3702
3704
3705
PB
PB
3706
17 17
AGORAMODELS BISMARCK PB
AGORAMODELS BISMARCK
01. FITTING THE NEXT HULL SECTION
STAGE 38
THE FORETOP RADAR
AND A STARBOARD HULL SECTION
01 02
3802
3801
3803
3804
PM
2
3
41
51
2
33
3801
PM
3501
3001
3801
COMPONENTS CHECKLIST
38-01: Lower starboard hull
section
38-02: Foretop command post
gallery
38-03: Small accessories (1–5)
38-04: Deck
PM: Four PM 2 x 4 mm screws
Fix the hull section 38-01 in place with three
PM 2 x 4 mm screws.
Take the hull assembly from stage 37. Fit the pegs on
the lower starboard hull section 38-01 into the raised
screw sockets in the hull sections 30-01 and 35-01.
18 18
AGORAMODELS BISMARCK PB
AGORAMODELS BISMARCK
3804 3802
3702
3704
3802
3702
3804
1
11
2
1
2
1
01 02
03 04
02. ACCESSORIES FOR THE FORETOP CONTROL POST
05 06
This shows the deck in place. If it is loose, fix in place
with a little superglue.
Take the deck 38-04 and fit it into the foretop
command post gallery 38-02, as indicated by the
blue arrow shown in the picture above.
Take the foretop assembly from stage 37. Cut the two
sockets, 1, from the frame 38-03 and smooth any
rough edges. Check the fit on the side of the radar
unit 37-02. Apply a little glue to the pegs on the first
socket 1and fix in place.
Repeat step 03 to fit the second socket, 1, on the other
side of the radar unit.
Cut the two rangefinder arms, 2, from the frame 38-03.
Check the fit of the first arm in one of the sockets, 1,
ensuring you have it pointing in the right direction, as
indicated by the arrows. Also, carefully note the
orientation of part 37-02. Fix in place with superglue.
Repeat step 05 to fix the second rangefinder arm, 2,
into the second socket, 1.
19 19
AGORAMODELS BISMARCK PB
AGORAMODELS BISMARCK
3706
3704
3707
3802
3
3
3707
3
3707 3
4
5
3601
11
07 08
09 10
Turn the foretop around so that you can fit the second
part 3, in one of the recesses in the aft corners of the
foretop deck 37-07. Again, make sure you have part 3
facing the right way, in this case it faces outwards. Fix
in place with a little superglue.
Cut the three parts 3, from the frame 38-03. Identify
the fixing point for the first part 3, on the recess
on the forward end of the deck 37-07. Note that the
flat side should face forwards. Fix in place with a
little superglue.
Thread the motor cable 36-01 through the centre of
the foretop command post gallery 38-02. Check that
the triangular shapes of the foretop are aligned. Apply
a little superglue around the base of part 37-04 and
fix in place.
Completed work
Accessories and a gallery have been fitted to the
foretop command post.
Cut the door, 5, and the set of three lockers, 4, from
the frame 38-03. Test the fit on the foretop, noting the
orientation, and fix in place with a little superglue.
Fix the third part 3in place in the other corner
of the foretop deck, again, with the flat side
facing outwards.
20 20
AGORAMODELS BISMARCK PB
AGORAMODELS BISMARCK

Other Hachette Toy manuals

Hachette AGORA MITSUBISHI A6M ZERO FIGHTER Manual

Hachette

Hachette AGORA MITSUBISHI A6M ZERO FIGHTER Manual

Hachette AGORA BISMARCK THE LEGENDARY BATTLESHIP Manual

Hachette

Hachette AGORA BISMARCK THE LEGENDARY BATTLESHIP Manual

Hachette ALIEN XENOMORPH User manual

Hachette

Hachette ALIEN XENOMORPH User manual

Hachette ALIEN spectacular User manual

Hachette

Hachette ALIEN spectacular User manual

Hachette U-BOAT U 96 User manual

Hachette

Hachette U-BOAT U 96 User manual

Hachette ALIEN PACK 4 Manual

Hachette

Hachette ALIEN PACK 4 Manual

Hachette ALIEN PACK 6 Manual

Hachette

Hachette ALIEN PACK 6 Manual

Hachette PACK 3 Manual

Hachette

Hachette PACK 3 Manual

Hachette ALIEN User manual

Hachette

Hachette ALIEN User manual

Hachette Agora Models BISMARCK Manual

Hachette

Hachette Agora Models BISMARCK Manual

Hachette ALIEN spectacular Product information sheet

Hachette

Hachette ALIEN spectacular Product information sheet

Hachette ALIEN PACK 7 Manual

Hachette

Hachette ALIEN PACK 7 Manual

Hachette Agora Models BISMARCK Manual

Hachette

Hachette Agora Models BISMARCK Manual

Hachette ALIEN PACK 8 Manual

Hachette

Hachette ALIEN PACK 8 Manual

Popular Toy manuals by other brands

REVELL KIT 7317 Assembly manual

REVELL

REVELL KIT 7317 Assembly manual

BLOTZ B06-CS-003 quick start guide

BLOTZ

BLOTZ B06-CS-003 quick start guide

Fisher-Price W2783 quick start guide

Fisher-Price

Fisher-Price W2783 quick start guide

BNF Viking 12 280 instruction manual

BNF

BNF Viking 12 280 instruction manual

Mega Bloks HALO 97002 manual

Mega Bloks

Mega Bloks HALO 97002 manual

Fisher-Price 74066 instructions

Fisher-Price

Fisher-Price 74066 instructions

Thames & Kosmos 553013 instruction manual

Thames & Kosmos

Thames & Kosmos 553013 instruction manual

Fisher-Price RESCUE HEROES ACTiON TRaCKERS H7233 instruction sheet

Fisher-Price

Fisher-Price RESCUE HEROES ACTiON TRaCKERS H7233 instruction sheet

Faller SIENA manual

Faller

Faller SIENA manual

Hasbro Star Wars Clone Trooper Quick Blasting Action... instruction manual

Hasbro

Hasbro Star Wars Clone Trooper Quick Blasting Action... instruction manual

Fisher-Price C5523 instruction sheet

Fisher-Price

Fisher-Price C5523 instruction sheet

Eduard P-40B Tomahawk interior Assembly instructions

Eduard

Eduard P-40B Tomahawk interior Assembly instructions

FUTABA Groovy 90 3A instruction manual

FUTABA

FUTABA Groovy 90 3A instruction manual

Serpent S811 Cobra Truggy instruction manual

Serpent

Serpent S811 Cobra Truggy instruction manual

MGA MINI L.O.L. SURPRISE! CLAW MACHINE manual

MGA

MGA MINI L.O.L. SURPRISE! CLAW MACHINE manual

Hasbro Kenner Disney TATOOINE SKIFF E6060 quick start guide

Hasbro

Hasbro Kenner Disney TATOOINE SKIFF E6060 quick start guide

LEGO Technic 9391 Assembly instructions

LEGO

LEGO Technic 9391 Assembly instructions

Fisher-Price Y4231 quick start guide

Fisher-Price

Fisher-Price Y4231 quick start guide

manuals.online logo
manuals.online logoBrands
  • About & Mission
  • Contact us
  • Privacy Policy
  • Terms and Conditions

Copyright 2025 Manuals.Online. All Rights Reserved.